Templates
Templates in Testomat.io empower teams to work faster and more consistently by standardizing how tests, defects, and communications are created and maintained. Whether you’re reporting bugs, writing test cases, or sending test run reports to Slack, templates save time, reduce errors, and promote clarity across your QA process.
Types of Templates
Section titled “Types of Templates”- Test Template: used to define the structure and content for individual test cases;
- Suite Template: used to define the structure and content of individual test suites/folders;
- Code Template: used to define the default code structure for automated tests with dynamic variables to simplify test automation;
- Defect Template: used to automatically prefill the issue summary and description fields when reporting defects to integrations like Jira, GitHub, or Azure;
- Meta Template: defines which meta-data keys are displayed in the Run Report View; it controls how data is shown and helps enrich report context;
- Notification Template (Slack / MS Teams / Telegram): used to customize the structure and content of automated messages sent to Slack, Microsoft Teams, or Telegram after a test run is completed;
Managing Templates
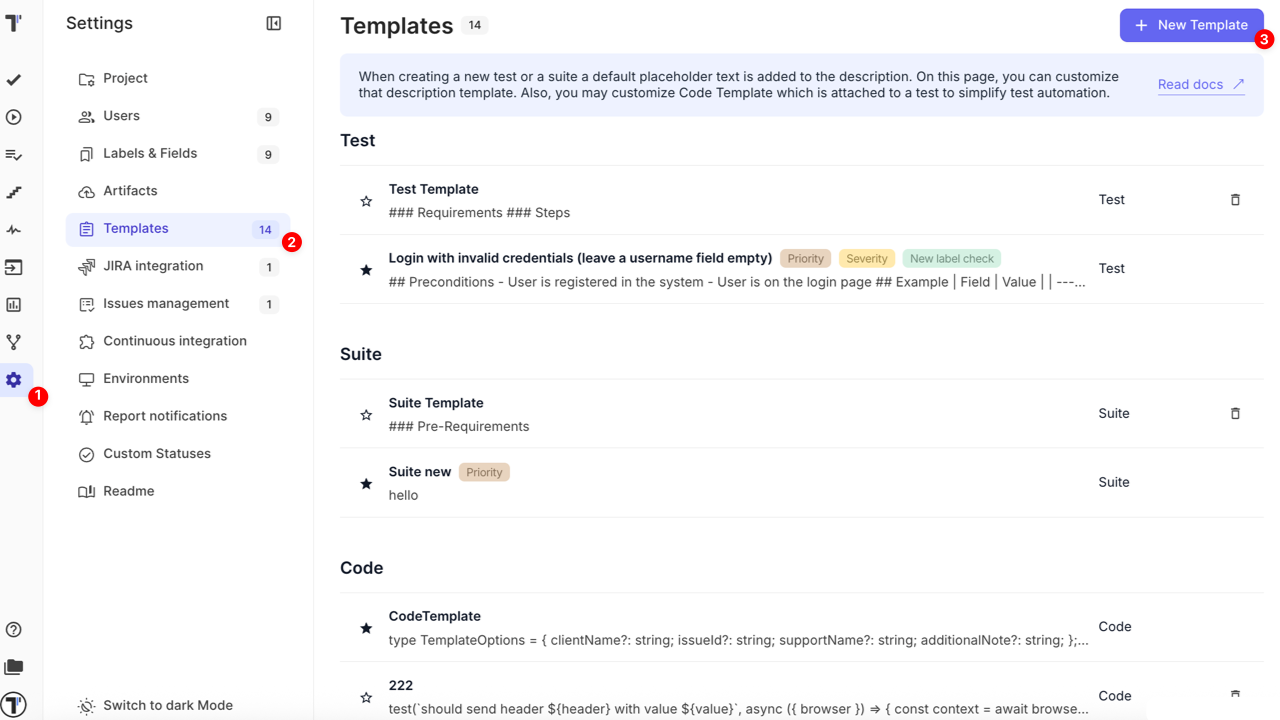
Section titled “Managing Templates”Use the Templates section in Settings to create, edit, or delete reusable content structures for tests, suites, code, defects, meta fields, and notifications.
How To Create Templates
Section titled “How To Create Templates”All templates share a similar creation flow:
- Navigate to Settings in the sidebar
- Click on Templates
- Click the + New Template button
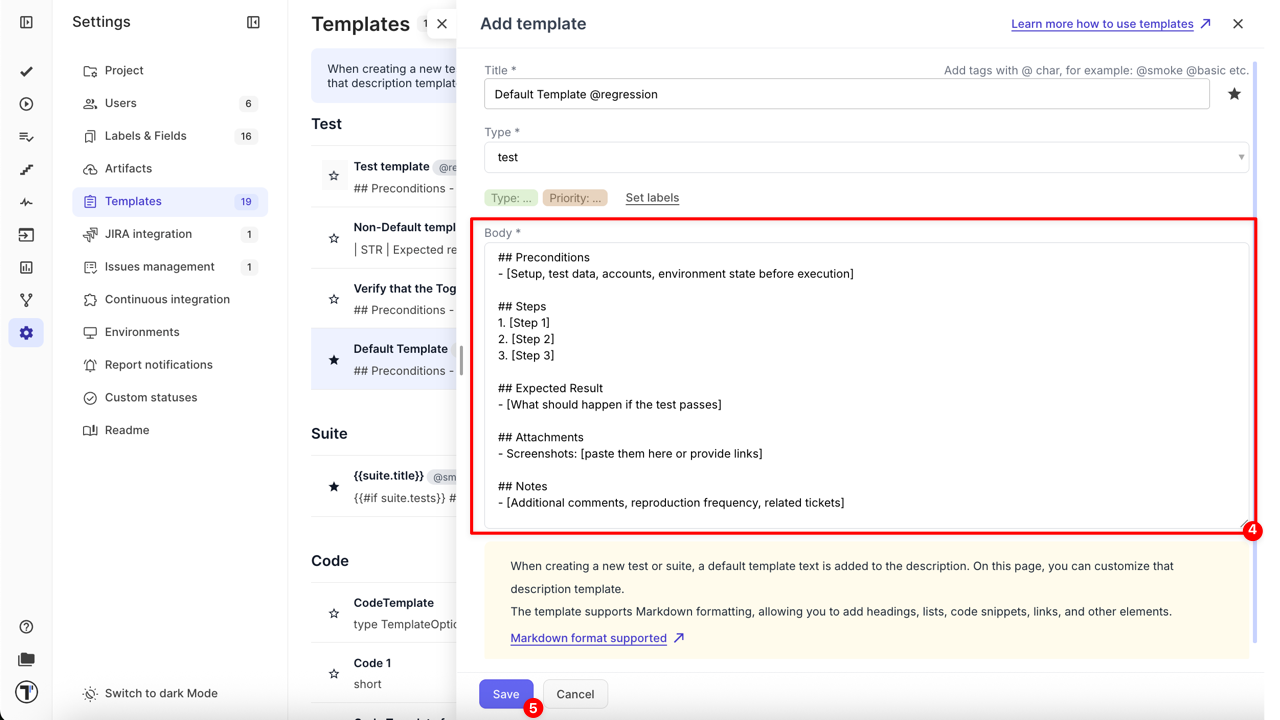
Once the Add template sidebar opens,
- Fill in the following fields:
- Title (required): enter a unique title and optionally add tags using @ syntax (e.g., @smoke);
- Type (required): select the template type from the dropdown — test is selected by default, but you can change it to suite, defect, code, meta, notification-slack, notification-telegram, or notification-ms-teams;
- Default (optional): set this template as the default by clicking the star icon;
- Set labels: click to open an additional sidebar where you can select from existing Labels and Custom Fields. Only items that were previously configured (as described in the How to Add Labels & Custom Fields) will be available for selection. To use new ones, you must define them first using the linked guide;
- Add variables (optional): сhoose from available variables for the selected template type, shown in the dropdown list;
- Body (required): each template type comes with a predefined default body that you can edit.
- You can format it using Markdown;
- You can use dynamic variables with most template types, which will be automatically replaced when the template is applied;
- For Test and Suite templates, dynamic variables are not supported — here you just work with the plain Markdown content;
- Click Save button to apply changes or Cancel button to discard
How To Edit Templates
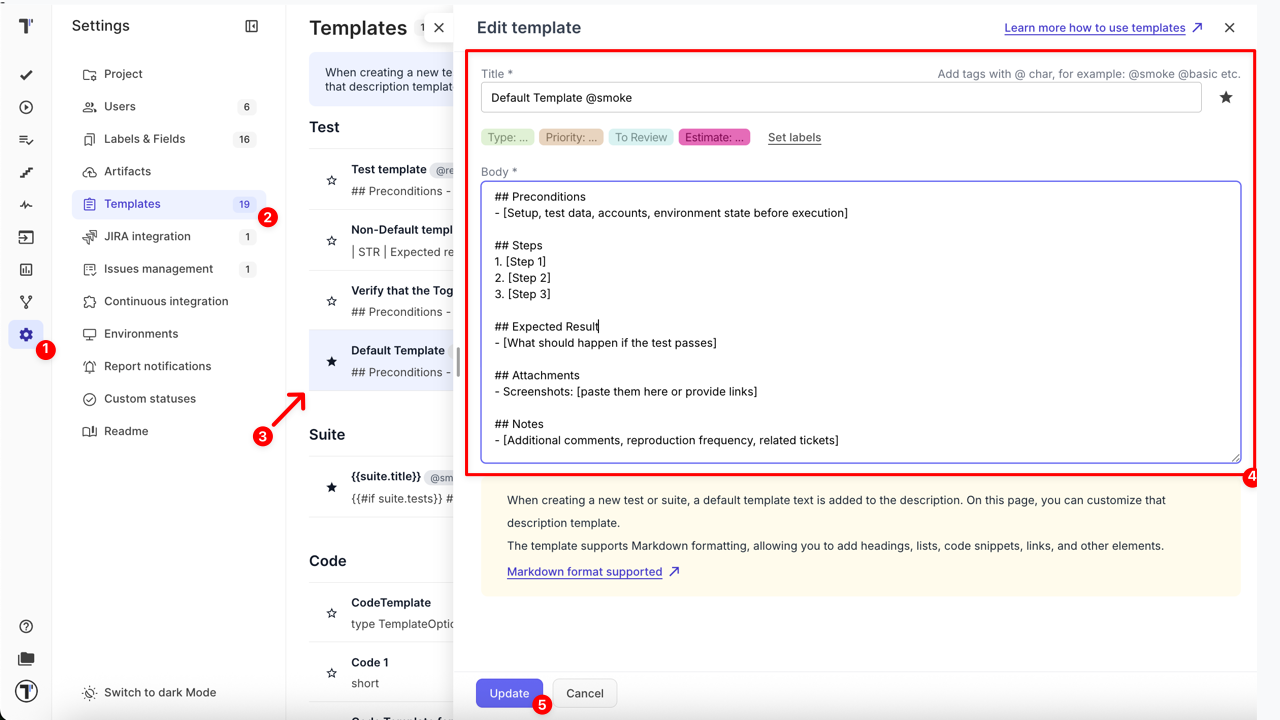
Section titled “How To Edit Templates”- Navigate to Settings in the sidebar
- Click Templates
- Click a template you want to edit
- Modify content as needed
- Click Update button to save changes
How To Delete Templates
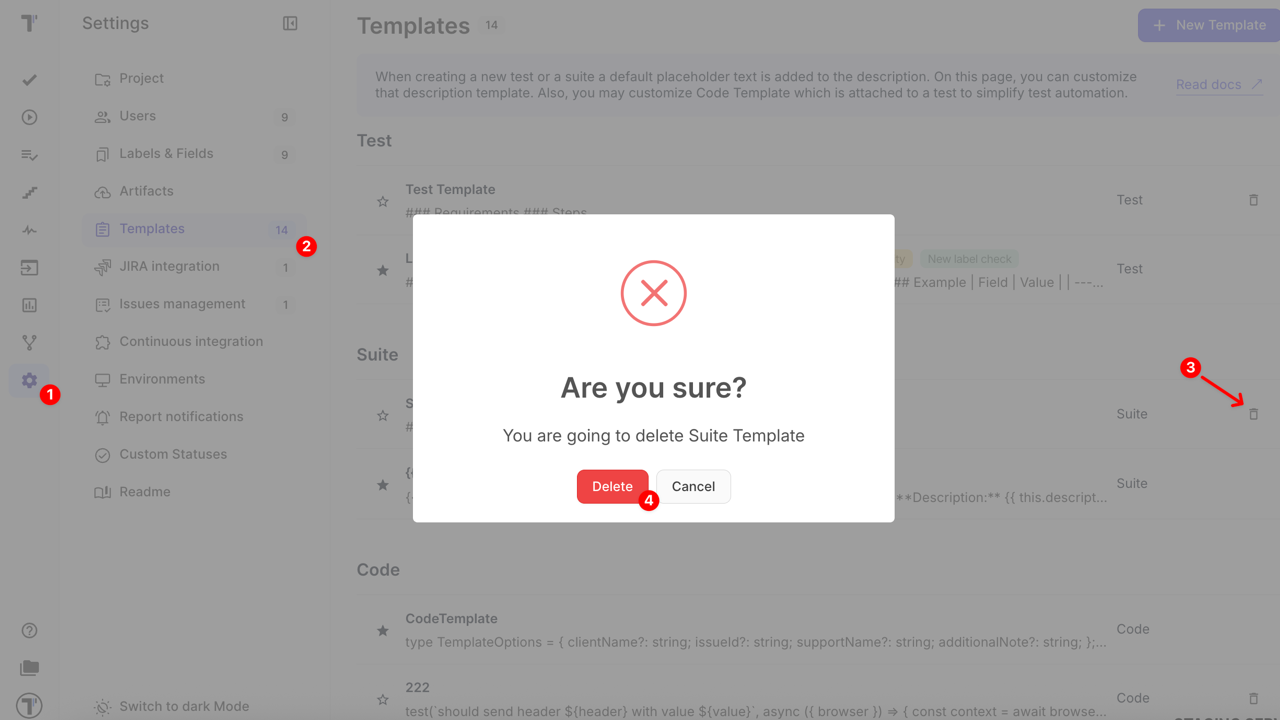
Section titled “How To Delete Templates”- Navigate to Settings in the sidebar
- Click Templates
- Click the Delete icon next to needed template
- Click the Delete button in the ‘Are you sure?’ pop-up to confirm deletion
Using Variables in Templates
Section titled “Using Variables in Templates”Templates in Testomat.io support dynamic content by using variables. Variables are selected from a dropdown and automatically inserted in a conditional format, ensuring they are rendered only if data exists.
Insertion format:
{{#if variable}}Label: {{ variable }}{{/if}}
Supported Variables
Section titled “Supported Variables”The following shows which variables are supported for each type of template that allows variables:
Code Templates
Section titled “Code Templates”Depending on the selected framework, the corresponding block with the correct syntax will be inserted. You can use as it is, or modify it as needed.
| Variable | Inserted As |
|---|---|
test.id | {{ test.id }} |
test.title | {{ test.title }} |
test.description | {{ test.description }} |
test.body / body | {{ test.body }} or {{ body }} |
suite.id | {{ suite.id }} |
suite.title | {{ suite.title }} |
suite.description | {{ suite.description }} |
Defect Templates
Section titled “Defect Templates”Test-related Variables
| Variable | Inserted As |
|---|---|
test.title | {{#if test.title}}### Test: **{{ test.title }}**{{/if}} |
test.id | {{#if test.id}}### Test ID: **{{ test.id }}**{{/if}} |
test.priority | {{#if test.priority}}### Test Priority: **{{ test.priority }}**{{/if}} |
test.tags | {{#if test.tags}}### Test Tags: **{{ test.tags }}**{{/if}} |
test.labels | {{#if test.labels}}### Test Labels: **{{ test.labels }}**{{/if}} |
test.jiraissues | {{#if test.jiraissues}}### Test Link to: **{{ test.jiraissues }}**{{/if}} |
test.assignee | {{#if test.assignee}}### Test Assigned to: **{{ test.assignee }}**{{/if}} |
test.steps | {{#if test.steps}}### Test Steps: **{{ test.steps }}**{{/if}} |
test.attachments | {{#if test.attachments}}### Test Attachment URLs: **{{ test.attachments }}**{{/if}} |
Testrun-related Variables
| Variable | Inserted As |
|---|---|
testrun.title | {{#if testrun.title}}### Testrun: **{{ testrun.title }}**{{/if}} |
testrun.status | {{#if testrun.status}}### Status: **{{ testrun.status }}**{{/if}} |
testrun.message | {{#if testrun.message}}### Message: **{{ testrun.message }}**{{/if}} |
testrun.stack | {{#if testrun.stack}}### Stack: **{{ testrun.stack }}**{{/if}} |
testrun.attachments | {{#if testrun.attachments}}### Attachments: **{{ testrun.attachments }}**{{/if}} |
testrun.assignee | {{#if testrun.assignee}}### Assignee: **{{ testrun.assignee }}**{{/if}} |
testrun.retries | {{#if testrun.retries}}### Retries: **{{ testrun.retries }}**{{/if}} |
Run-related Variables
| Variable | Inserted As |
|---|---|
run.title | {{#if run.title}}### Run: **{{ run.title }}**{{/if}} |
run.executed | {{#if run.executed}}### Run Executed by: **{{ run.executed }}**{{/if}} |
run.assignee | {{#if run.assignee}}### Run Assigned to: **{{ run.assignee }}**{{/if}} |
run.creator | {{#if run.creator}}### Run Created by: **{{ run.creator }}**{{/if}} |
run.environment | {{#if run.environment}}### Run Environment: **{{ run.environment }}**{{/if}} |
run.finished | {{#if run.finished}}### Run Finished at: **{{ run.finished }}**{{/if}} |
run.created | {{#if run.created}}### Run Created at: **{{ run.created }}**{{/if}} |
run.duration | {{#if run.duration}}### Run Duration: **{{ run.duration }}**{{/if}} |
run.project | {{#if run.project}}### Run Project: **{{ run.project }}**{{/if}} |
run.tests | {{#if run.tests}}### Run Tests count: **{{ run.tests }}**{{/if}} |
run.id | {{#if run.id}}### Run ID: **{{ run.id }}**{{/if}} |
run.plan | {{#if run.plan}}### Run Plan: **{{ run.plan }}**{{/if}} |
run.passed | {{#if run.passed}}### Run Passed count: **{{ run.passed }}**{{/if}} |
run.failed | {{#if run.failed}}### Run Failed count: **{{ run.failed }}**{{/if}} |
run.skipped | {{#if run.skipped}}### Run Skipped count: **{{ run.skipped }}**{{/if}} |
run.failures | {{#if run.failures}}### List of Failed Launch Test IDs: **{{ run.failures }}**{{/if}} |
run.labels | {{#if run.labels}}### Run Labels: **{{ run.labels }}**{{/if}} |
run.attachments | {{#if run.attachments}}### Run Attachment URLs: **{{ run.attachments }}**{{/if}} |
Report-related Variables
| Variable | Inserted As |
|---|---|
report.title | {{#if report.title}}### Report Title: **{{ report.title }}**{{/if}} |
report.id | {{#if report.id}}### Report ID: **{{ report.id }}**{{/if}} |
Meta Templates
Section titled “Meta Templates”| Variable | Inserted As |
|---|---|
project.value | {{ project.value }} |
Notification Templates
Section titled “Notification Templates”| Variable | Inserted As |
|---|---|
run.title | {{#if run.title}}### Run: **{{ run.title }}**{{/if}} |
run.executed | {{#if run.executed}}### Run Executed by: **{{ run.executed }}**{{/if}} |
run.assignee | {{#if run.assignee}}### Run Assigned to: **{{ run.assignee }}**{{/if}} |
run.creator | {{#if run.creator}}### Run Created by: **{{ run.creator }}**{{/if}} |
run.environment | {{#if run.environment}}### Run Environment: **{{ run.environment }}**{{/if}} |
run.finished | {{#if run.finished}}### Run Finished at: **{{ run.finished }}**{{/if}} |
run.created | {{#if run.created}}### Run Created at: **{{ run.created }}**{{/if}} |
run.duration | {{#if run.duration}}### Run Duration: **{{ run.duration }}**{{/if}} |
run.project | {{#if run.project}}### Run Project: **{{ run.project }}**{{/if}} |
run.tests | {{#if run.tests}}### Run Tests count: **{{ run.tests }}**{{/if}} |
run.id | {{#if run.id}}### Run ID: **{{ run.id }}**{{/if}} |
run.plan | {{#if run.plan}}### Run Plan: **{{ run.plan }}**{{/if}} |
run.failures | {{#if run.failures}}### List of Failed Launch Test IDs: **{{ run.failures }}**{{/if}} |
run.labels | {{#if run.labels}}### Run Labels: **{{ run.labels }}**{{/if}} |
run.attachments | {{#if run.attachments}}### Run Attachment URLs: **{{ run.attachments }}**{{/if}} |
Examples per Template Type
Section titled “Examples per Template Type”Test Template
## Preconditions- [Setup, test data, accounts, environment state before execution]
## Steps1. [Step 1]2. [Step 2]3. [Step 3]...
## Expected Result- [What should happen if the test passes]
## Postconditions- [State of the system after execution — e.g., data created, user logged in/out]
## Attachments- Screenshots: [paste them here or provide links]- Logs: [paste log file or link here]
## Notes- [Additional comments, reproduction frequency, related tickets]
You can find additional examples of markdown-formatted test cases in the documentation here: Examples of Markdown Written Test Cases.
Suite Template
## Requirements
- [List of requirements or preconditions for the suite]
## Notes
- [Additional comments, related tickets, or other important information]
Code Template
test.describe('{{ suite }}', () => { test('{{ test }}', () => {{{ body }} });});Defect Template
## STR
1. [Step 1]2. [Step 2]3. [Step 3]   ...
## Actual result[Describe what actually happened]
## Expected result{{ test.title }}
Executed by: {{ run.executed }}
## Test case informationTags: **{{ test.tags }}**Link to: {{ test.jiraissues }}
## Environment
{{#if run.environment}}Run Environment: {{ run.environment }}{{/if}}
Meta Template
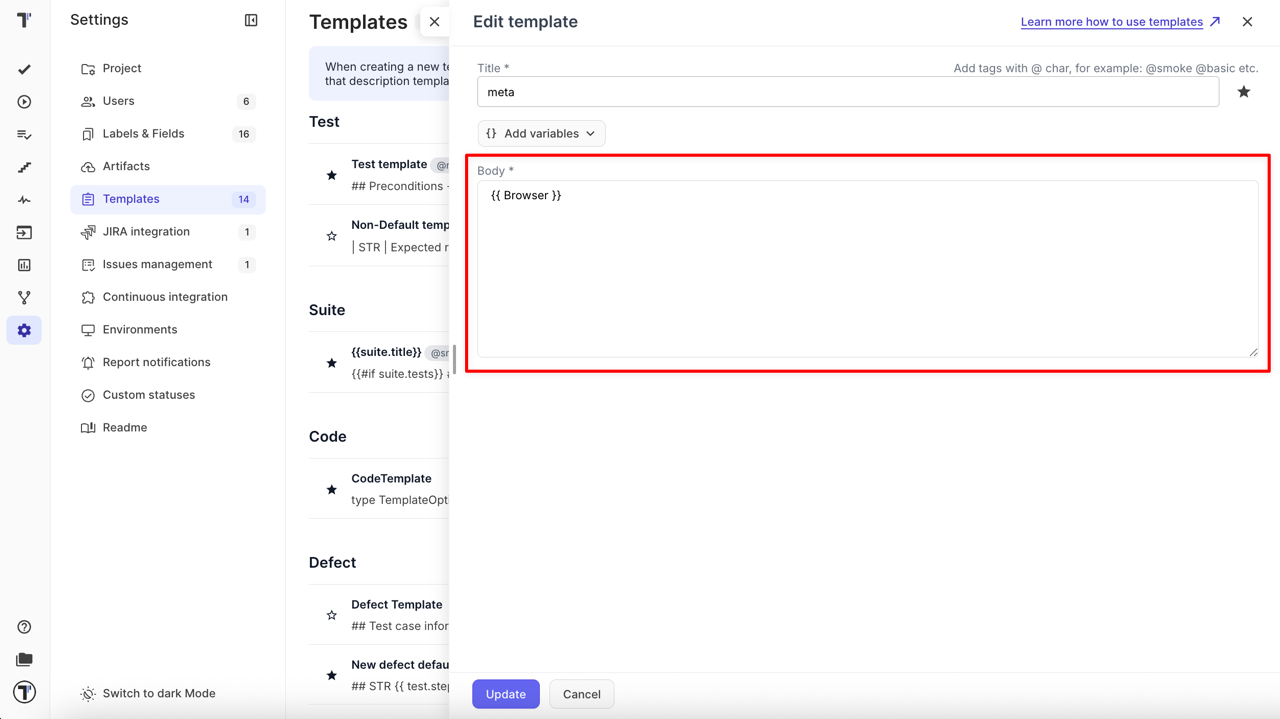
Create a template using the keys available in the Run Report View. If the test report doesn’t include a value for a specific key (e.g, project.value or browser), the corresponding placeholders will remain empty. More info: Applying Meta Templates
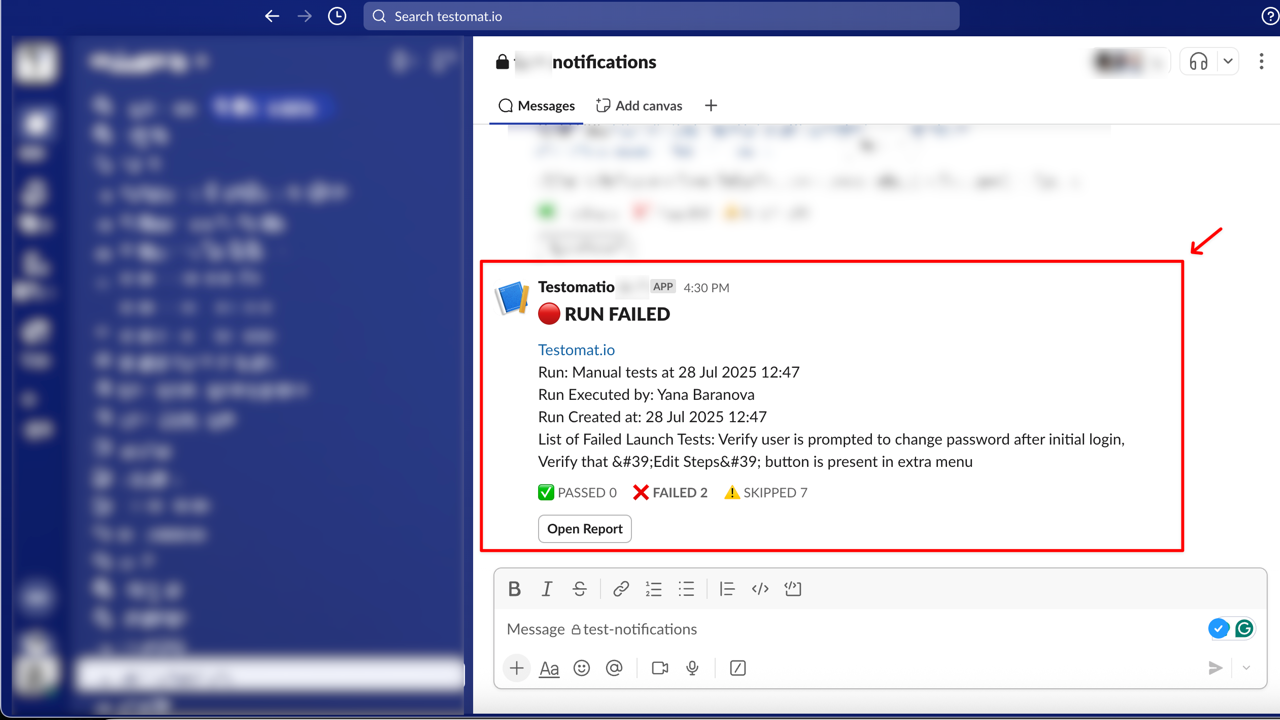
{{ project.value }}{{ browser }}Notification Template
{{#if run.title}}Run: {{ run.title }}{{/if}}{{#if run.executed}}Run Executed by: {{ run.executed }}{{/if}}{{#if run.environment}}Run Environment: {{ run.environment }}{{/if}}{{#if run.finished}}Run Finished at: {{ run.finished }}{{/if}}{{#if run.created}}Run Created at: {{ run.created }}{{/if}}{{#if run.duration}}Run Duration: {{ run.duration }}{{/if}}{{#if run.project}}Run Project: {{ run.project }}{{/if}}{{#if run.tests}}Run Tests count: {{ run.tests }}{{/if}}{{#if run.id}}Run ID: {{ run.id }}{{/if}}{{#if run.plan}}Run Plan: {{ run.plan }}{{/if}}{{#if run.failures}}List of Failed Launch Tests: {{ run.failures }}{{/if}}{{#if run.labels}}Run Labels: {{ run.labels }}{{/if}}Applying Templates
Section titled “Applying Templates”Templates aren’t just about saving time — they help you work smarter and more consistently across your entire testing workflow.
Key Benefits of Using Templates:
- Save time by avoiding repetitive manual input
- Ensure consistency across test cases, suites, defects, and reports
- Improve clarity in communication with development teams
- Standardize formatting and enforce team-wide structure
- Automate integration content for tools like Jira, GitHub, Slack, etc.
- Enable reuse of best practices and proven formats
Whether you’re reporting a defect, creating a new test case, or sending notifications to Slack — templates make your process faster, cleaner, and more scalable.
Templates can be applied either:
- Automatically — when marked as default;
- Manually — when selected during test, suite, or defect creation;
Applying Templates To Tests And Suites
Section titled “Applying Templates To Tests And Suites”- Go to Tests tab
- Open the relevant test case or suite in Edit mode
- Select the needed template in the Use Template dropdown or keep a default one
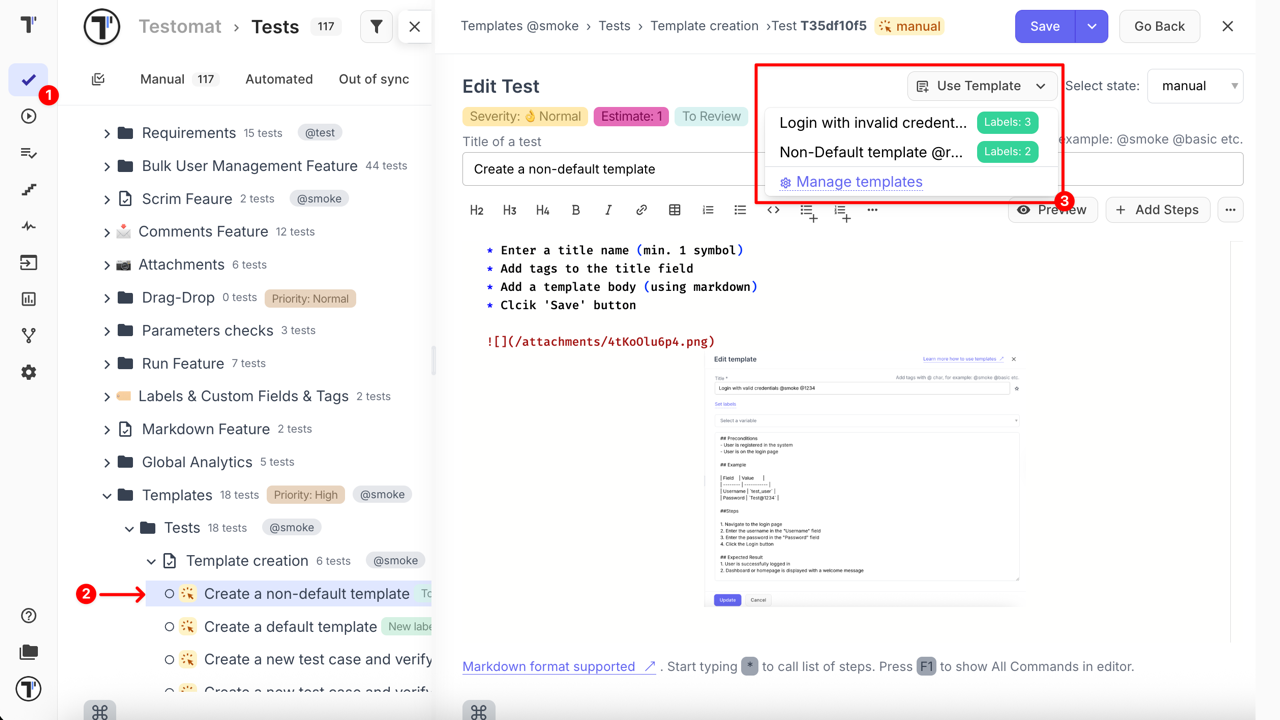
- Confirm your selection - the template will be applied to the current item
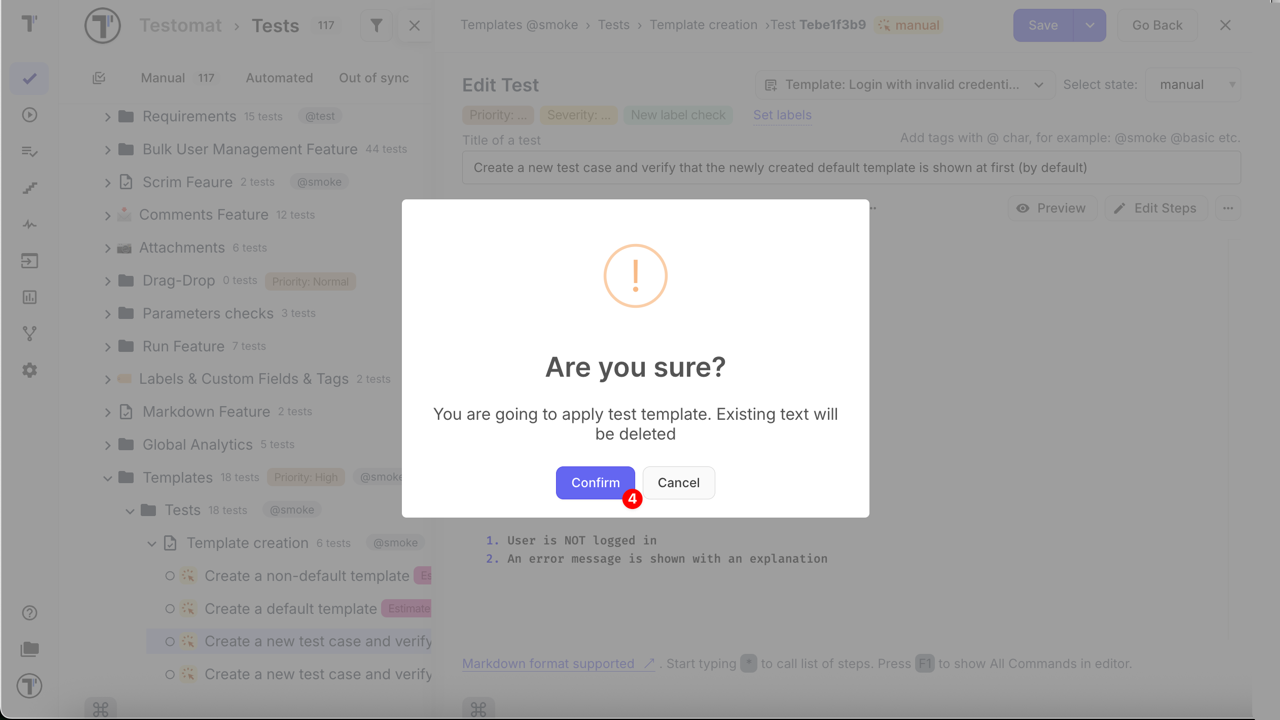
If the selected test or suite already contains text, a confirmation window will appear:
- You are going to apply test (suite) template. Existing text will be deleted.
- Otherwise, if the test or suite is empty, this confirmation will be skipped and the template will be applied immediately.
The selected template will automatically populate the fields with the predefined structure and content.
::: note
When you create a new test or suite, the default template (if configured) will be applied automatically. This helps ensure consistent formatting and structure without manual selection.
Keep in mind that required custom fields cannot be removed when applying templates, while labels remain optional and can be removed.
:::
Applying Code Templates
Section titled “Applying Code Templates”- Go to Tests tab
- Open the relevant test case in the Code template tab
- Select the needed template in the extra menu
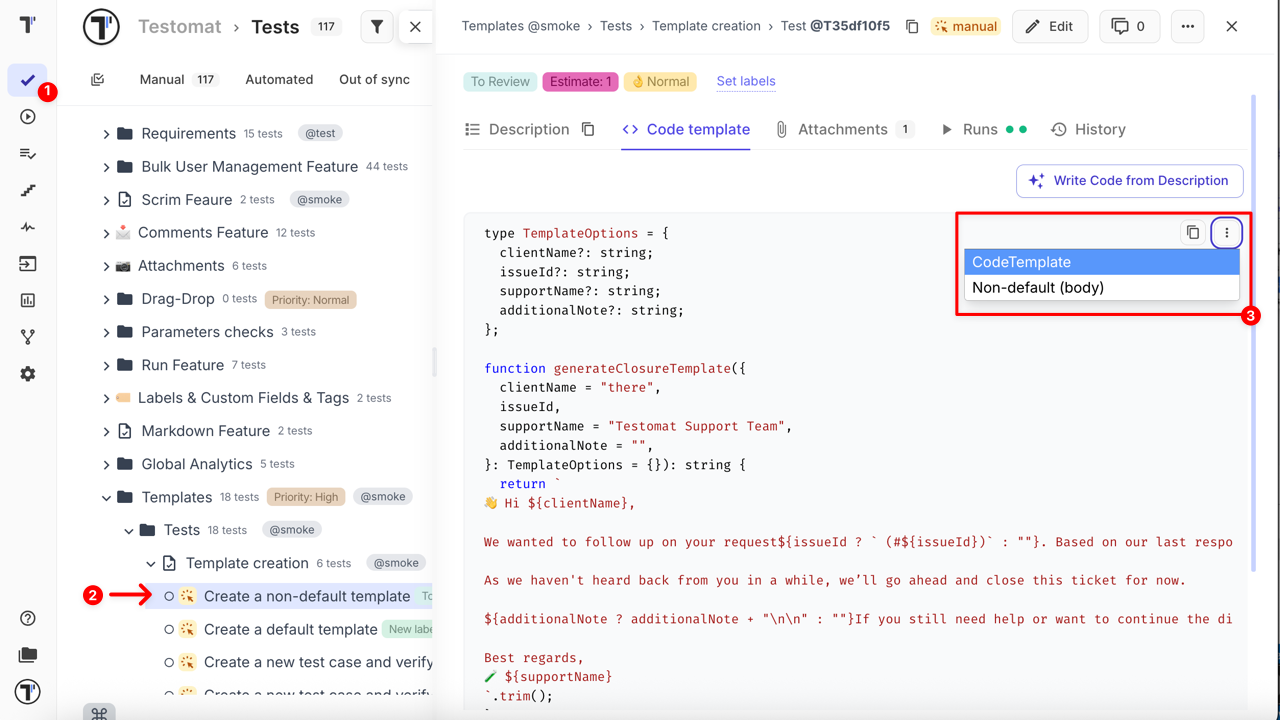
Once selected, the code will automatically update — no manual edits needeed.

Applying Templates To Defects
Section titled “Applying Templates To Defects”Testomat.io supports integration with a wide range of issue management systems, including:
- Jira
- GitHub
- Azure DevOps
- Linear
- ClickUp
- YouTrack
- GitLab
- Shortcut
- Confluence pages
Learn more: How to connect to an Issue Management System (IMS)
Once the integration with your preferred issue management system is set up and linked, you can easily create and link issues directly from your test runs using predefined templates.
- Go to Runs tab
- Open the relevant ongoing run
- Click the Continue button
- Click the Link Defect in the failed test
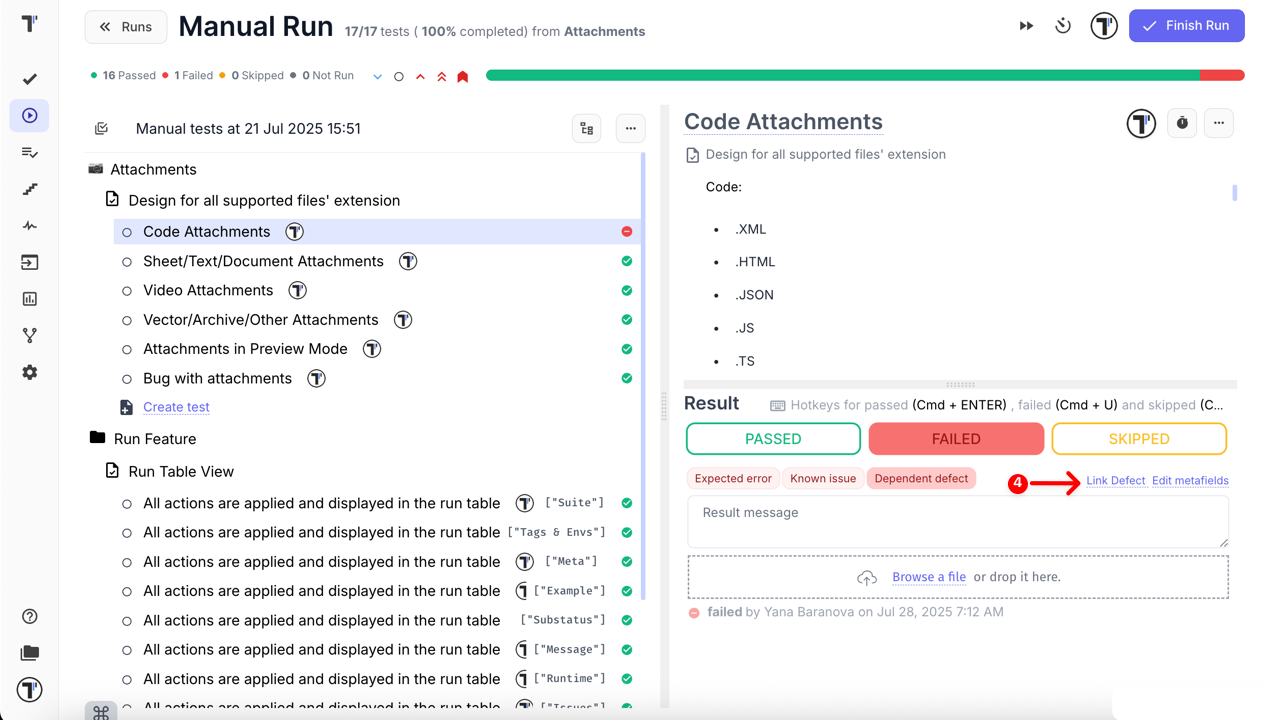
- Click the Create new issue button
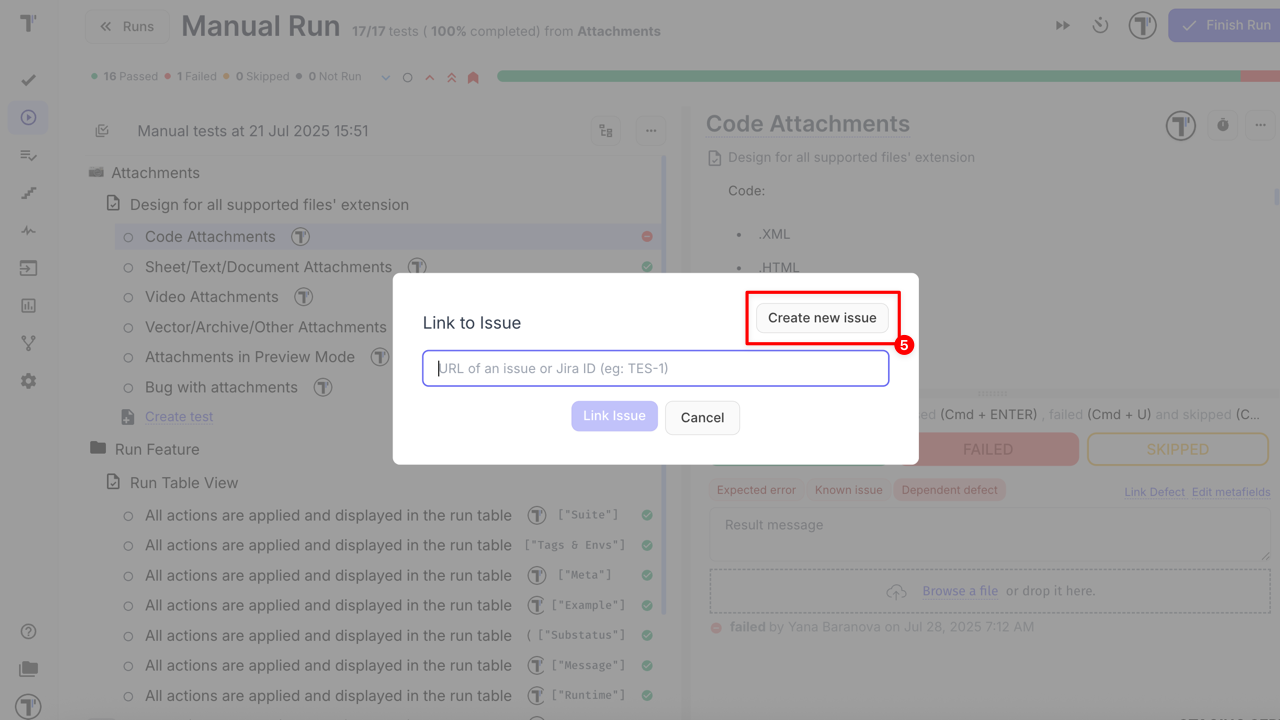
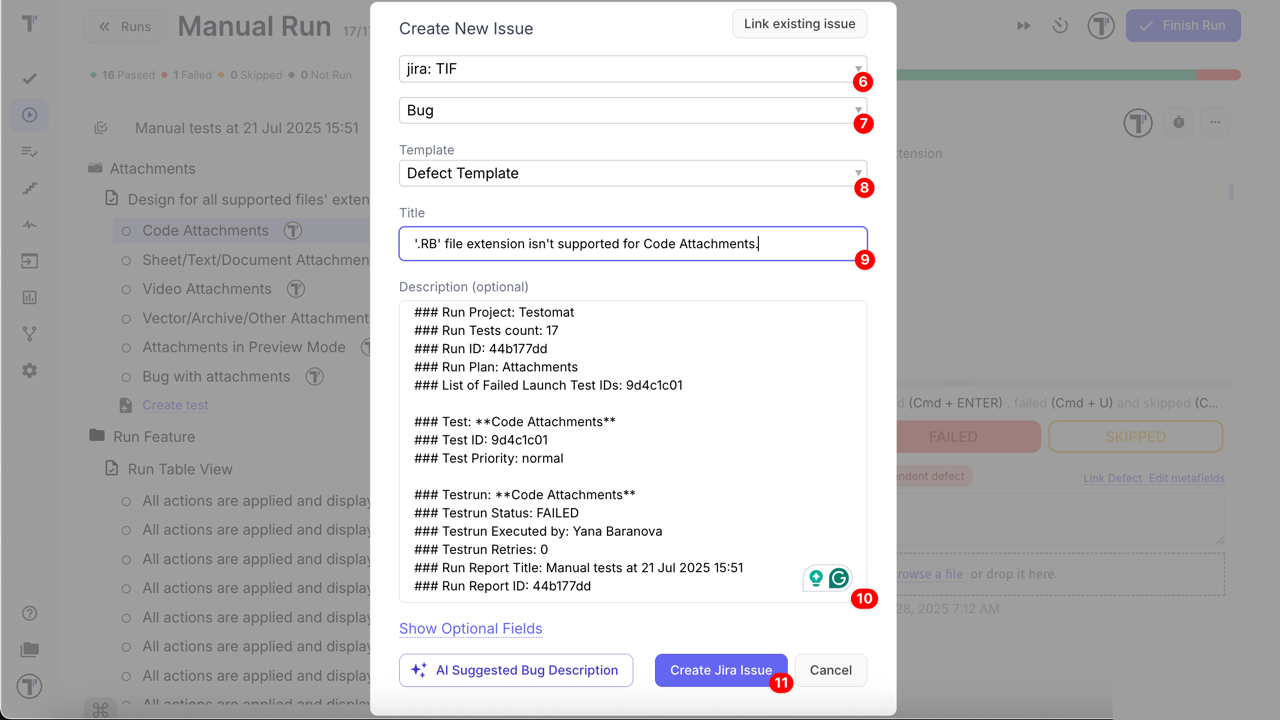
In the Create new issue window, just fill in the required fields:
- Select profile (e.g. Jira Integration) from the dropdown list
- Select Jira Issue Type from the dropdown list (e.g. Bug)
- Select Template from the dropdown to apply Defect Templates to automatically prefill the summary and description fields
- Add a title to the field
- Write an optional description to the body if needed
- Click the ‘Create Jira Issue’ button
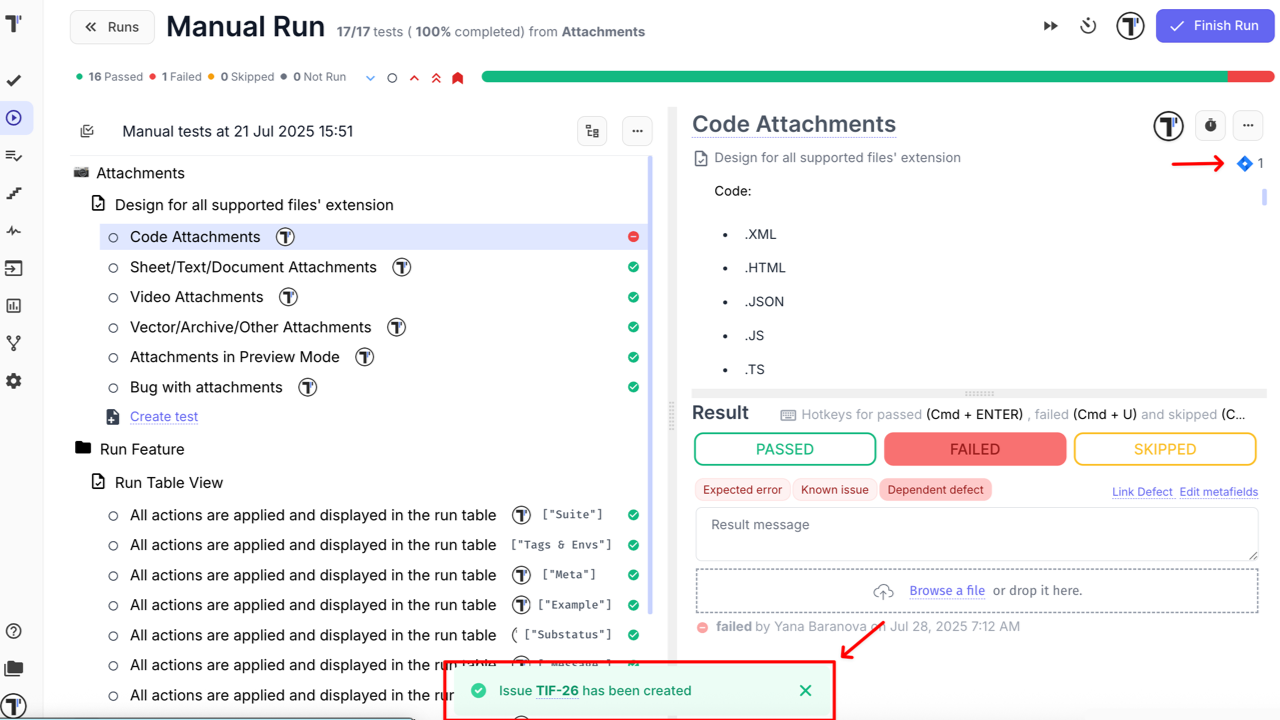
Once the issue is created:
- An icon will appear next to the test case — it includes a direct link to the created issue;
- A confirmation message will show with a direct link to the created issue;
Applying Meta Templates
Section titled “Applying Meta Templates”Meta Template defines which specific meta-data will be displayed in the Run Report View. It only controls the display of data and does not affect how the meta-data is generated, stored, or passed by the test.
- Unlike other template types, there is no manual option to select a Meta Template during a test run
- You specify which keys should be shown
- Meta-data can be added manually only for manual runs
- It works strictly with key–value pairs
- It is recommended to use Meta Template in automated tests to dynamically display important information without manual input
- Meta Template helps standardize meta-data display and focus on key information
How it Works for Manual Run
Section titled “How it Works for Manual Run”Once the default Meta Template is created with specific keys (variables),
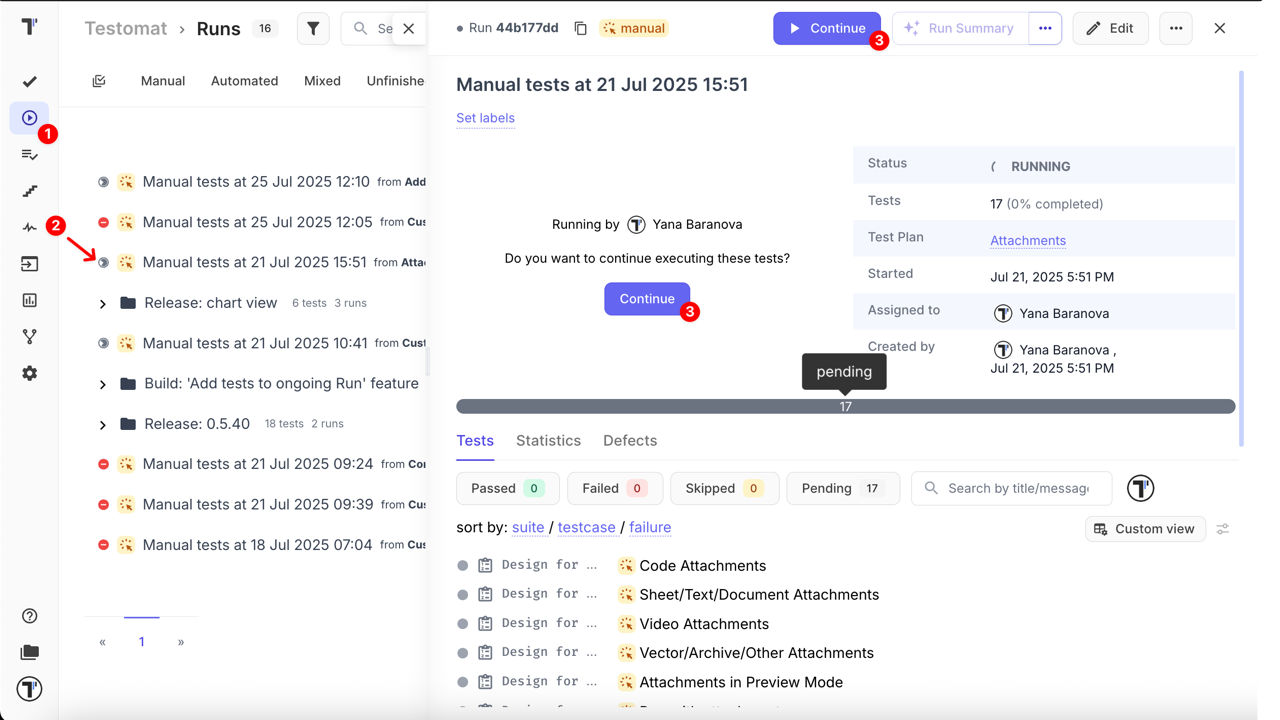
- Go to Runs tab
- Open the relevant ongoing run
- Click the Continue button
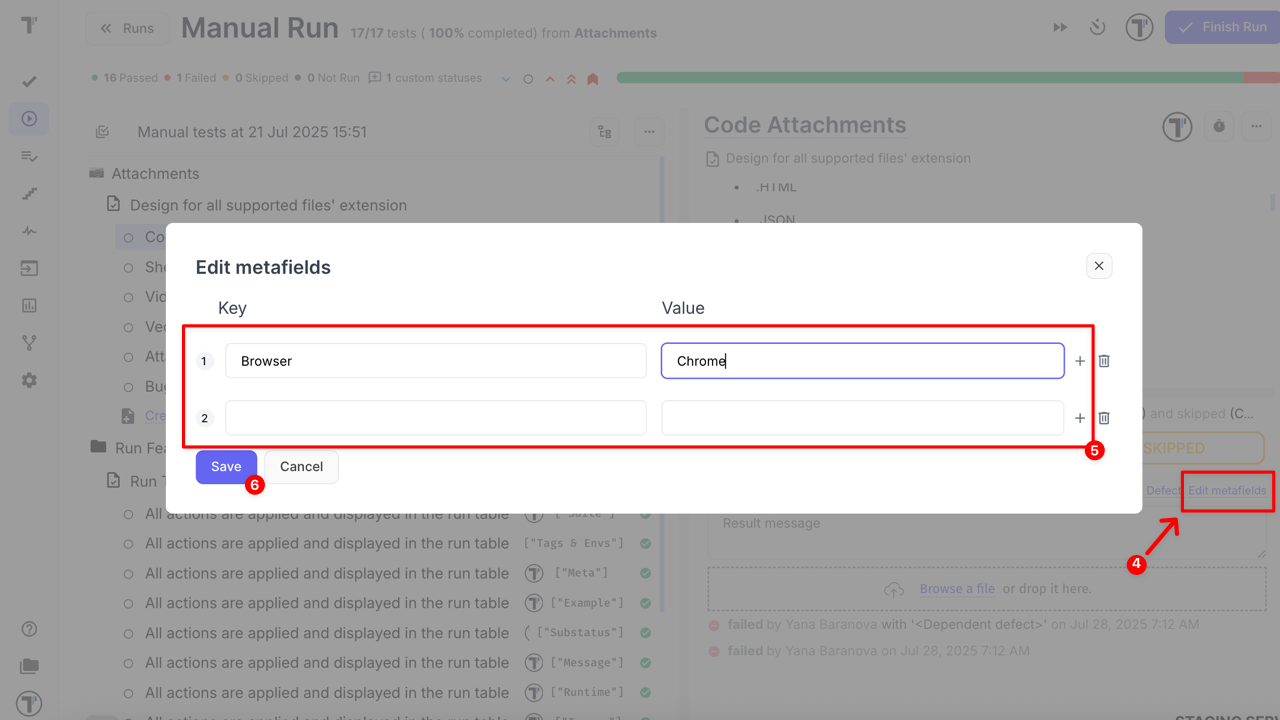
-
Click the Edit metafields button under the test result
-
Fill in the Key and Value
- Click the Save button
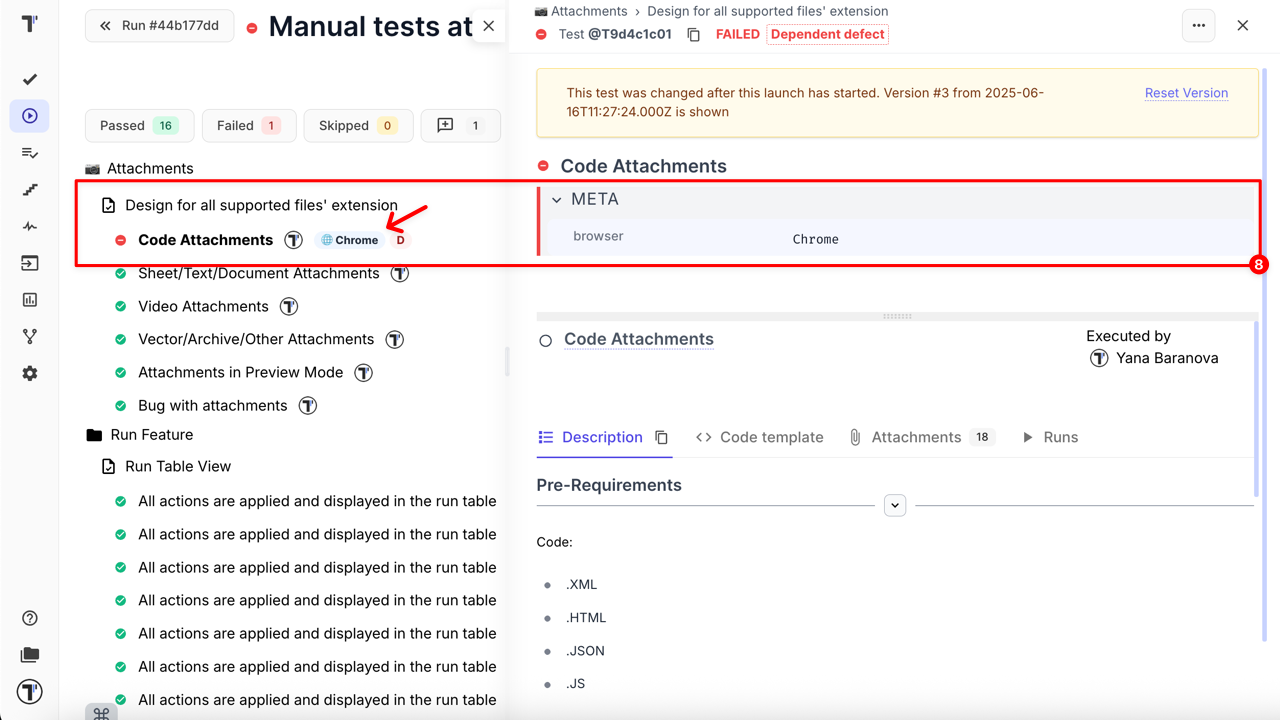
- Click the Finish Run button

- Open the test in run report to see how meta data is applied
How it Works for Automated Run
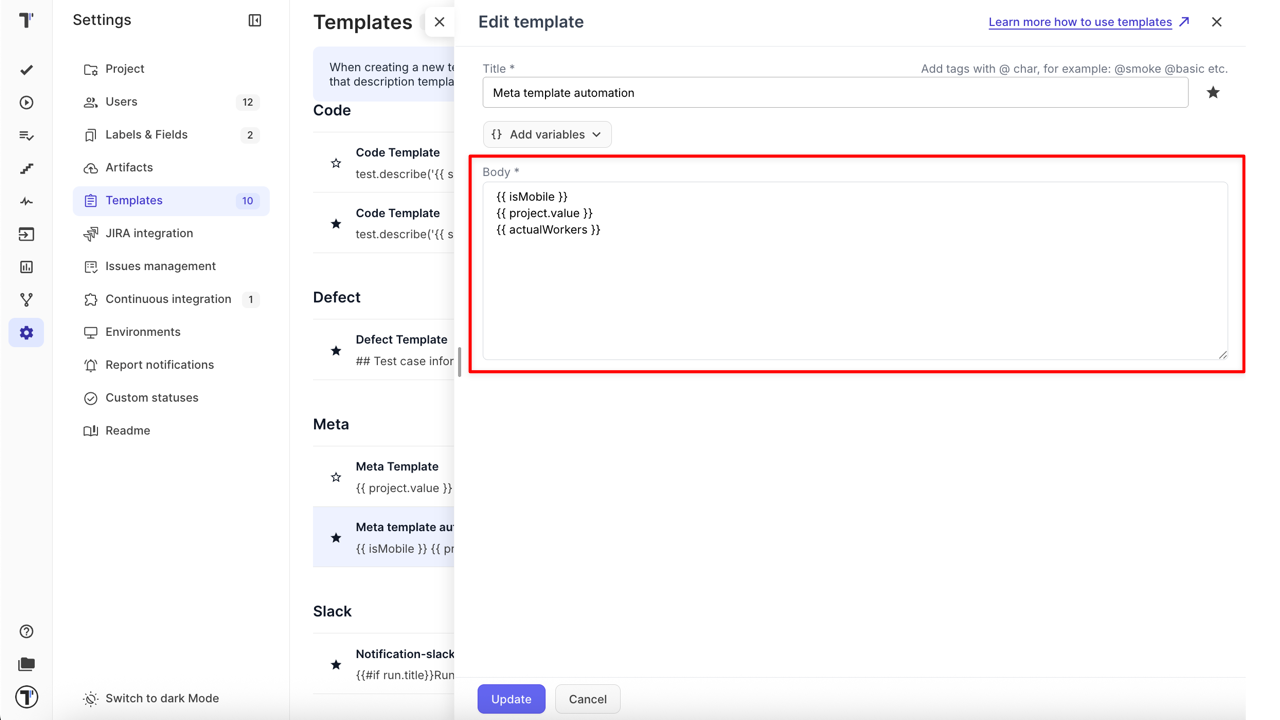
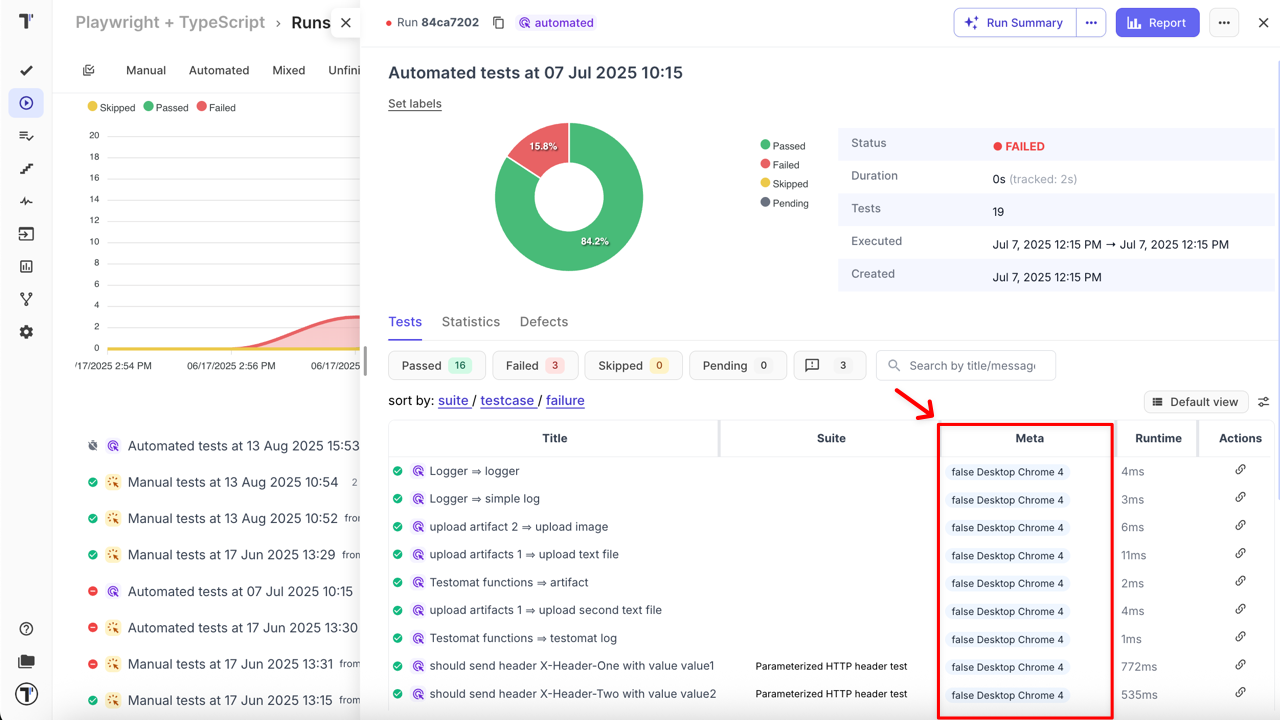
Section titled “How it Works for Automated Run”When using automated tests, a default Meta Template is applied automatically to display meta-data in the Run Report View based on the keys defined in the template.
Once the default Meta Template is created with specific keys (variables):
- Go to Runs tab
- Open the relevant finished run
In the Run Report View, the values corresponding to the keys defined in the template are displayed in the order specified in the template.
Applying Notification Template
Section titled “Applying Notification Template”Unlike other template types, there is no manual option to select a Notification Template during a test run or when sending report notifications.
Once you have configured Slack Notification, MS Teams Notification, or Telegram Notification, and created a default Notification Template, it will be automatically applied to all notifications triggered by your configured Notification Rules.
Best Practices
Section titled “Best Practices”- Regularly review and update templates to ensure relevance
- Utilize labels and tags strategically for efficient organization
- Encourage collaboration to create standardized templates across teams