AI-Requirements
AI-Powered Requirements
Section titled “AI-Powered Requirements”Testomat.io introduces another AI-powered feature - AI-Requirements that helps to streamline test coverage alignment with product requirements.
A dedicated ‘Requirements’ page brings all your requirements into a single, convenient workspace, where you can view, organize, and update all requirements in one place, eliminating the need to jump between different parts of a project.
When you add a Requirement source (Jira issue, Confluence page, PDF file, etc.) in Testomat.io, the system analyzes the description and automatically generates a structured requirement summary. You can also view all suites linked to a requirement, the original source, and any added attachments directly from the ‘Requirement details’ page.
AI can analyze requirement descriptions and suggest relevant test data examples that support broader test coverage and more effective validation of business requirements.
Based on the requirement analysis, you’ll be offered two intelligent options:
- Generate New Suites: Create a new test suite with AI-suggested test cases.
- Analyze Existing Coverage: Review existing suites and receive suggestions for coverage improvements.
This feature is available both at the project level and within individual test suites, enabling flexible, requirements-driven testing whether you’re planning at a high level or working in a focused domain.
Key benefits:
- Automation: Speeds up the transition from business requirements to actionable test cases.
- Traceability: Ensures alignment between business goals and actual test coverage.
- Efficiency: Reduces manual effort and identifies potential gaps in test planning.
Requirements Page Overview
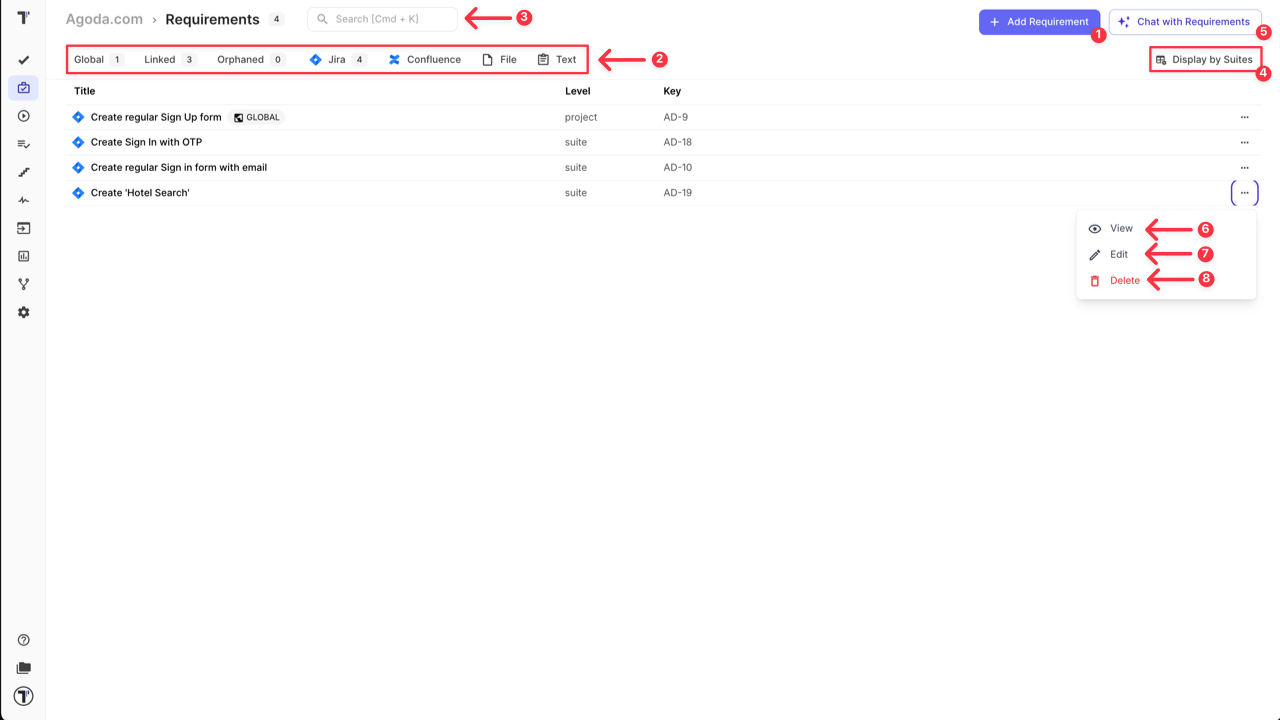
Section titled “Requirements Page Overview”On ‘Requirements’ page, you can perform the following actions::
- Link new requirement (check sections below for more details).
- Filter requirements by sourse type, level, and status.
- Search for specific information within your requirements.
- Change the Requirements Display View: List view vs. Suite view (check section below for more information).
- ‘Chat with Requirements’ using AI assistant (Read more).
- View ‘Requirement details’ page.
- Edit Requirement.
- Delete Requirement.
Requirements Display View
Section titled “Requirements Display View”Select the requirements display view based on your current workflow:
-
‘Display as List’: Work with requirements at the Requirement level. All requirements are displayed in a single list, allowing you to view details, link suites to the selected requirement, add attachments, or requirement notes.
-
‘Display by Suites’: Work with the requirements at the Suite level. All suites are displayed in one list alongside their linked requirements. It helps identify suites that lack coverage and allows you to attach or detach requirements easily, and as well change the requirement details.
Add Requirements to an Empty Project
Section titled “Add Requirements to an Empty Project”You can add requirements to a new project to drive test generation from the start.
Once a project is created (BDD or Classical), set up the integration for your Requirement Source (see detailed instructions for JIRA and Confluence). Then, proceed with adding requirements:
- Open ‘Requirements’ page.
- Click ‘+New Requirements’ or ‘+Add Requirement’ button.
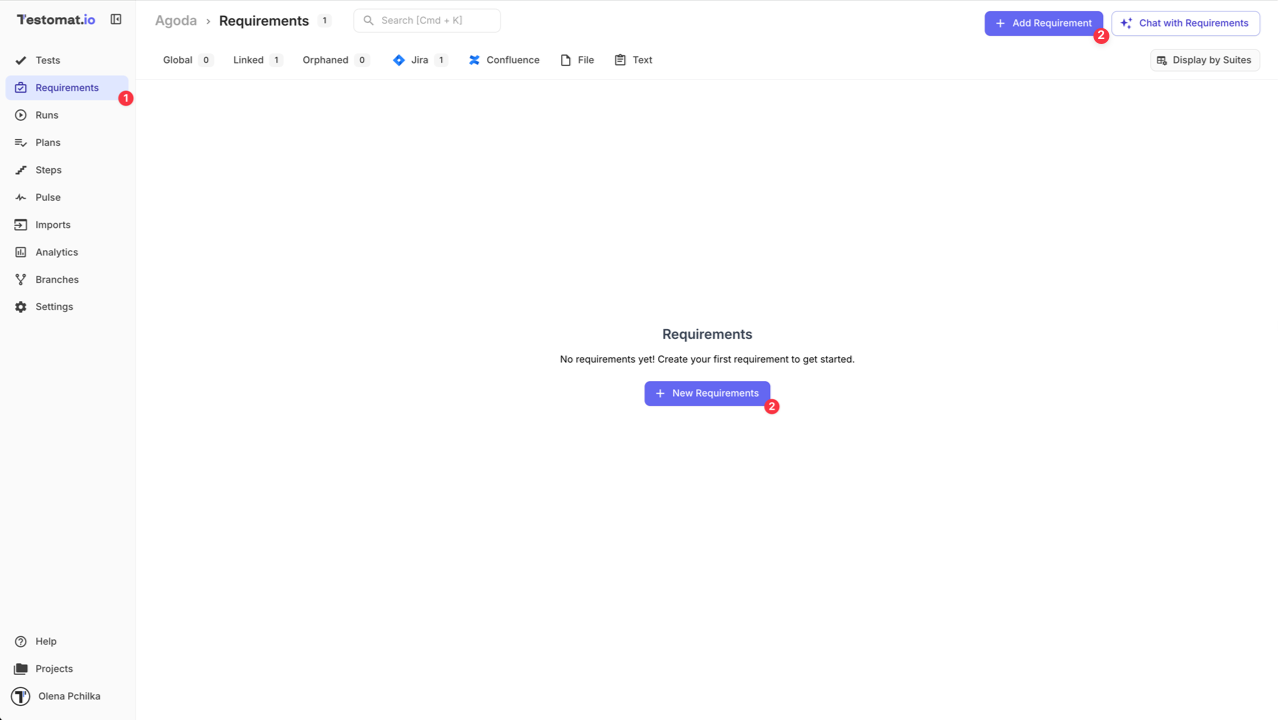
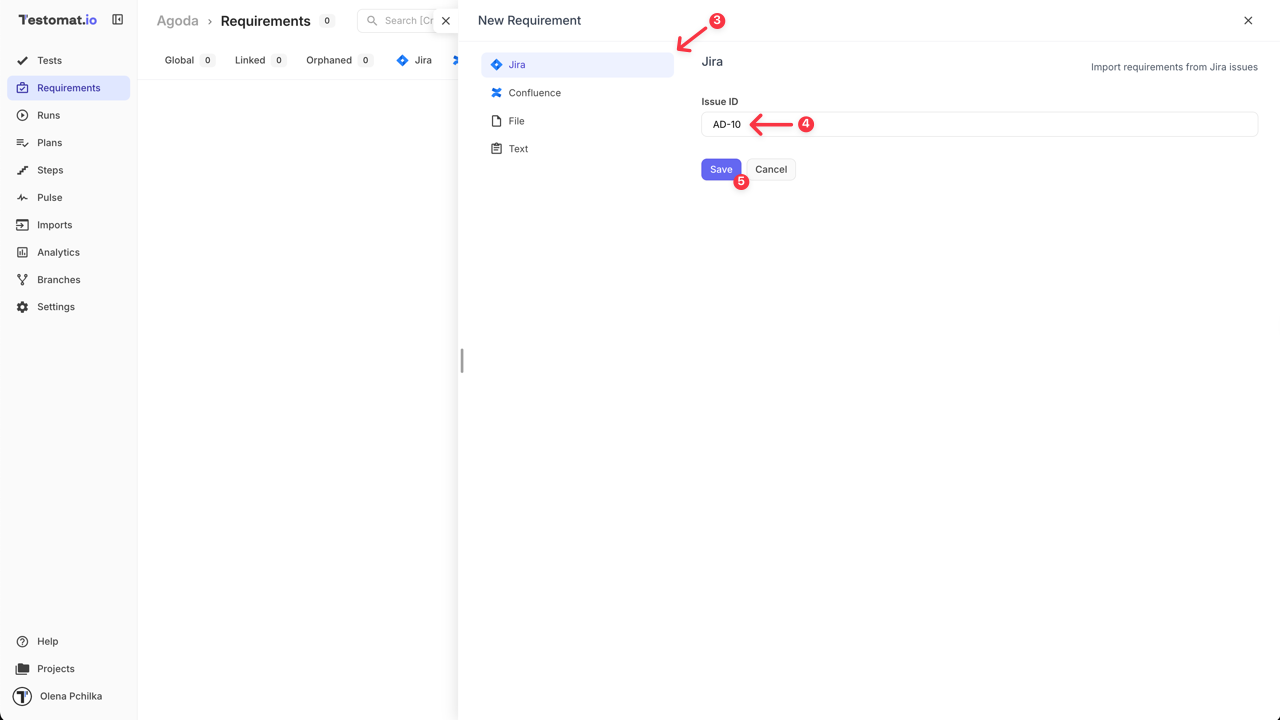
- Select your requirement source (e.g., Jira).
- Enter the source identifier (e.g., ‘Jira Issue ID’).
- Click ‘Save’ button.
After the requirement is linked to a project you can use AI Assistant to analyze requirements for edge cases and potential solutions. You can also create suites and test cases based on these requirements.
Link Requirement to an Existing Suite Case
Section titled “Link Requirement to an Existing Suite Case”Testomat.io allows you to link a requirement to an existing suite case directly from its page. To link the requirement that is already added to the project, follow these steps:
- Open your Suite Case.
- Select ‘Requirements’ option from the ‘Extra menu’ dropdown list.
OR
Click ‘Attach Requirements’ button under the Suite title.
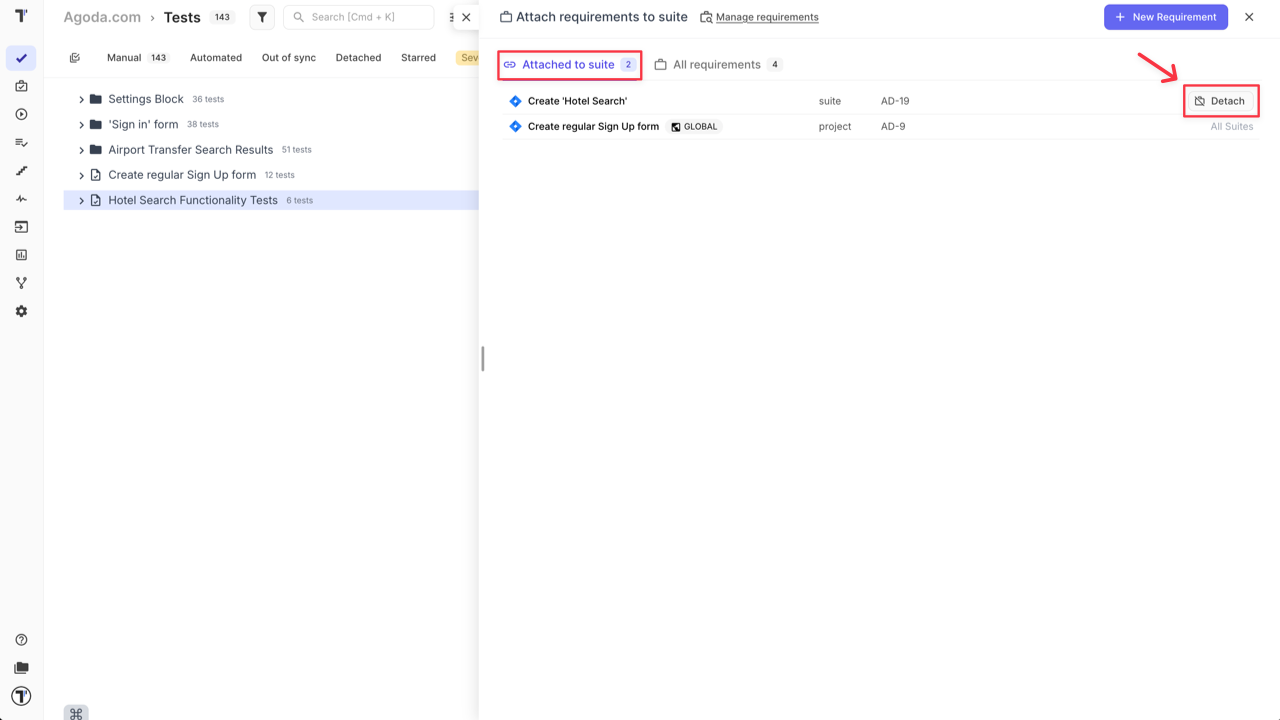
- Open ‘All Requirements’ tab.
- Select the requirement that you want to link to the Suite from the list by clicking on ‘Attach’ button.
To unlink the requirement from the suite, follow Steps 1-3 and on ‘Attached to suite’ or ‘All Requirements’ tab click ‘Detach’ button for requirement that you want to unlink.
Jira as a Requirement Source
Section titled “Jira as a Requirement Source”Testomat.io not only allows you to start a new project with requirements but also to link requirements to an ongoing project at any time.
To add Jira as a Requirement Source:
- Open your Project in Testomat.io.
- Go to ‘Requirements’ page.
- Click ‘+Add Requirement’ button.
OR
Access ‘Requirements’ page via ‘Extra menu’ button on ‘Tests’ page.
- Select ‘Jira’ as your Requirement Source.
- Enter ‘Jira Issue ID’.
- Click ‘Save’ button.

Same as for a new project, after the requirement is linked to your project, you can start using AI-features for analyzing it, and generating suites, test cases, and edge cases to cover your requirements.
Confluence as a Requirement Source
Section titled “Confluence as a Requirement Source”Testomat.io allows you to use your Confluence space as a source of requirements. First, connect your Confluence space to your Testomat.io project, similar to setting up Jira. For detailed setup instructions, refer to the ‘Confluence’ section.
Once connected, the system can analyze your Confluence pages to extract requirement descriptions, assess traceability, identify edge cases, and generate relevant test suites and test cases.
This integration bridges the gap between documentation and test planning, enabling seamless test coverage based on the requirements your teams already maintain.
To add Confluence as a Requirement into your project:
- Go to ‘Requirements’ page.
- Click ‘+Add Requirement’ button.
OR
Access ‘Requirements’ page via ‘Extra menu’ button on ‘Tests’ page.
- Select ‘Confluence’ as your Requirement Source.
- Enter ‘Confluence page url’.
- Click ‘Save’ button.
Files & Text as a Requirement Source
Section titled “Files & Text as a Requirement Source”Testomat.io allows you to use not only Jira or Confluence as a Requirement Source, but also add text files, docs, spreadsheets or even screenshots and images.
Supported sources include:
- Files — PDF, DOCX, XLSX, CSV, TXT, Markdown, and others.
- Plain text — paste any text and instantly convert it into structured requirements.
This makes it much easier to import requirements from PRDs, customer documentation, spreadsheets, briefs, or any internal artifacts your team already uses.
To add requirement:
- Go to ‘Requirements’ page.
- Click ‘+Add Requirement’ button.

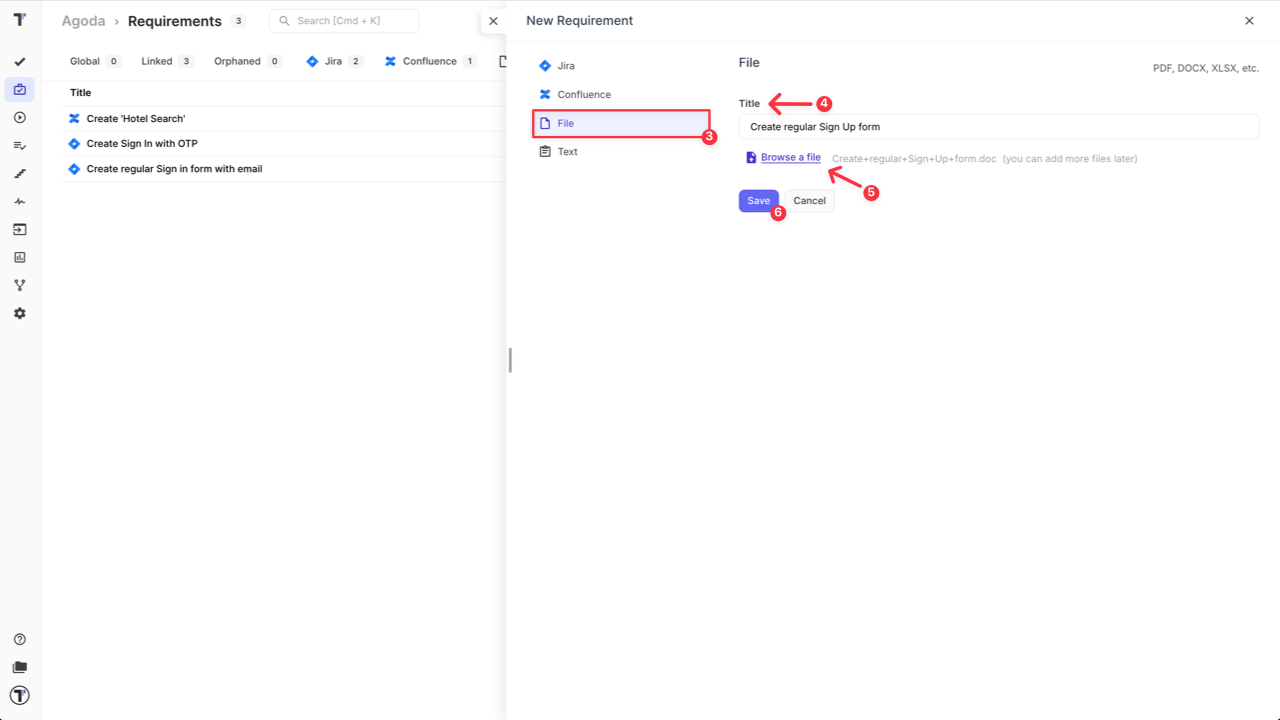
- To add a file as a requirement source:
- Select ‘File’.
- Enter Title.
- Upload any file in allowed format via ‘Browse a file’.
- Click ‘Save’ button.
- To add a plain text as a requirement source:
- Select ‘Text’.
- Enter Title.
- Add Description.
- Click ‘Save’ button.

Global Requirements Setup
Section titled “Global Requirements Setup”If you set up Requirements as Global on a Project level, it will allow the system to automatically attach selected requirements to every newly created test inside the project. This is especially useful for teams working with mandatory compliance rules, overarching documentation, or project-wide standards that must be reflected in all tests.
To set up Requirements as Global:
- Go to ‘Requirements’ page.
- Select a Requirement you want to set up as global.
- Click ‘Extra menu’ button.
- Select ‘Make Global’ option.

This ensures consistency and saves time by eliminating repeated manual assignment.
AI-Powered Image Understanding for Requirements
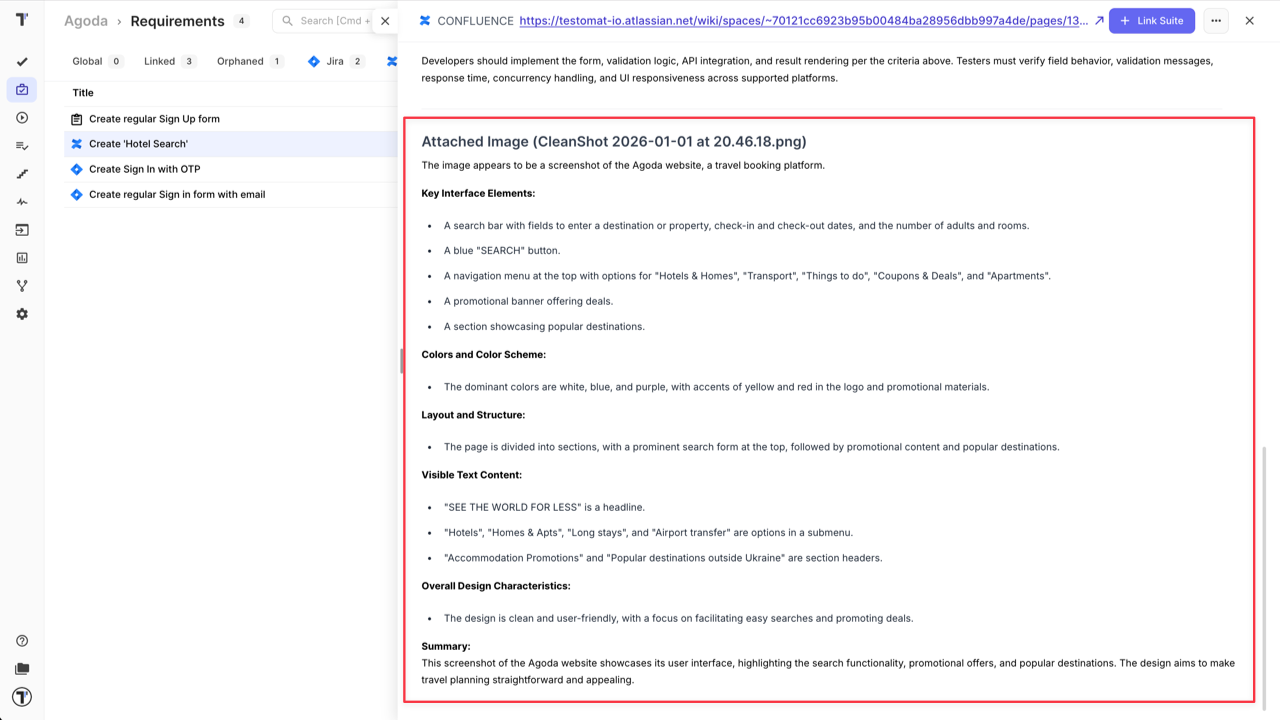
Section titled “AI-Powered Image Understanding for Requirements”With this feature you can attach images directly to your requirements, and AI will automatically analyze them and include their content in the requirement summary. This enriched summary is then used during test generation, ensuring that visual details are not missed.
The same behavior now applies to Jira- and Confluence-based requirements: if your Jira ticket or Confluence page includes attachments (images, diagrams, files), Testomat.io will import them, analyze them, and enrich the requirements summary — giving you more accurate AI-generated tests.
The requirements created based on the attached image will be displayed on ‘Summary’ tab under main requirements details in the ‘Attached Image’ section.
Edit Linked Requirements
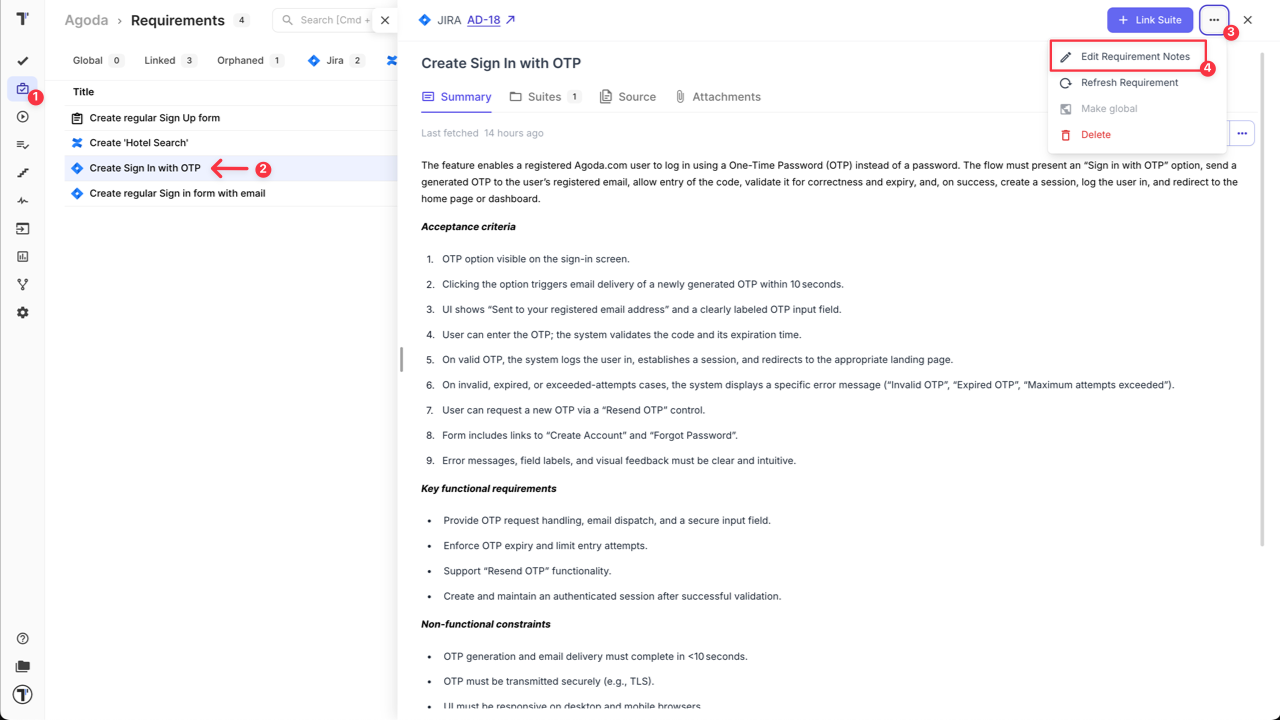
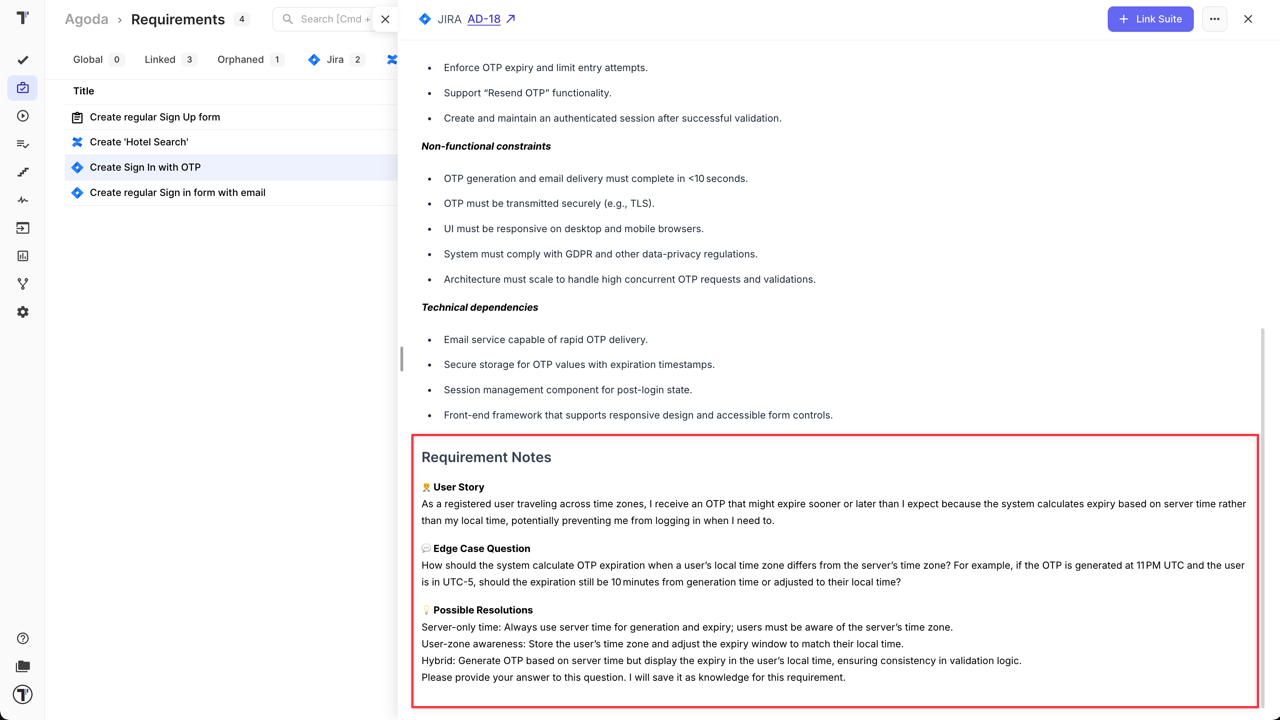
Section titled “Edit Linked Requirements”The original requirement cannot be edited inside Testomat.io, as it comes from an external source. But you can clarify any missing details from the original requirement or add some notes:
- Go to ‘Requirements’ page.
- Select the Requirement.
- Click ‘Extra menu’ button.
- Select ‘Edit Requirement Notes’ option.
- Add additional information/edge cases/notes.
- Click ‘Save’ button.
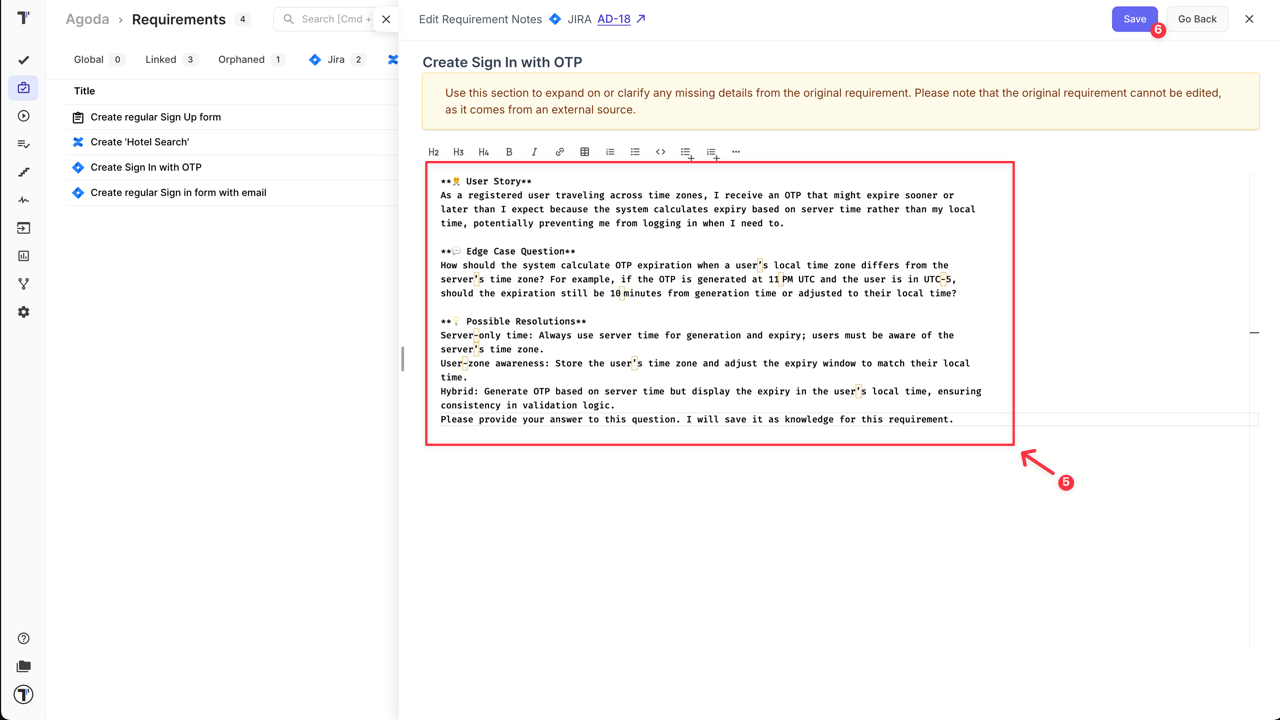
After notes are added and saved, they will be displayed on ‘Summary’ tab under main requirements details in the ‘Requirement Notes’ section.
Refresh the Requirement
Section titled “Refresh the Requirement”If you added some changes to the original source of your requirement, you would want it to be updated in your Testomat.io Project as well. To sync changes made in the original external source (e.g., an updated Jira ticket) you need:
- Go to ‘Requirements’ page.
- Open requirement that was updated.
- Click ‘Extra menu’ button.
- Click ‘Refresh Requirement’ option.
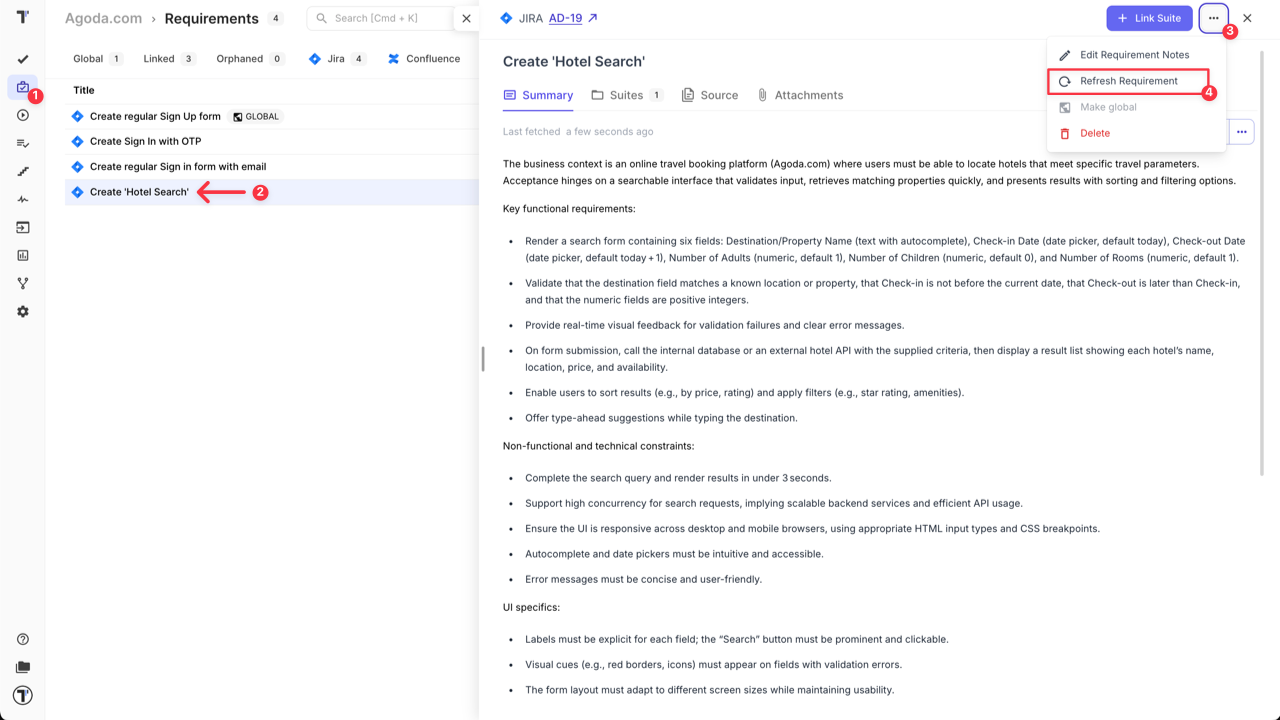
After the refreshment your requirement is automatically updated so you don’t need to link the requirement again or update it manually.
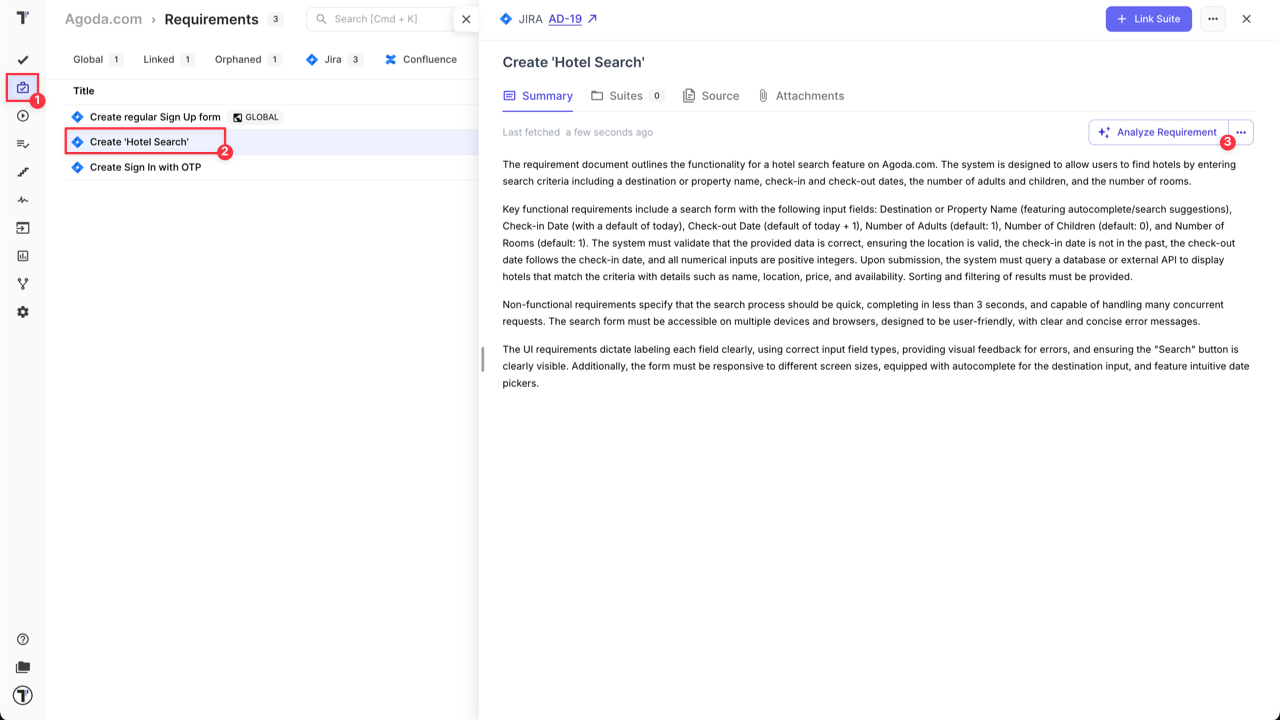
Analyze Requirements for Edge Cases
Section titled “Analyze Requirements for Edge Cases”- Open ‘Requirements’ page.
- Click on the added Requirement to open it.
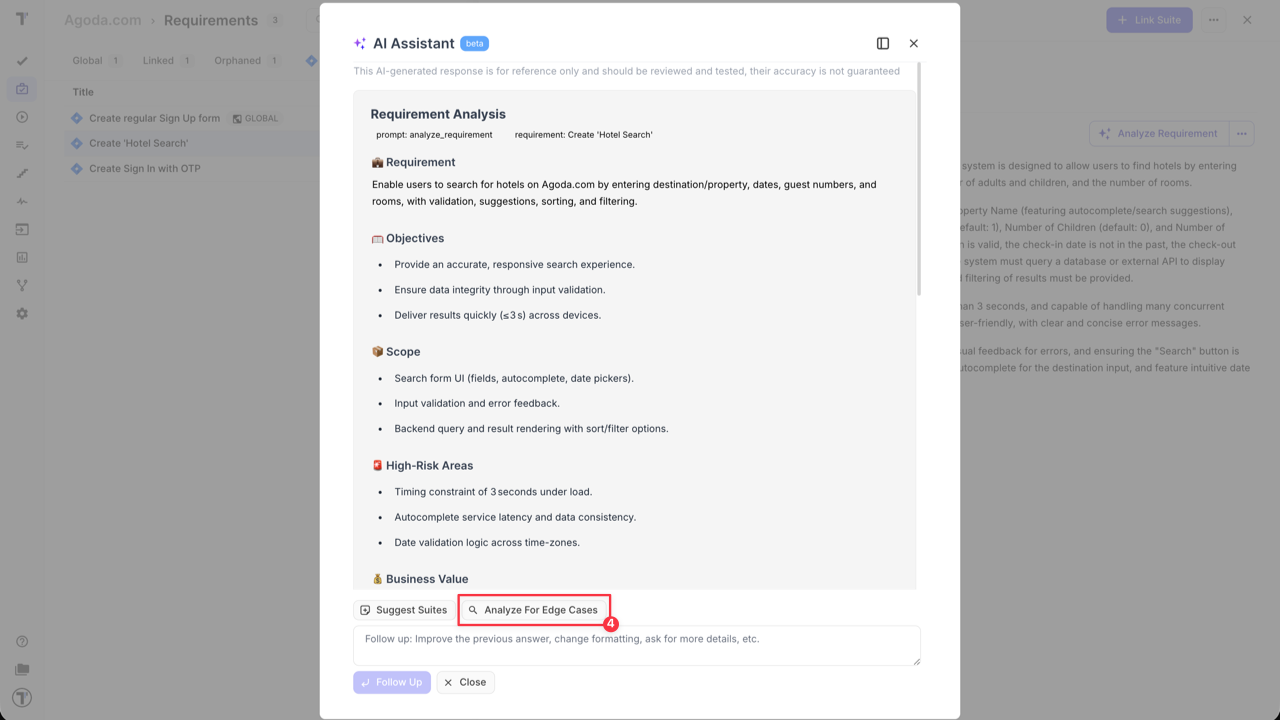
- Click ‘Analyze Requirement’ button on ‘Summary’ tab.
- Click ‘Analyze For Edge Cases’ button inside the AI Assistant.
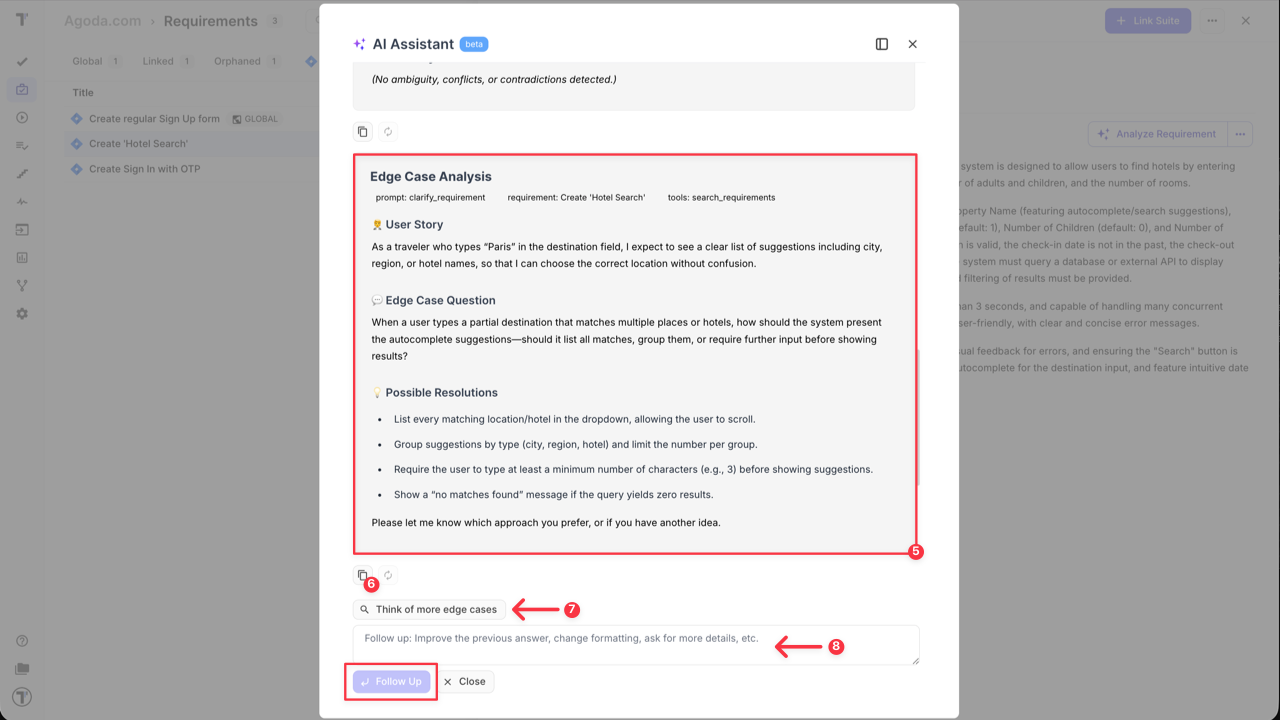
- Check suggestions from AI Assistant and add them as the edge cases solution.
- Click ‘Copy’ button to copy the edge case and add manually it to your requirement if needed.
- Ask AI to generate more Edge cases by clicking on ‘Think of more edge cases’ button.
- Improve the previous answer or ask about more details by sending relevant request via the ‘Follow up’ input field.
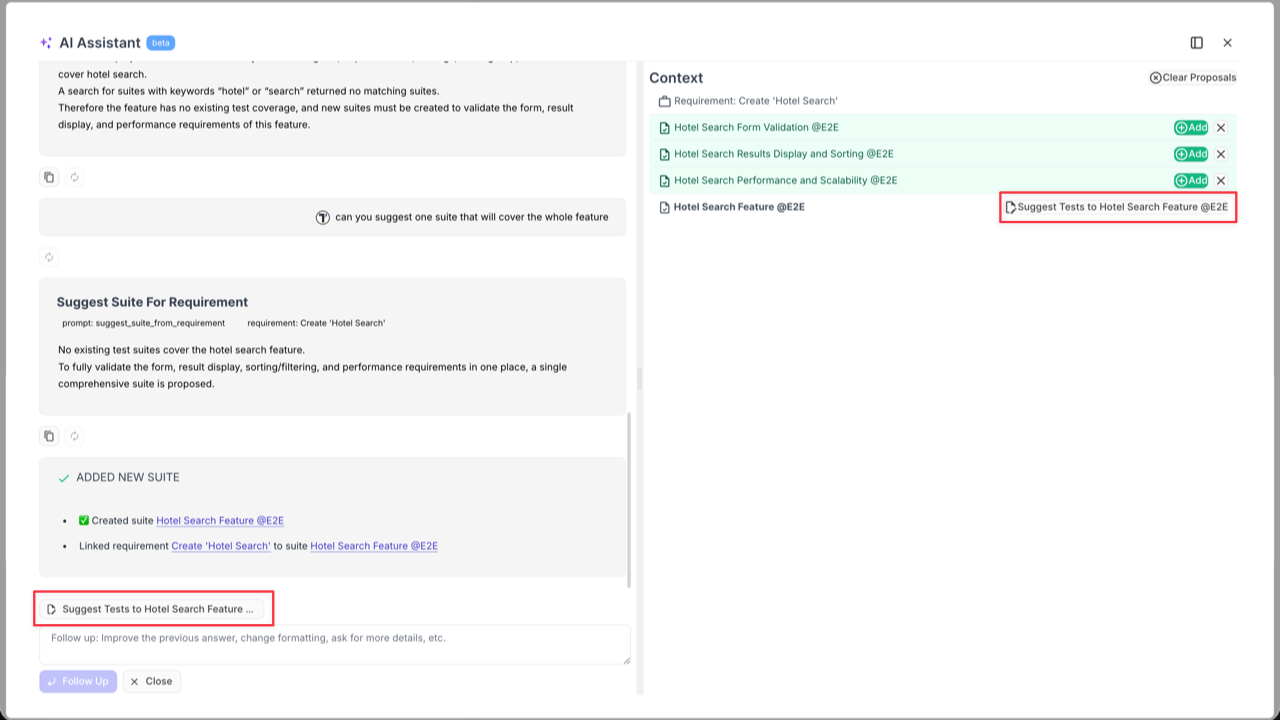
Create a Suite Case from Requirements
Section titled “Create a Suite Case from Requirements”- Open ‘Requirements’ page.
- Click on the added Requirement to open it.
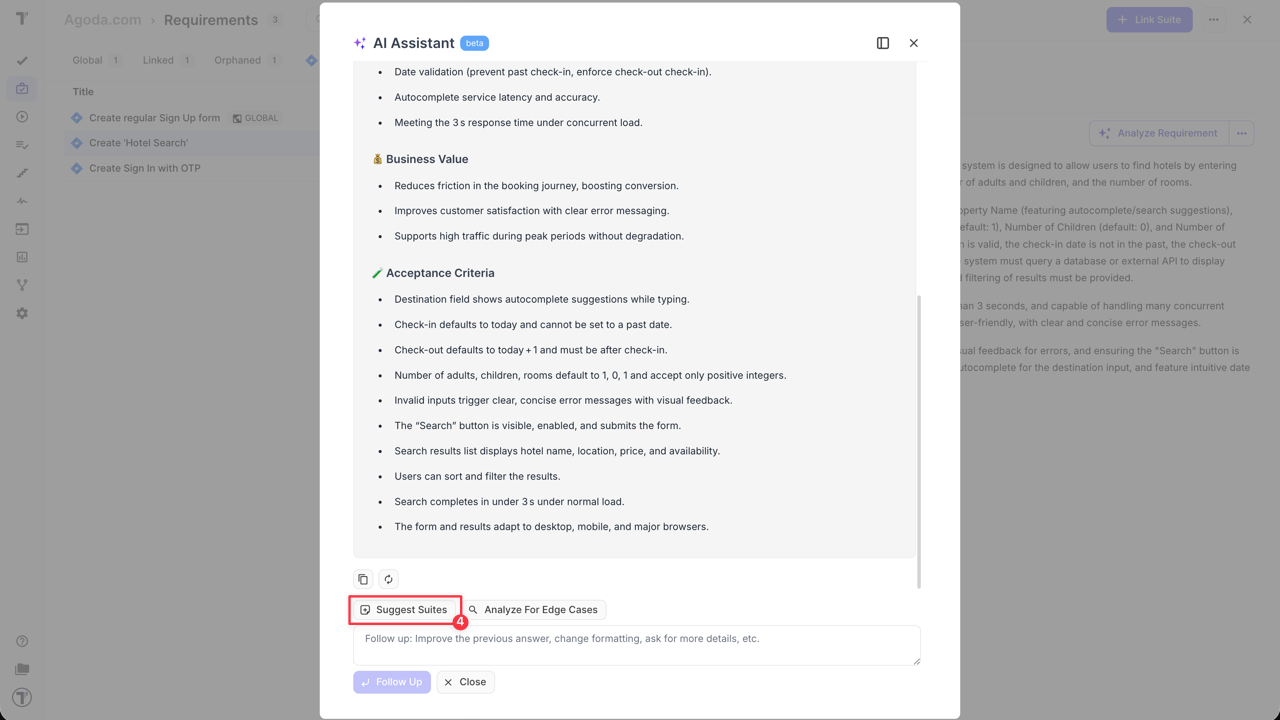
- Click ‘Analyze Requirement’ button on ‘Summary’ tab.
- Click ‘Suggest Suites’ button inside the AI Assistant.
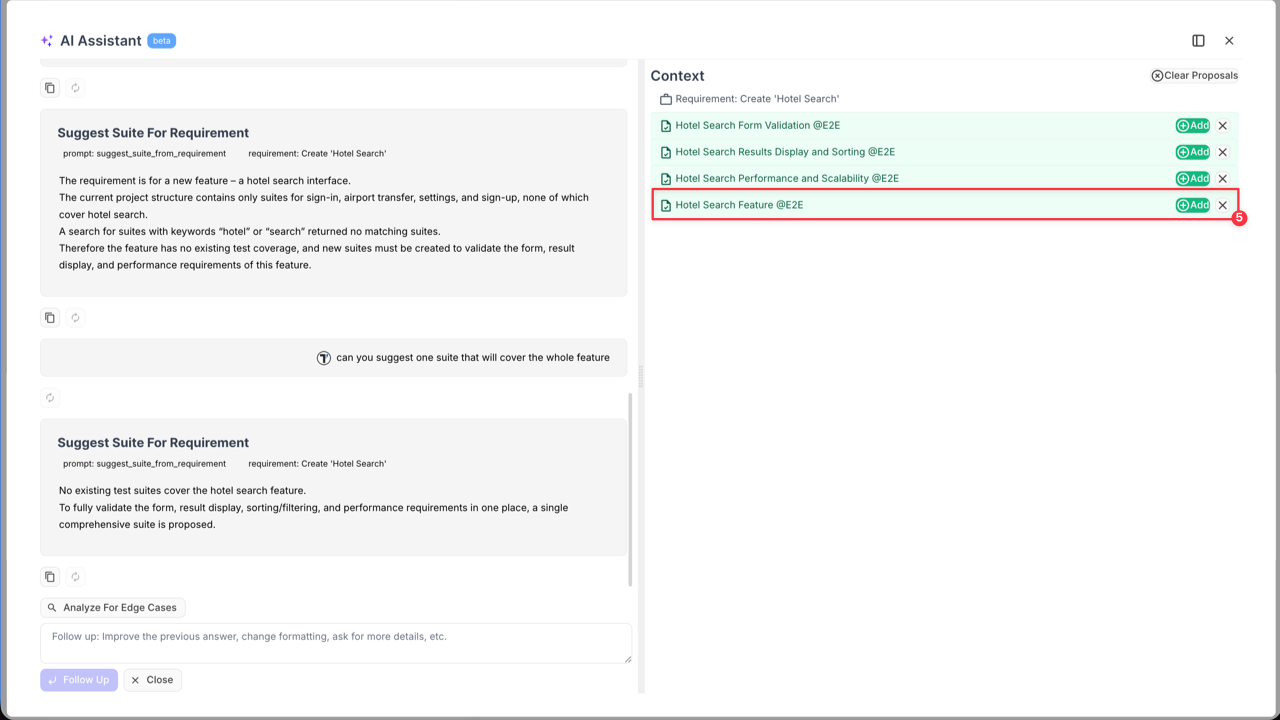
- Click ‘Add’ button to add suggested suite to your project.
After adding the Suite Case to your project, you can begin creating your test cases manually or use AI to generate them for you by clicking ‘Suggest Tests to {Suite_name}’ button.
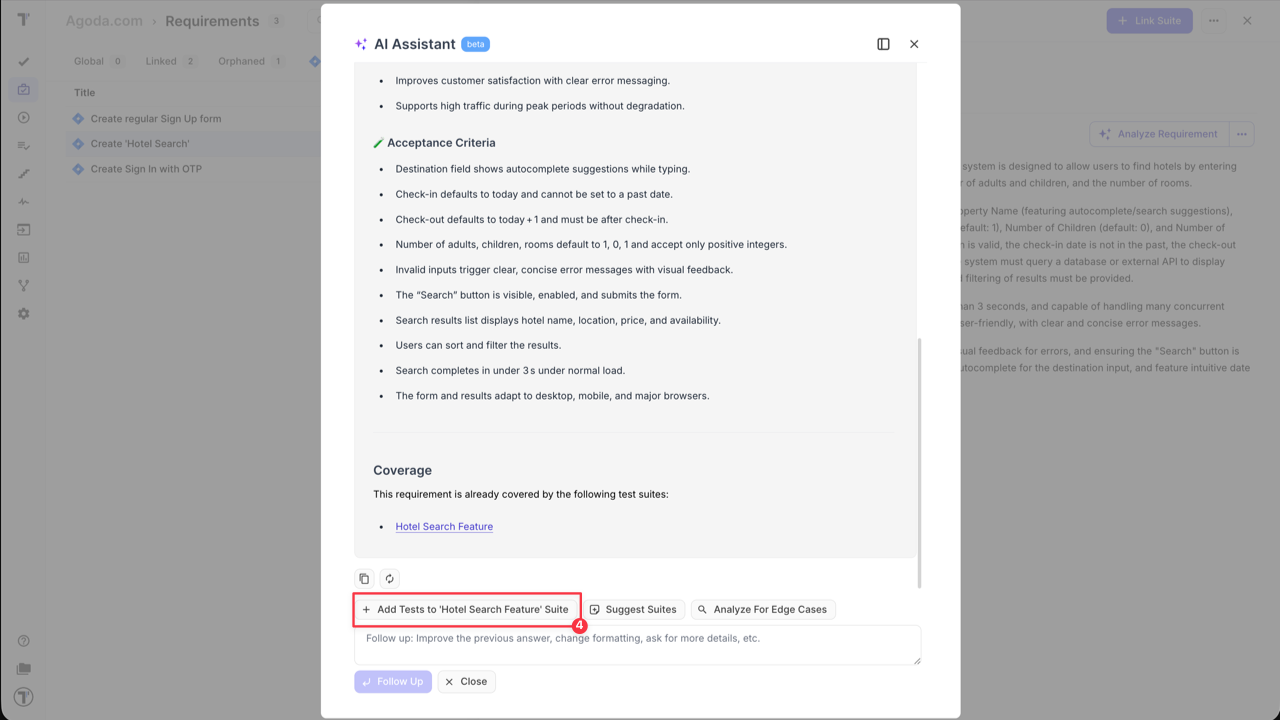
Generate Test Cases from Requirements Page
Section titled “Generate Test Cases from Requirements Page”If there is a suite case linked to the requirement, you can generate test cases usin AI-feature.
- Open ‘Requirements’ page.
- Click on the added Requirement to open it.
- Click ‘Analyze Requirement’ button on ‘Summary’ tab.
- Click ‘Add tests to {Suite_name} Suite’ option.
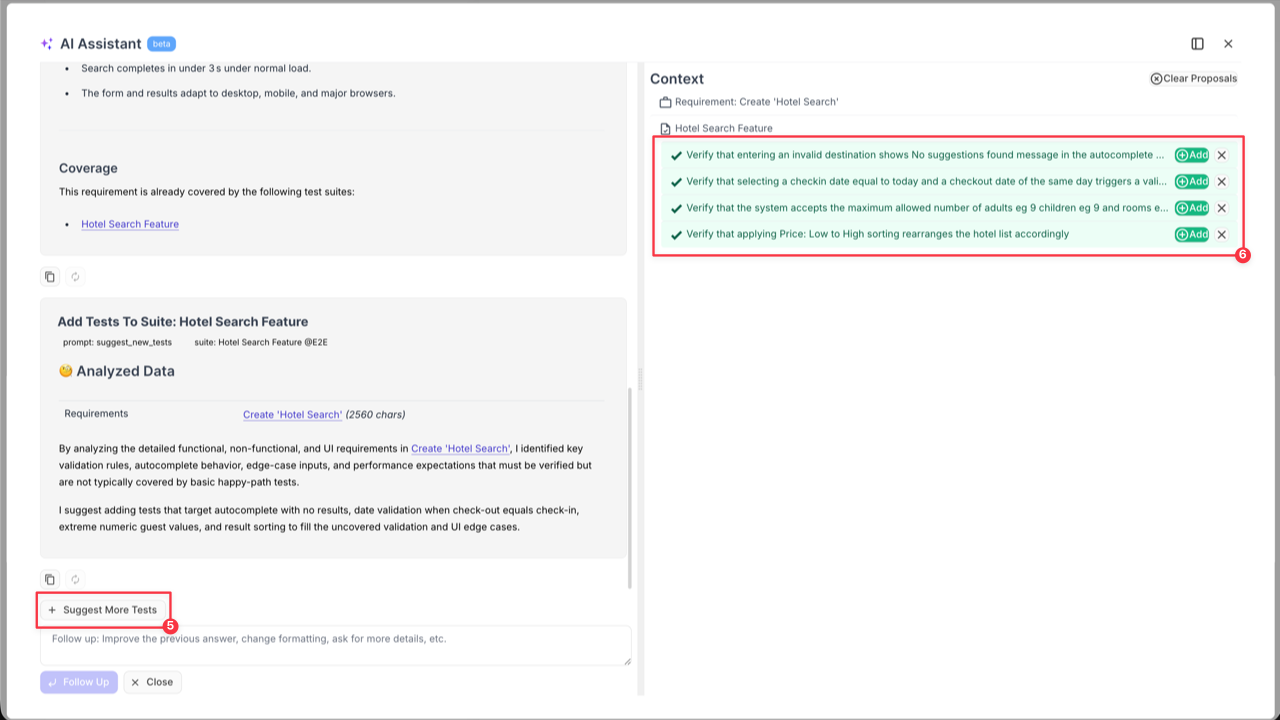
- Click ‘Suggest More Tests’ button to generate more test cases if you need.
- Check suggested test cases and add the relevant ones by clicking ‘Add’ button.
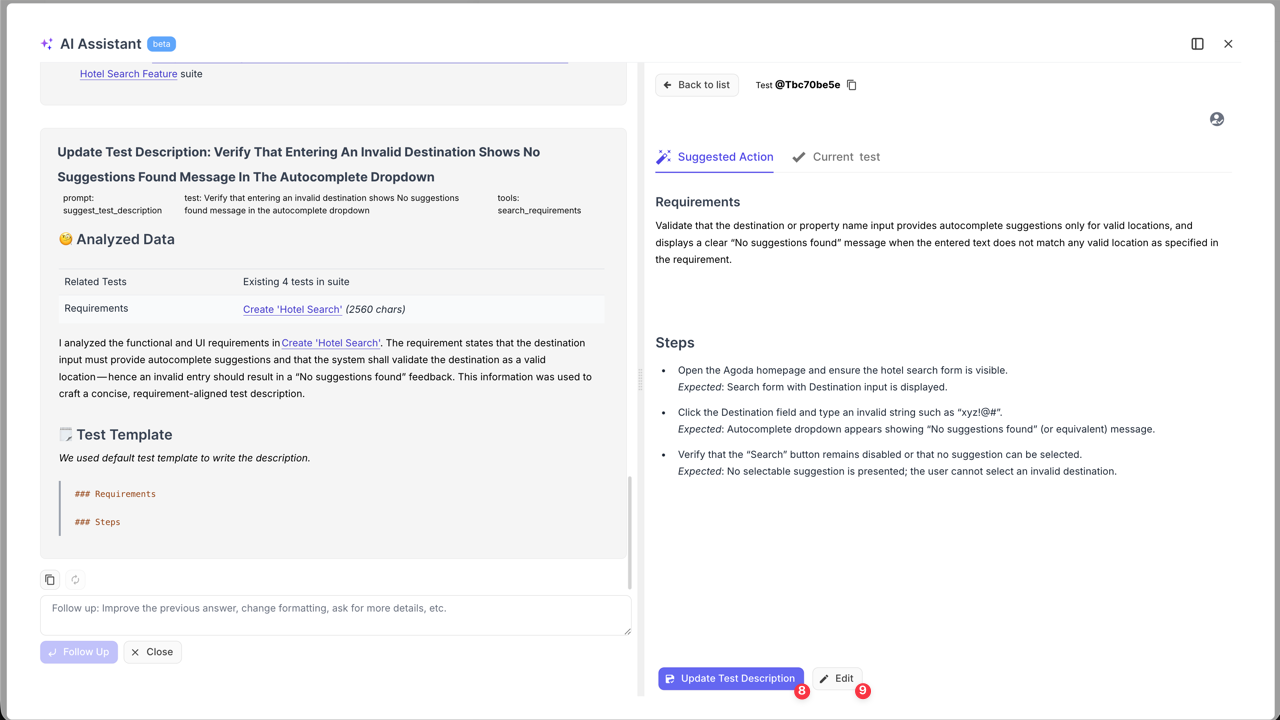
- Click ‘Write Description’ button to add description to the selected test case.

- Click ‘Update Test Description’ button to add generated test description to the selected test case.
- Click ‘Edit’ button if you want manually update your test case description before saving it.
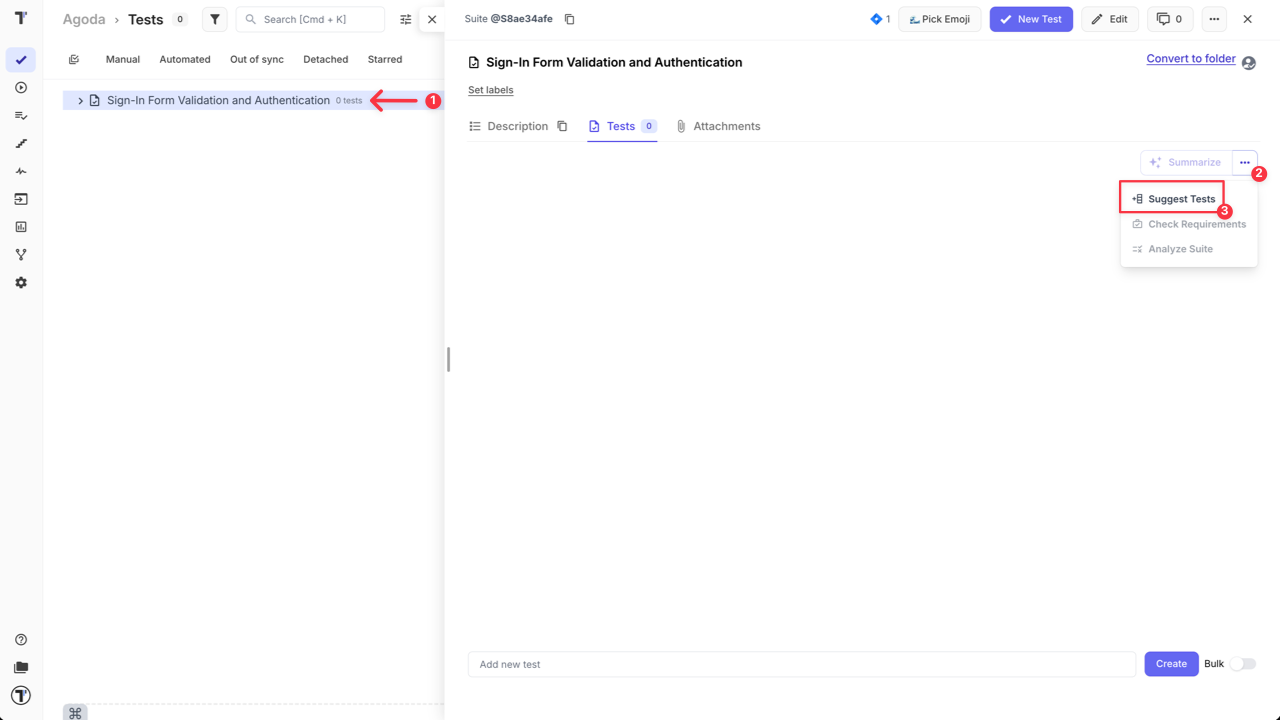
Suggest Test Cases Based on Requirements from Suite Level
Section titled “Suggest Test Cases Based on Requirements from Suite Level”You can also generate test cases directly from a Suite if it has a linked requirement.
- Open Suite Case with the linked requirement.
- Click ‘Extra menu’ button on ‘Summarize’ button.
- Select ‘Suggest Tests’ option from the dropdown list.
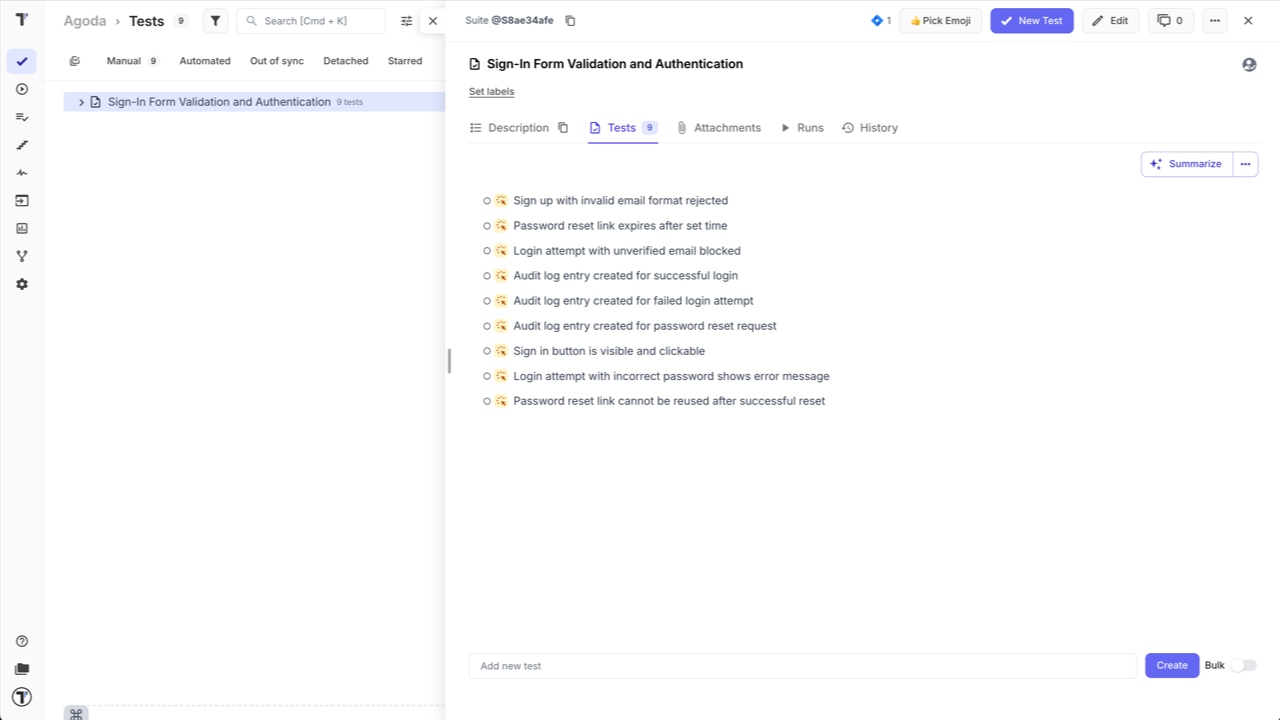
Similar to the previous case, review the suggested test cases, add the relevant ones, and write descriptions for the selected test cases directly from the AI-assistant window.
All added test cases will be displayed in your Suite after AI-assistant window is closed.
Chat with Requirements
Section titled “Chat with Requirements”Use ‘Chat with Requirements’ AI feature to ask specific questions about your project documentation. The AI assistant can search, filter, summarize, or analyze your requirements in real-time to provide immediate insights.
Additional AI-Features for Requirements
Section titled “Additional AI-Features for Requirements”Clarify Requirement
Section titled “Clarify Requirement”Use the ‘Clarify Requirement’ feature to identify edge cases and explore potential logic resolutions within your requirements.
- Open ‘Requirements’ page.
- Click on the added Requirement to open it.
- Click ‘Extra-menu’ button on ‘Summary’ tab.
- Select ‘Clarify Requirement’ option from dropdown menu.

Analyze Tests Coverage
Section titled “Analyze Tests Coverage”Use ‘Analyze Tests Coverage’ to ensure your requirements are fully covered by your test cases and to identify redundancy.
- Open ‘Requirements’ page.
- Click on the added Requirement to open it.
- Click ‘Extra-menu’ button on ‘Summary’ tab.
- Select ‘Analyze Tests Coverage’ option from dropdown menu.

- Click ‘Add Missing Tests to {suite_name}’ button to add test cases that will help to increase test coverage.
- Click ‘Remove Redundant Tests’ button to remove tests that are not relevant for the requirement if there are any.
Find Tests For Requirement
Section titled “Find Tests For Requirement”This feature helps you quickly locate existing test cases that already associated with a specific requirement, and as well test cases that could be potential associated with it.
- Open ‘Requirements’ page.
- Click on the added Requirement to open it.
- Click ‘Extra-menu’ button on ‘Summary’ tab.
- Select ‘Find Tests For Requirement’ option from dropdown menu.
