Test Case Creation and Editing
When a new project is created, there are multiple options to start:
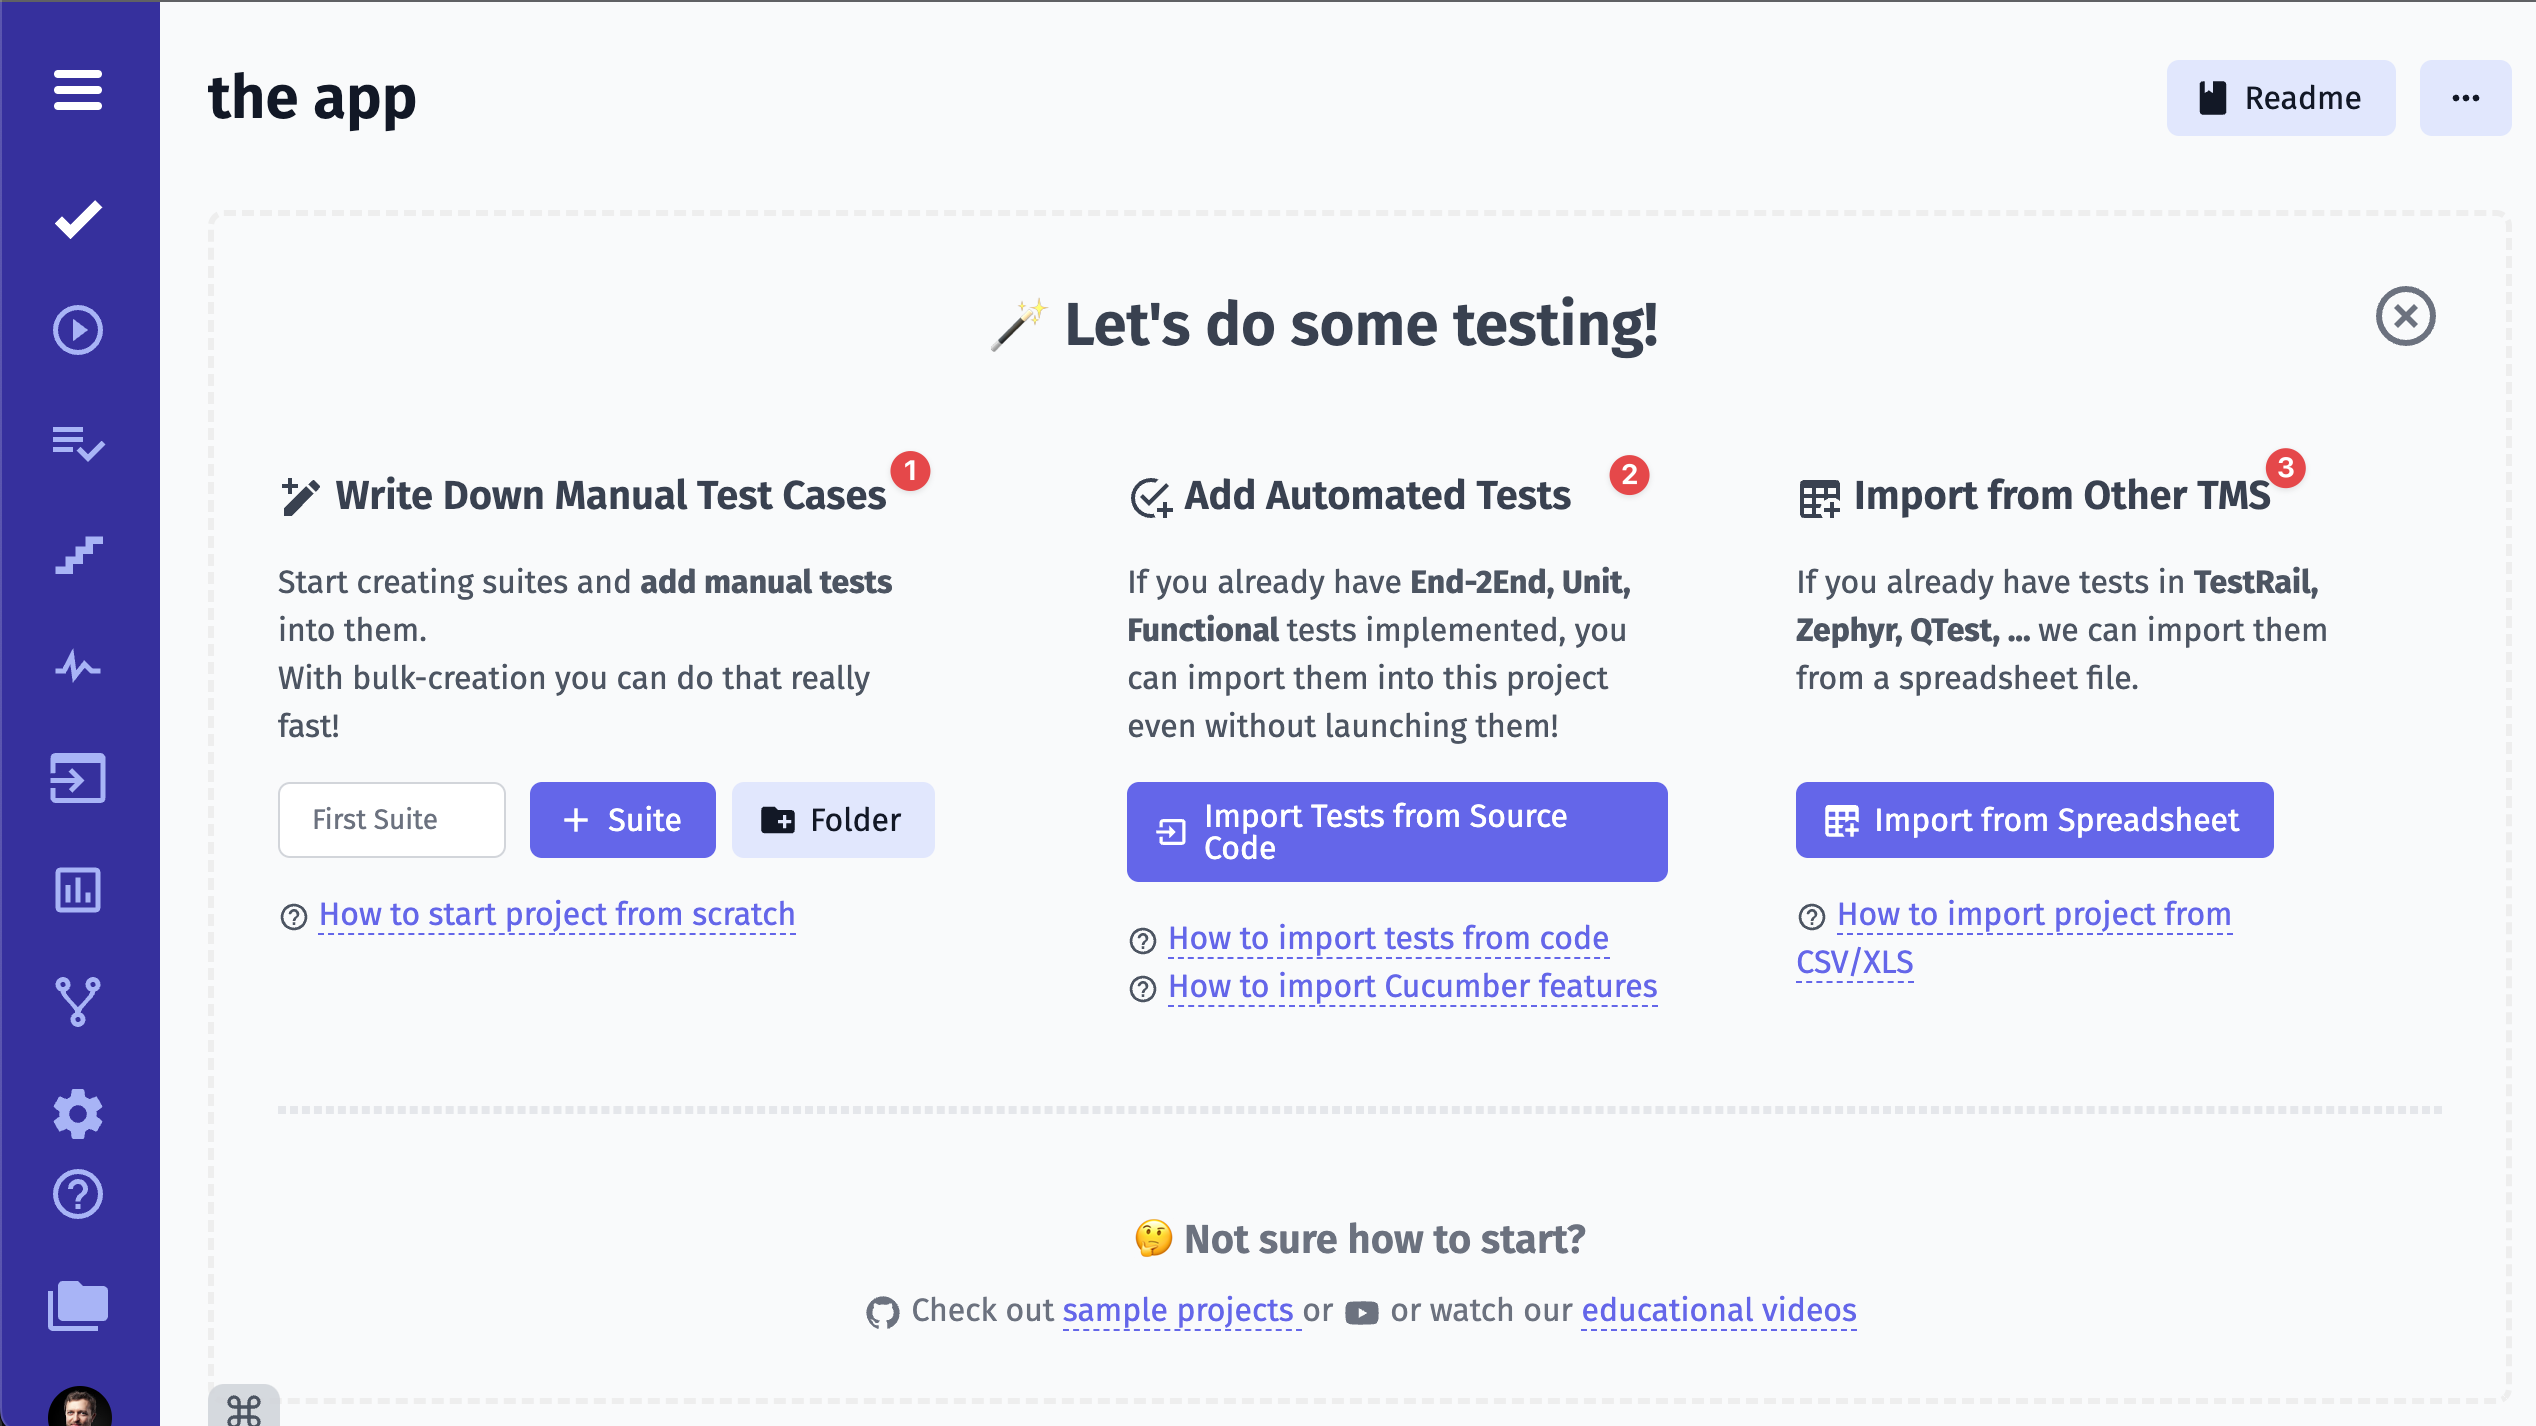
- Create new suite and start adding tests
- Import automated tests from source code
- Import tests from CSV file from another Test Management System
Creating a Test
Section titled “Creating a Test”Tests are created within a suite.
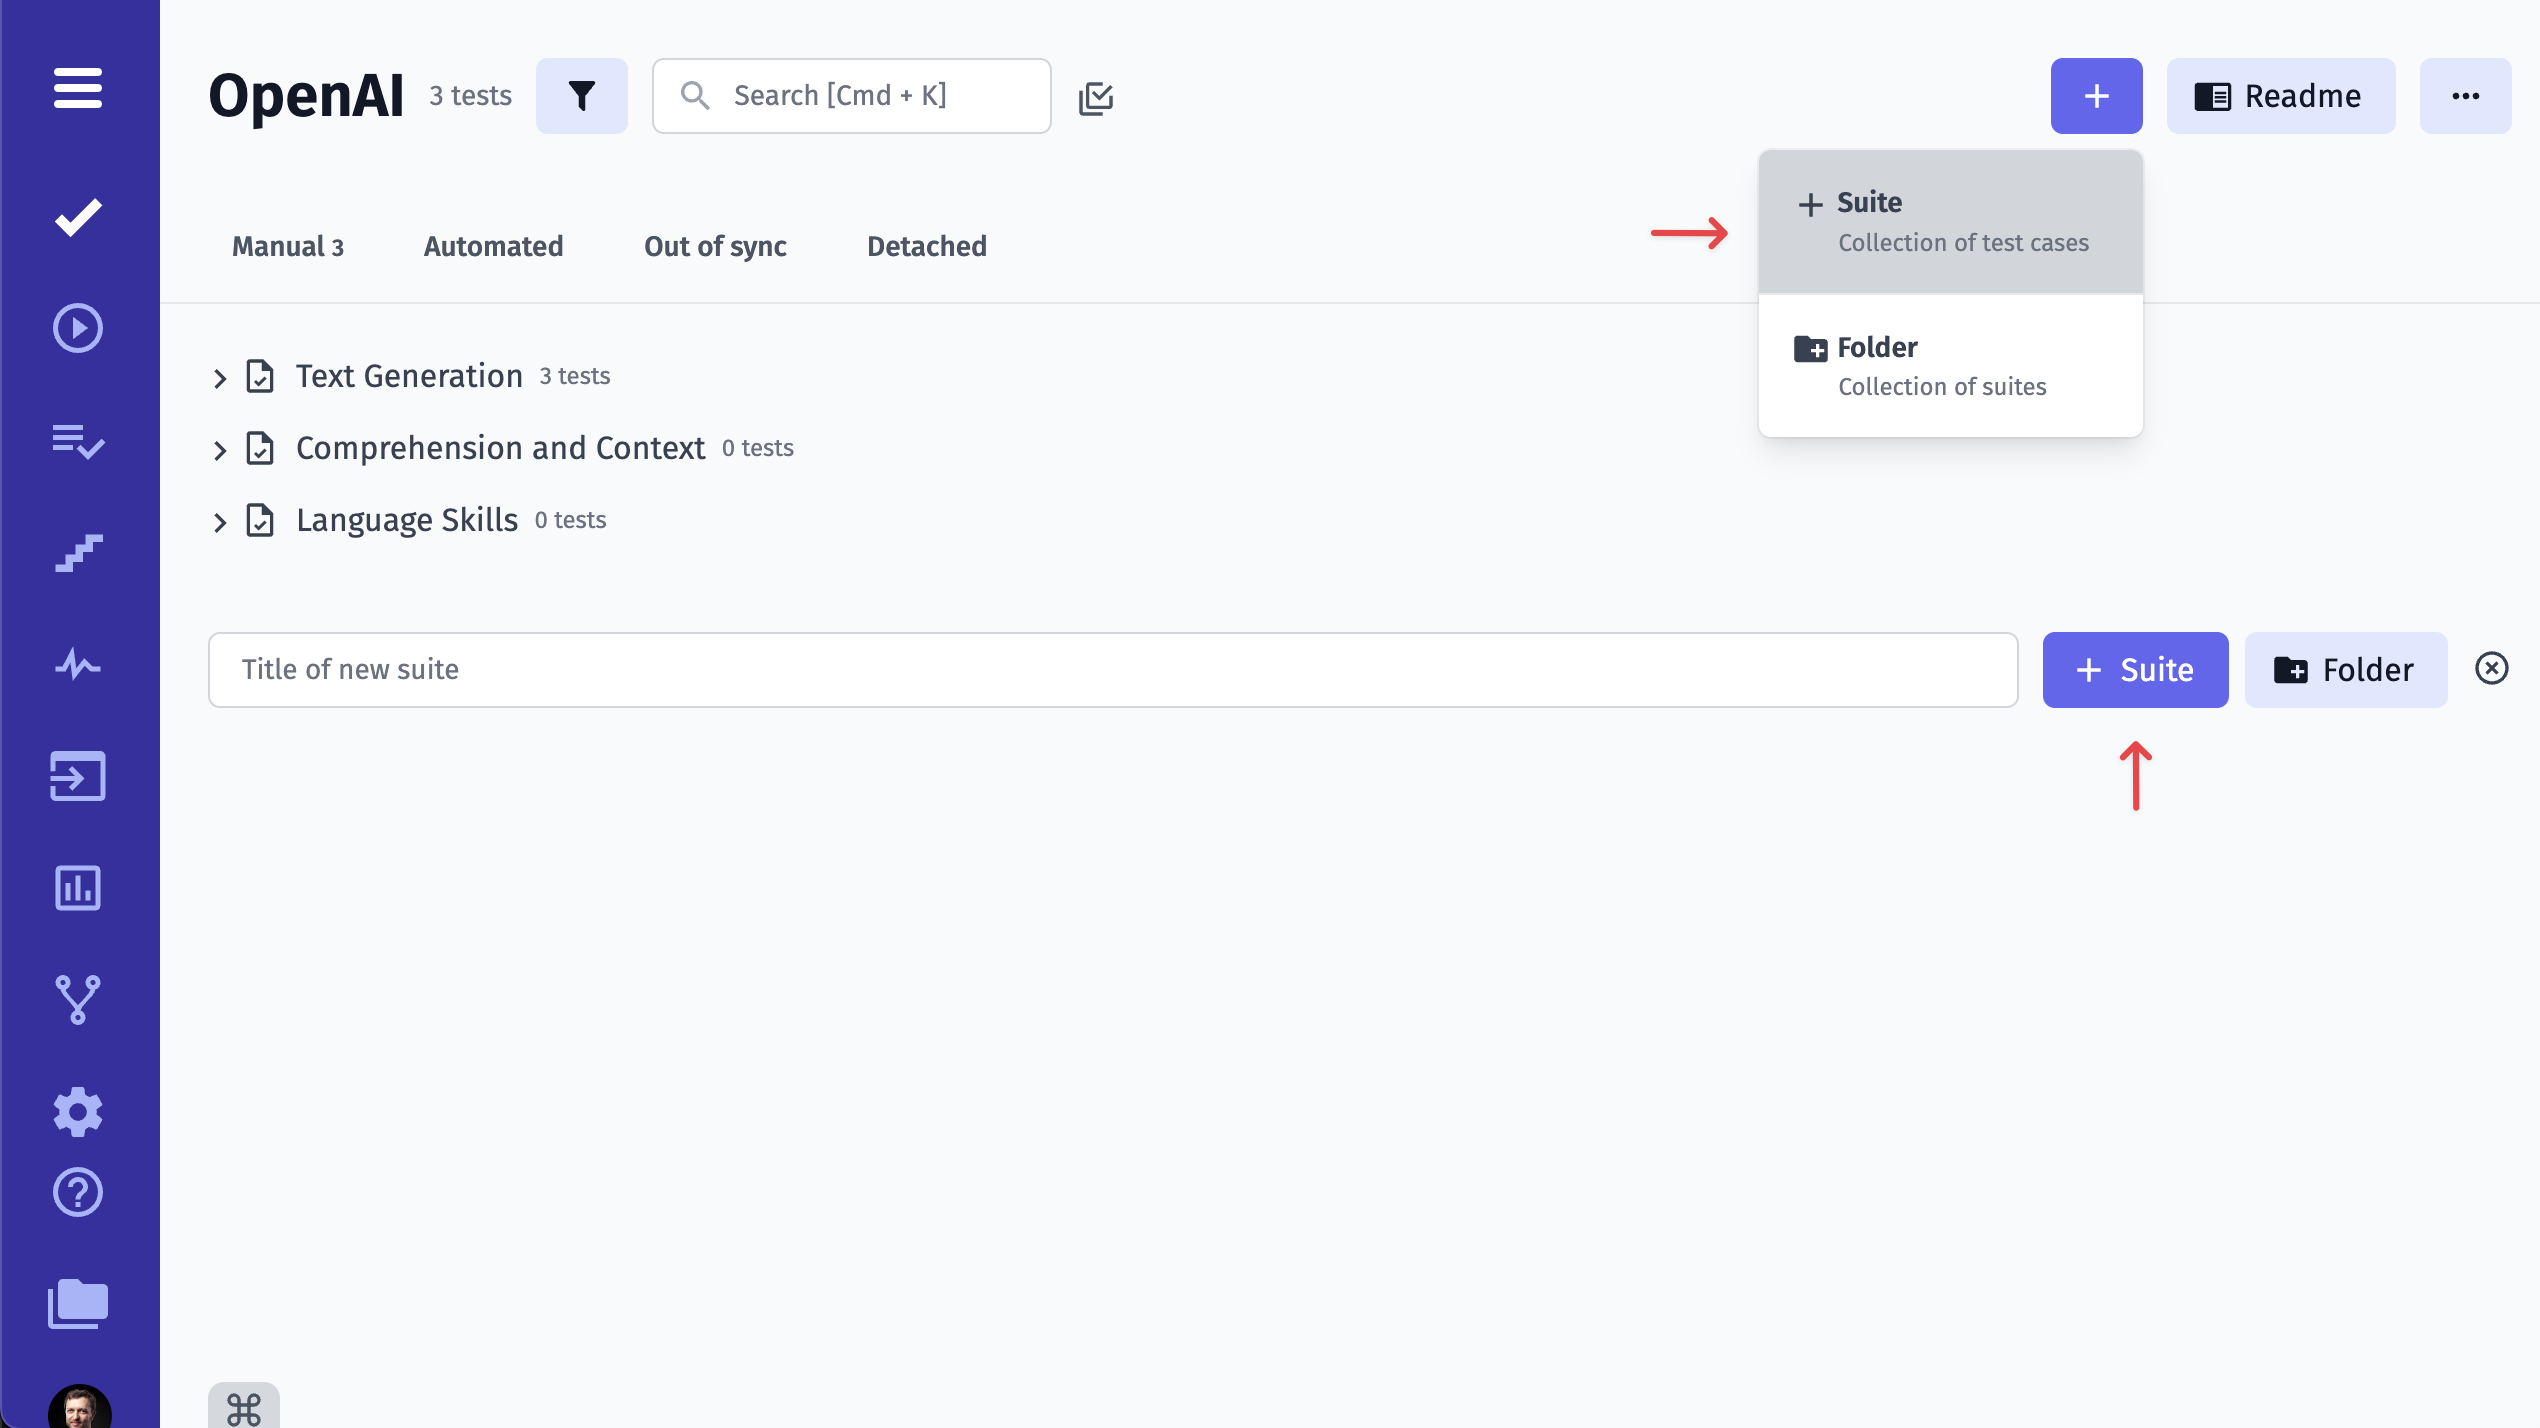
To create a new suite use ”+” button or input field. Open a newly created suite.
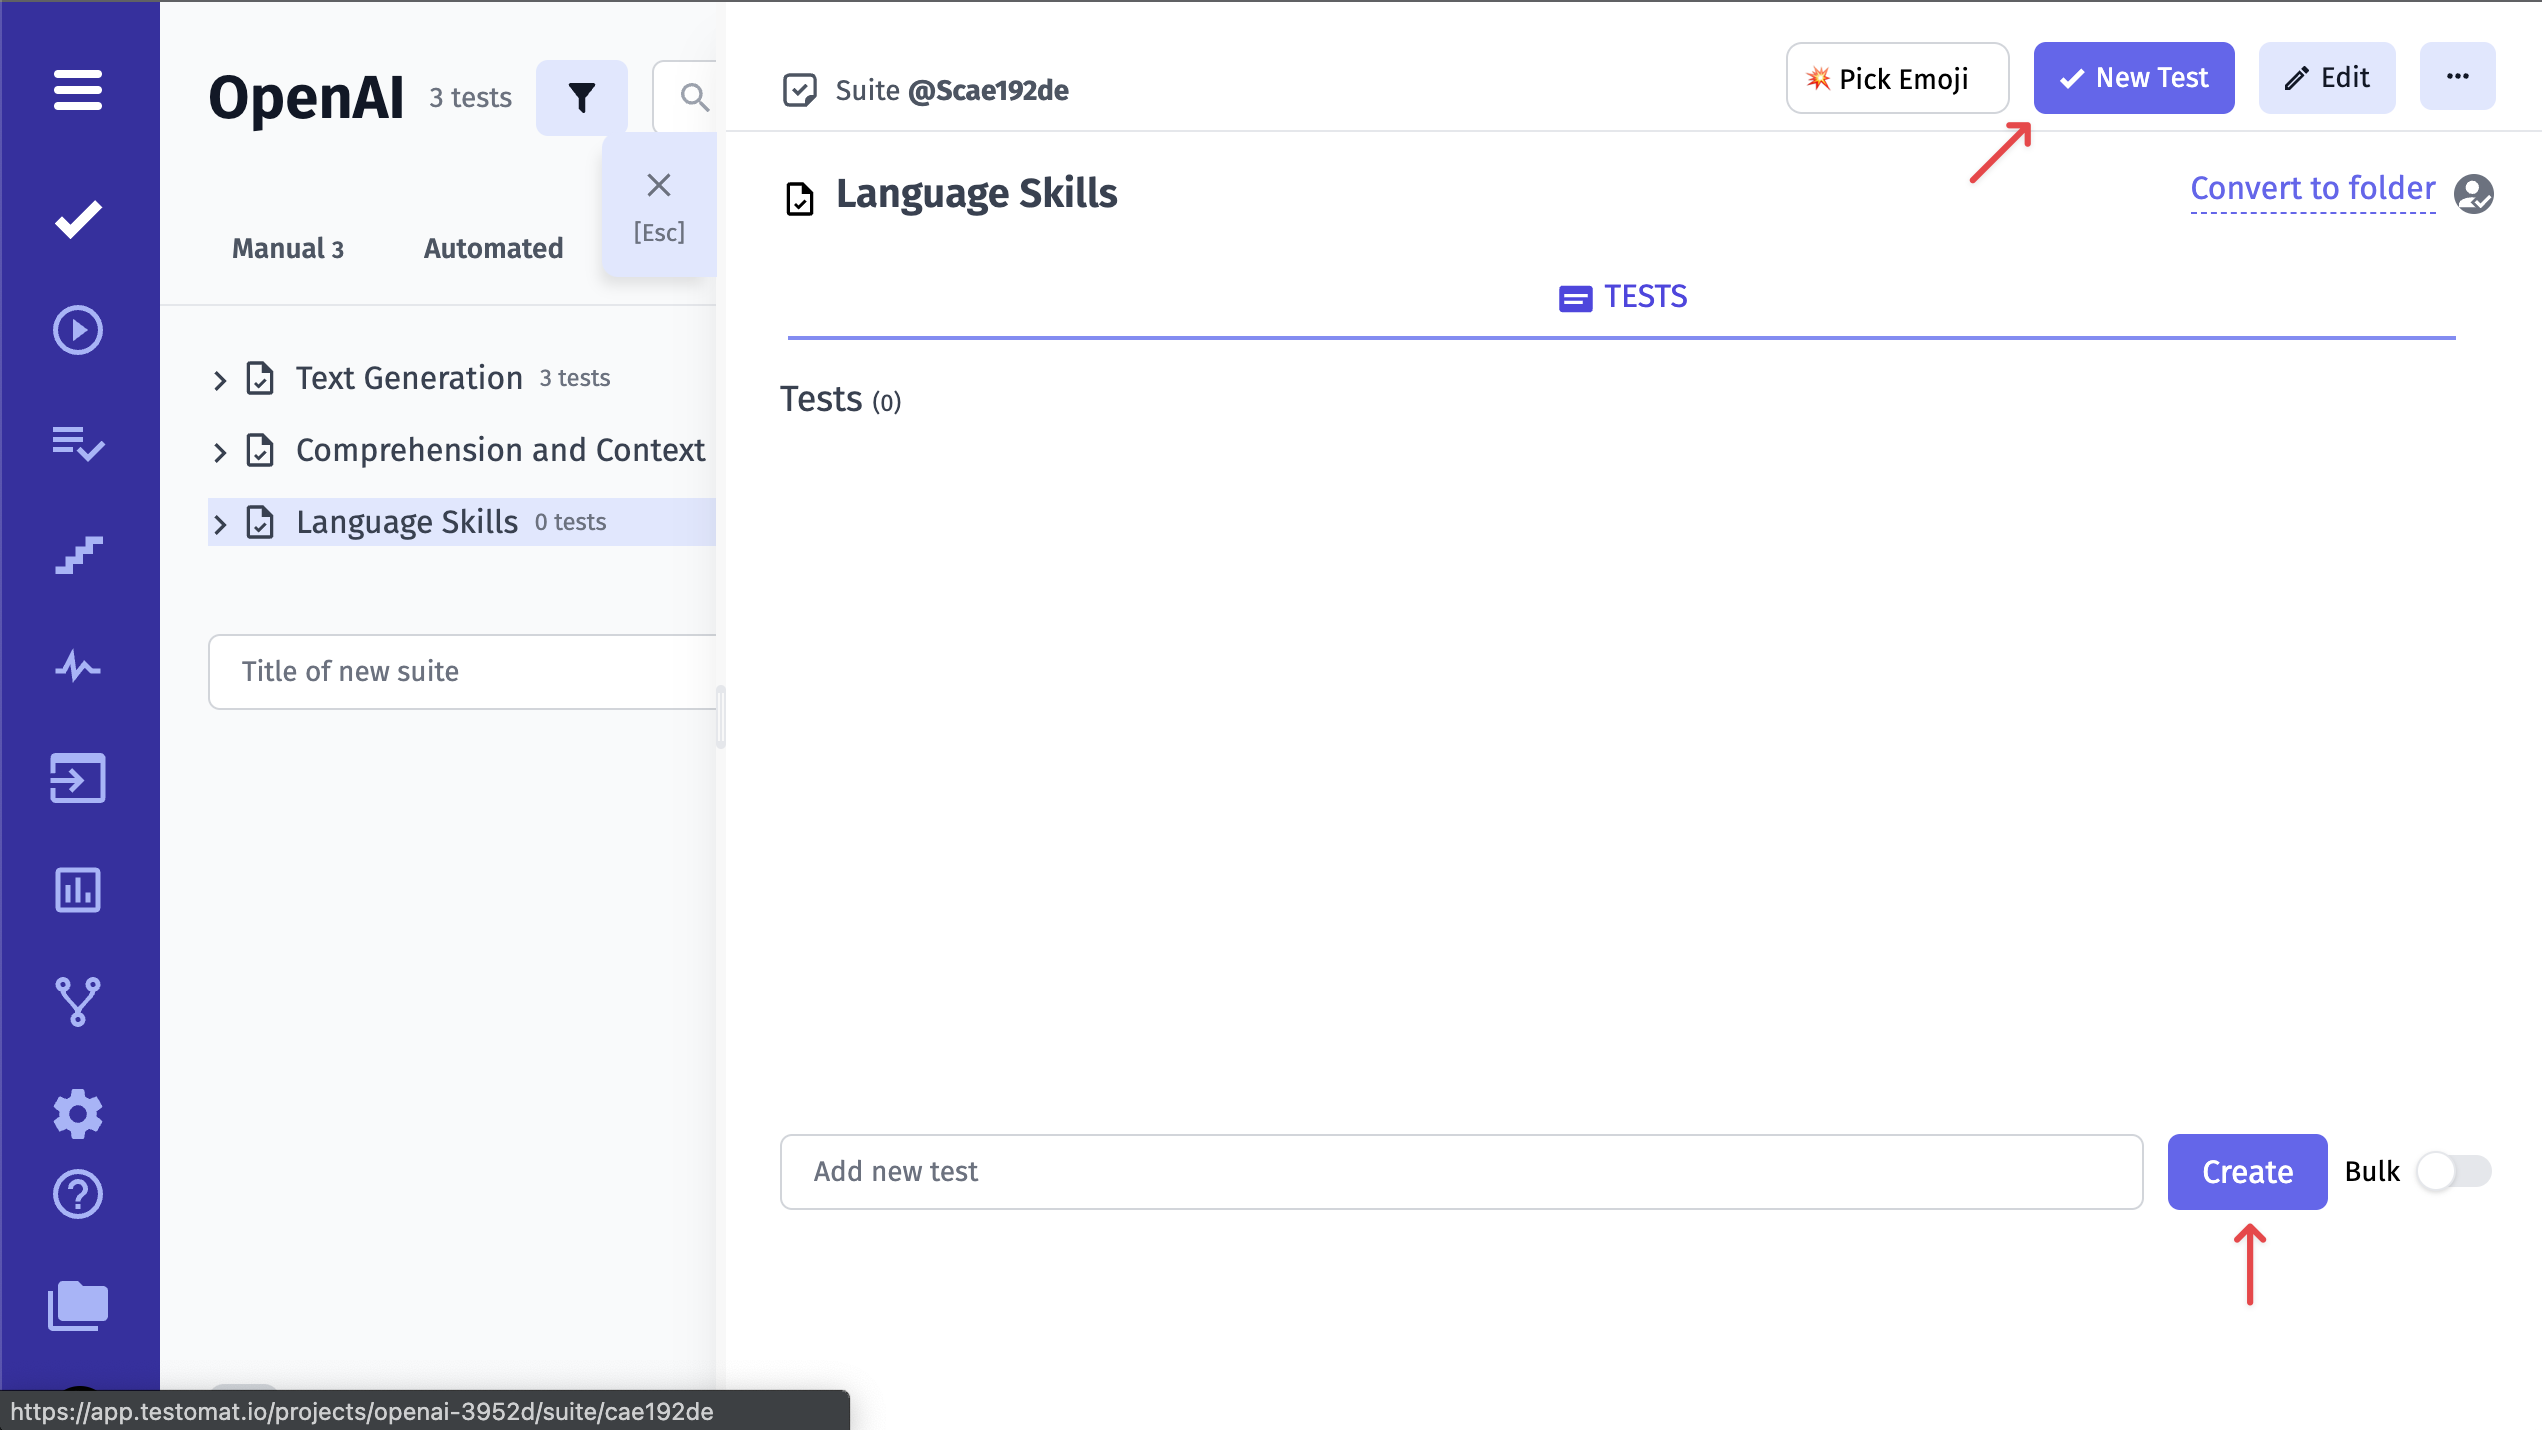
To add a new test to the suite you are currently in, click on New Test button.
Then input the name and the description of your test.
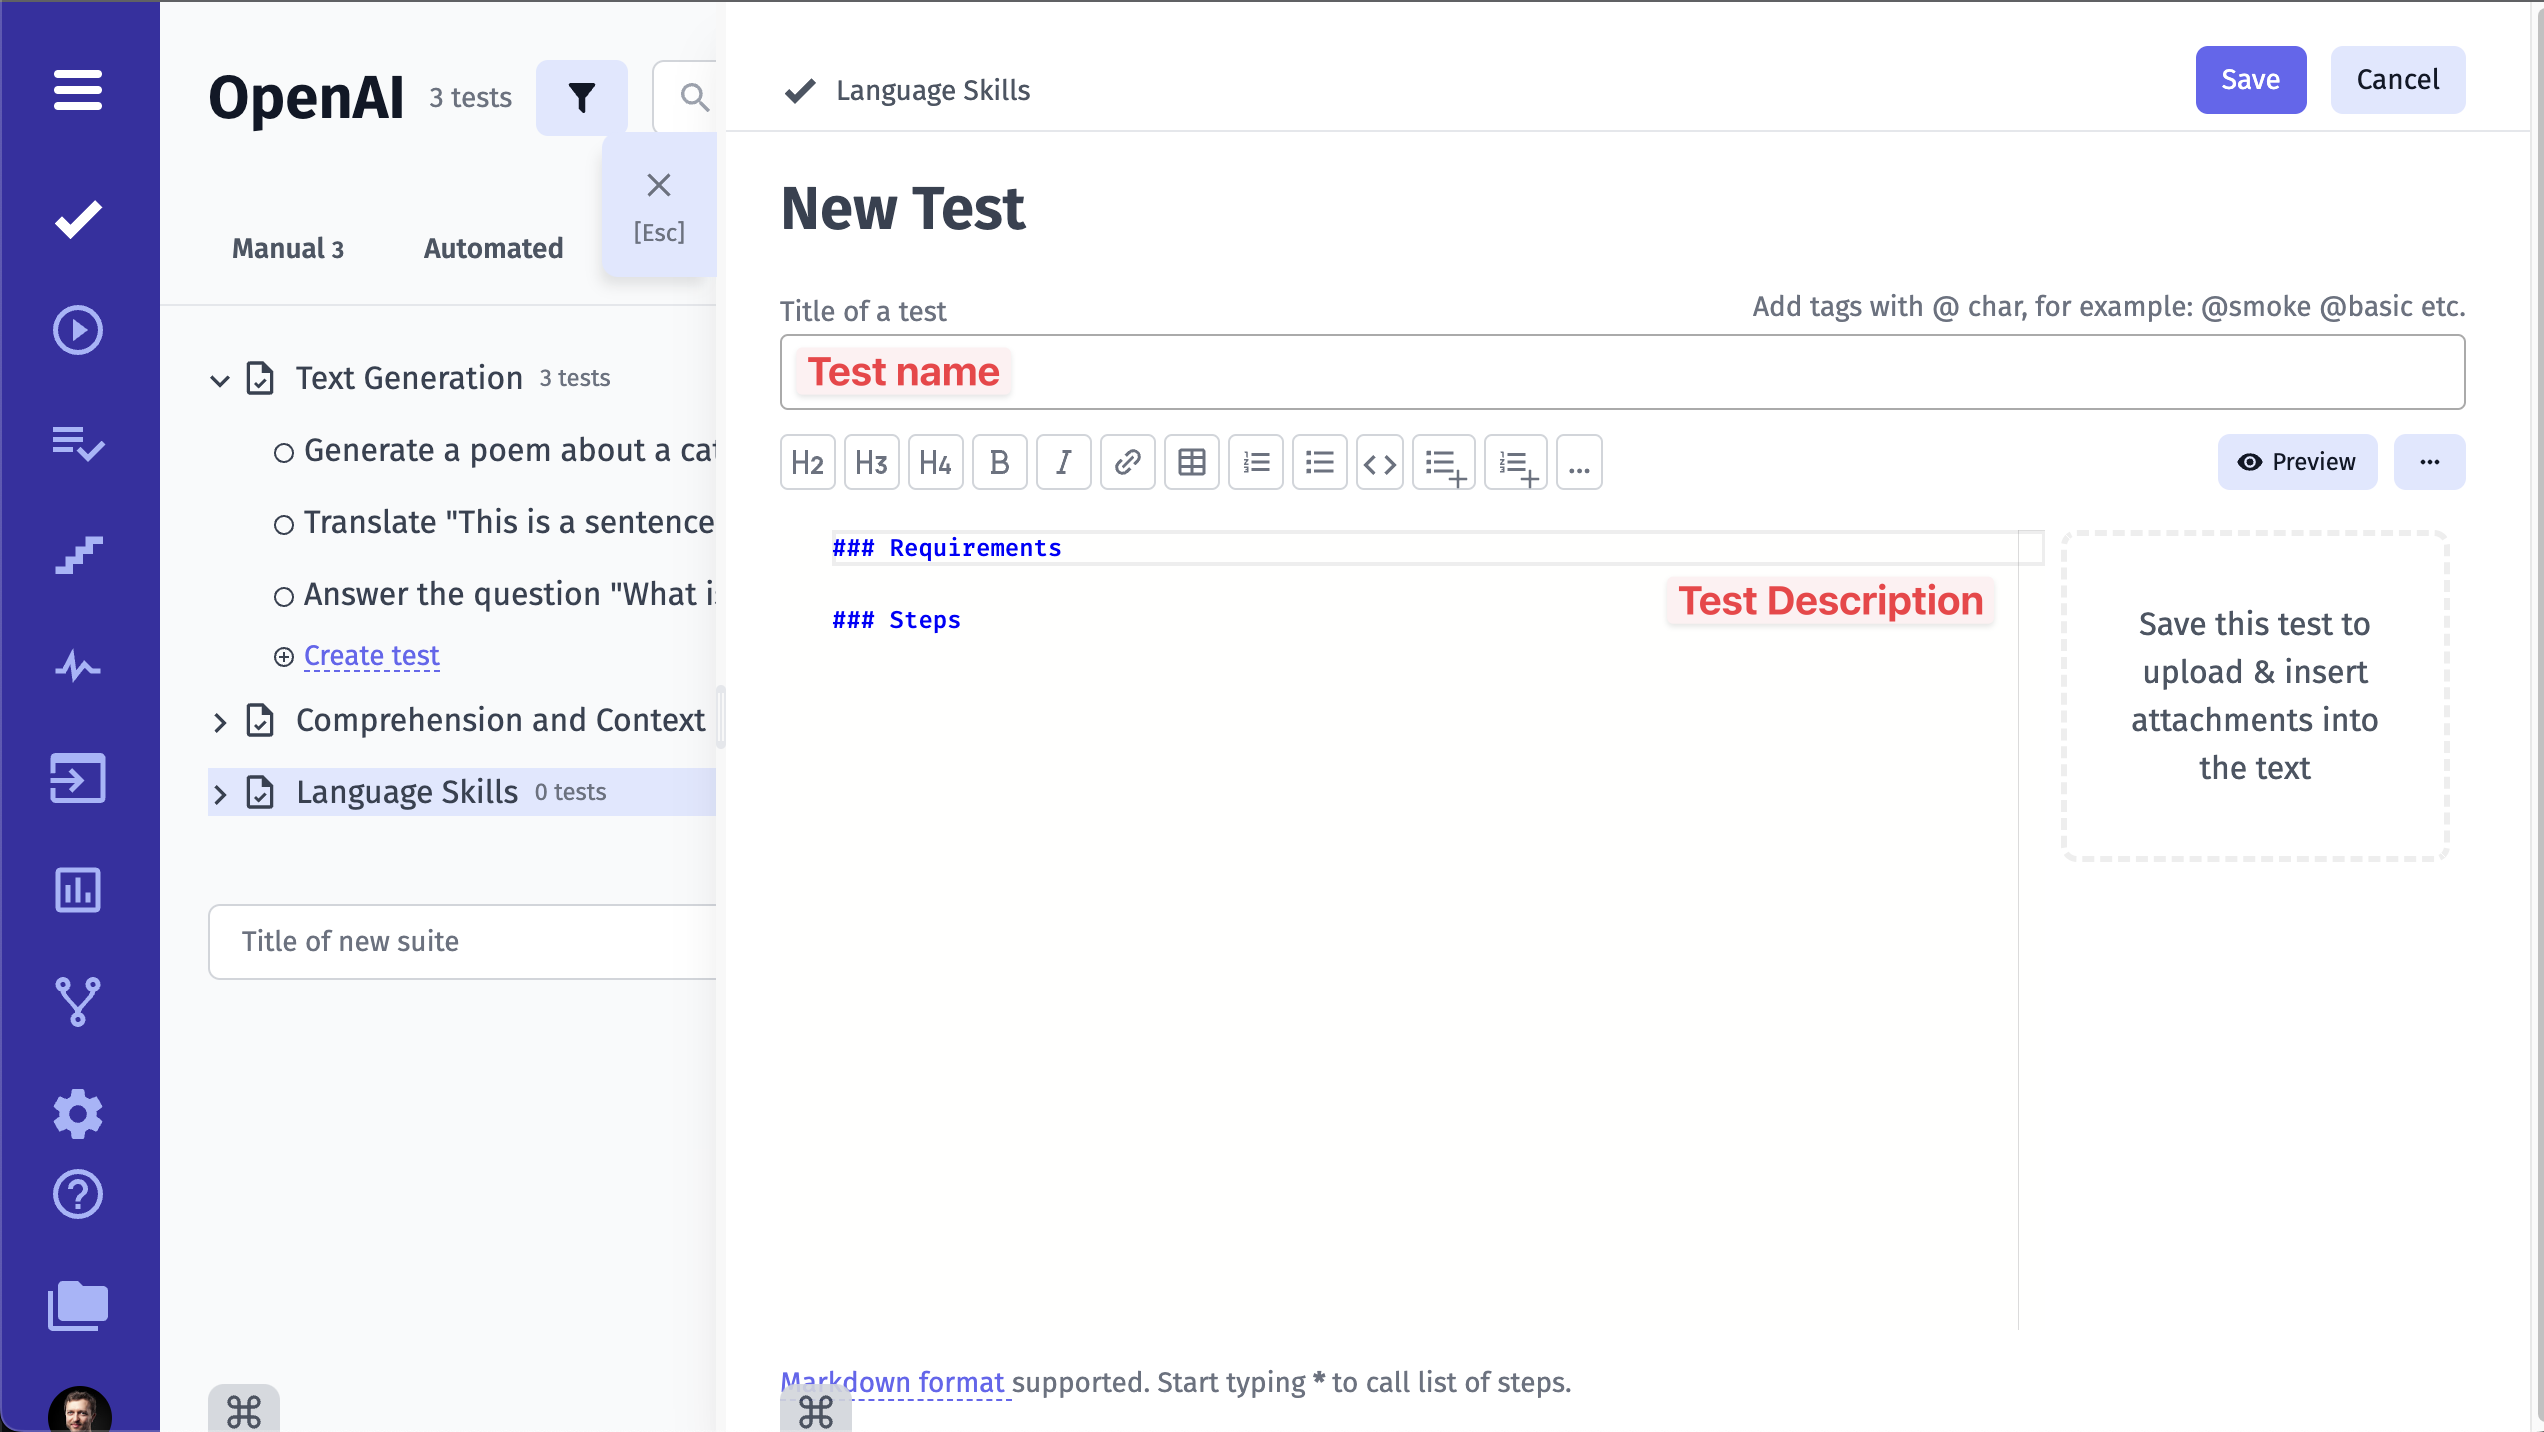
It is also possible to create the test straightaway from this screen. Simply input the test’s title and click on the Create button. You can add the description at any time later.
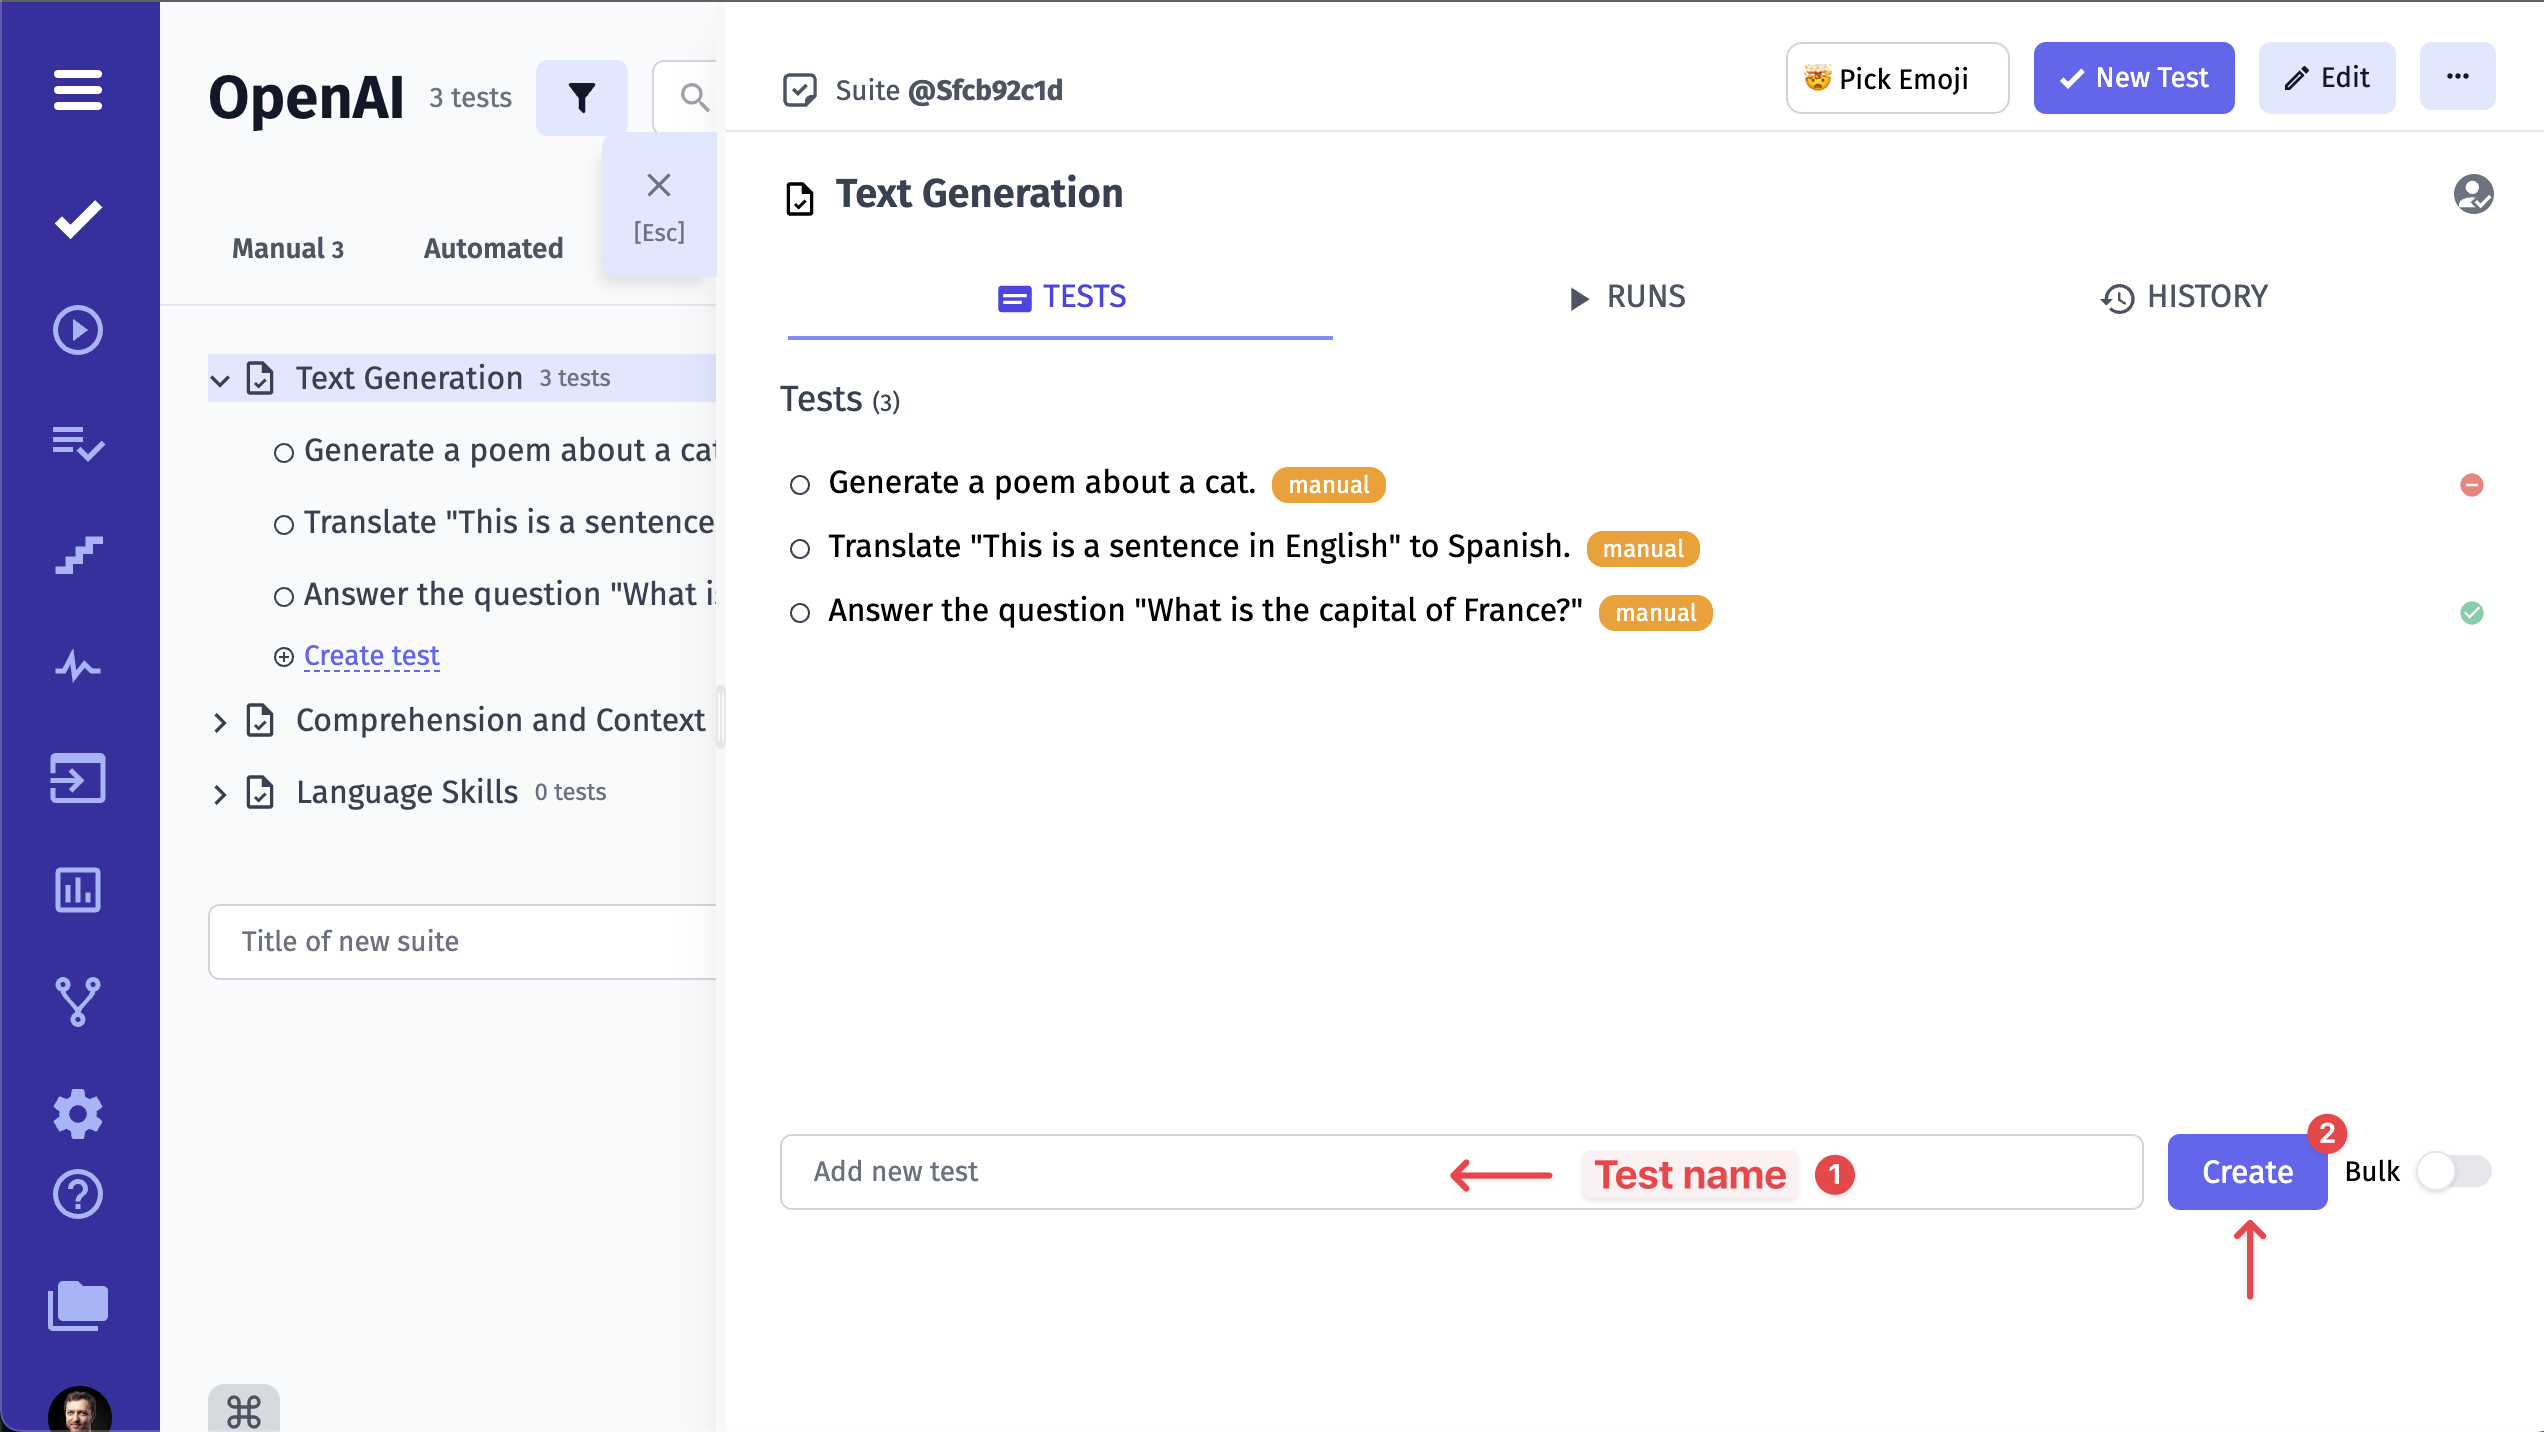
Repeating these steps, you can easily add as many tests as you need within a reasonable period of time.
Also, you can use shortcut commands to create/edit Test Cases or Suites. Visit the Keyboard Shortcuts page to learn more.
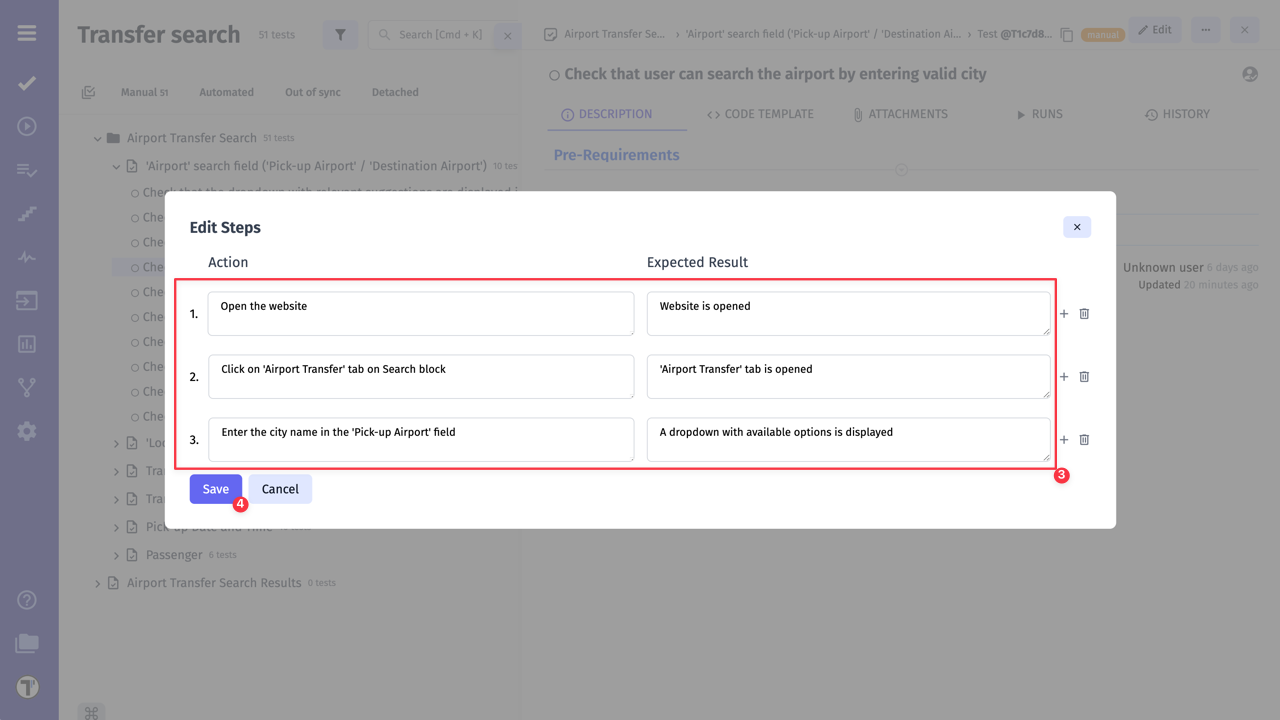
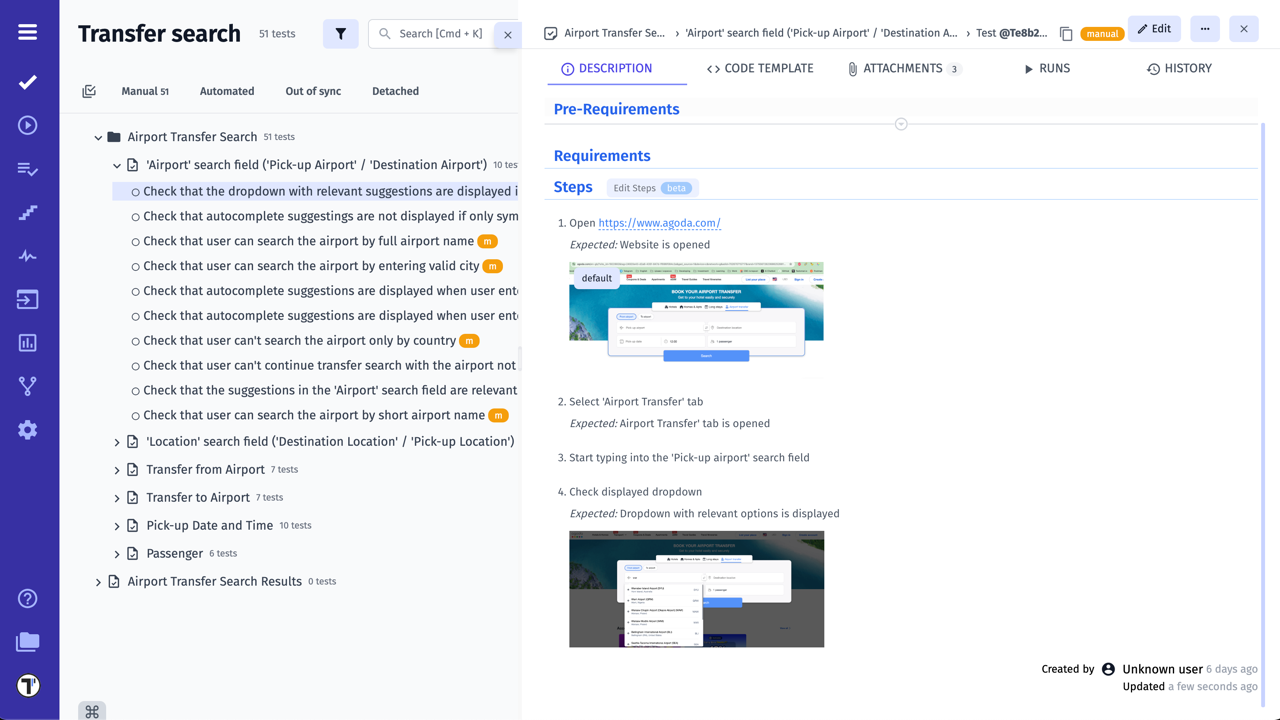
Edit Steps in Test Case Preview
Section titled “Edit Steps in Test Case Preview”After your test cases are created, Testomat.io offers a convenient feature for quick editing - Edit Steps. This allows you to modify steps and expected results directly from the test case preview page.
To use this feature, ensure that the Steps title is included in the test case description. Once that is set, you will see the Edit Steps option near the Steps title.
To edit steps from the test case preview window, follow these steps:
- Click the Edit Steps button.

- Click Add Step button on displayed modal.

- Add steps and expected results, if needed.
- Click Save button.
Example of test case after editing:
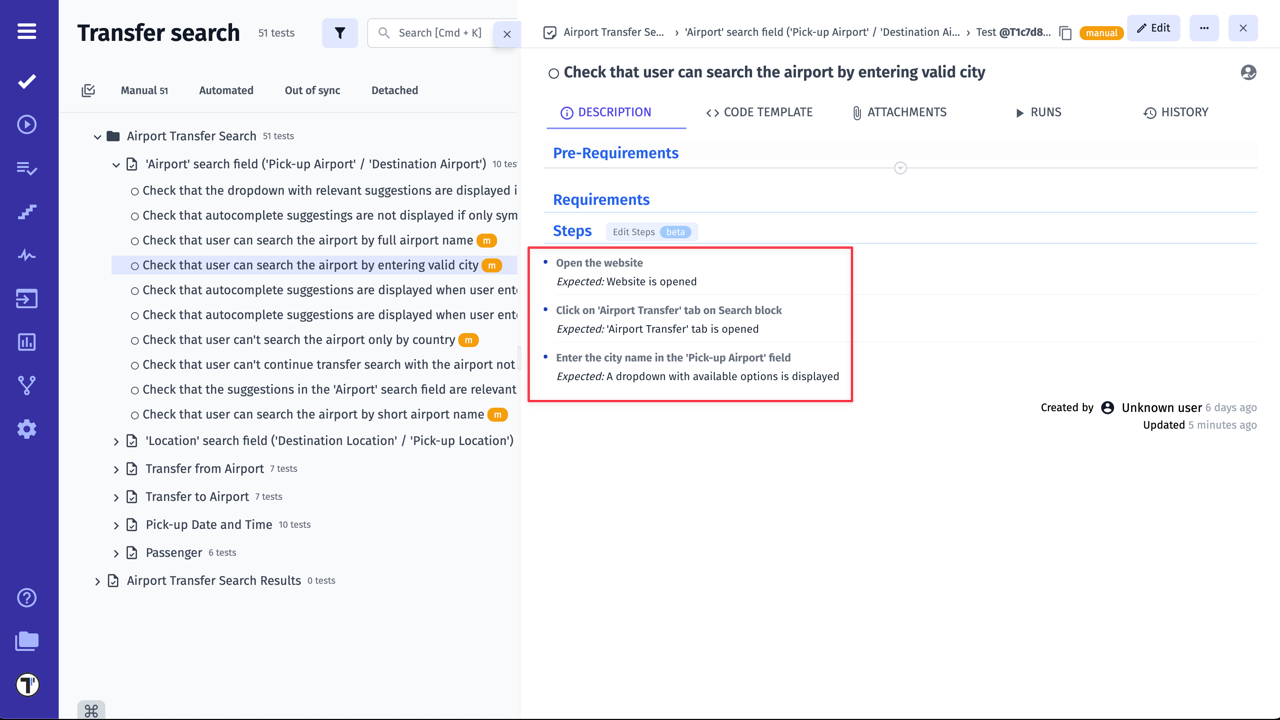
For example, if you used the pattern displayed below, after clicking Edit Steps you need to delete Expected result wording as it will be added automatically after you save changes.
## Steps
* Step 1    Expected result: Step 1* Step 2    Expected result: Step 2* Step 3    Expected result: Step 2
Test Case before editing:
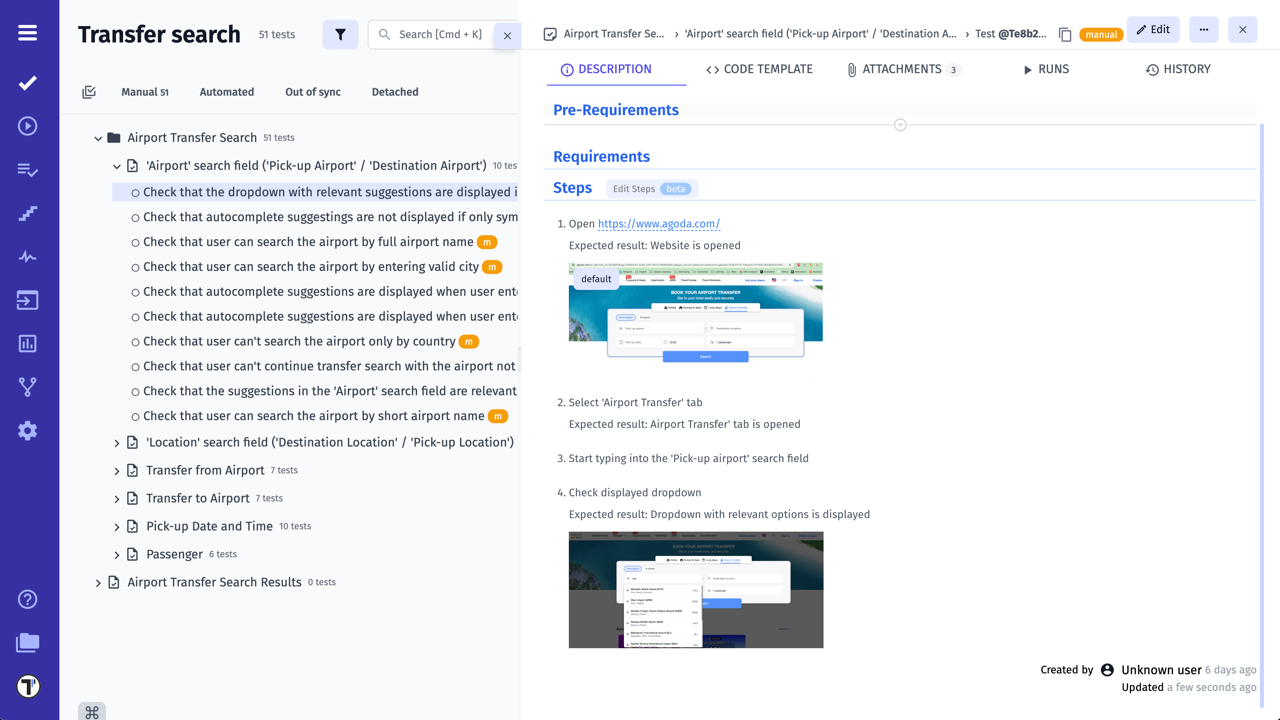
Test Case after editing:
How To Save Your Tests
Section titled “How To Save Your Tests”Testomat.io Editor offers options designed to streamline your test and suite management workflow. Lets have look:
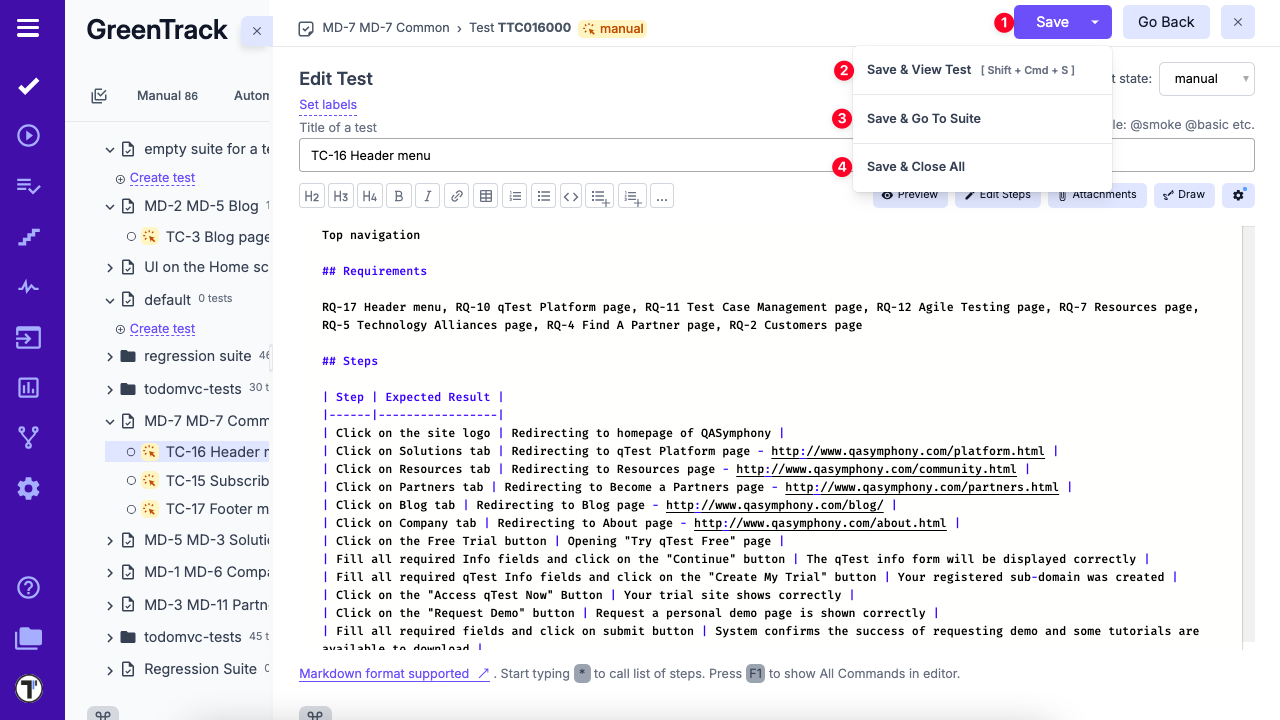
Save: promptly save your changes while staying on the current test.
Save + View Test: save your work while immediately viewing the test in question.
Save + Go To Suite: save your changes and seamlessly navigate to the suite you’re working on.
Save + Close All: ensures all open tests and suites are saved and closed simultaneously.
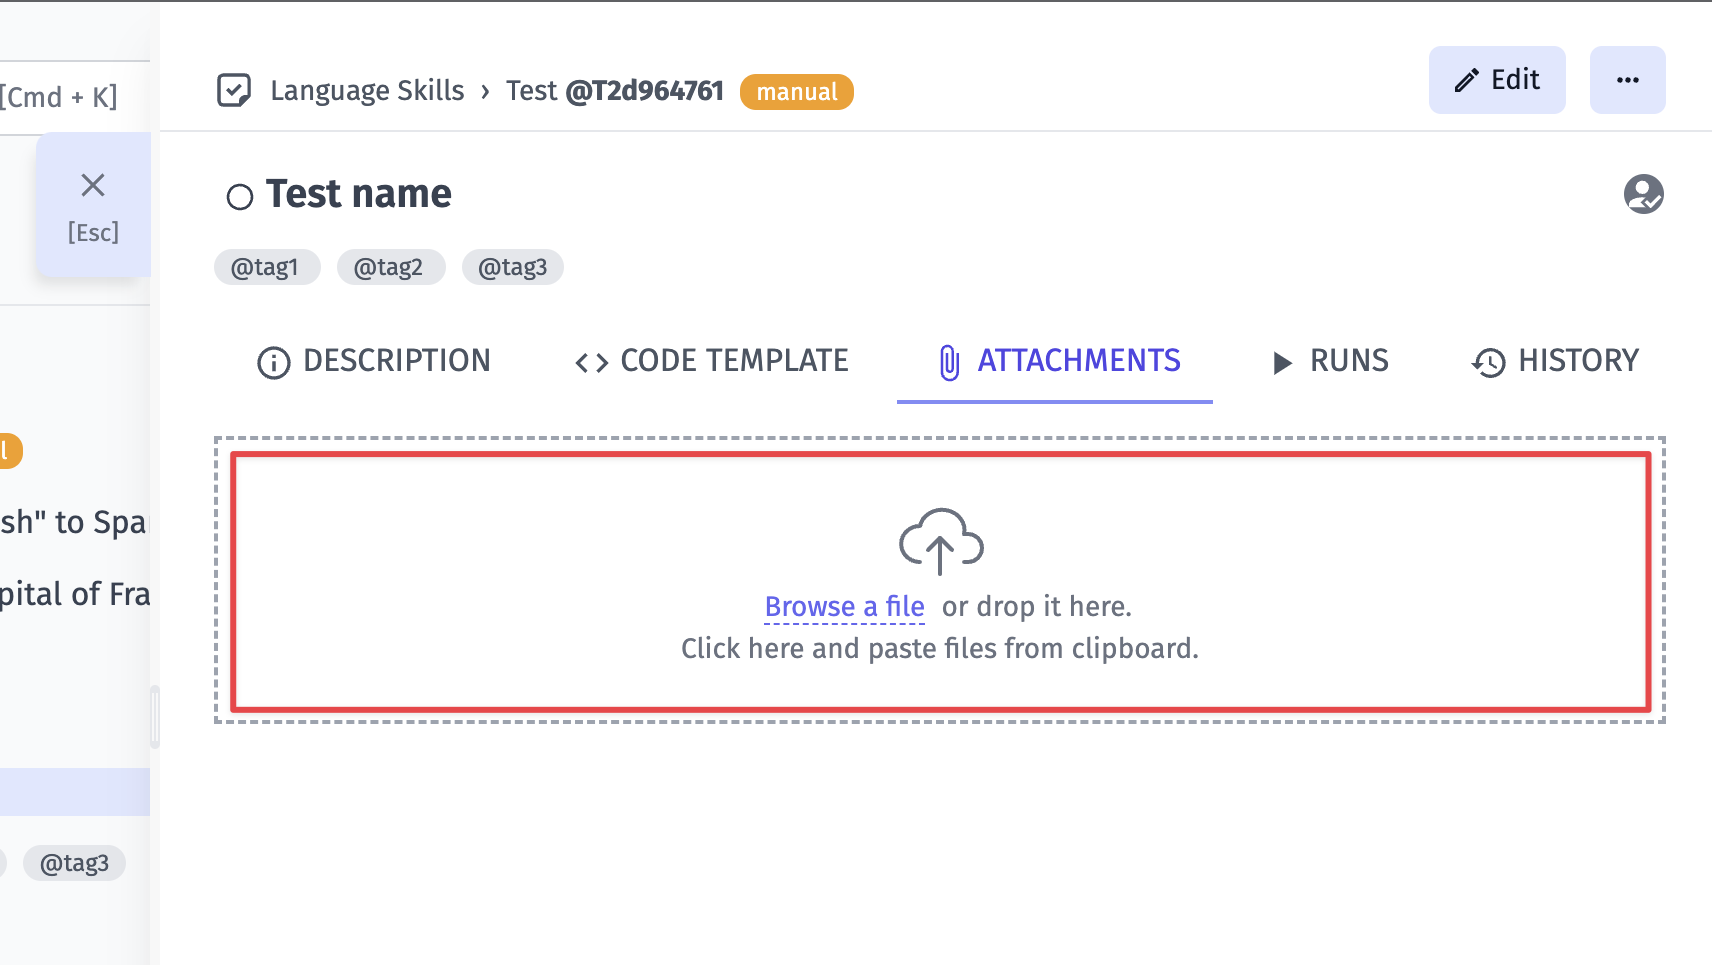
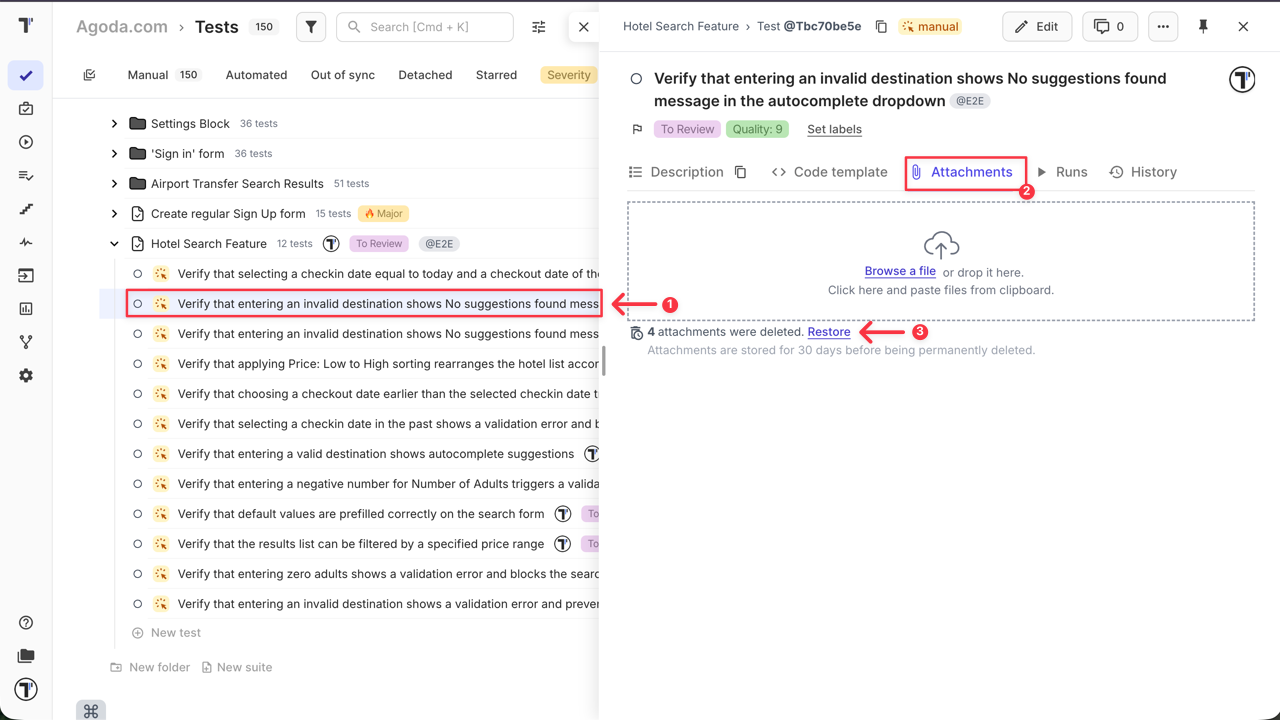
Add Attachments to Test
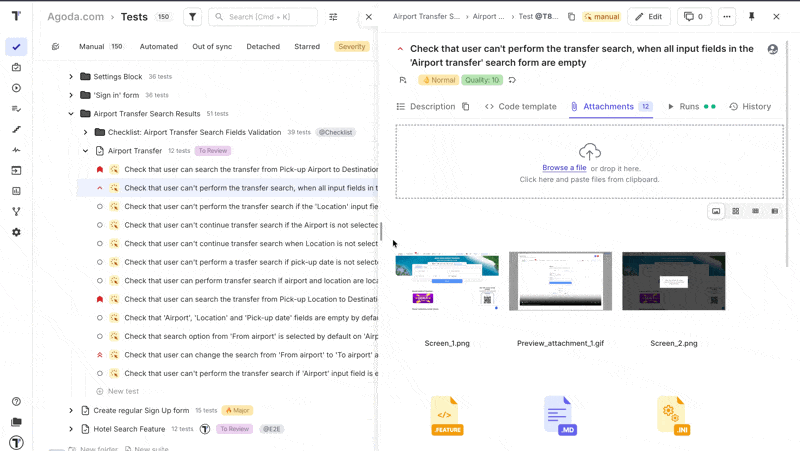
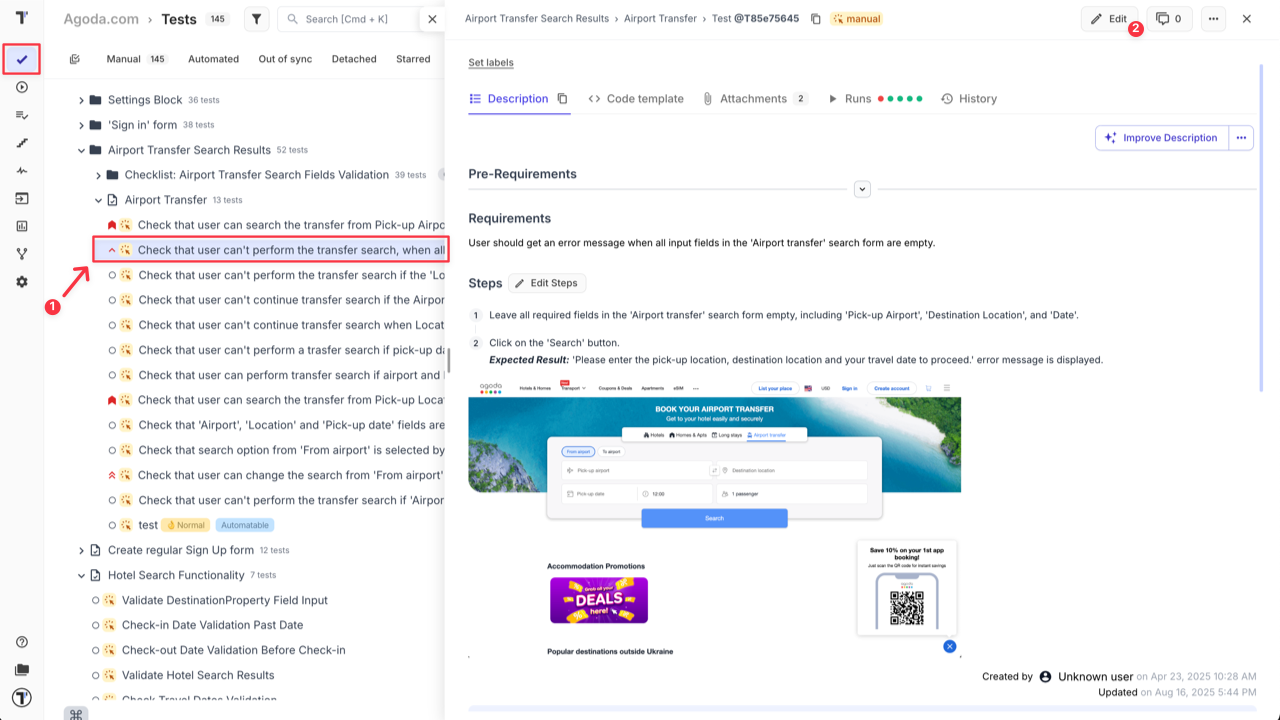
Section titled “Add Attachments to Test”First of all, you need to open the test that you want to add the attachment to.
Click on the Attachments tab.
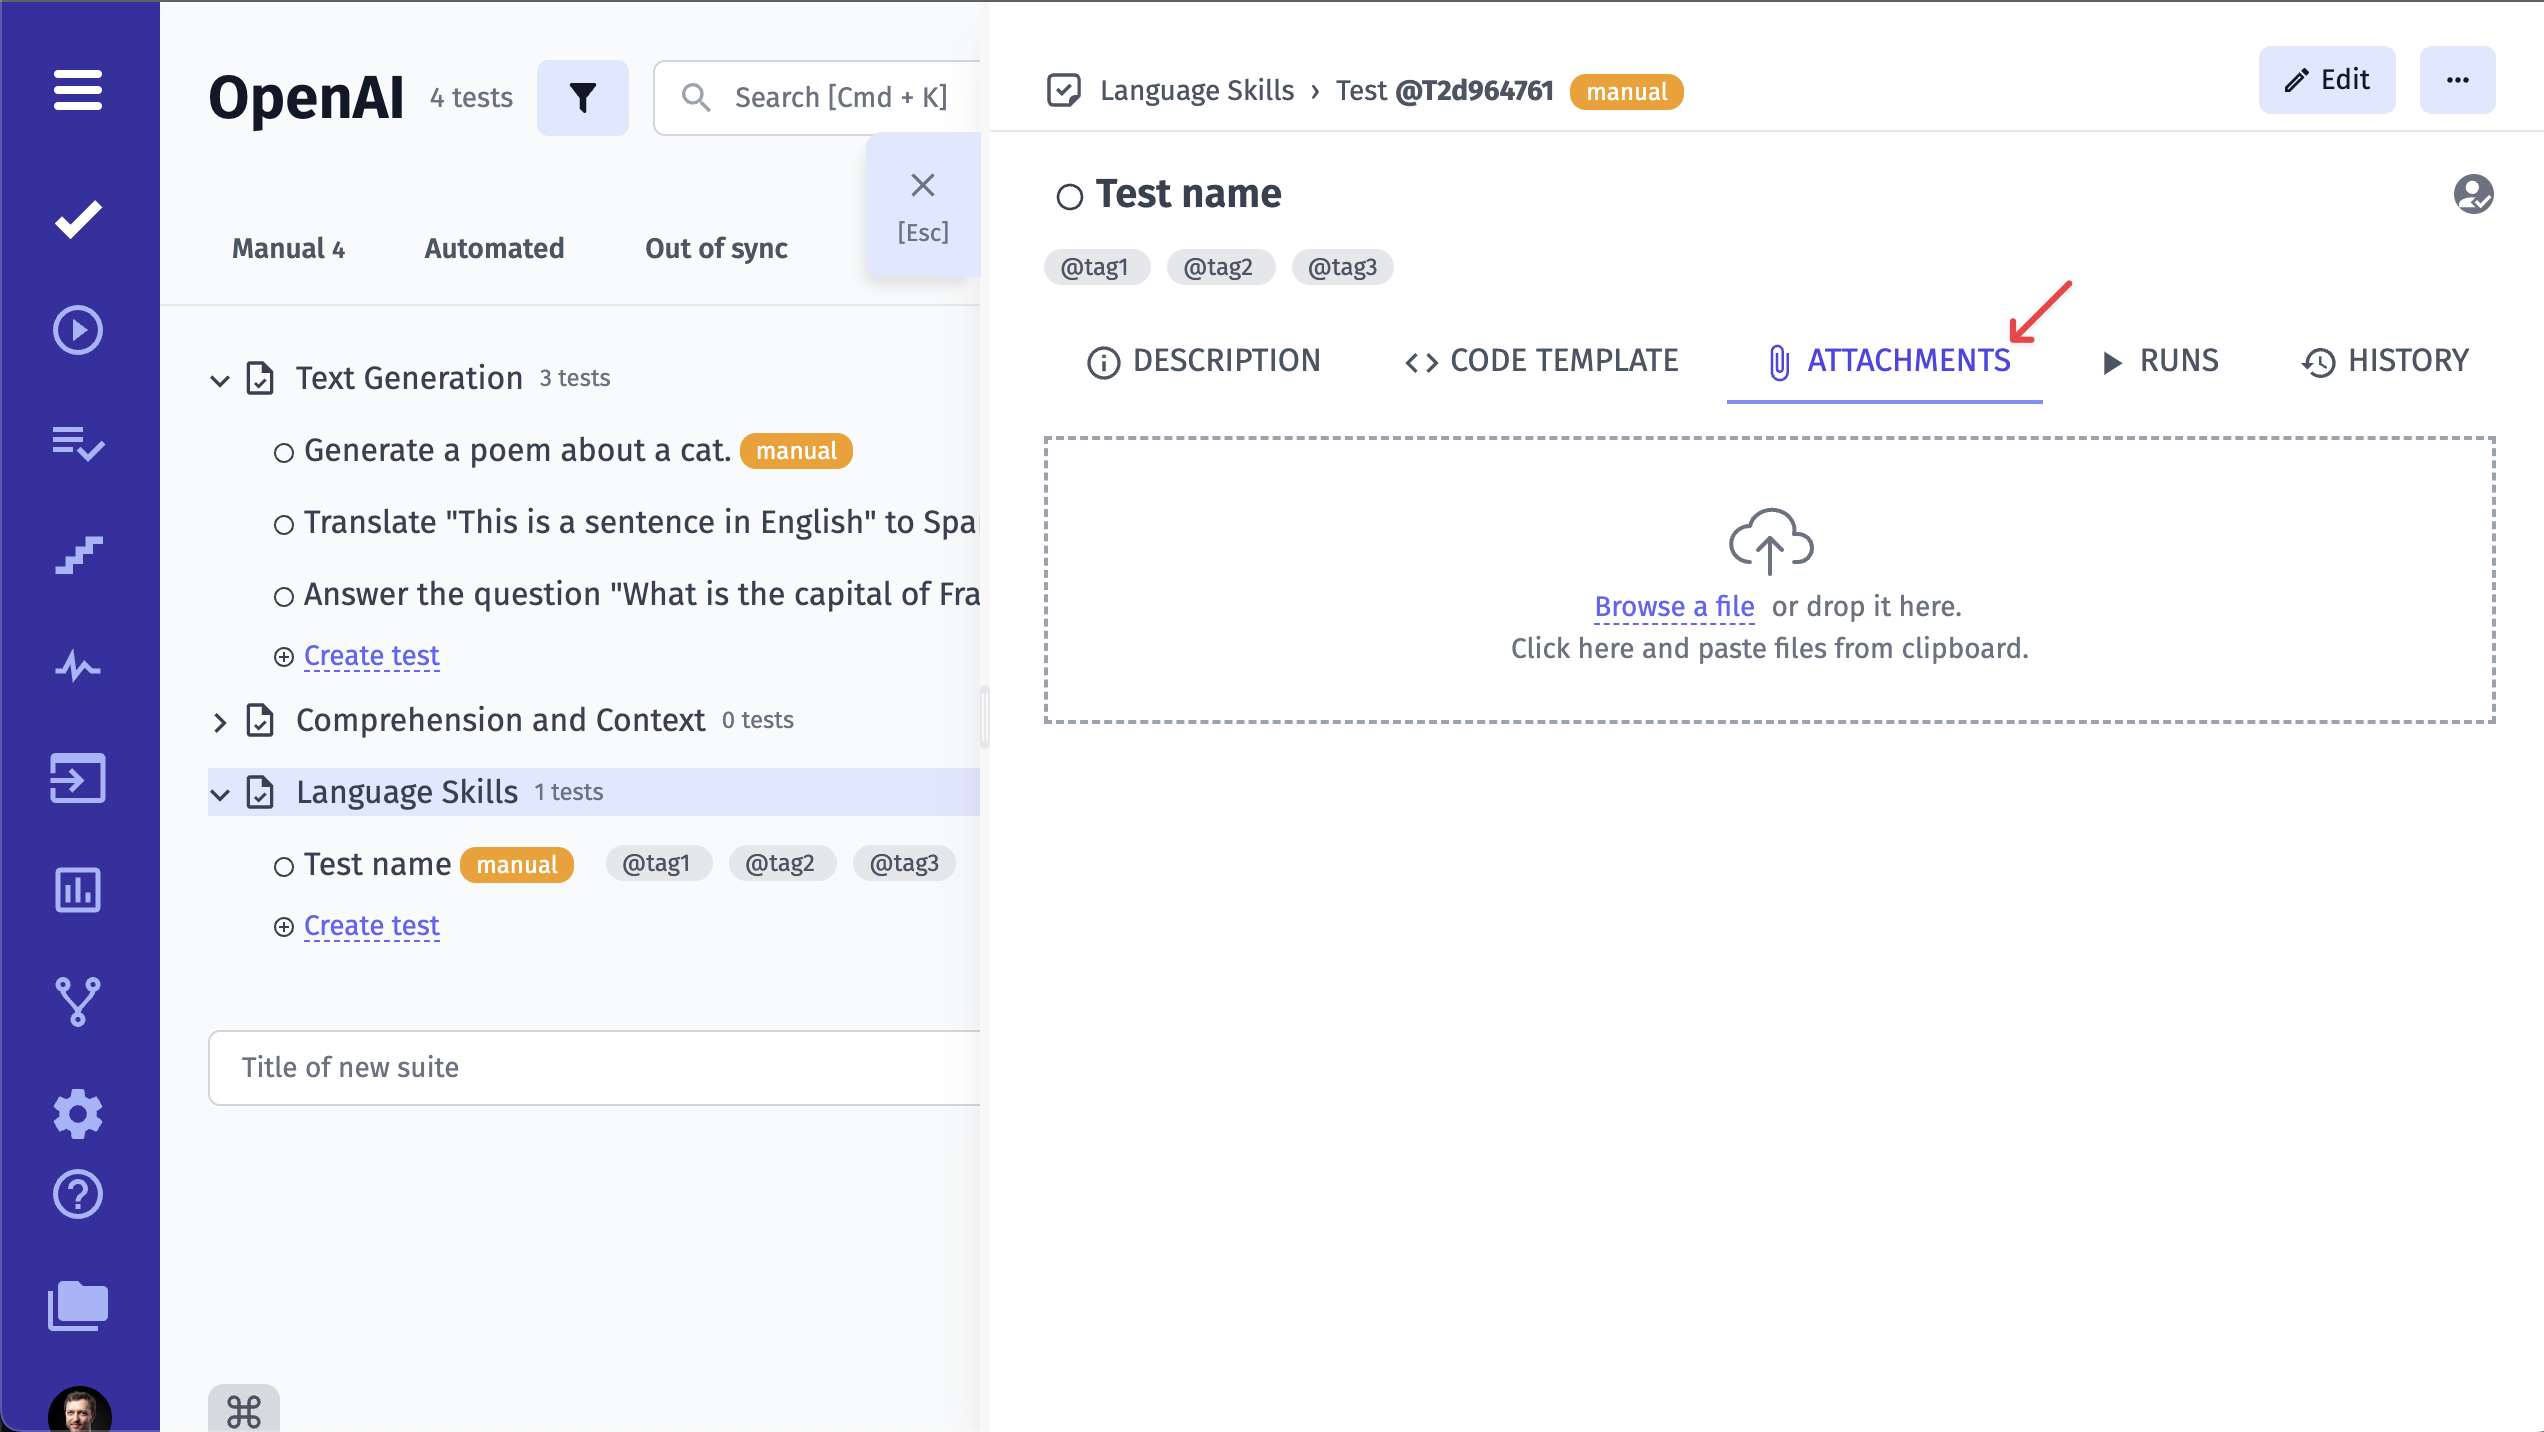
Add your attachment via Browse a file or simply drag and drop it.
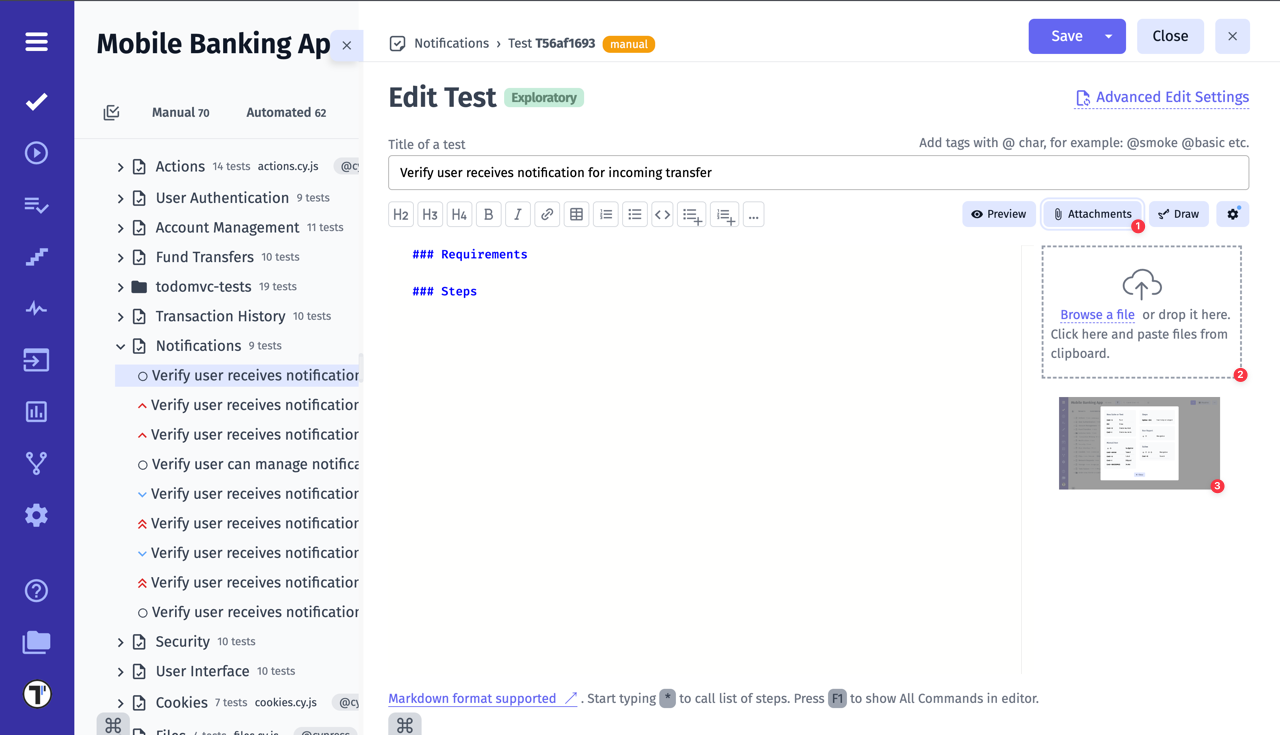
You can also add attachmennts to the test descrption:
- Click on the Attachment button.
- Select a file from your PC, or drag and drop it onto the area. You can also paste a file from the clipboard.
- Click on the image that has been downloaded.
Once you have completed the steps, you will see the attachment in the test case description:
How to Resize Attached Images in a Test Case
Section titled “How to Resize Attached Images in a Test Case”All images attached to a test case are displayed on the preview page at their default size.
To change the size of an attached image for a better view, follow these steps:
- Hover over the attachment.
- Click on the displayed button.
By clicking on the resize button on one image, all attachments in the test case will automatically resize.
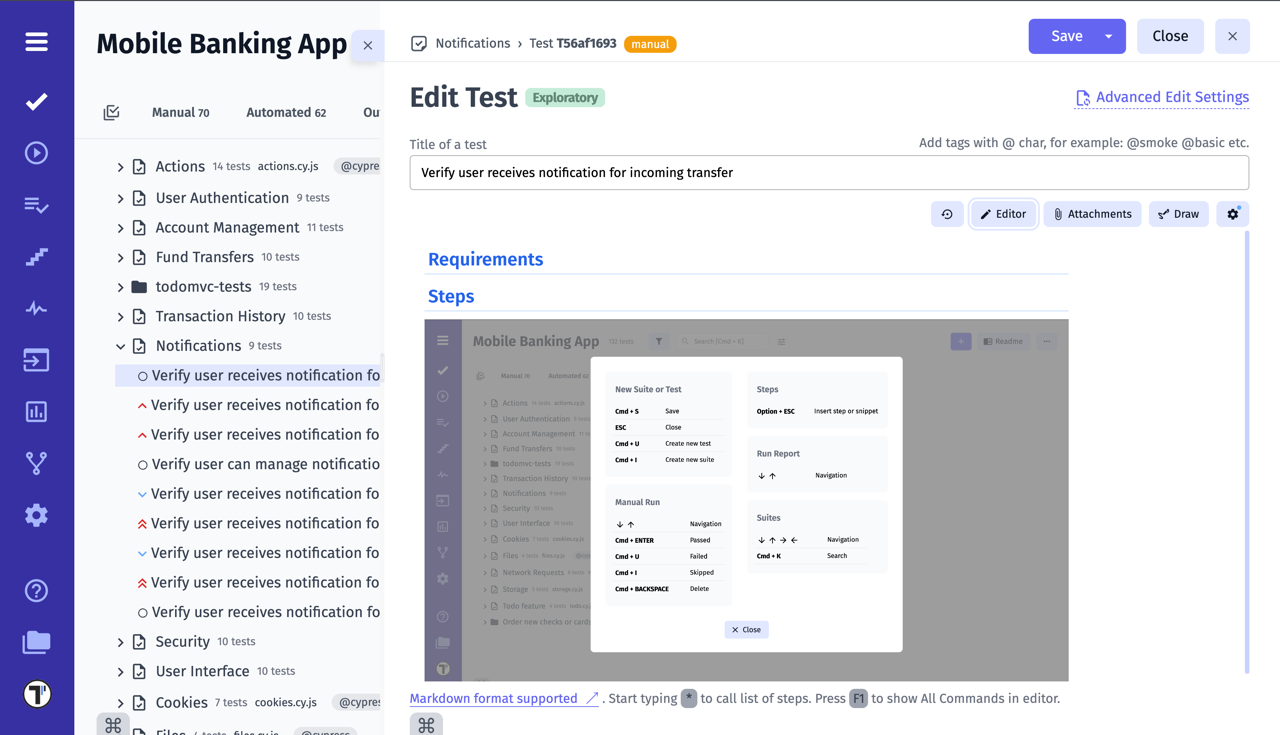
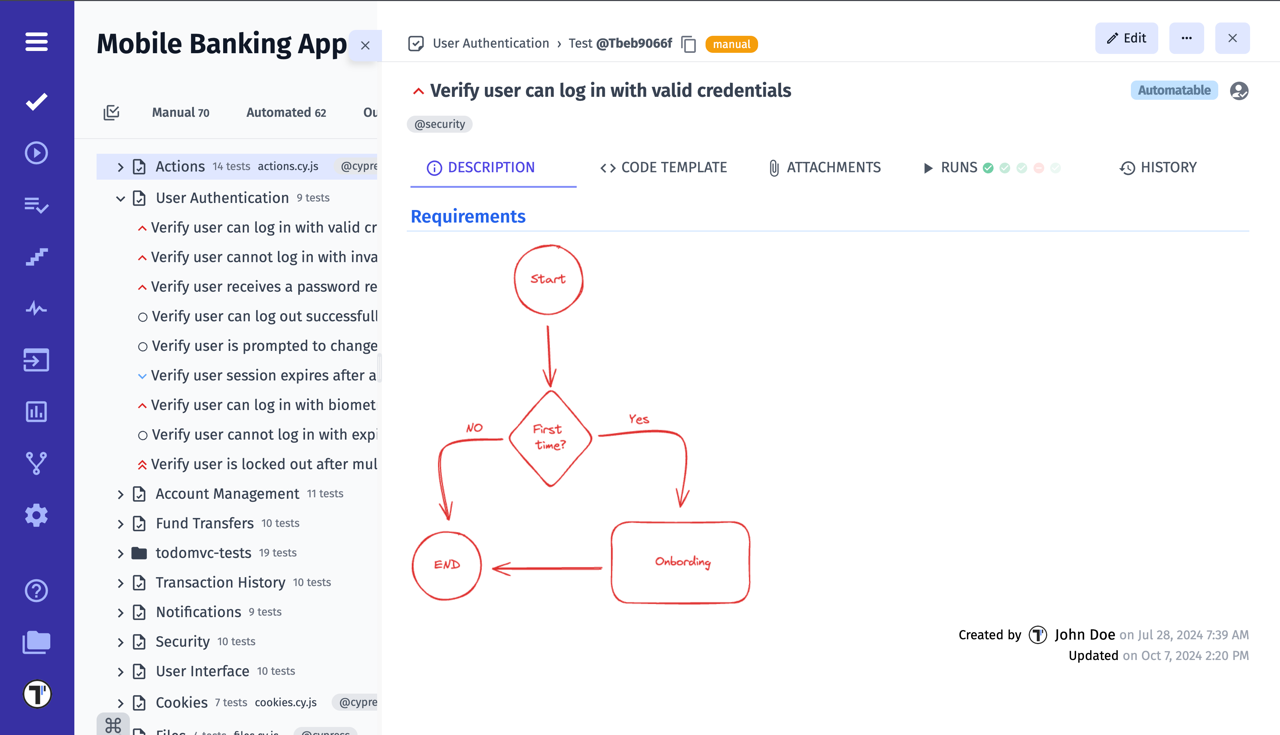
Add Drawing to Test
Section titled “Add Drawing to Test”Including drawings in test case descriptions can improve clarity by visually representing complex UI layouts and interactions that are difficult to explain through text alone.
To add a drawing to a test case, enter the edit mode and click on the Draw button.
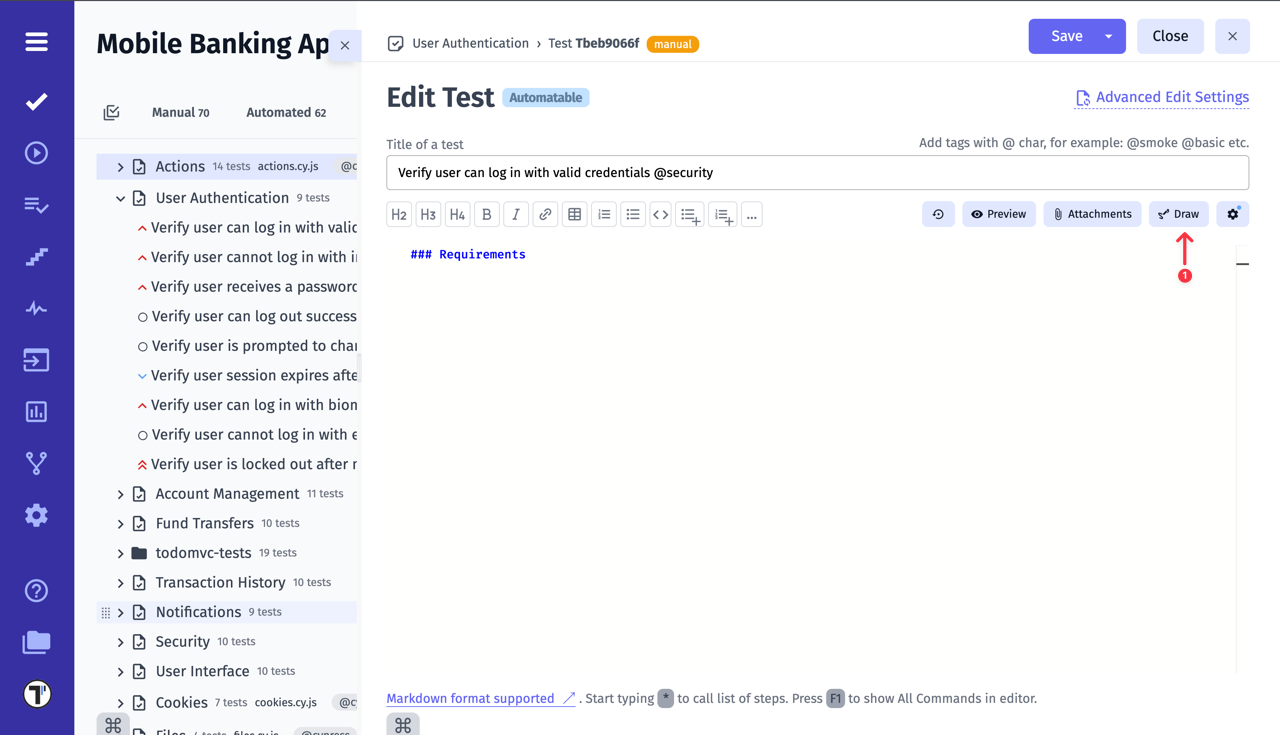
You’ll see a window with a set of drawing tools. You can select different elements from the top panel (2) and apply styles to them from the side panel (3). When you are done with the drawing, click on the Save button (4).

After saving the changes in the edit mode, you will see a preview of the drawing in the test case description:
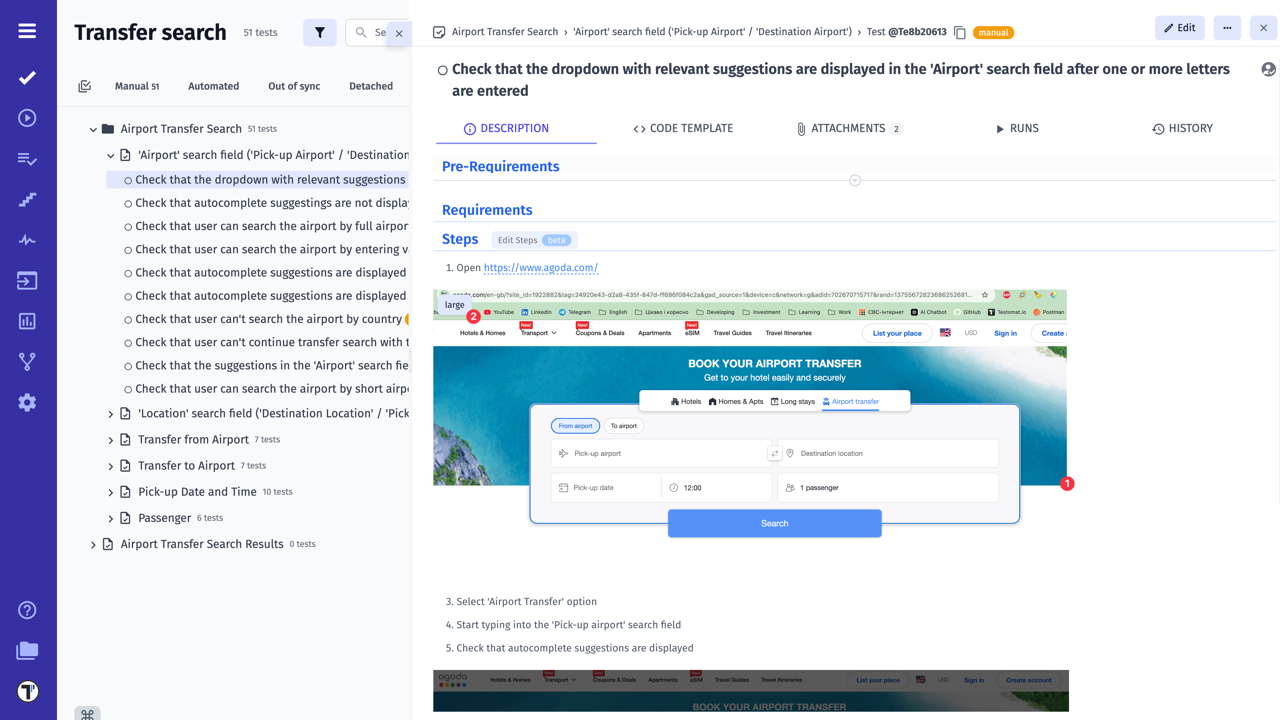
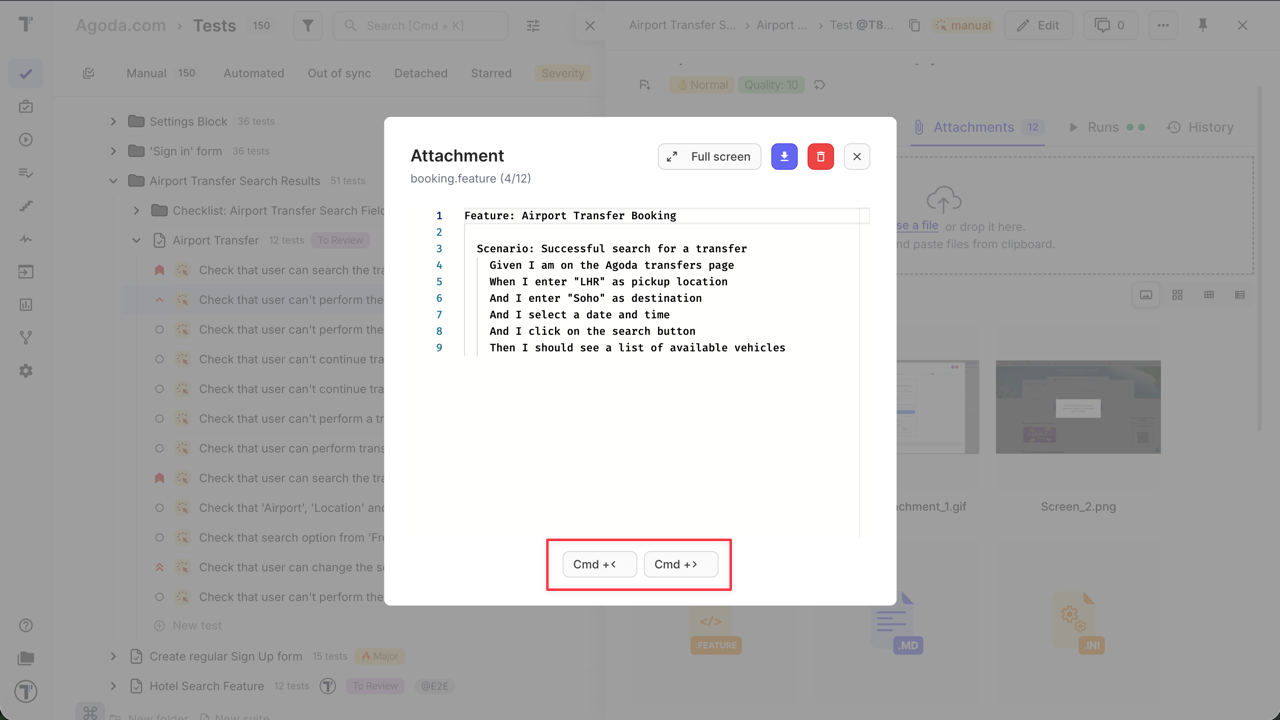
How to Preview Attachments
Section titled “How to Preview Attachments”Testomat.io provides a built-in previewer that allows you to check files directly in your browser, without the need of downloading them just to check their contents.
- On ‘Tests’ page open Test Case (Suite/Folder).
- Go to ‘Attachments’ tab.
- Click on any attachment to open the preview window.
- Adjust your view: Click the ‘Fit to width/height’ or ‘Full screen’ buttons to optimize the display.
- Use keyboard combinations to navigate between attached files.
Supported Preview Formats:
In addition to standard image files, you can preview the following types:
-
Code & Data:
.json,.xml,.html,.sql,.js,.py,.java,.svg -
Logs & Text:
.txt,.log,.properties,.csv -
Scripts:
.bat,.sh -
Documents:
.pdf
How to Delete Attachment from Test Case
Section titled “How to Delete Attachment from Test Case”Save time by quickly deleting unnecessary attachments, ensuring your test cases remain relevant and clutter-free. To delete attachment:
- On ‘Tests’ page open Test Case.
- Click ‘Attachments’ tab.
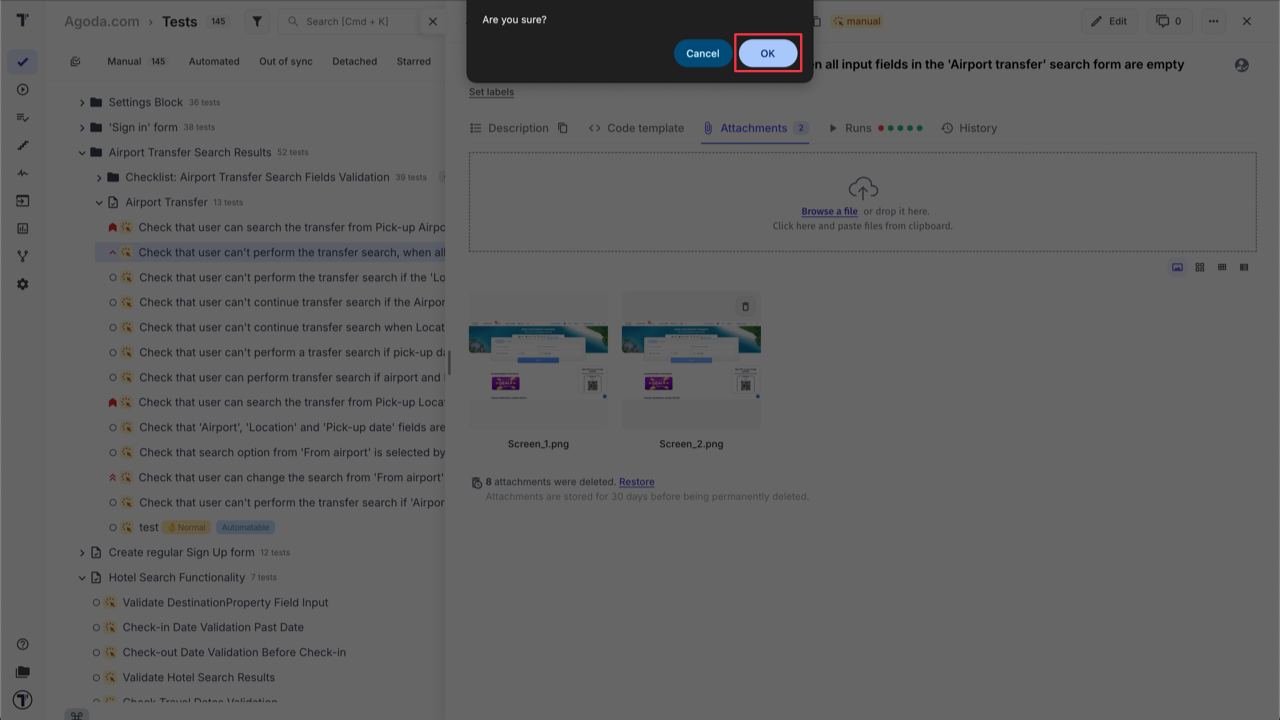
- Click ‘Delete’ icon on the attachment you want to delete.
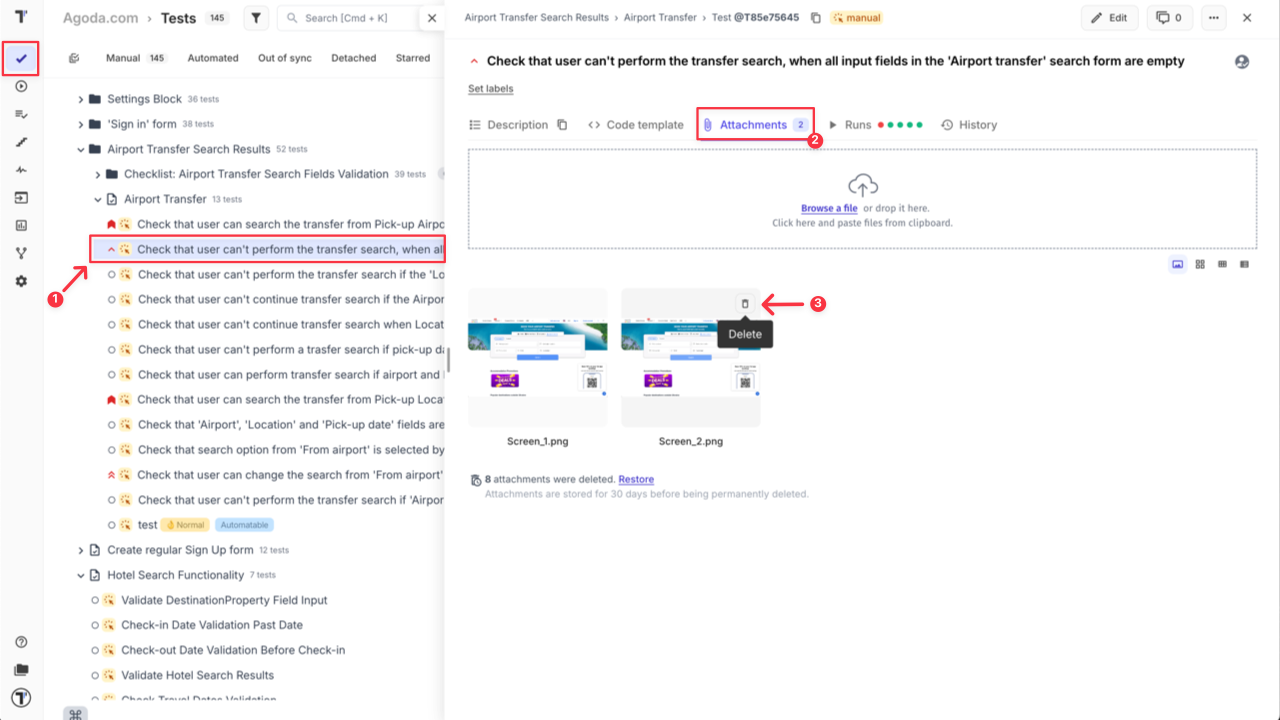
- Confirm action.
OR
- On ‘Tests’ page open Test Case.
- Click ‘Edit’ button.
- Click ‘Attachments’ tab inside edit mode.
- Click ‘Delete’ icon on the attachment you want to delete.

- Confirm action and Save changes.
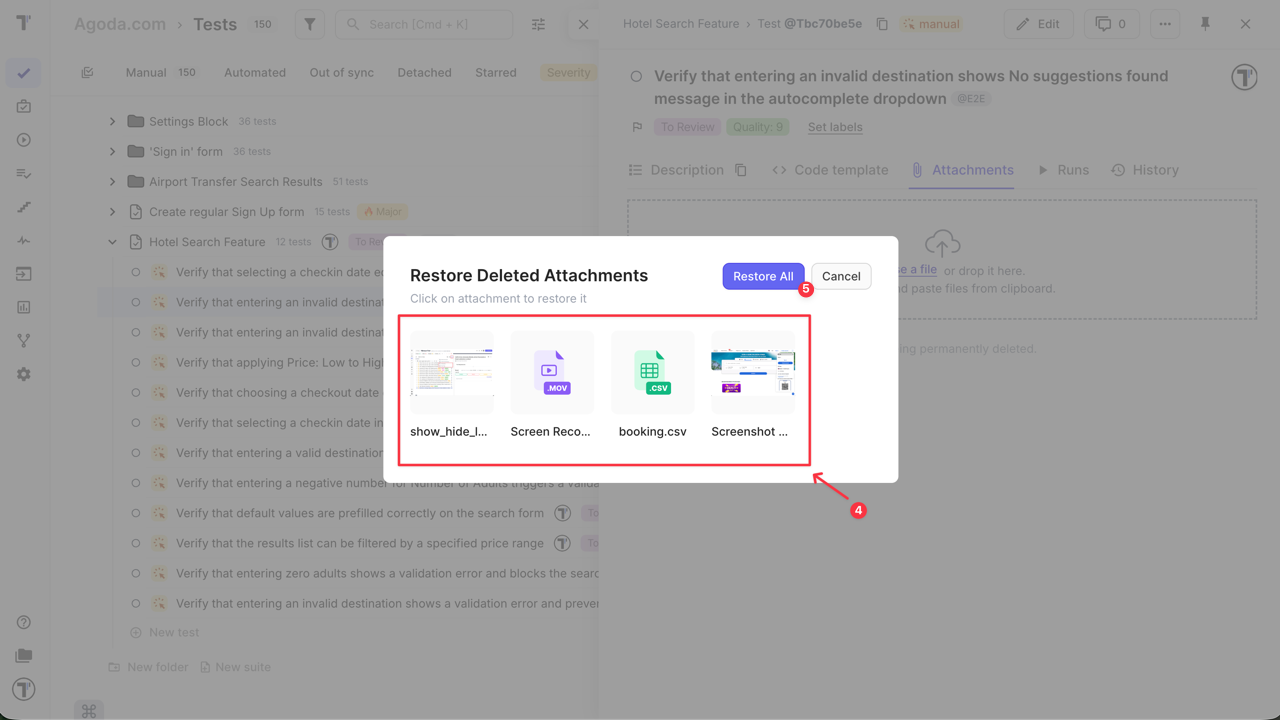
How to Restore Deleted Attachment
Section titled “How to Restore Deleted Attachment”Before the attachment is permanently deleted from the store, you can restore it. To do that:
- Open test case (or suite case) with deleted attachments you want to restore.
- Open ‘Attachments’ tab.
- Click ‘Restore’ button.
- Click on a single attachment to restore it.
- Click ‘Restore All’ button to restore all attachments with one click.
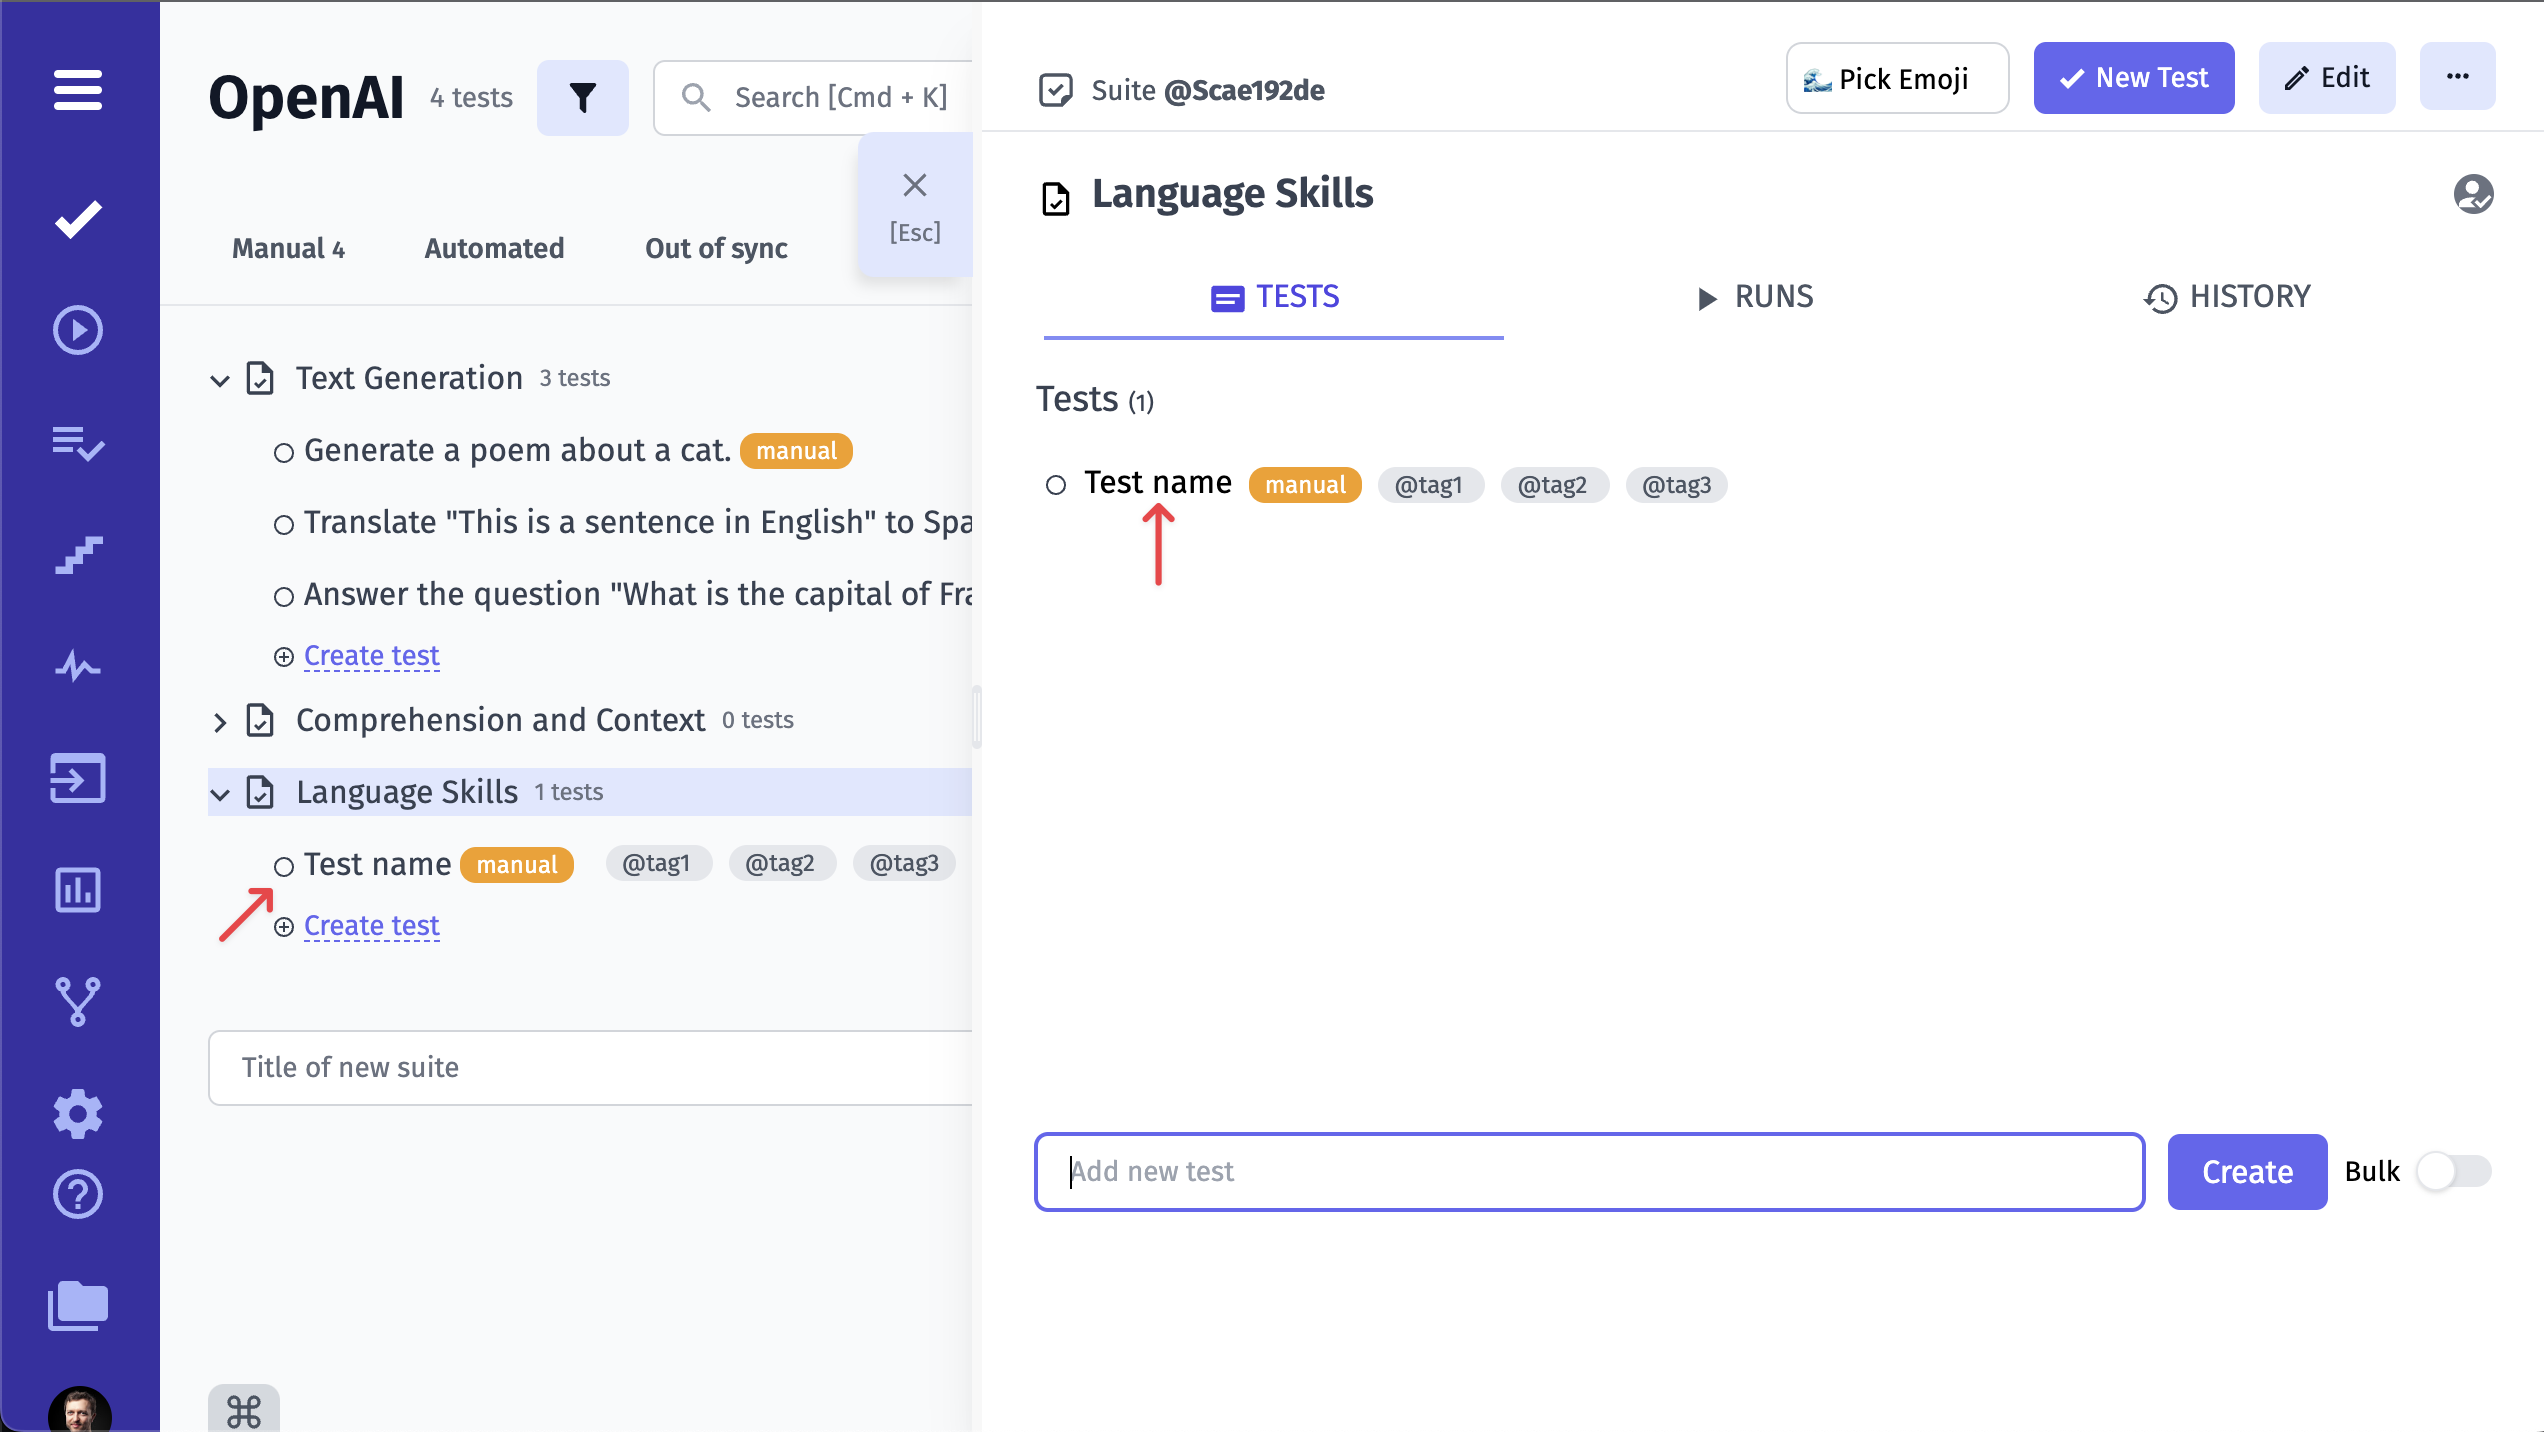
How to Add a Label/Tag to a Test
Section titled “How to Add a Label/Tag to a Test”This option is the easiest one! You simply need to add the label’s name (preceeded by @ char) in the name field of the test. The drop-down list of tags already used in projects appears, when you type the @ symbol.
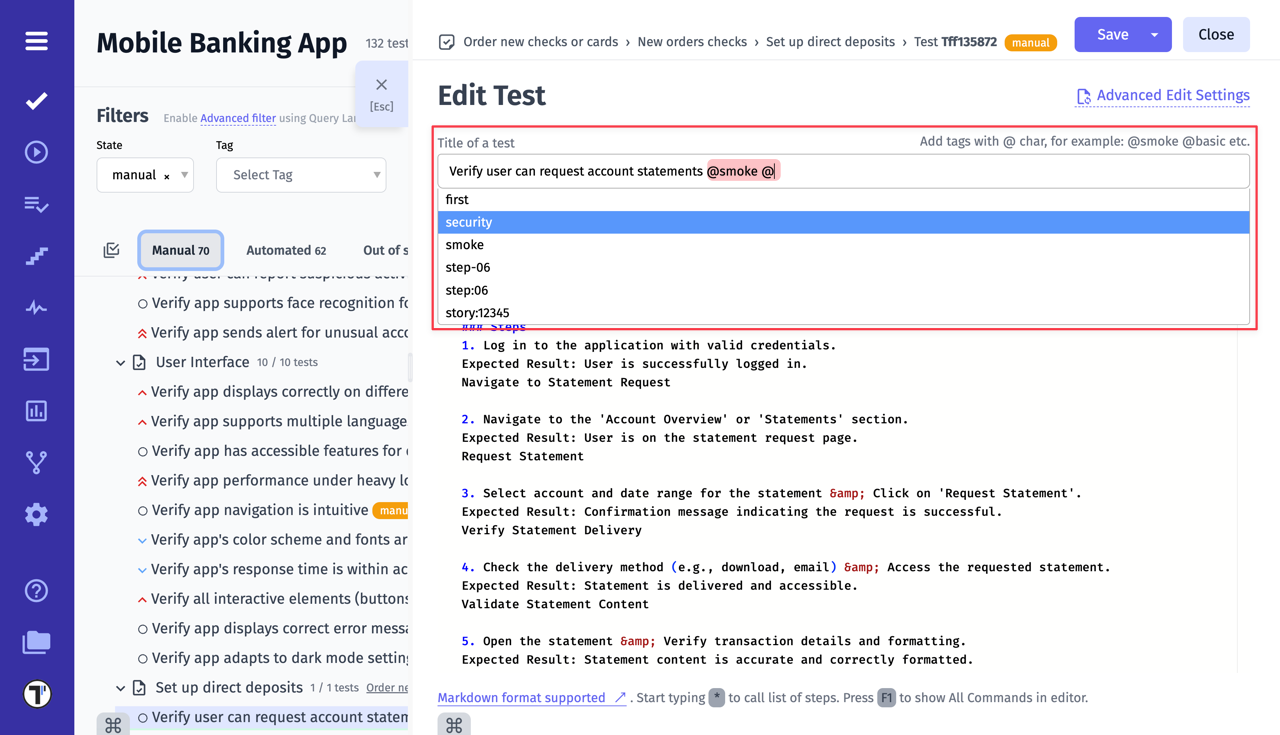
And now you can see your label/tag in the test list next to the test’s title.
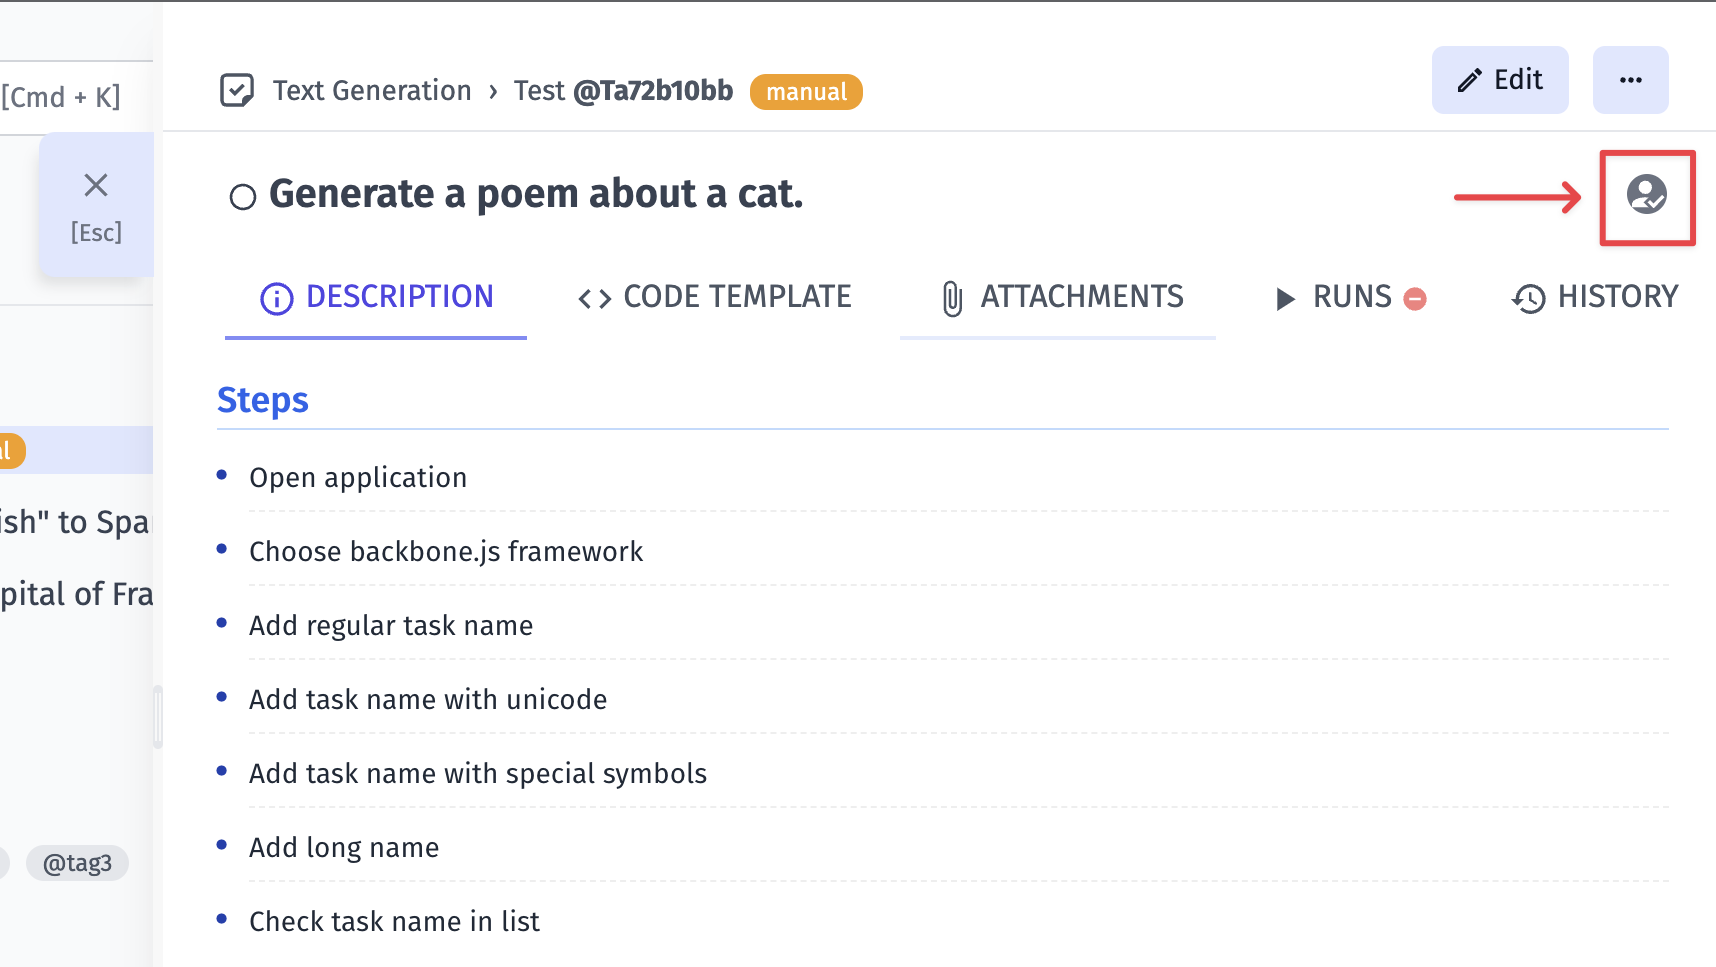
How to Assign a Test to a User
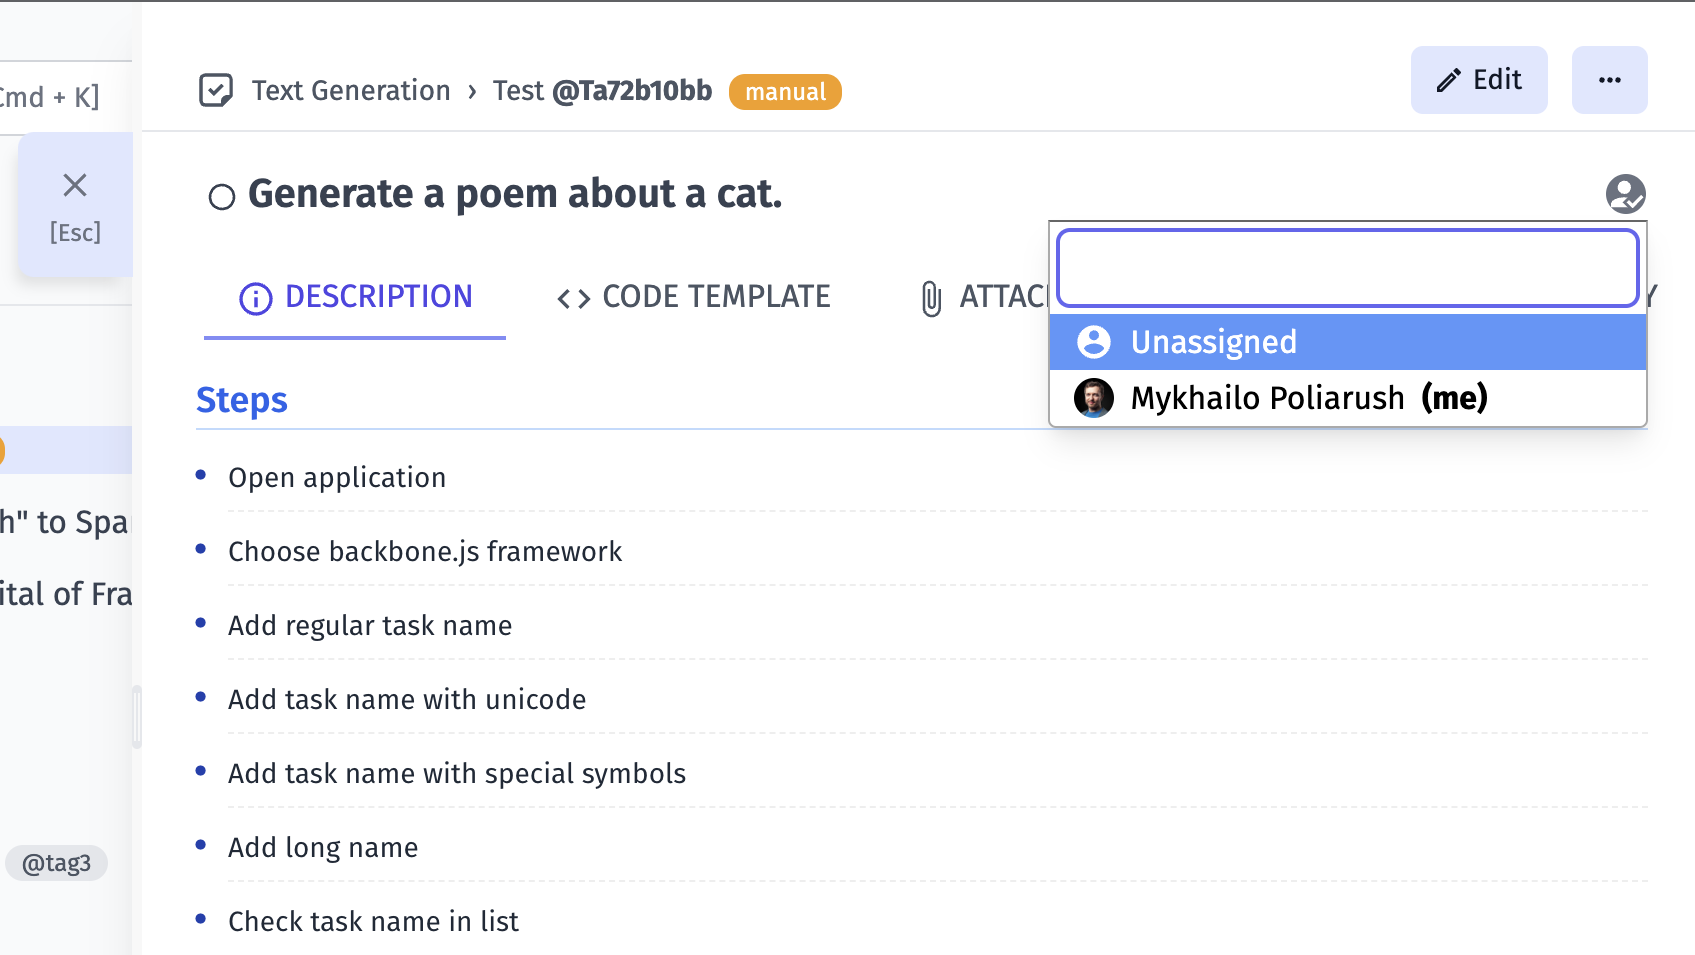
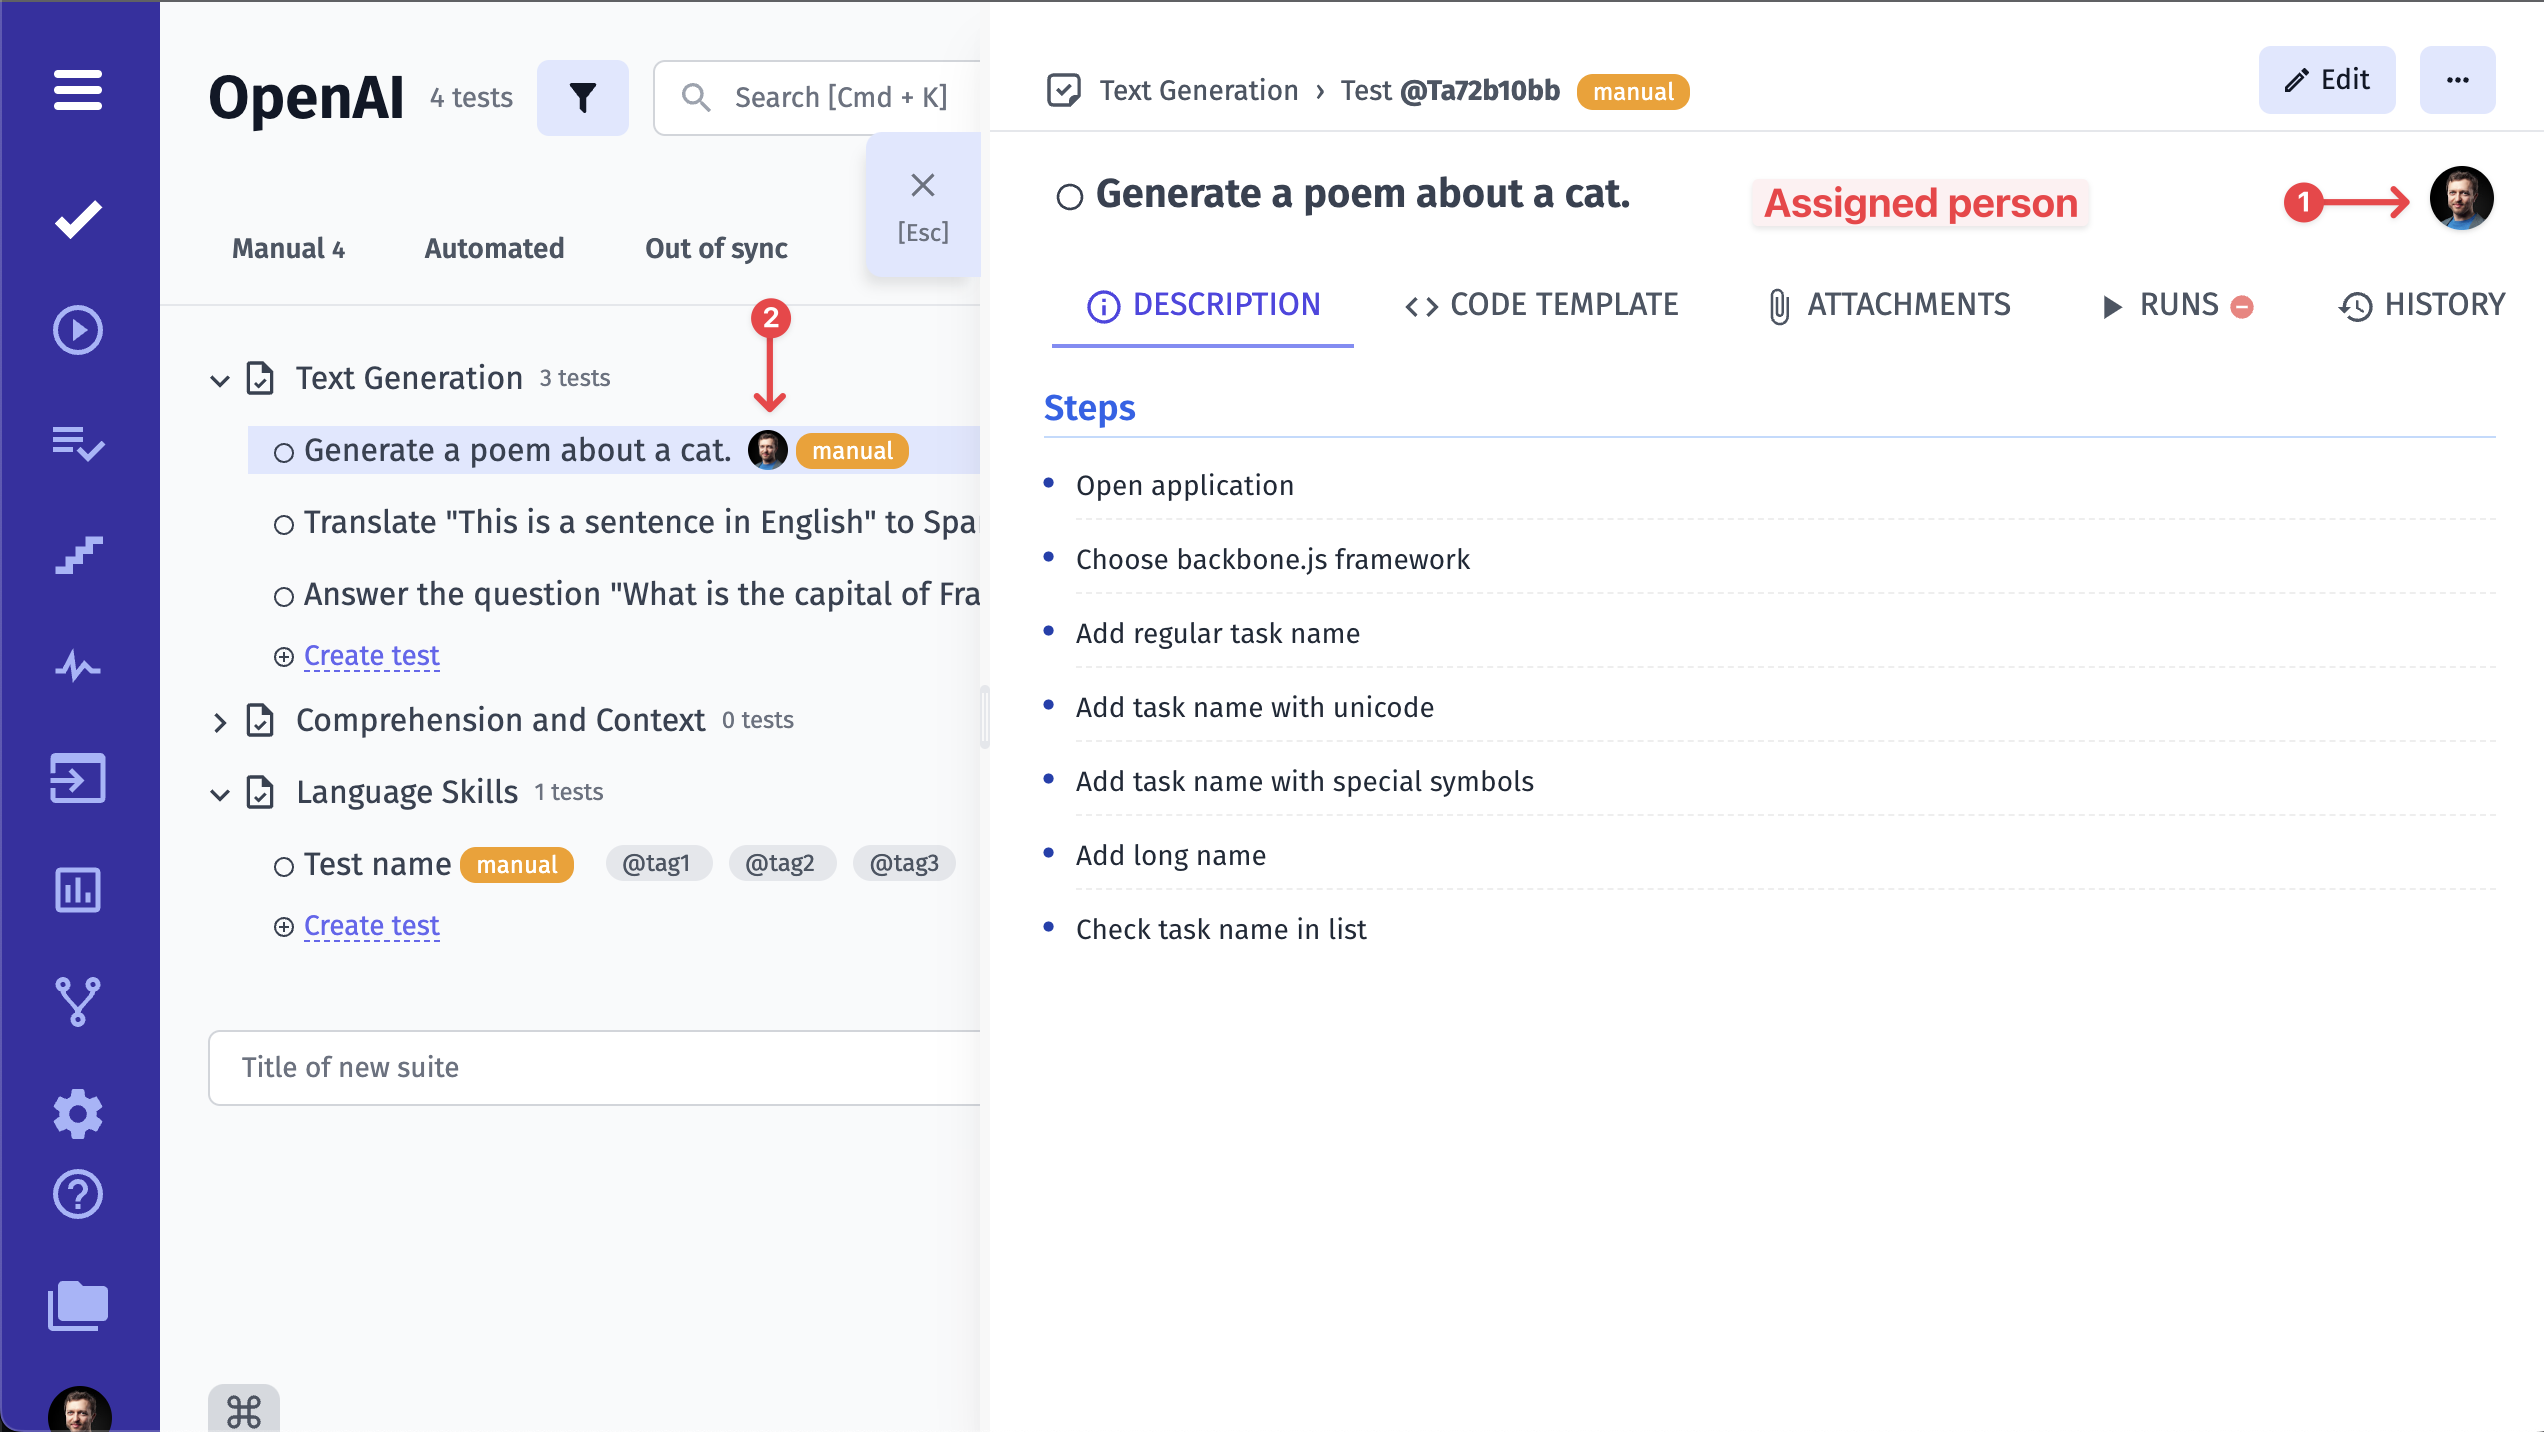
Section titled “How to Assign a Test to a User”If you want to assign a certain test to a certain user, you should click on this user icon in the upper right corner of the window, as shown in the picture.
Assign a user from the list of users added to the project by clicking on the user’s name. Please note, that you need to make sure the intended user is added to the project first!
Now you can see that this test is assigned to a certain user. The user icon has changed accordingly.
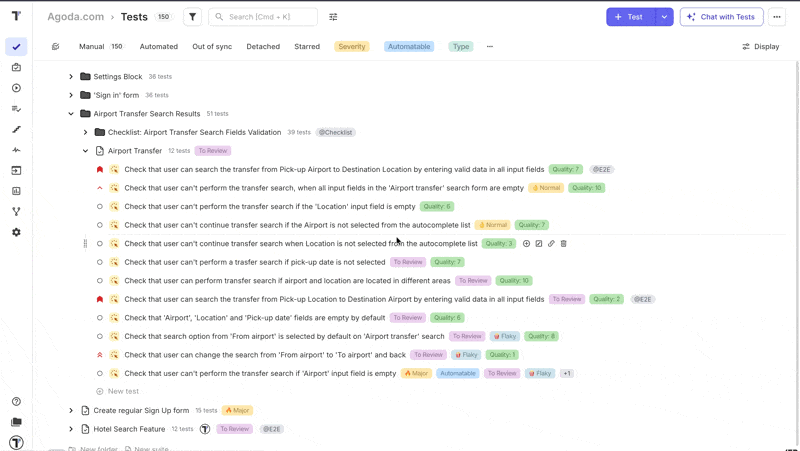
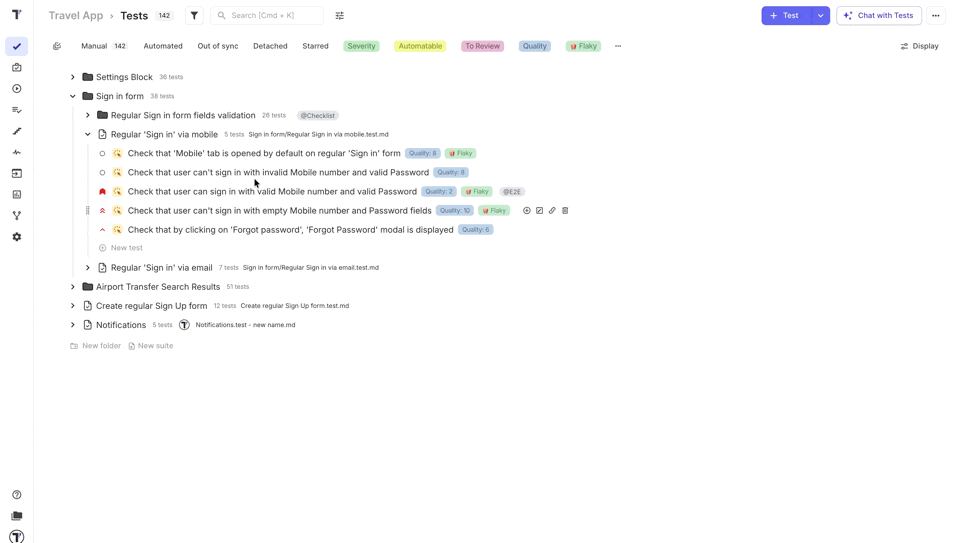
Test Priority
Section titled “Test Priority”Priority helps teams quickly understand the importance of a test and focus on the most critical scenarios first. By assigning a priority, you can better organize test cases, improve visibility, and efficiently manage execution and reporting.
Priority can be:
- set when creating a new test
- changed at any time while editing an existing test
- updated in bulk for multiple tests at once
- used to filter tests
- visually identified via an icon displayed next to the test title
Priority visibility:
- priority icon is displayed next to each test title
- priority icon is displayed in the test tree
This allows teams to instantly focus on the most important tests.
Available Priority Levels
Section titled “Available Priority Levels”Testomat.io supports the following priority levels:
- Low – low-importance test
- Normal – default priority
- High – high-importance test
- Important – important test
- Critical - critical/blocker test
Each priority level has a dedicated icon to make test importance easily recognizable across the interface.
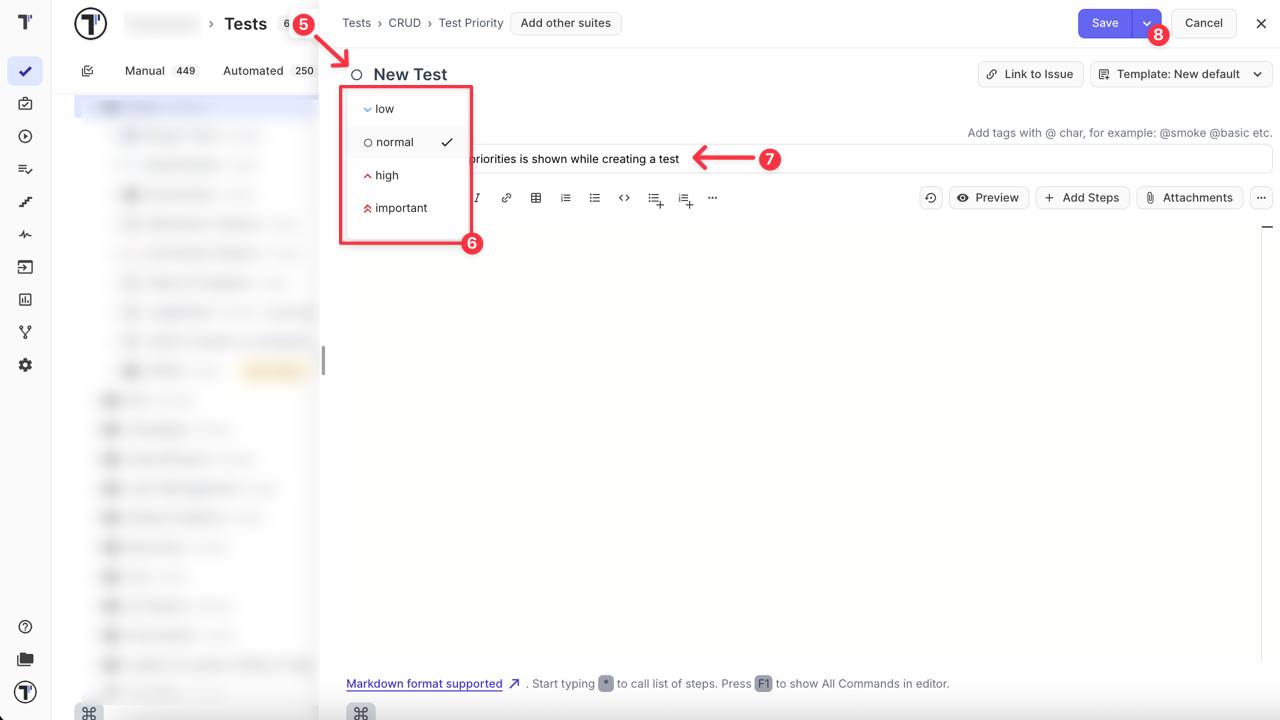
How to Set Priority When Creating a Test
Section titled “How to Set Priority When Creating a Test”When creating a new test, you can assign a priority directly from the test editor:
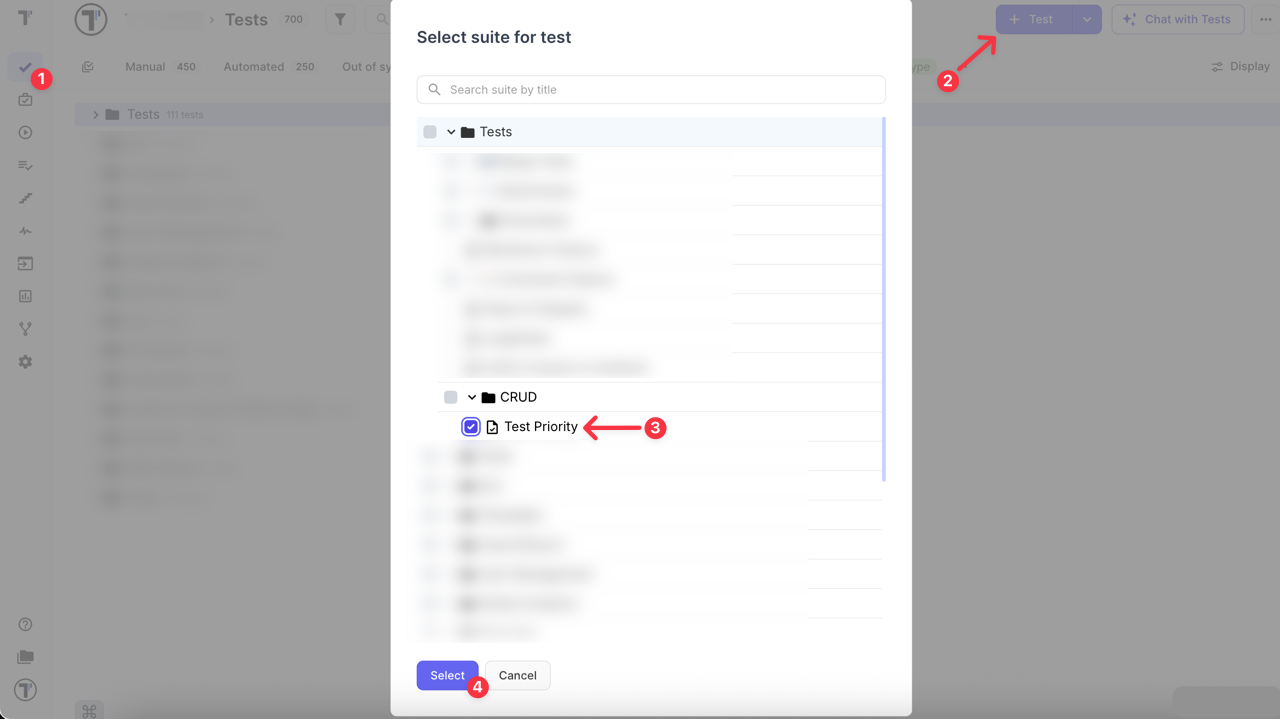
- Navigate to the ‘Tests’ page.
- Click the ’+ Test’ button.
- Select a suite for test.
- Click the ‘Select’ button.
- Click the ‘Priority icon’ to open the list of available priorities next to the ‘New Test’ indicator.
- Select the required priority.
- Enter the test title.
- Save the test — the selected priority will be applied.
How to Change Priority When Editing a Test
Section titled “How to Change Priority When Editing a Test”You can update the priority of an existing test at any time:
- Navigate to the ‘Tests’ page.
- Open the test you want to edit.
- Click the ‘Priority icon’ next to the ‘Edit Test’ indicator.
- Click on the desired priority.
- Save the test — the changed priority will be applied.
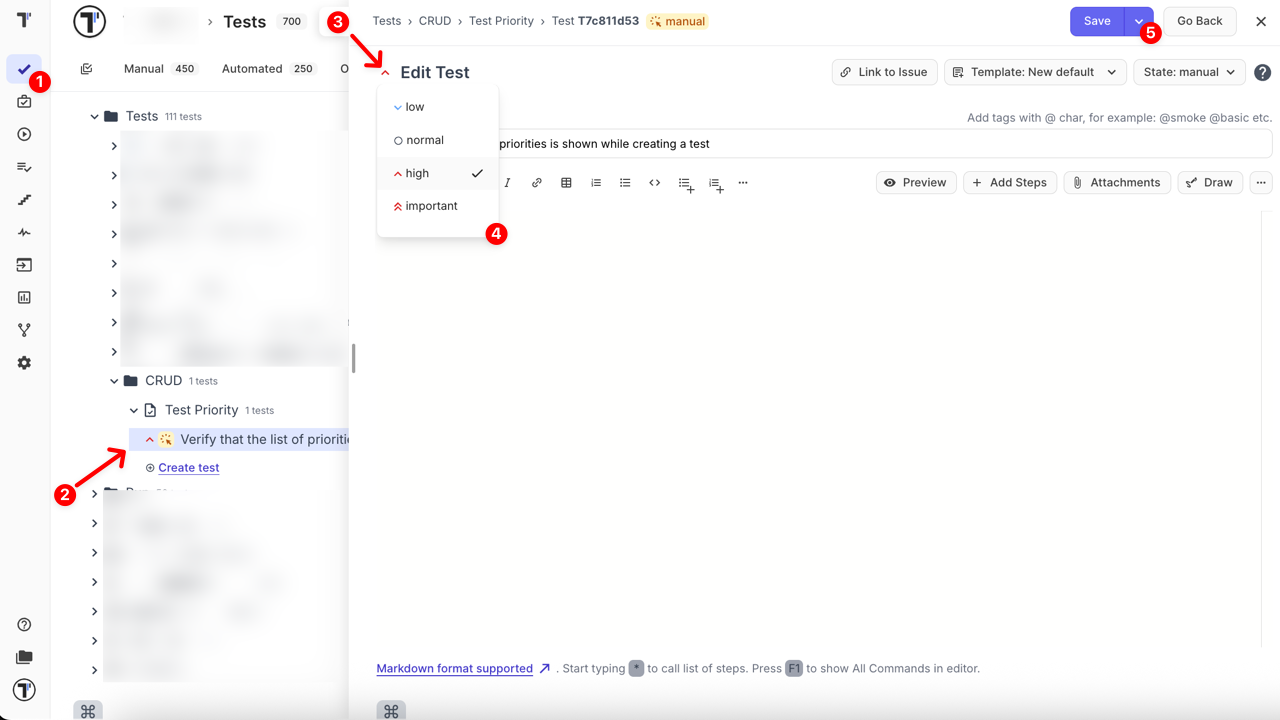
The icon will update immediately to reflect the selected priority.
How to Bulk Assign (Change) Priority
Section titled “How to Bulk Assign (Change) Priority”You can change the priority for multiple tests at once to save time and quickly update large test sets.
- Navigate to the ‘Tests’ page.
- Enable ‘multi-select’ button and select tests using the checkboxes.
- Click the ‘Priority’ button at the bottom of the screen.
- In the popup, select the desired priority (e.g., important).
- Click ‘Apply’ button.
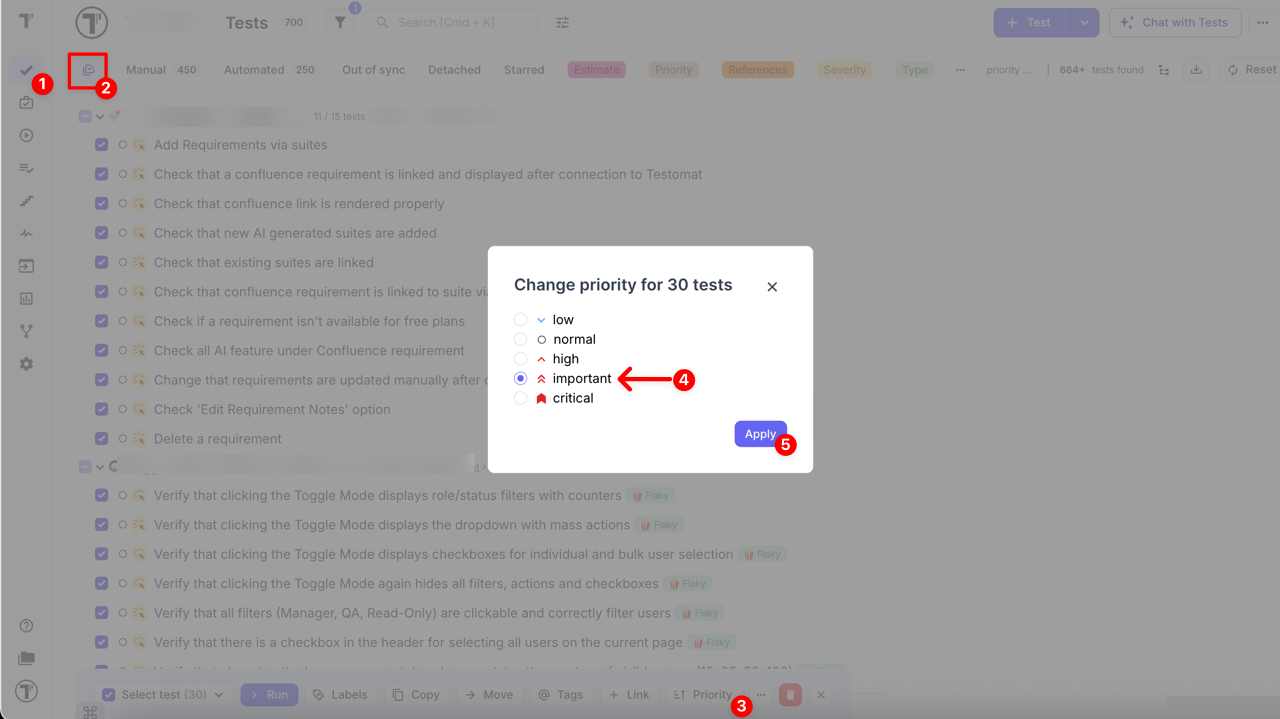
All selected tests will immediately update to the new priority, and the icons will reflect the change.
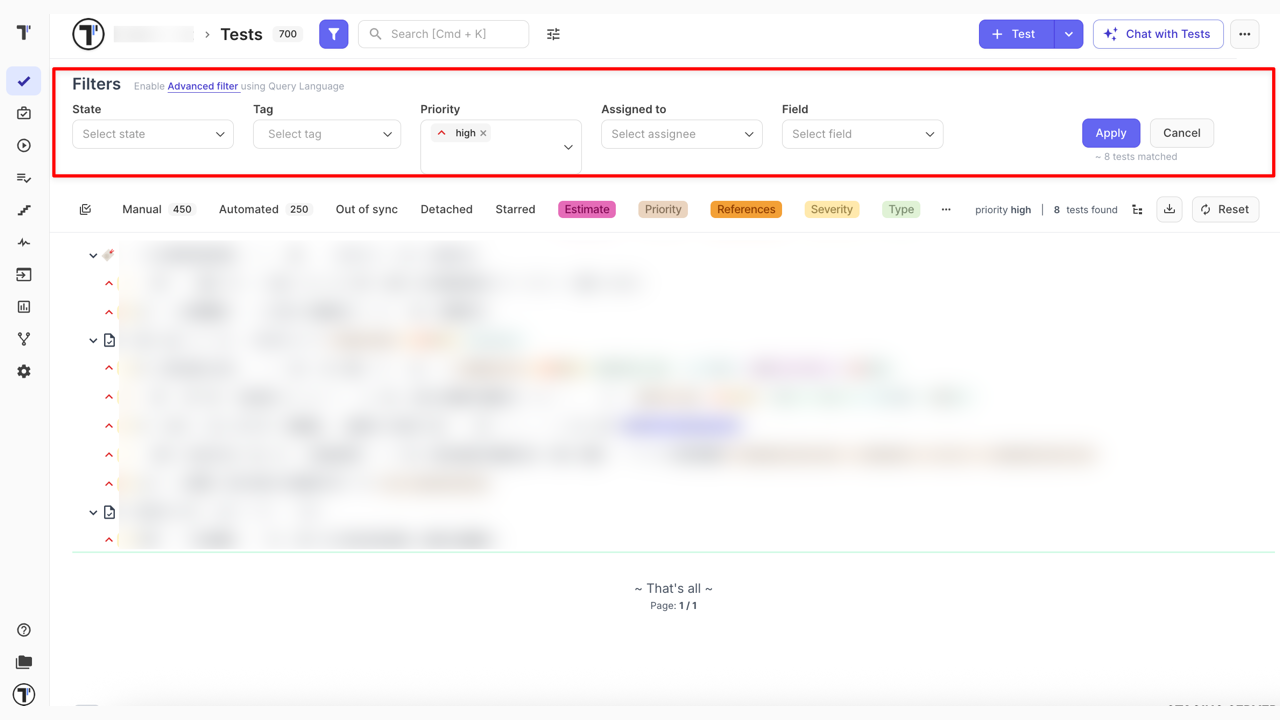
How to Filter Tests by Priority
Section titled “How to Filter Tests by Priority”Testomat.io allows you to filter tests by Priority, making it easy to:
- focus on High or Important tests during regression or smoke testing.
- quickly narrow down large test suites.
- combine Priority filtering with other filters such as tags, a state or an assignee.
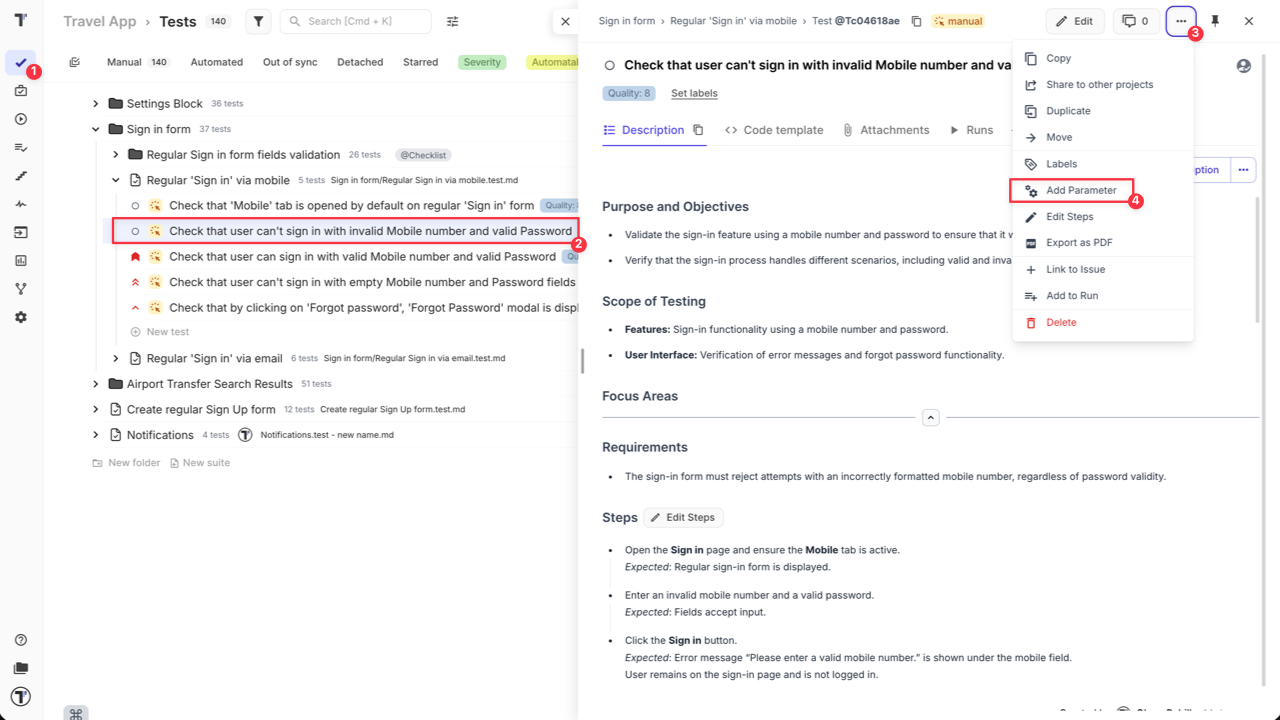
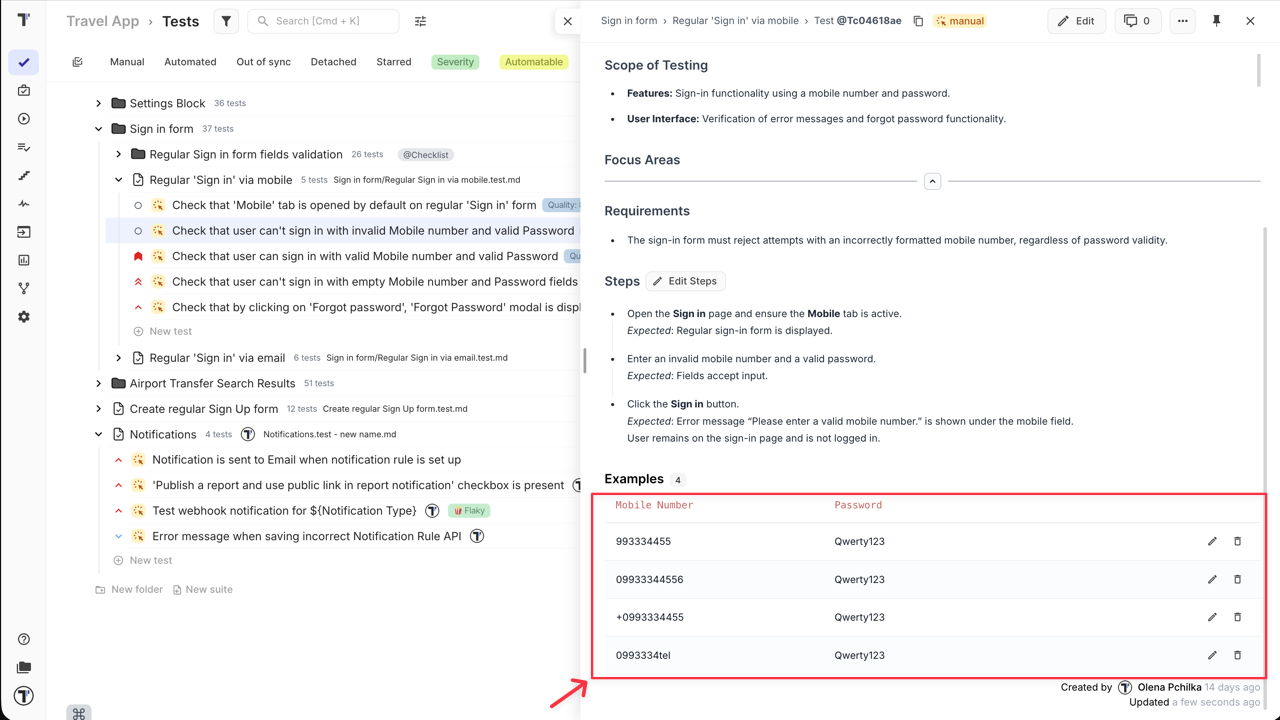
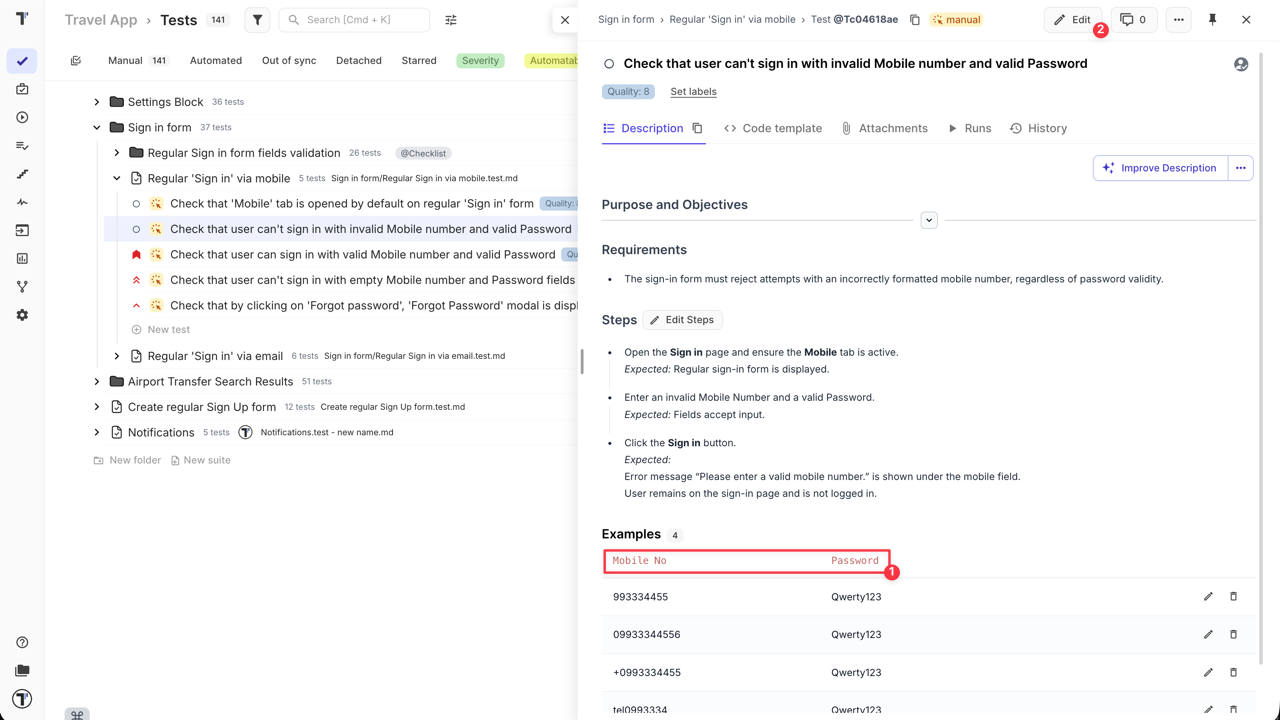
How to Add Dynamic Parameters to a Test
Section titled “How to Add Dynamic Parameters to a Test”Lets start with definition of ‘Dynamic Parameters’.
While standard parameters define your data set, Dynamic Parameters are the placeholders you use within your test steps or description. They act as variables that are automatically swapped with real values from your parameter table during execution.
This ensures that a single test script can dynamically change its behavior or input data for every iteration without you having to write multiple versions of the same test.
Parameters are used to create data-driven tests. Each parameter will be treated as a separate test during a manual or automated run.
To add parameters to your test:
- Navigate to ‘Tests’ in the sidebar.
- Select specific test.
- Click the ‘Extra button’ icon.
- Select ‘Add Parameter’ from the menu.
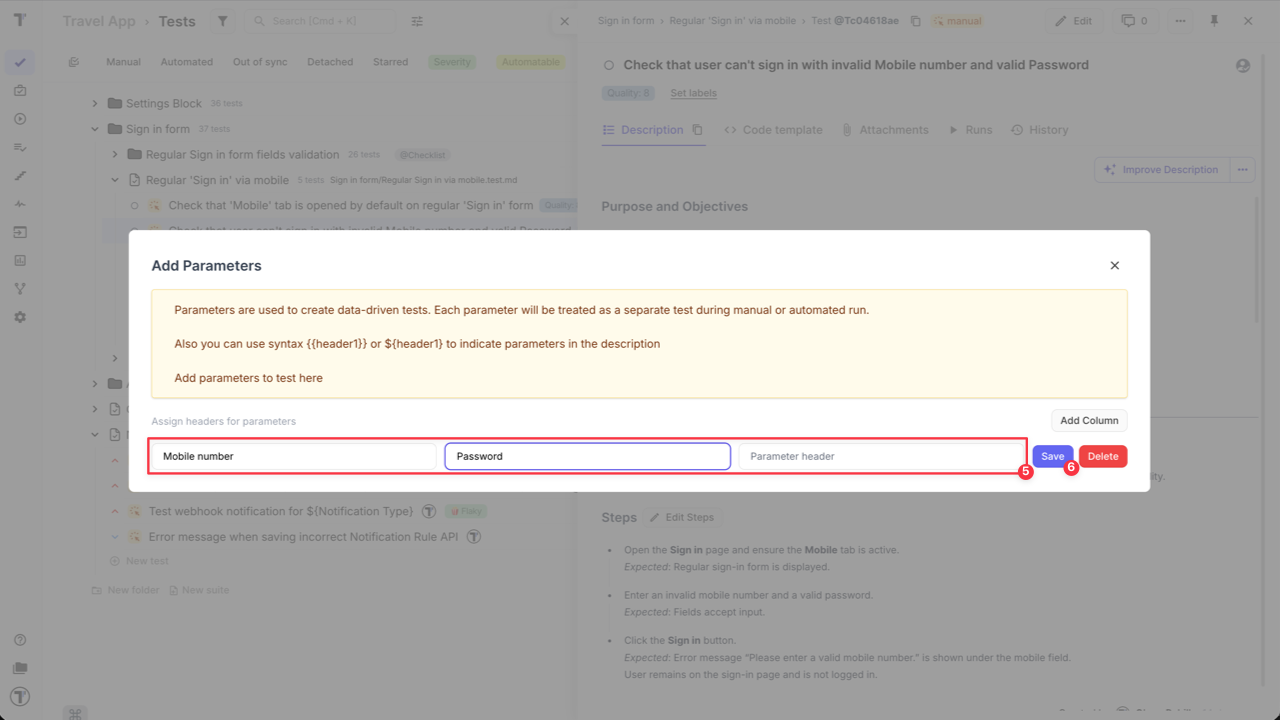
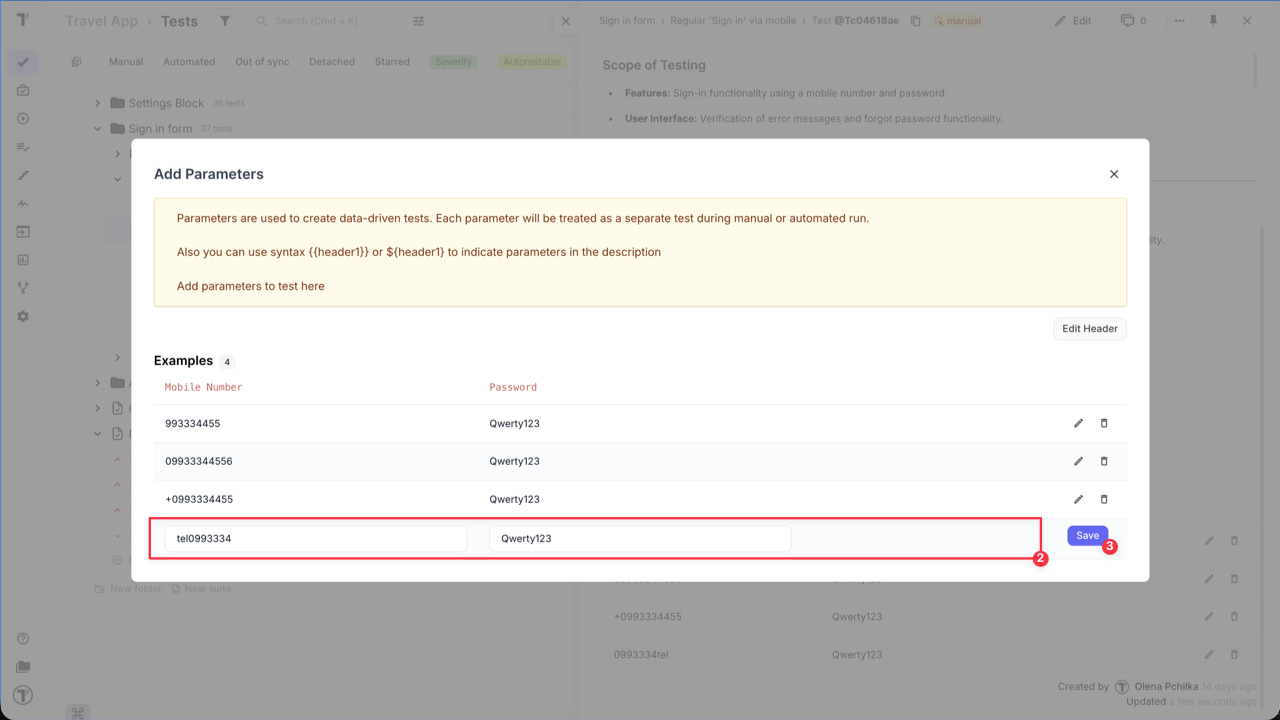
After a modal with instructions will appear,
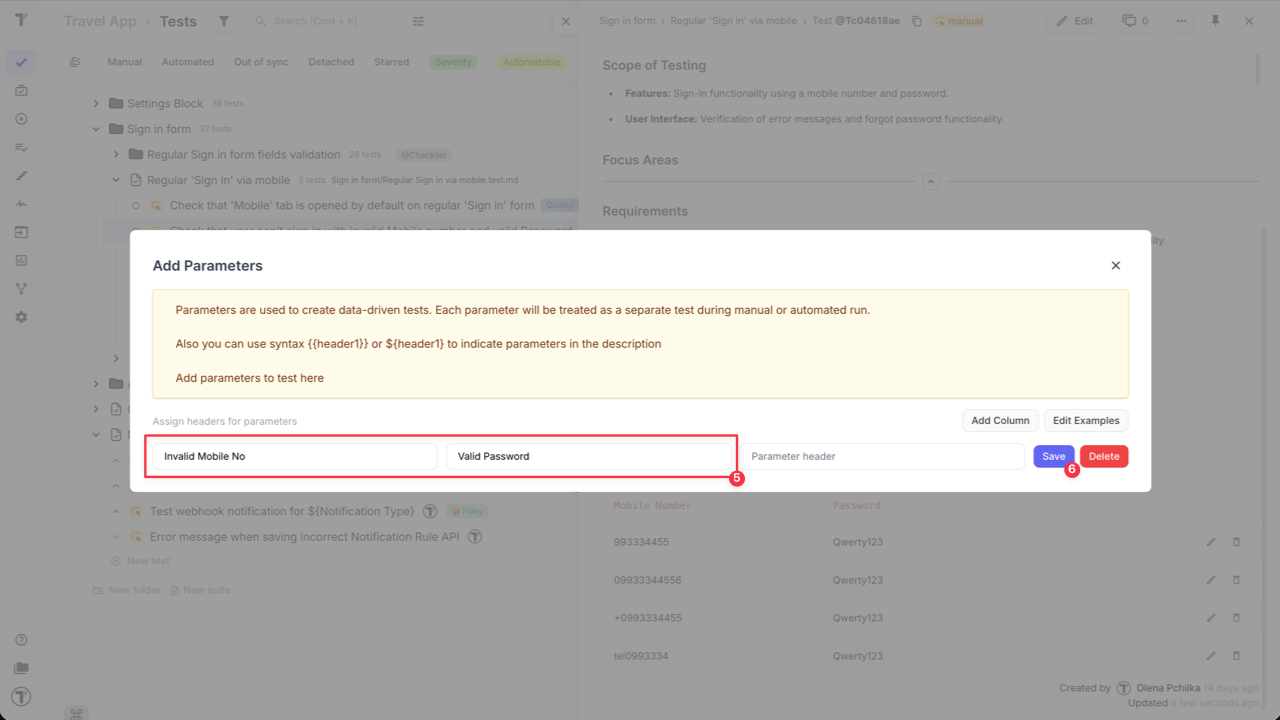
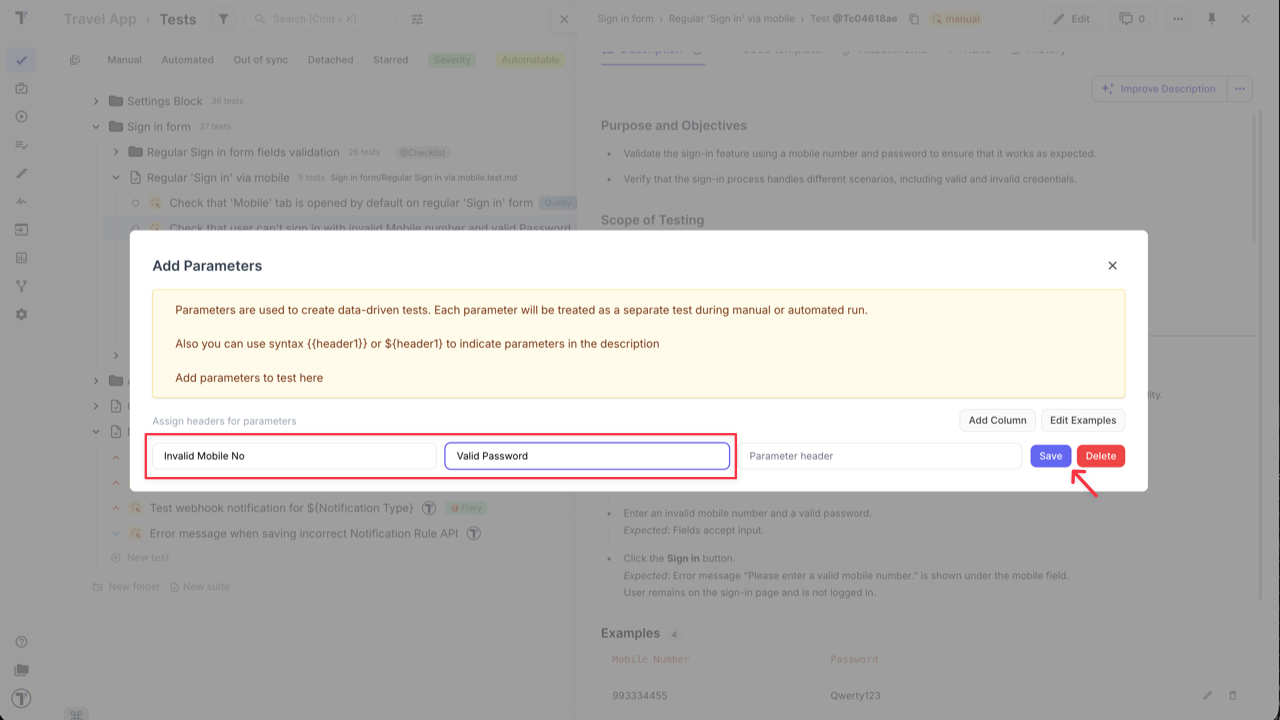
- Add parameter headers:
- Enter a name for the header.
- A new ‘Parameter header’ will appear automatically for each additional header (or click ‘Add column’ button).
- Click ‘Save’ button after adding all necessary headers.
- Add parameter names.
- Click ‘Save’ button.
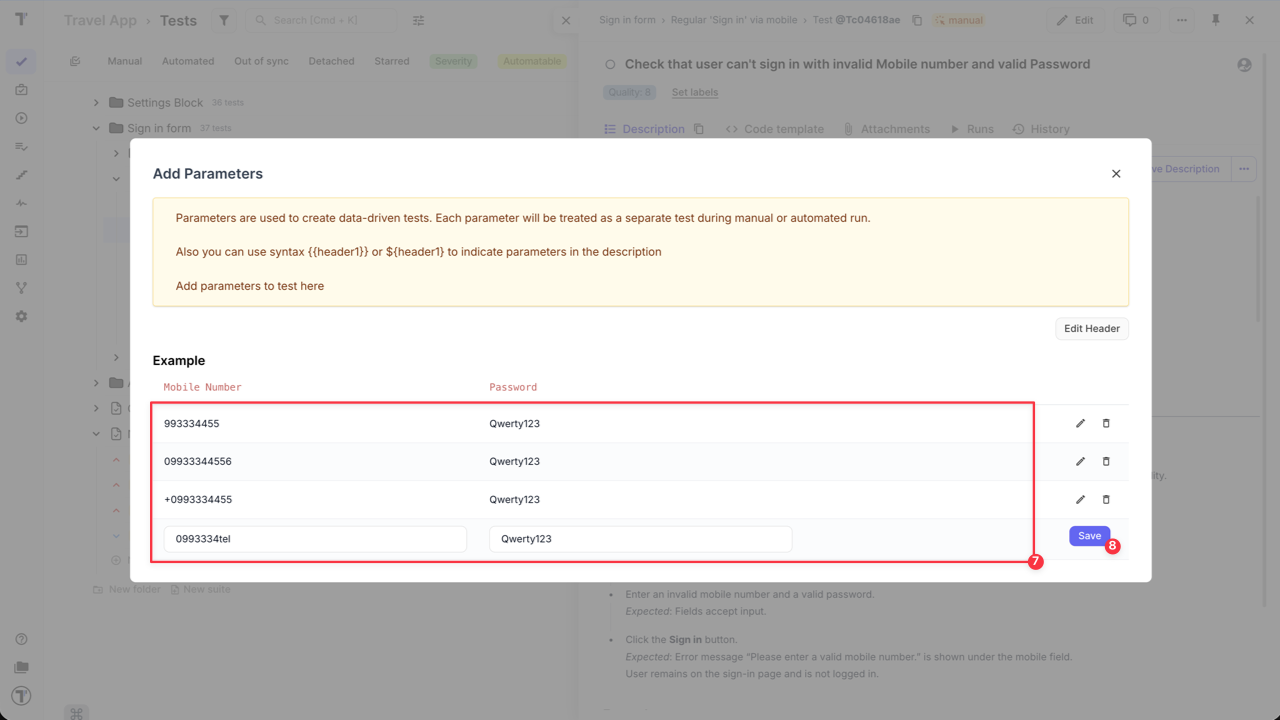
Now, your parameters are added, and you can see them at the bottom of the modal,
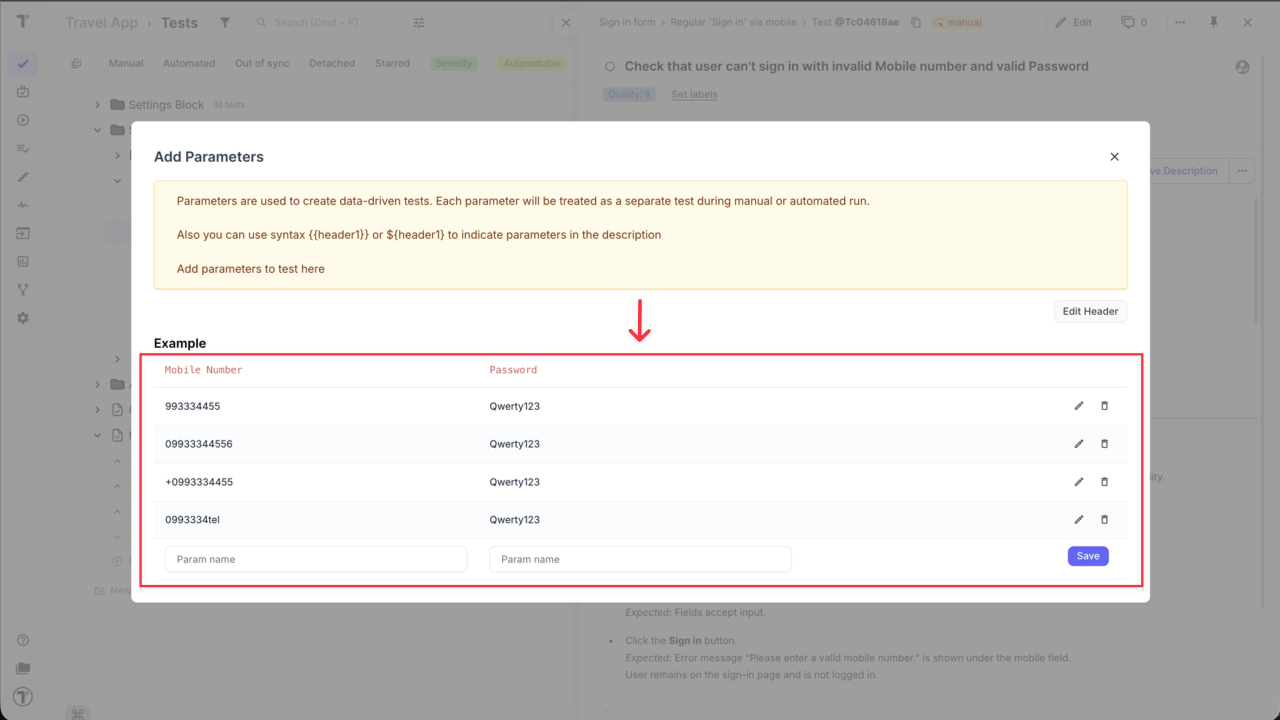
or under the test description.
How to Edit Test Parameters
Section titled “How to Edit Test Parameters”You are able to edit existing parameters or parameter headers in two methods:
Method 1: Editing directly under the test description
- Click the ‘Edit’ icon next to the parameter.
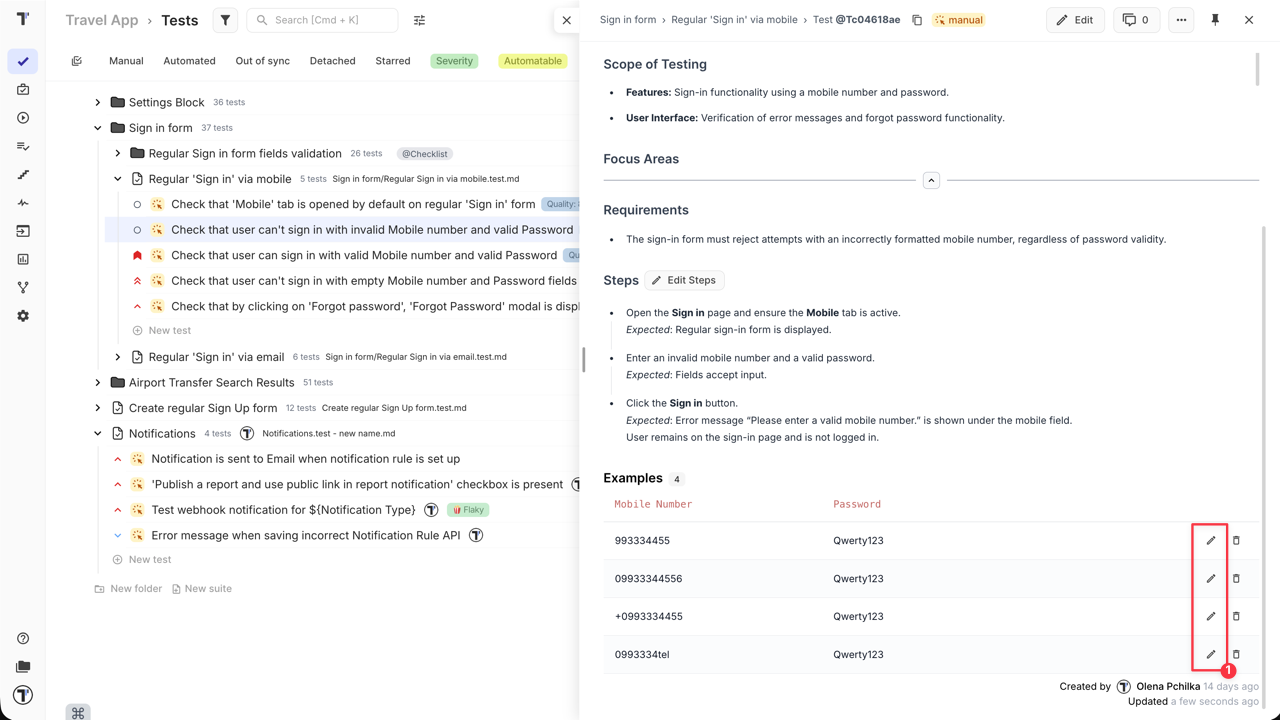
- Update the parameter name.
- Click the ‘Save’ button.
- Click the ‘Edit Header’ button.
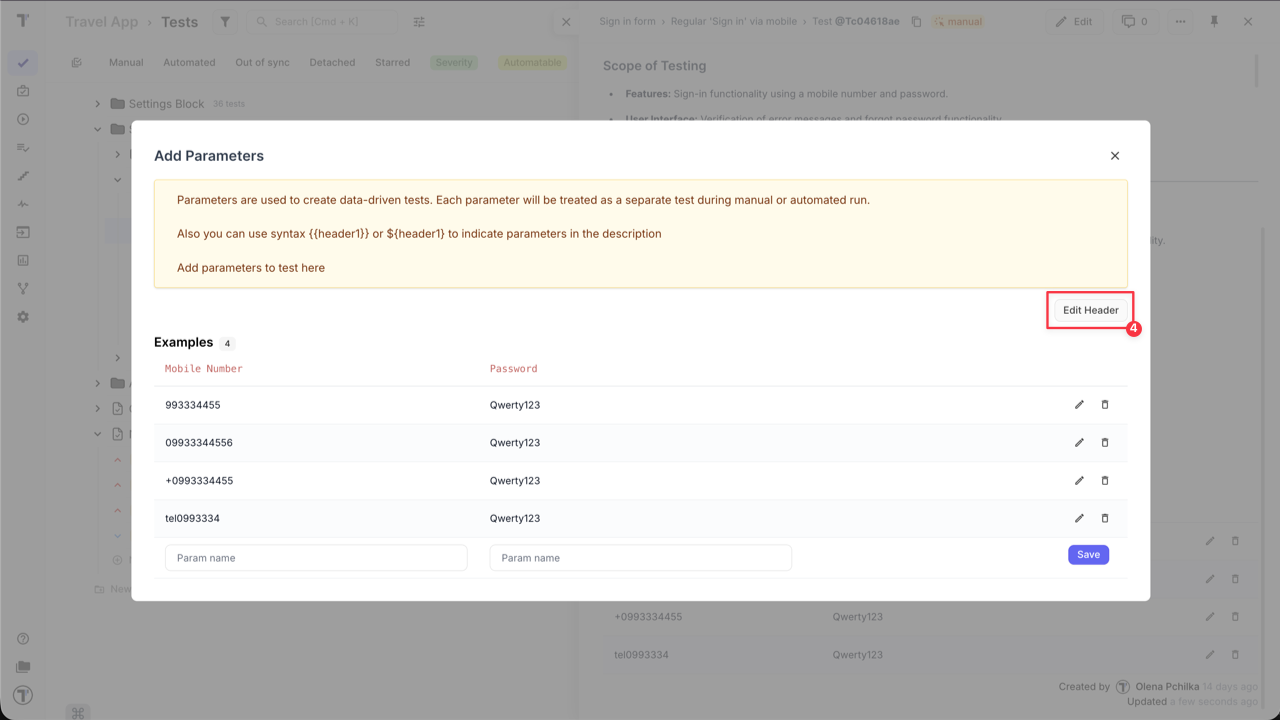
- Update the header name.
- Click the ‘Save’ button.
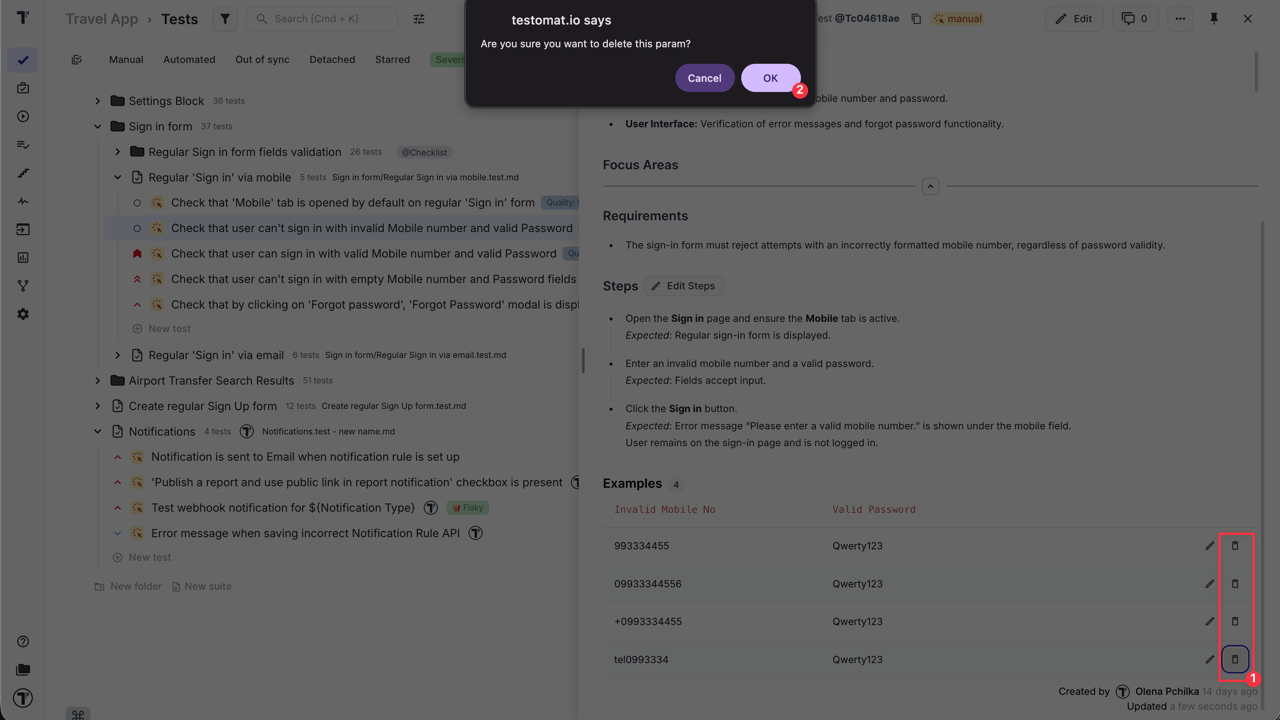
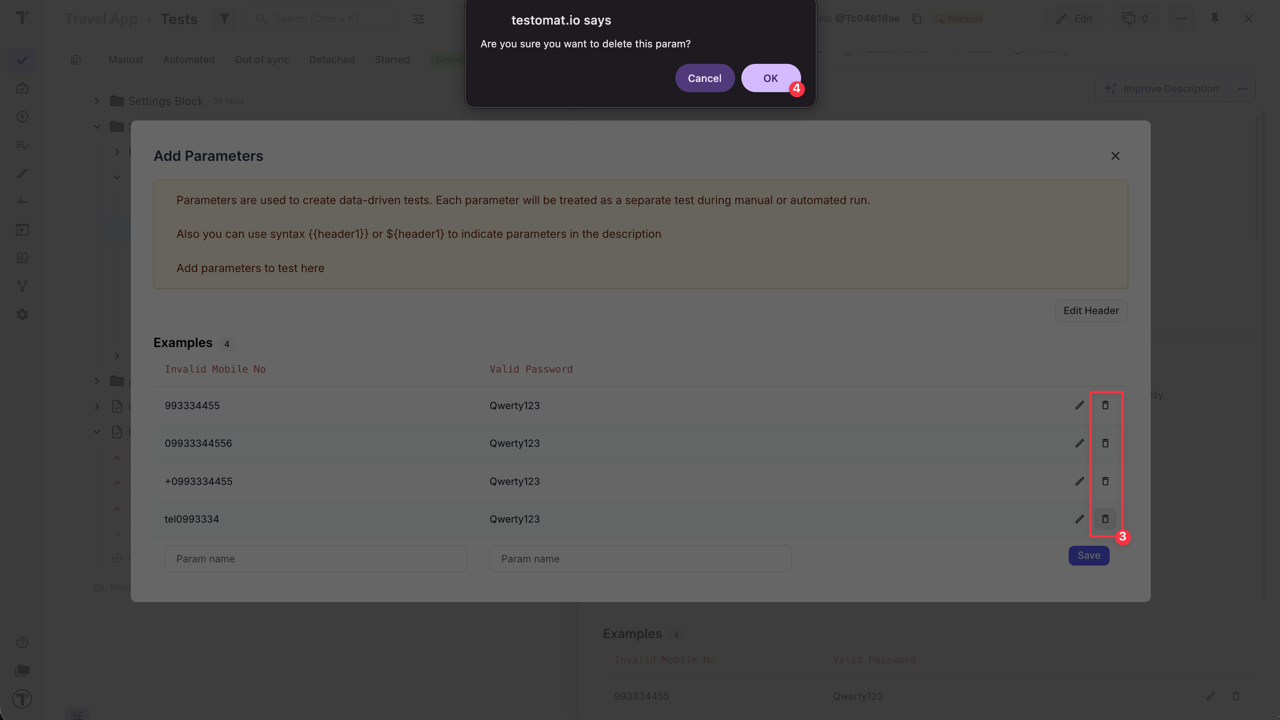
To delete a parameter:
- Click the ‘Trash’ icon.
- Click ‘OK’ to confirm action on ‘Are you sure you want to delete this param?’ pop-up.
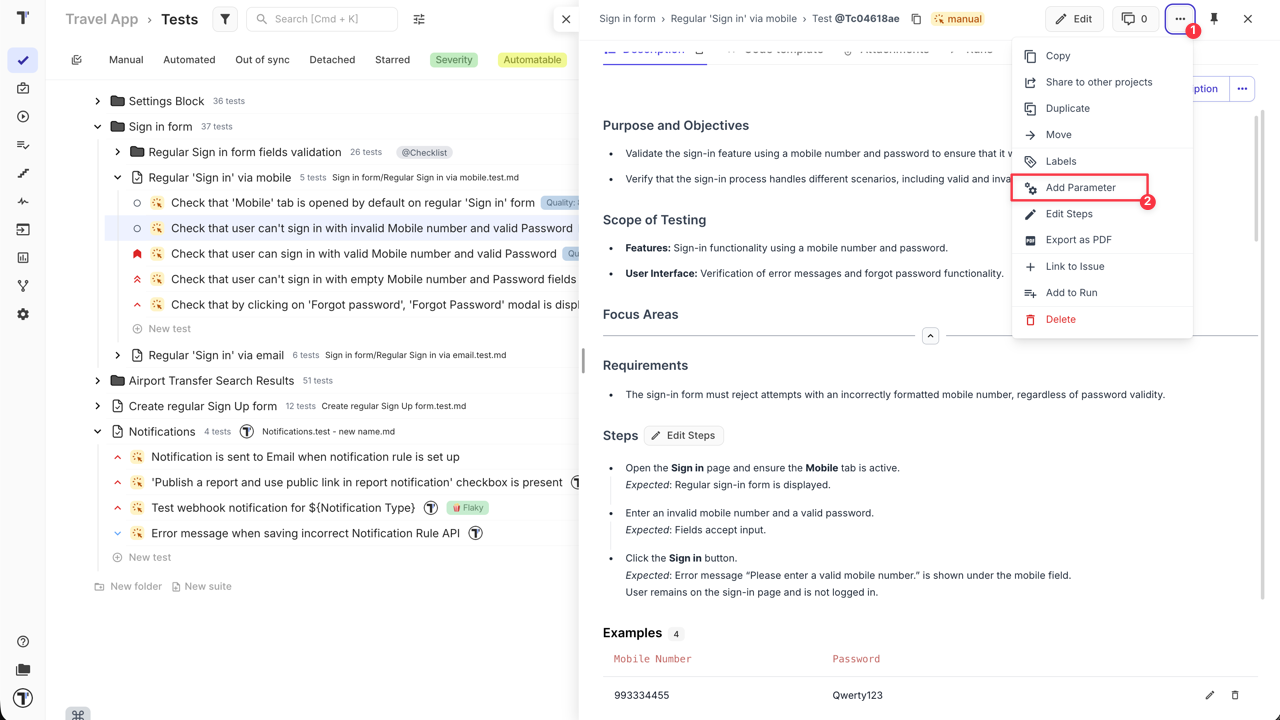
Method 2: Editing via the parameter menu
- Click the ‘Extra button’ icon.
- Select ‘Add Parameter’ from the extra menu dropdown.
- Follow the same steps as in Method 1:
- Click the ‘Edit’ icon next to the parameter.
- Update the parameter name.
- Click ‘Save’.

- Click ‘Edit Header’ button.
- Update the header name.
- Click ‘Save’.
To delete a parameter via the parameter menu:
- Click the ‘Extra button’ icon.
- Select ‘Add Parameter’ from the extra menu dropdown.
- Click the ‘Trash’ icon.
- Click ‘OK’ to confirm action on ‘Are you sure you want to delete this param?’ pop-up.
How to Use Dynamic Parameters in Test Steps
Section titled “How to Use Dynamic Parameters in Test Steps”Once you have defined your Parameter Headers (as shown in the steps above), you can reference them directly in your test logic.
- Identify your Header: Note the exact name of the ‘Parameter header’ you created (e.g.,
UsernameorEnvironment). - Click ‘Edit’ button for test.
- Insert the Placeholder: In the Test Description or Steps field, use the syntax
${ParameterName}or{{ParameterName}}.
Example:
Enter an invalid Mobile Number ${Mobile No}
OR
Open home page {{URL}}.- Save the Test: Click the ‘Save’ button on the test case.
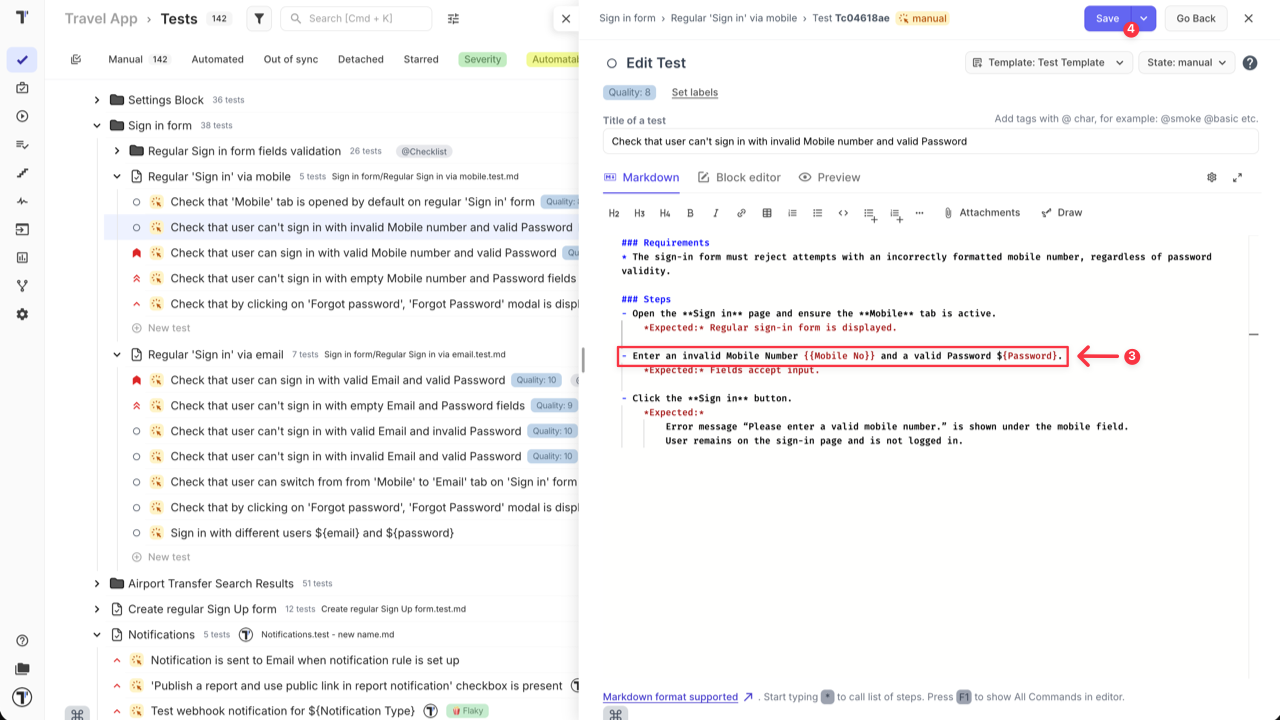
When you launch the test, Testomat.io will scan for the ${} and {{}} syntax and inject the corresponding value from your parameters table for that specific run iteration.
Launch Test Case with Dynamic Parameters
Section titled “Launch Test Case with Dynamic Parameters”When a test case with added parameters is launched — whether as a manual or automated run — it is automatically rendered with actual values. This data-driven approach ensures that your test logic remains clean while covering multiple scenarios.
How Parameters Work During Execution:
- Iteration-Based Testing: Each row in your parameters table is treated as a separate test iteration.
- Data Substitution: During the run, the system substitutes the parameter placeholders with the specific data from that row.
- Comprehensive Reporting: In the Run Report, each iteration is displayed as an individual test case, complete with its specific test results.
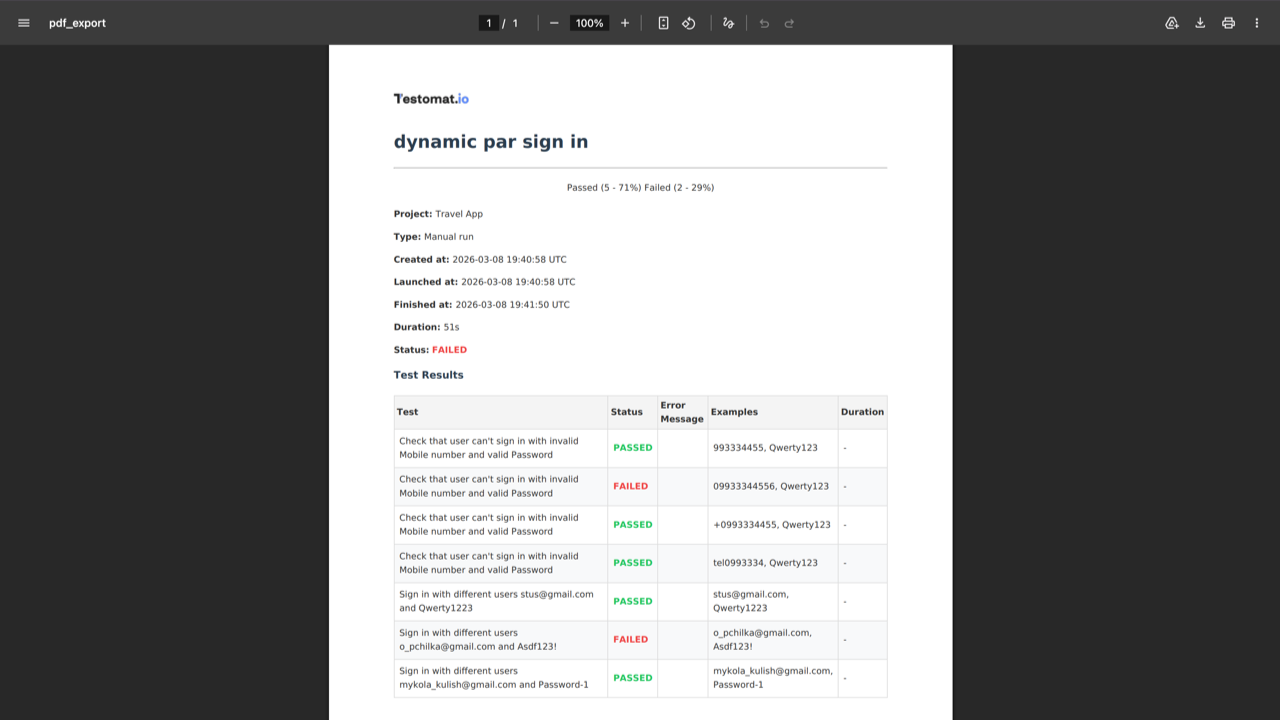
This functionality allows you to pinpoint exactly which set of data caused a failure without searching through a single, massive test log.