Work with Tests in Jira
This guide explains how to create, edit, link, and manage Suites, Tests, and Plans in Jira using the Testomat.io plugin.
How to Work with Suites
Section titled “How to Work with Suites”Create and manage Suites in Jira — organize related tests and link them to issues using the Testomat.io plugin.
How to Create a Suite
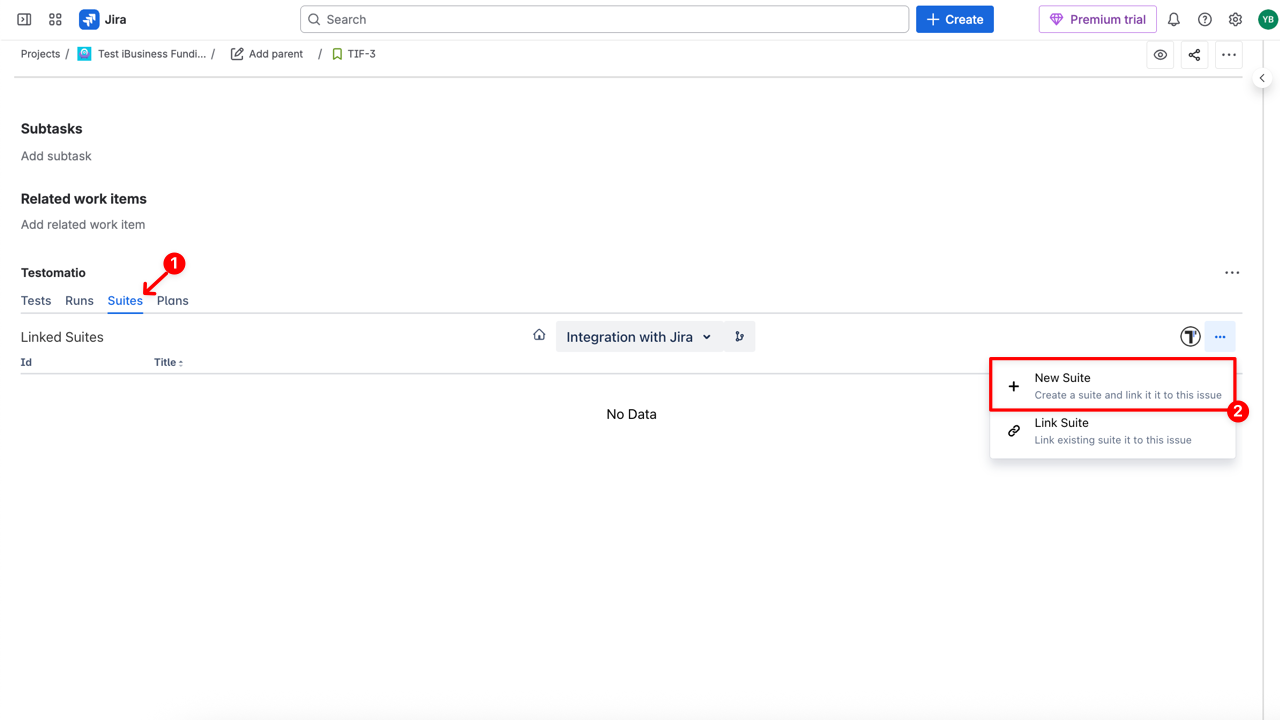
Section titled “How to Create a Suite”- Navigate to the Suites tab
- Click the menu button (⋯) and select New Suite
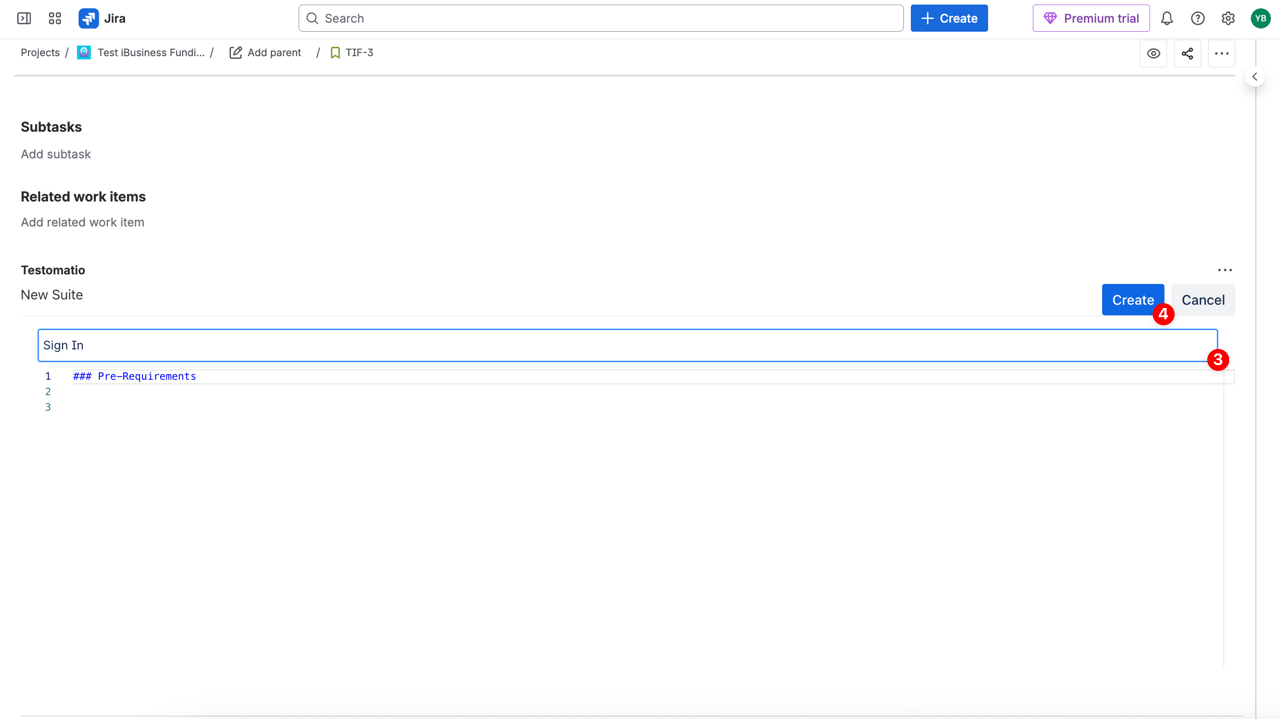
- Enter the suite’s name and description below (optional)
- Click Create button
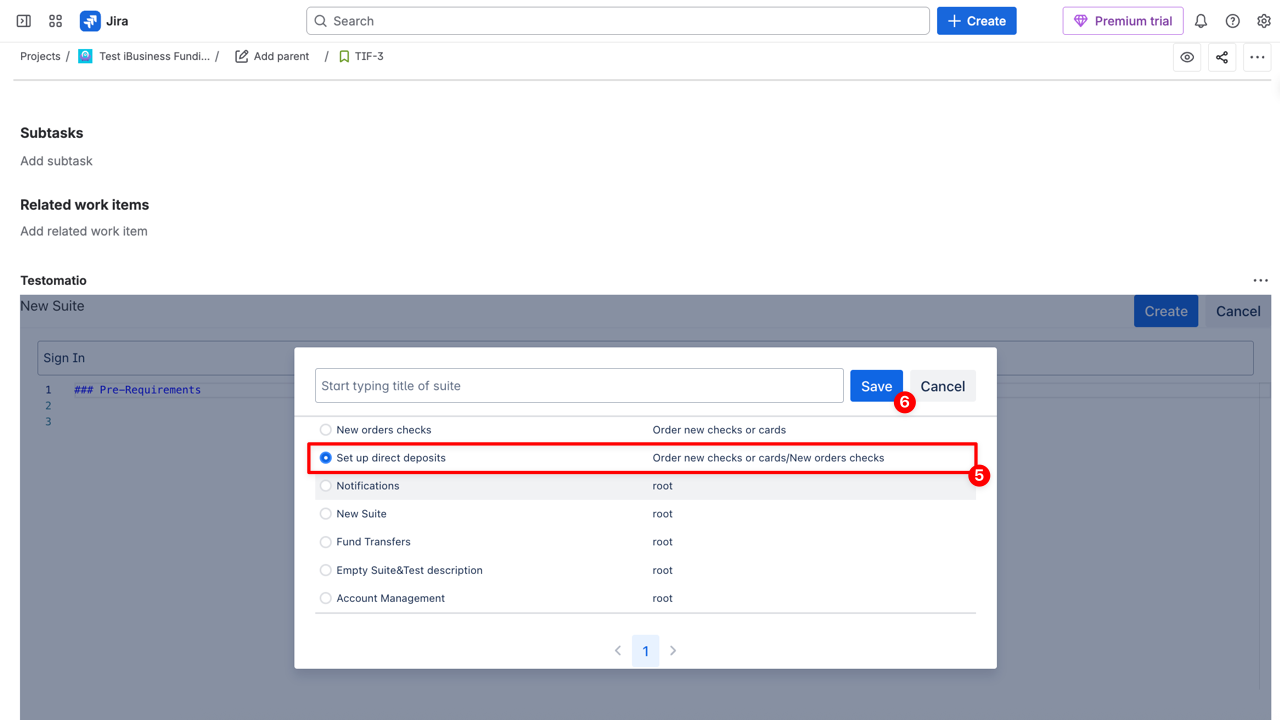
- Select a parent suite from the dropdown or Root destination
- Click Save button
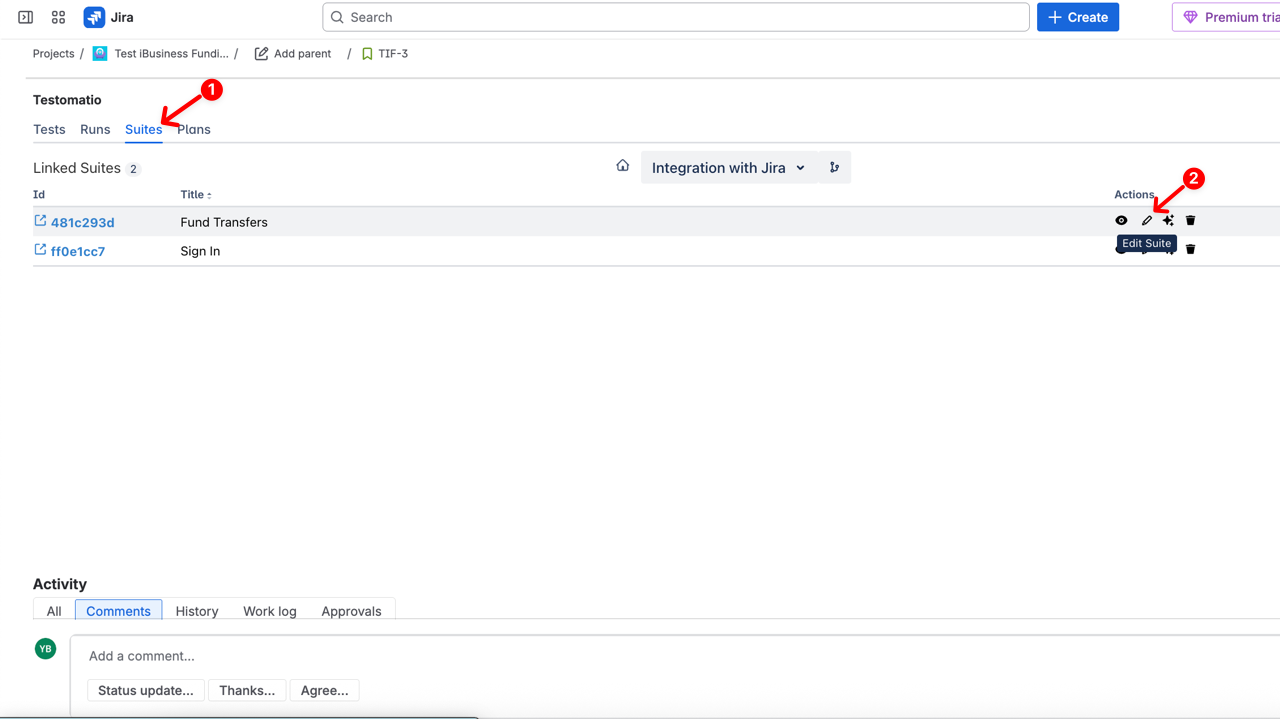
How to Edit a Suite
Section titled “How to Edit a Suite”- Navigate to the Suites tab
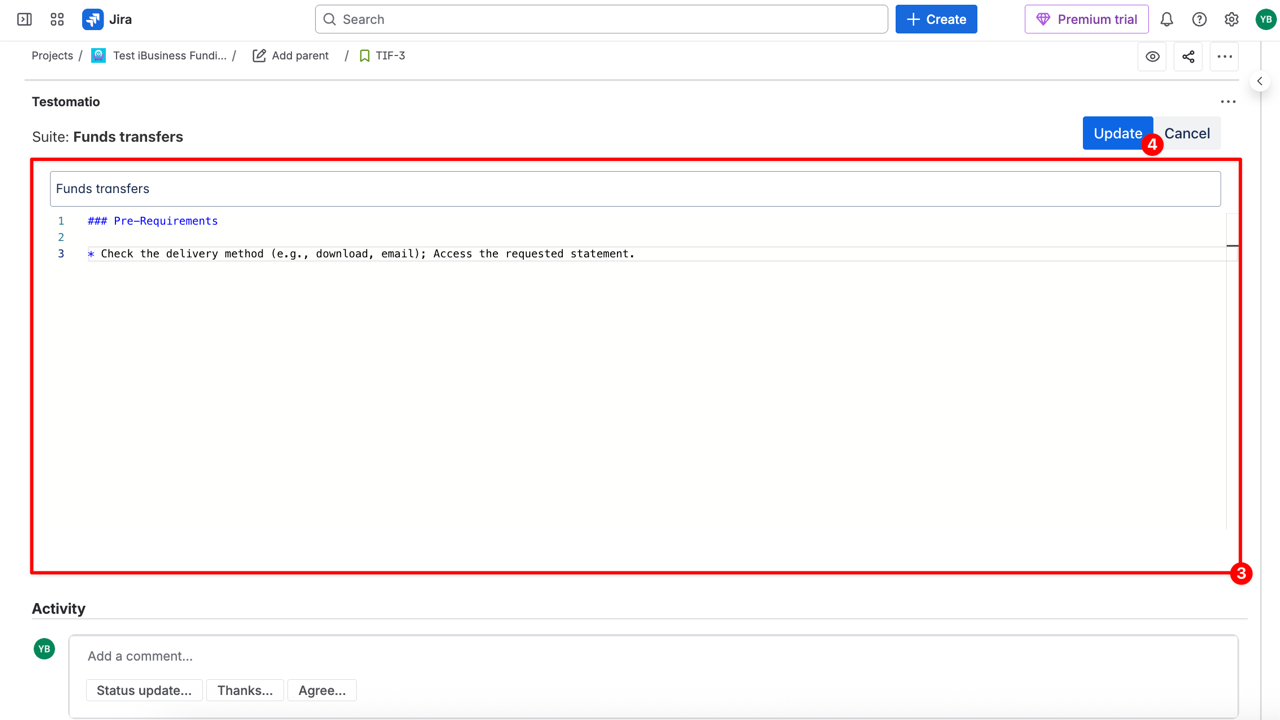
- Click the pen icon near the suite you want to edit
- Edit the suite (Suite title, description)
- Click Update button
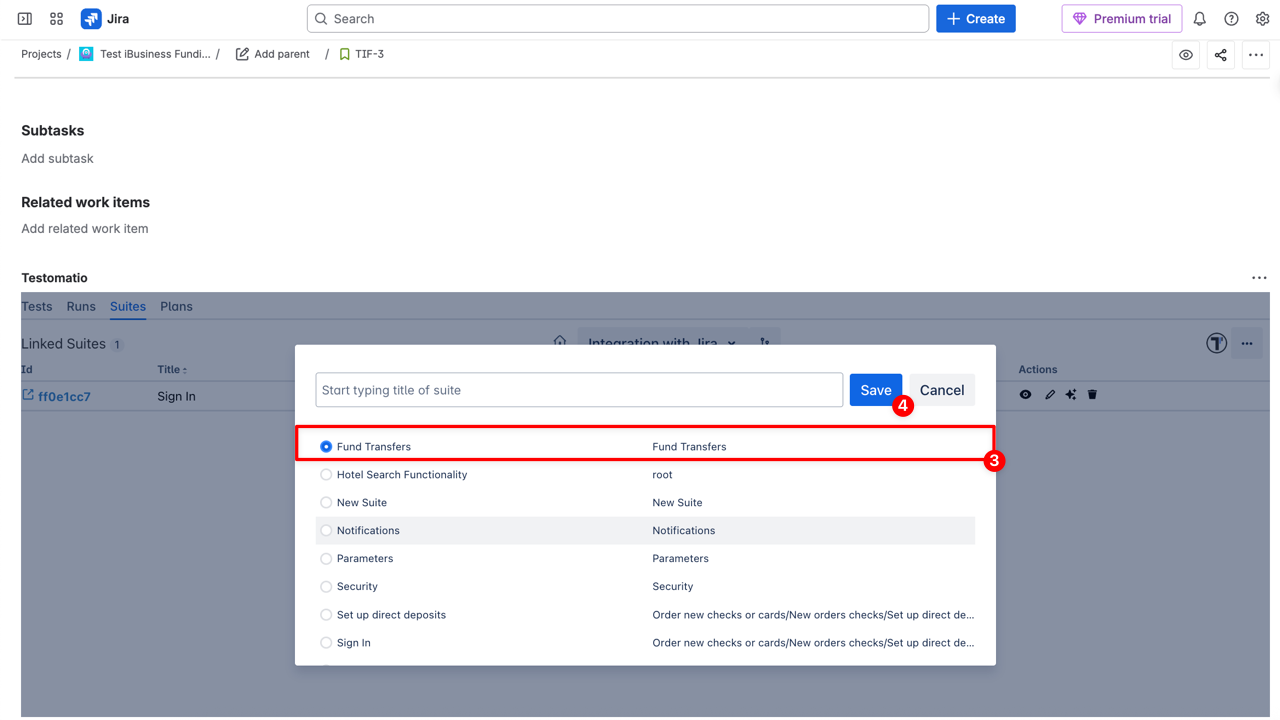
How to Link and Unlink a Suite
Section titled “How to Link and Unlink a Suite”To link a suite to a Jira issue:
- Navigate to the Suites tab
- Click the menu button (⋯) and select Link Suite

- Select a parent suite from the dropdown
- Click Save button
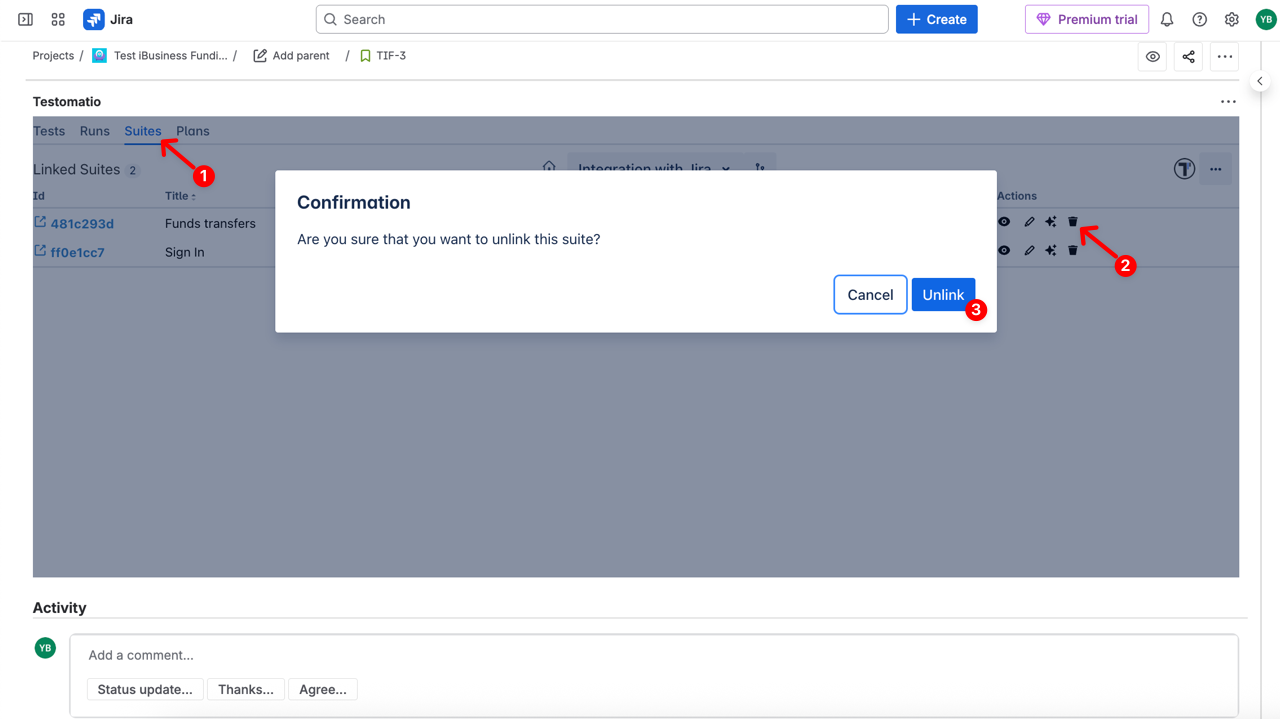
To unlink a suite:
- Navigate to the Suites tab
- Сlick the trash can icon next to the linked suite
- Once the modal window opens, confirm by clicking Unlink button
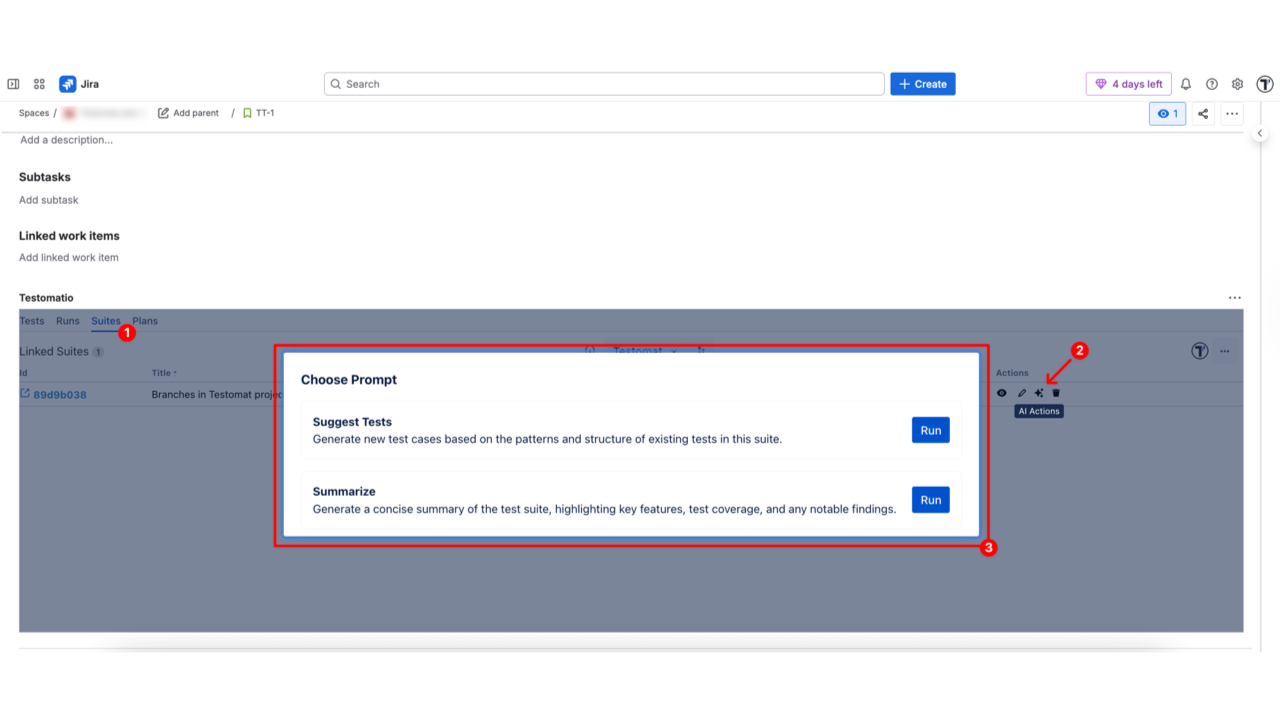
AI Actions for Suites
Section titled “AI Actions for Suites”Use AI to generate new test cases, or summarize the suite. Helps quickly expand test coverage, identify gaps, and create high-level insights about the suite without manual analysis.
- Suggest Tests – Generate new test cases based on the patterns and structure of existing tests in this suite.
- Summarize – Generate a concise summary of the test suite, highlighting key features, test coverage, and any notable findings.
How to run AI Actions on a suite:
- Navigate to the Suites tab in the Jira Plugin
- Click the AI Actions button next to the specific suite
- Select and run the desired AI prompt
How to Work with Tests
Section titled “How to Work with Tests”Manage your tests directly in Jira — create, edit, and link them to issues or plans within the Testomat.io plugin.
How to Create a Test
Section titled “How to Create a Test”- Navigate to the Tests tab
- Click the menu button (⋯) and select New Test
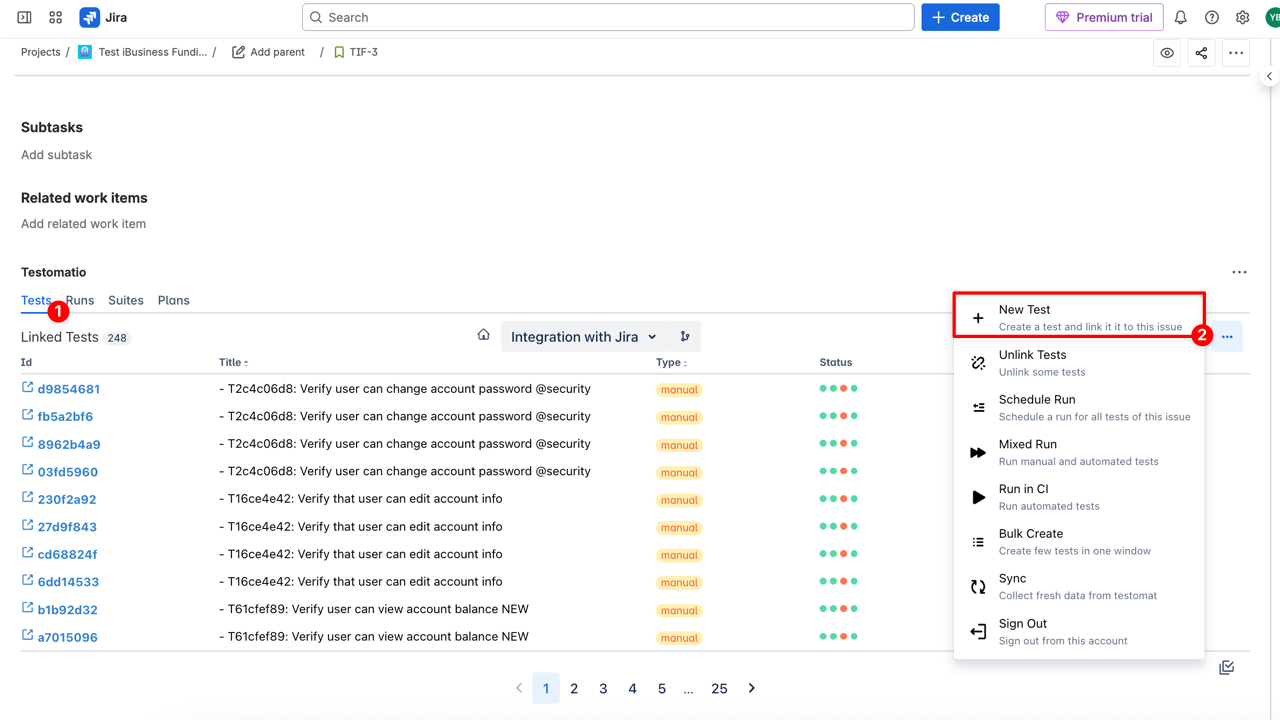
- Enter the test’s name and optional description
- Click Create button
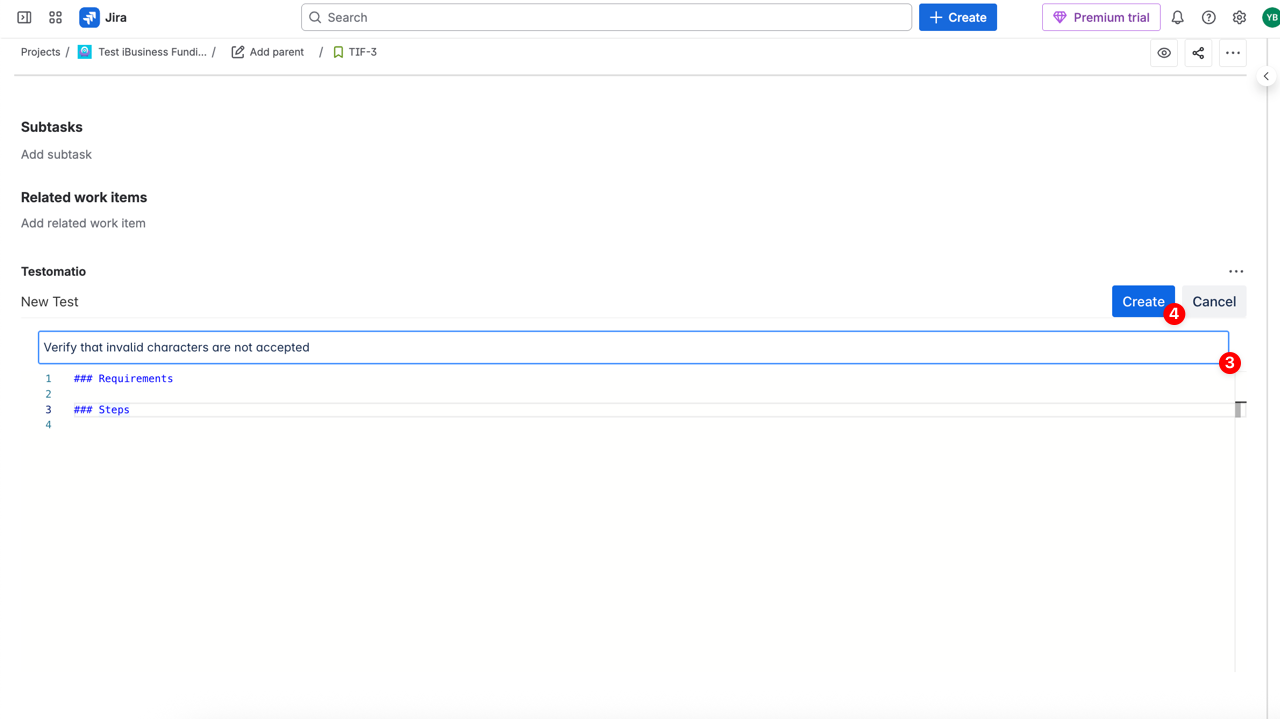
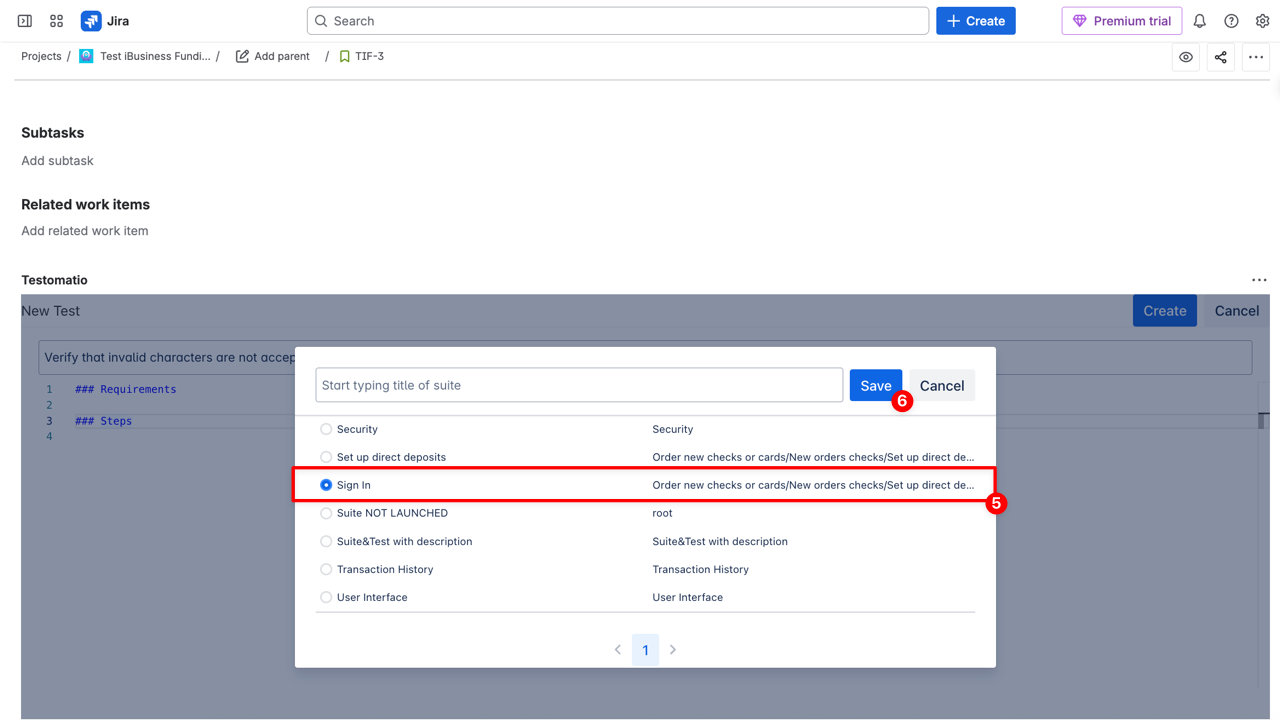
- Select a suite from the dropdown
- Click Save button
How to Bulk Create Tests
Section titled “How to Bulk Create Tests”Quickly create multiple tests at once directly from Jira.
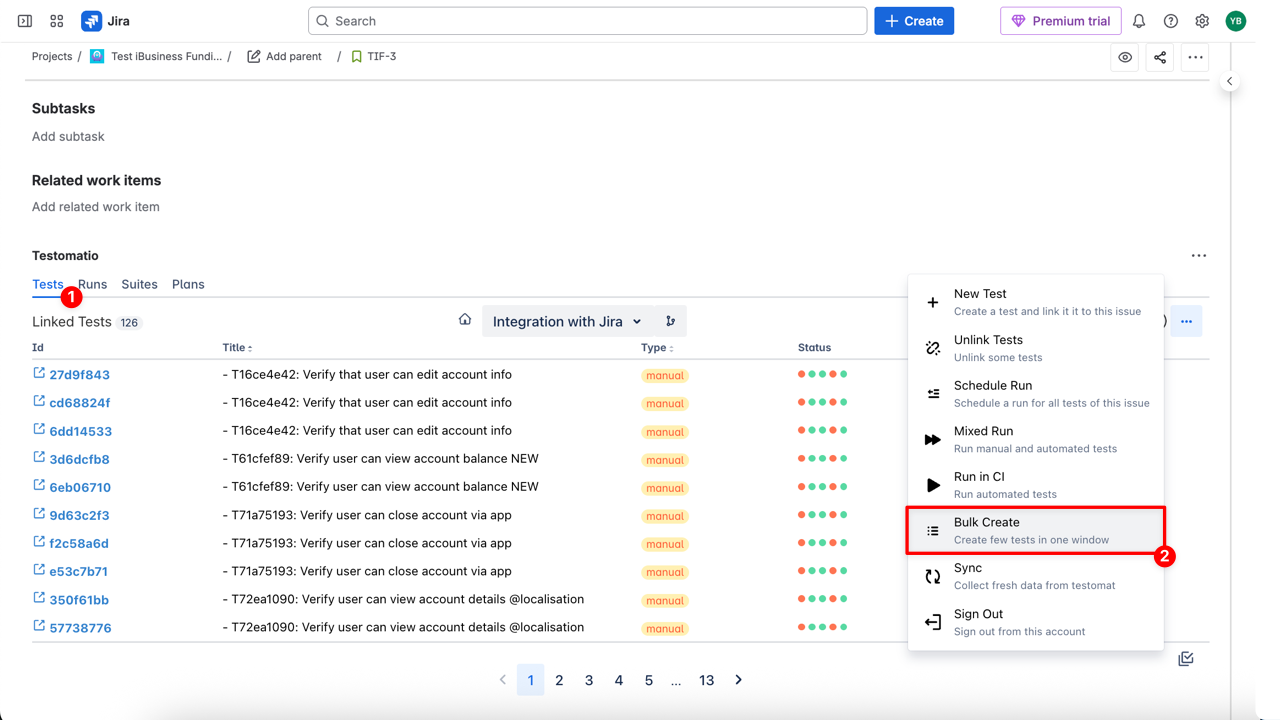
- Navigate to the Tests tab
- Click the menu button (⋯) and select Bulk Create
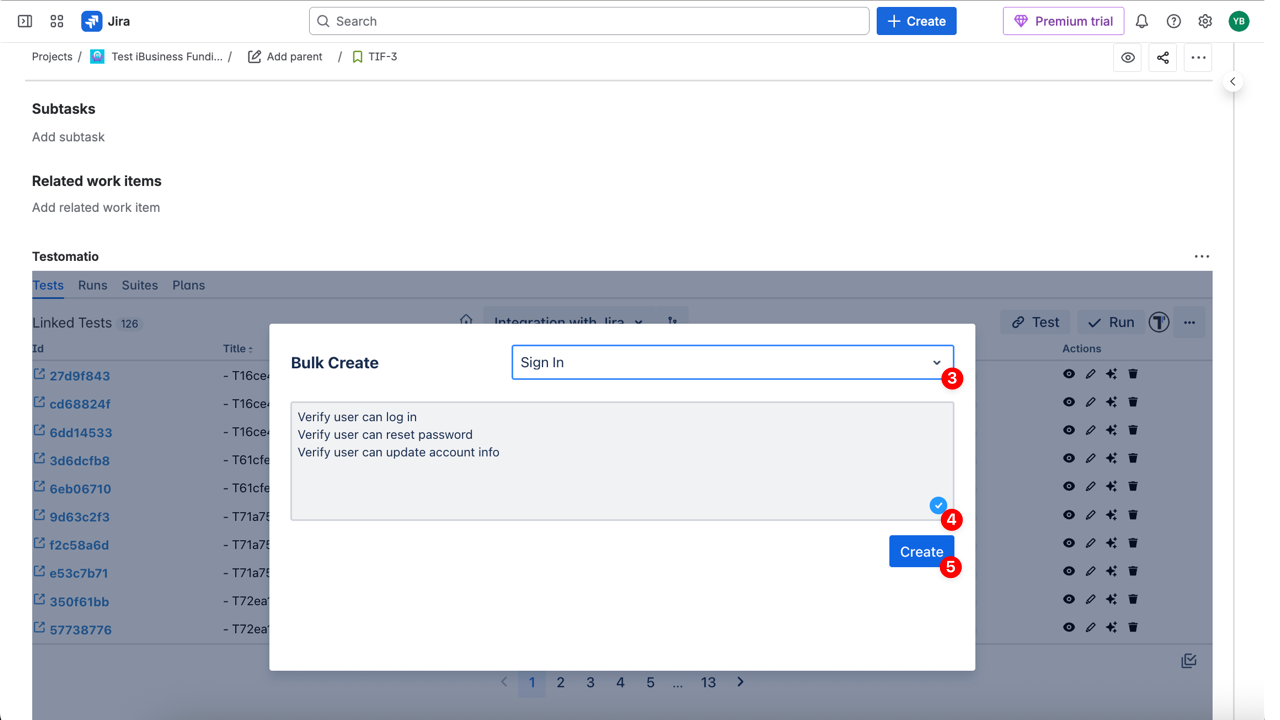
- Select the existing suite from the dropdown list
- In the Add new tests field, enter test titles — each line corresponds to the title of a new test
- Click the Create button to add all listed tests to the selected suite
How to Edit a Test
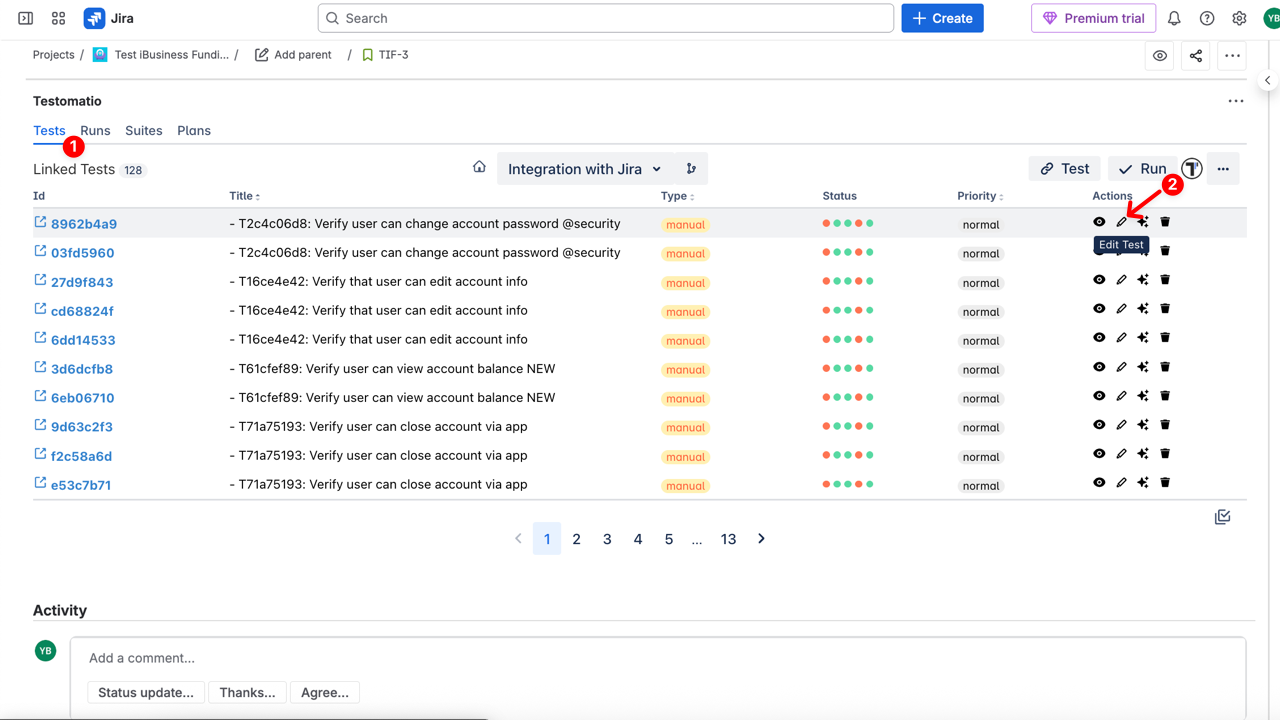
Section titled “How to Edit a Test”- Navigate to the Tests tab
- Click the pen icon near the test you want to edit
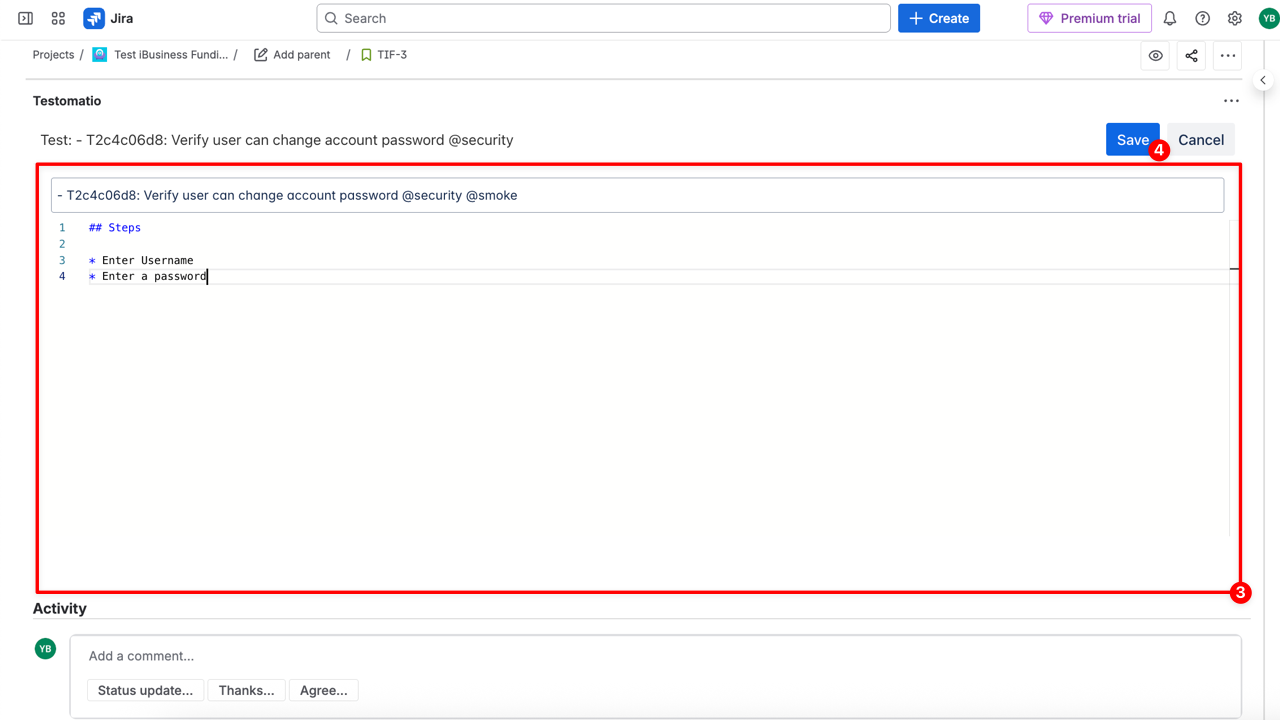
- Edit the test (Test title, description)
- Click Save button
How to Link and Unlink a Test
Section titled “How to Link and Unlink a Test”How to Link a Test
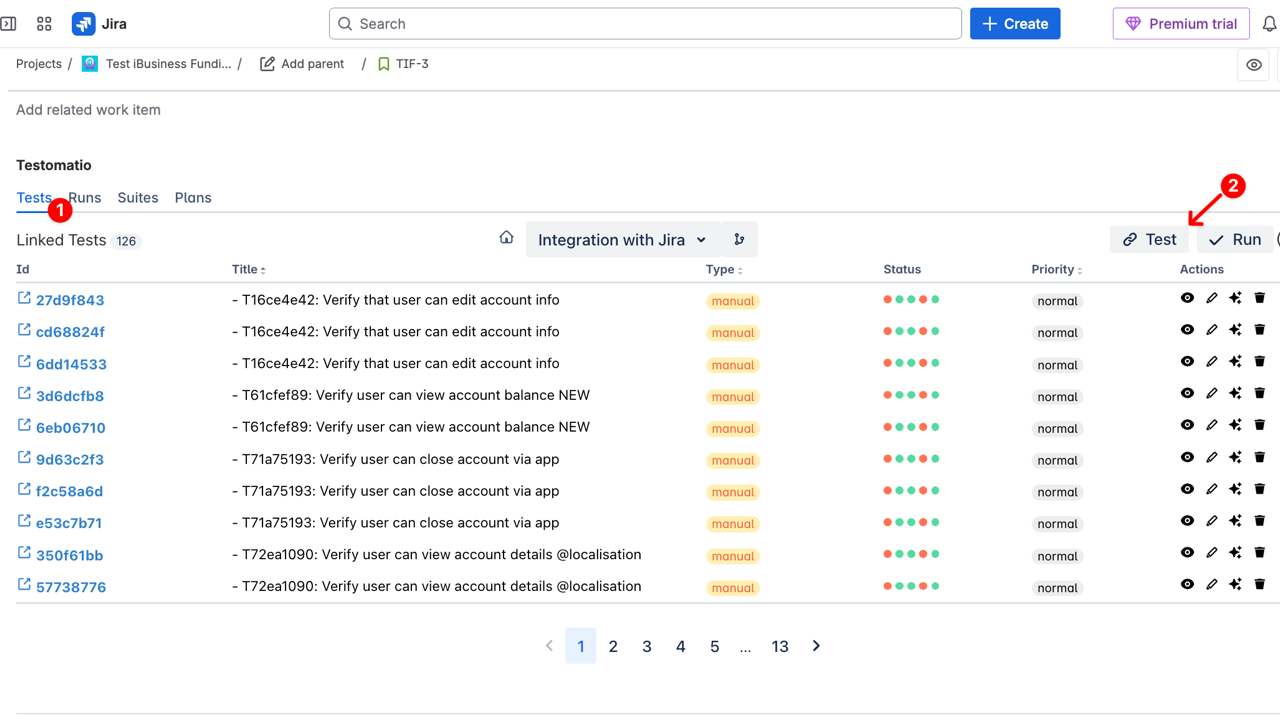
Section titled “How to Link a Test”- Navigate to the Tests tab
- Click the 🔗 Test button with the link icon
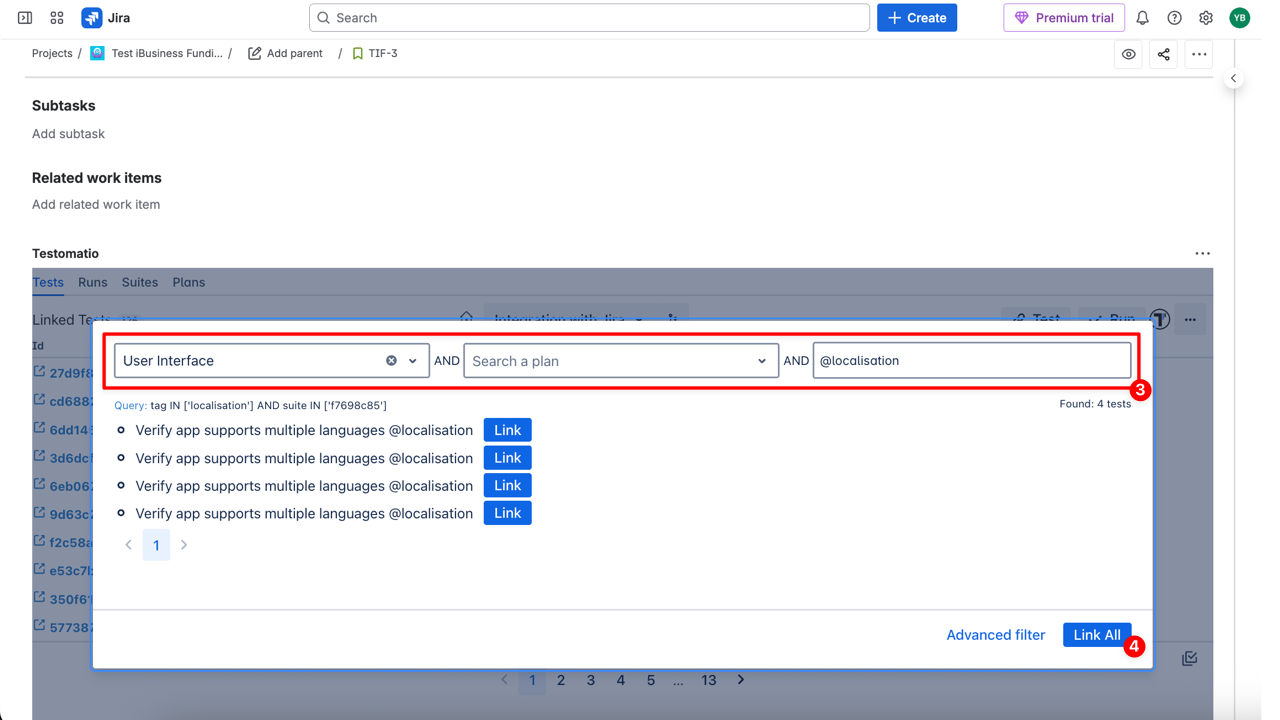
- In the opened window, use filters to find the needed tests:
- Select a suite in the Search a suite dropdown
- Select a plan in the Search a plan dropdown
- Optionally, enter a tag in the Type @tag and press ‘Enter’ field
- Combine filters using AND or OR to refine search results
- From the list of found tests, click the Link button next to a test to connect it to the Jira issue
- You can also click Link All to link all displayed tests
How to Unlink a Test
Section titled “How to Unlink a Test”You can unlink tests from a Jira issue in several ways:
- via the menu button (⋯)
- through the 🔗Test button
- using Bulk Unlink (recommended for mass actions)
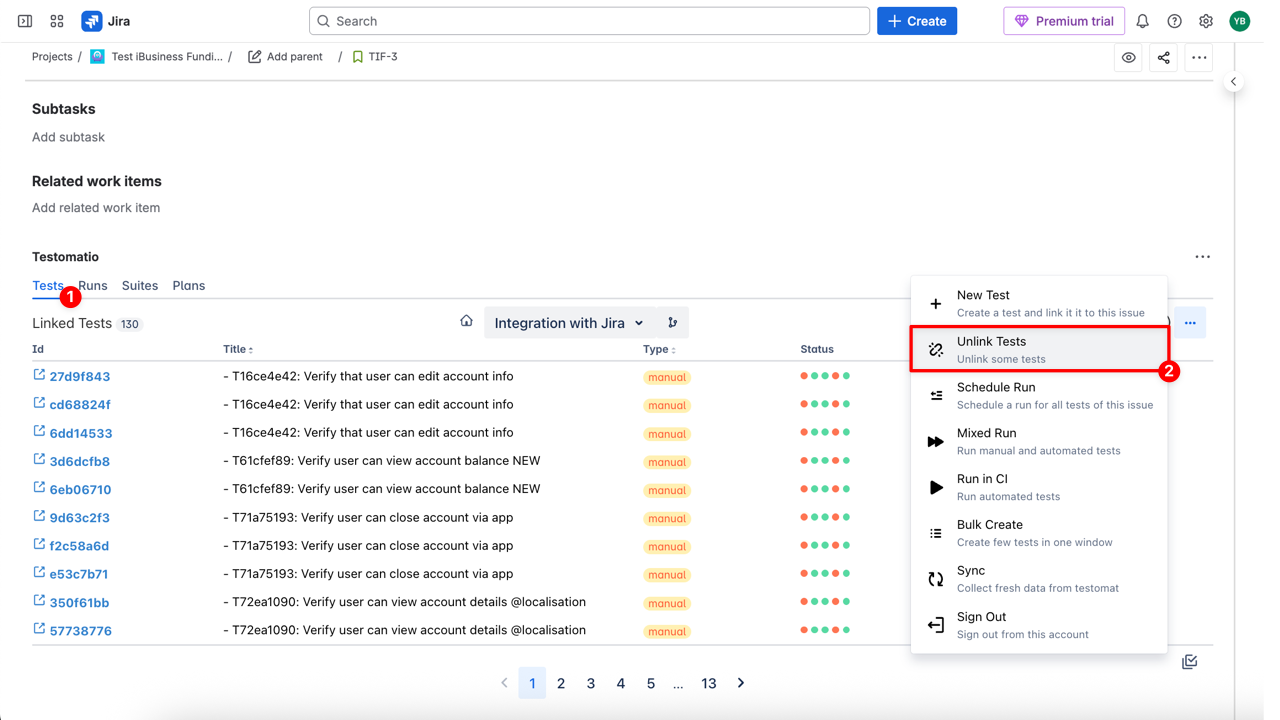
Option 1 — via the menu button (⋯)
- Navigate to the Tests tab
- Click the menu button (⋯) and select Unlink Test
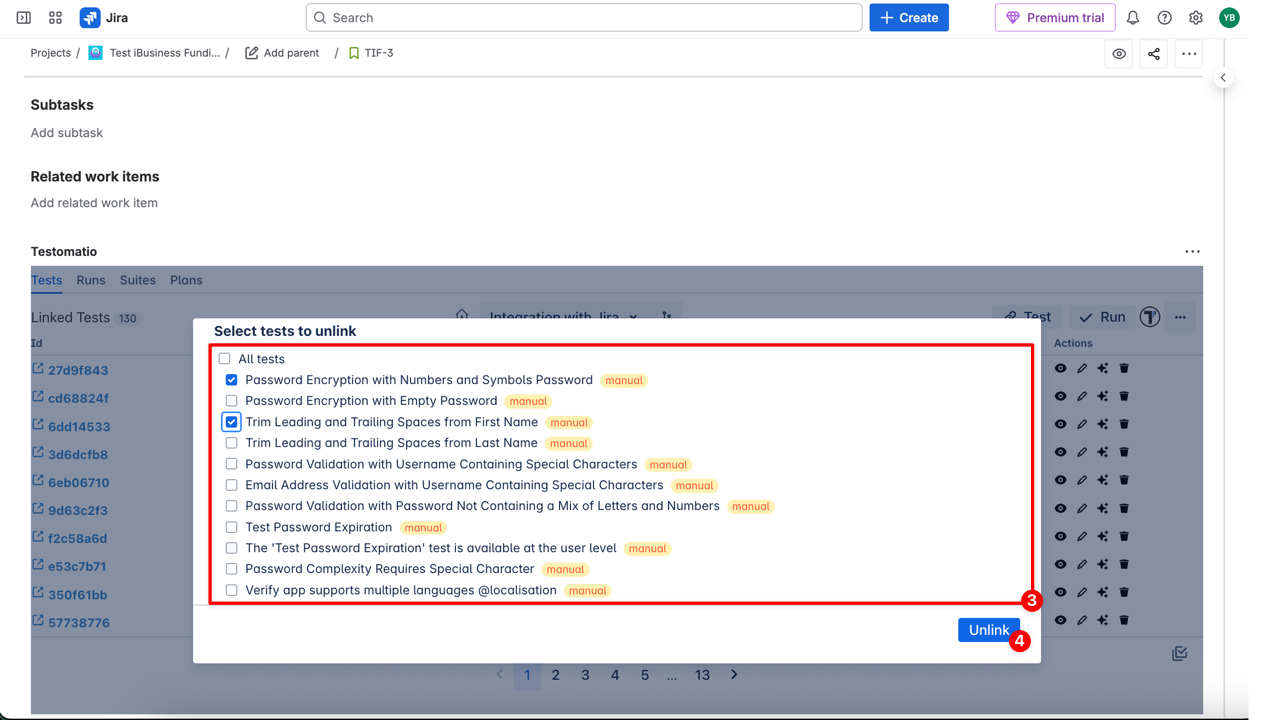
- Select tests to unlink:
- By default, all tests are selected for unlinking
- If you don’t want to unlink all tests — uncheck the box next to the specific tests
- To unlink only selected ones, uncheck All tests first, then select individual tests you want to unlink
- Click the Unlink button to confirm
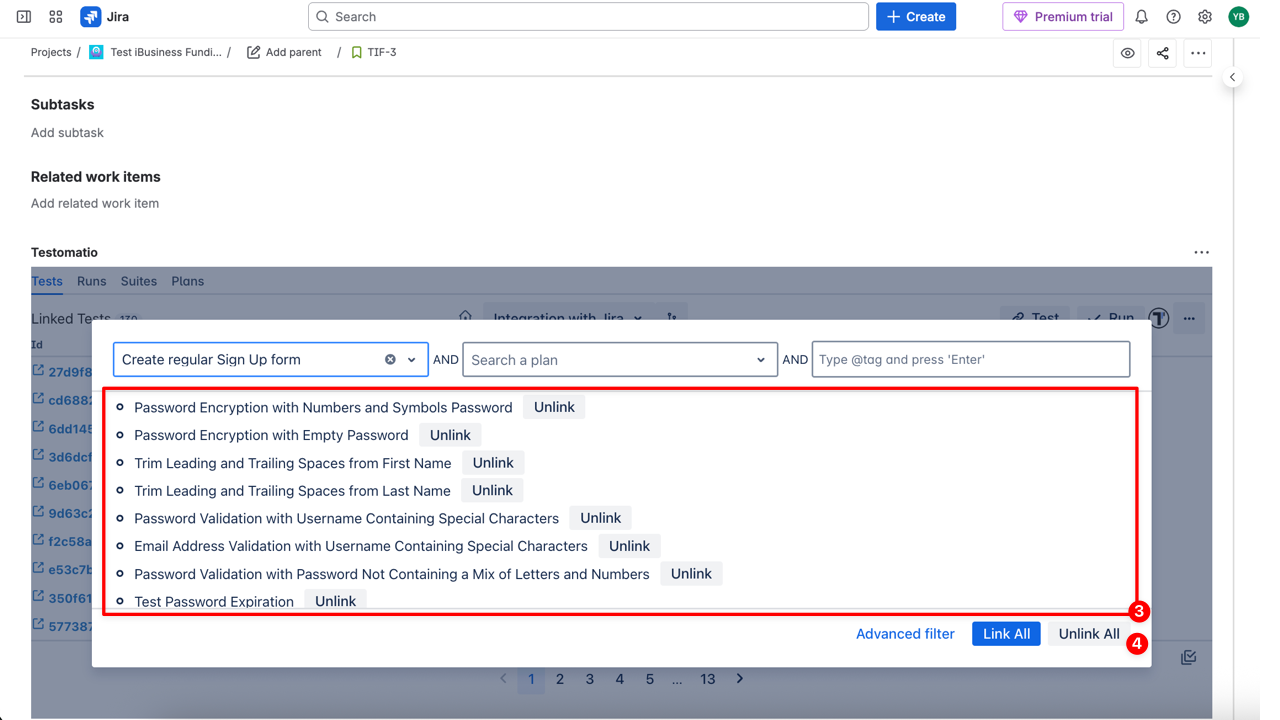
Option 2 — through 🔗Test button
- Navigate to the Tests tab
- Click the 🔗 Test button with the link icon
- In the opened window, find linked tests — Click Unlink next to the test you want to remove
- Or click Unlink All to detach all linked tests at once
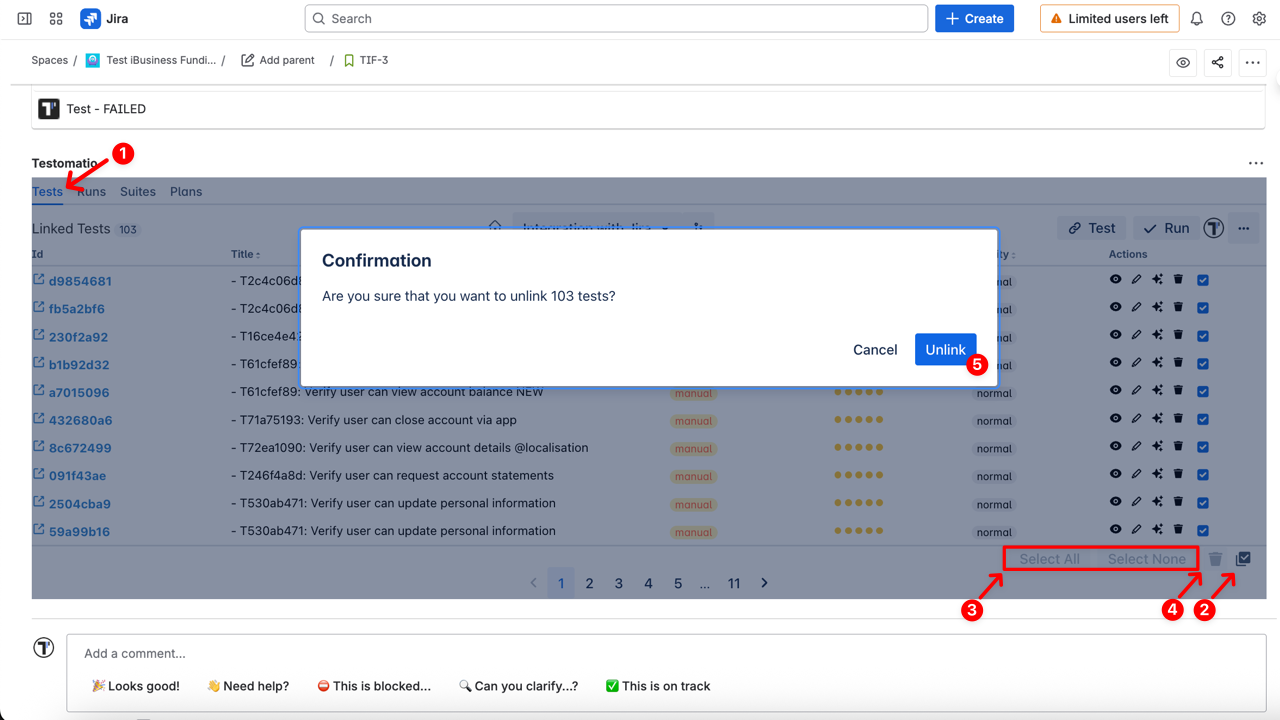
Option 3: Bulk Unlink – via the ‘multi-select’ button
- Navigate to the Tests tab
- Click the ‘multi-select’ button at the bottom right corner
- Use the checkboxes to select individual tests:
- Click Select All to select all tests
- Click Select None to clear the selection
- Click the Trash icon to unlink the selected tests
- In the confirmation pop-up (‘Are you sure that you want to unlink # tests?’), click Unlink to confirm
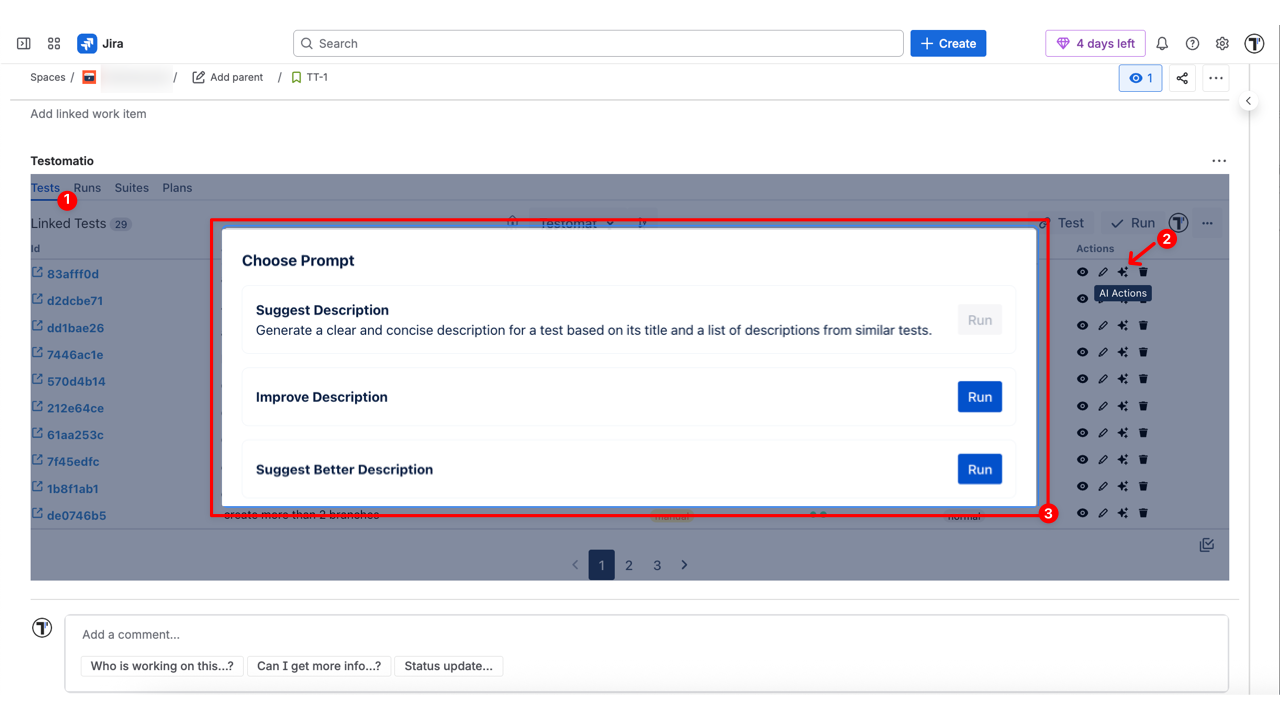
AI Actions for Tests
Section titled “AI Actions for Tests”Automatically generate or improve individual test descriptions. AI Actions save time on writing or refining test documentation, ensure clarity and consistency across the project, and improve overall quality.
- Suggest Description – Generate a clear and concise description for a test based on its title and a list of descriptions from similar tests.
- Improve Description – Enhances formatting and readability using Markdown without changing the content, ensuring consistency and easy scanning.
- Suggest Better Description – Rewords and reorganizes the existing description to make it clearer, more informative, and concise while preserving the original intent.
How to run AI Actions on a test:
- Navigate to the Tests tab in the Jira Plugin
- Click the AI Actions button next to the specific test
- Select and run the desired AI prompt
How to Work with Test Plans
Section titled “How to Work with Test Plans”Link and execute Test Plans directly from Jira to track and manage testing progress.
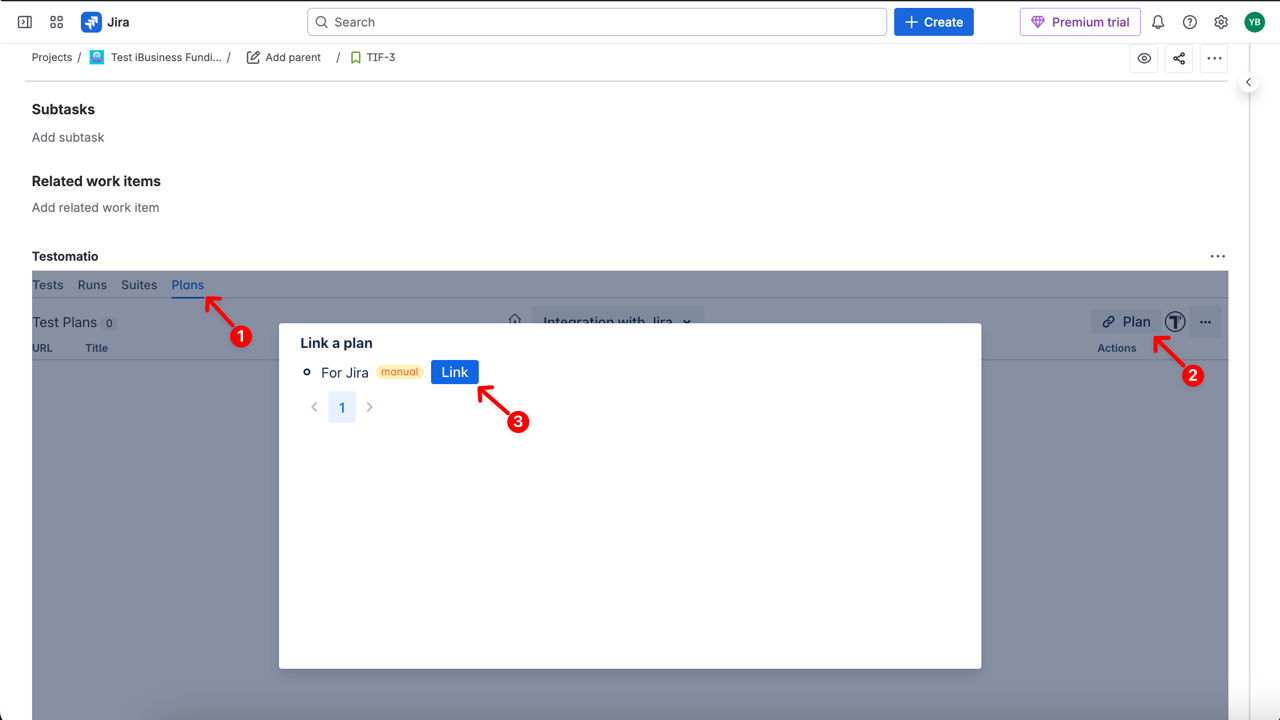
How to Link a Test Plan
Section titled “How to Link a Test Plan”- Navigate to the Plans tab
- Click the 🔗 Plan button or menu button (⋯) and select Link Plan
- Click Link button
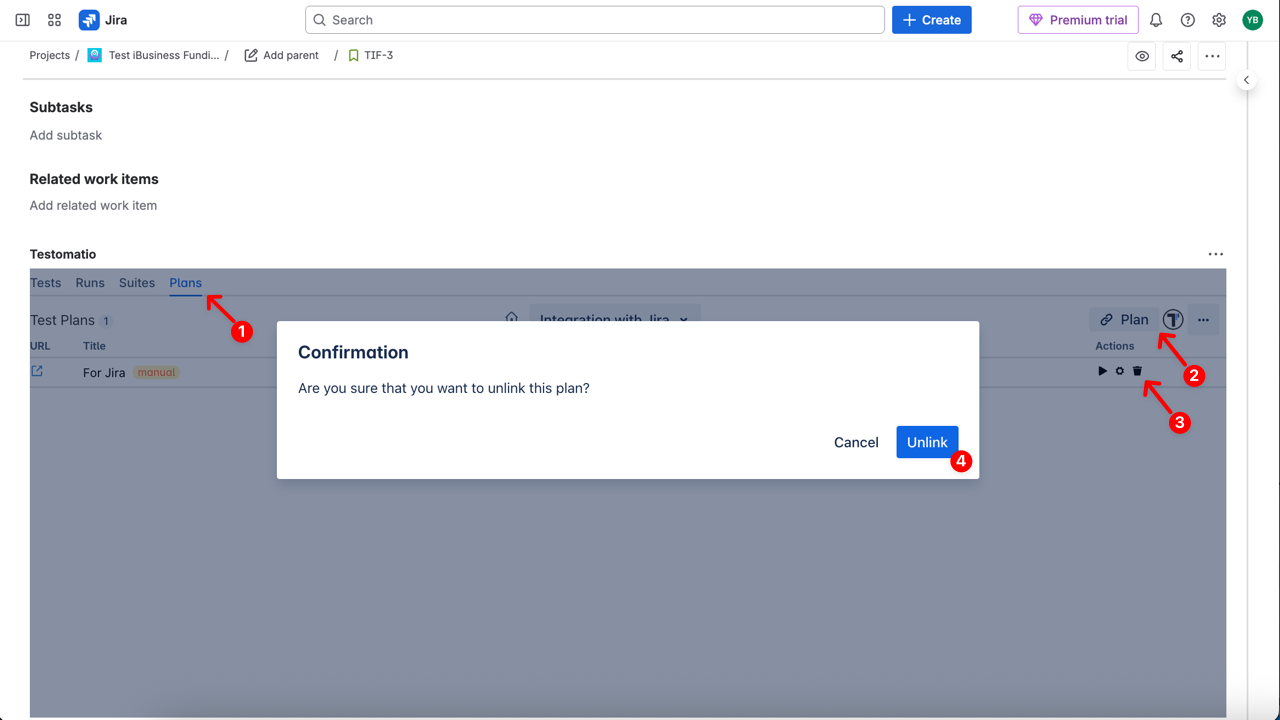
How to Unlink from a Test Plan
Section titled “How to Unlink from a Test Plan”- Navigate to the Plans tab
- Click the 🔗 Plan button, or
- Click the trash can icon next to the linked plan
- Click the Unlink button to confirm
How to Work with Feature Files (BDD)
Section titled “How to Work with Feature Files (BDD)”Edit and update BDD Feature Files from Jira and sync changes with your Testomat.io project.
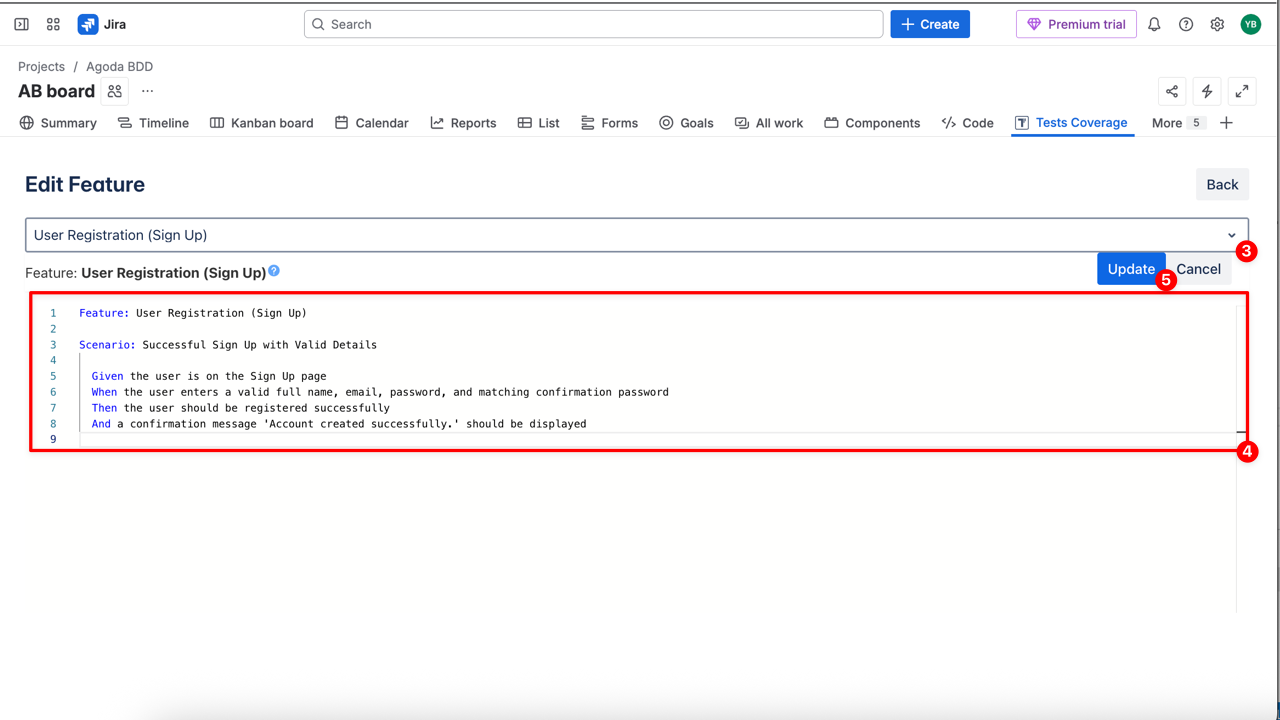
How to Edit a Feature File
Section titled “How to Edit a Feature File”- Navigate to the Test Coverage tab
- Click the menu button (⋯) and select Edit Feature
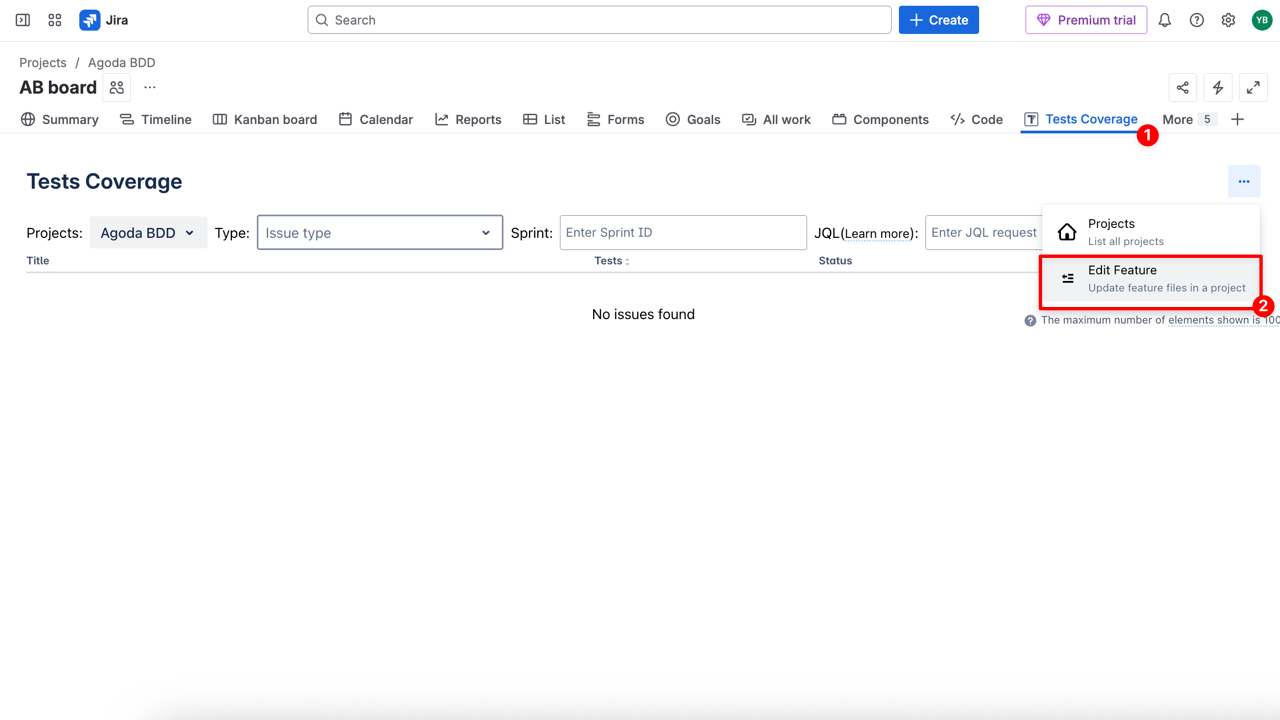
- Select the suite you want to edit in the Feature File
- Edit the Feature File
- Click the Update button