Running Tests Manually
In Testomat.io, manual test runs allow QA Engineers to execute tests that are not automated (yet) or to run automated tests in manual mode.
During a manual run, testers can mark each test as Passed, Failed, or Skipped, add messages, attach evidence (screenshots, logs, etc.), and assign tests to specific team members.
There are two main ways to start a manual run:
- From the ‘Tests’ page – quick launch for selected tests or suites, or adding tests to an already ongoing run without leaving the Tests view
- From the ‘Runs’ page – the classic way to create and manage full runs with complete configuration options
How to Launch from the Tests Page
Section titled “How to Launch from the Tests Page”From the ‘Tests’ page, you can quickly start a run or add tests to an existing run without opening the Runs view. Available options include:
- Add single test case to ongoing run
- Add multiple test cases to ongoing run
- Run a single suite
- Run multiple suites at once
- Launch manual, automated, or mixed suites if CI is configured
How to Add a Test Case to the Run from Tests Page
Section titled “How to Add a Test Case to the Run from Tests Page”Add a test case to your unfinished run directly from ‘Tests’ page.
- Go to the ‘Tests’ page.
- Click on the Test Case that you want to add.
- Click the Extra menu button on test case page.
- Select ‘Add to Run’ option from the dropdown menu.
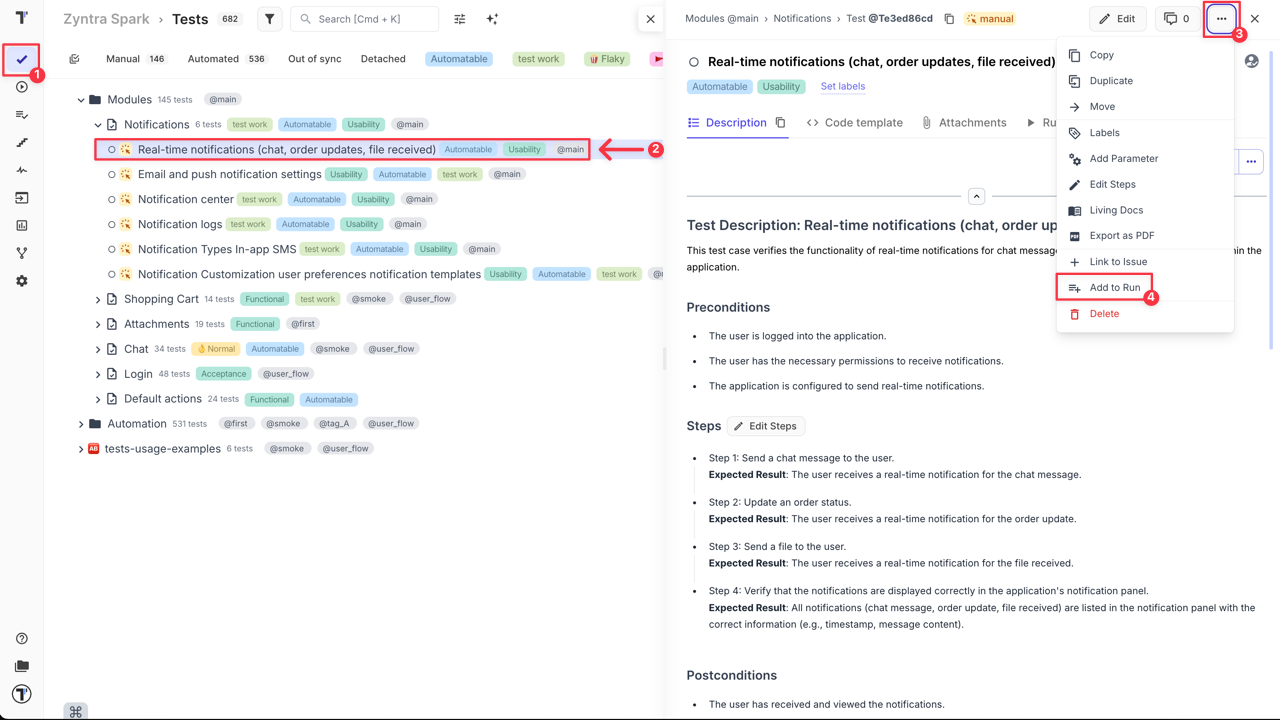
- Select the unfinished run to which you want to add this test.
- Click the ‘Add to Run’ button.
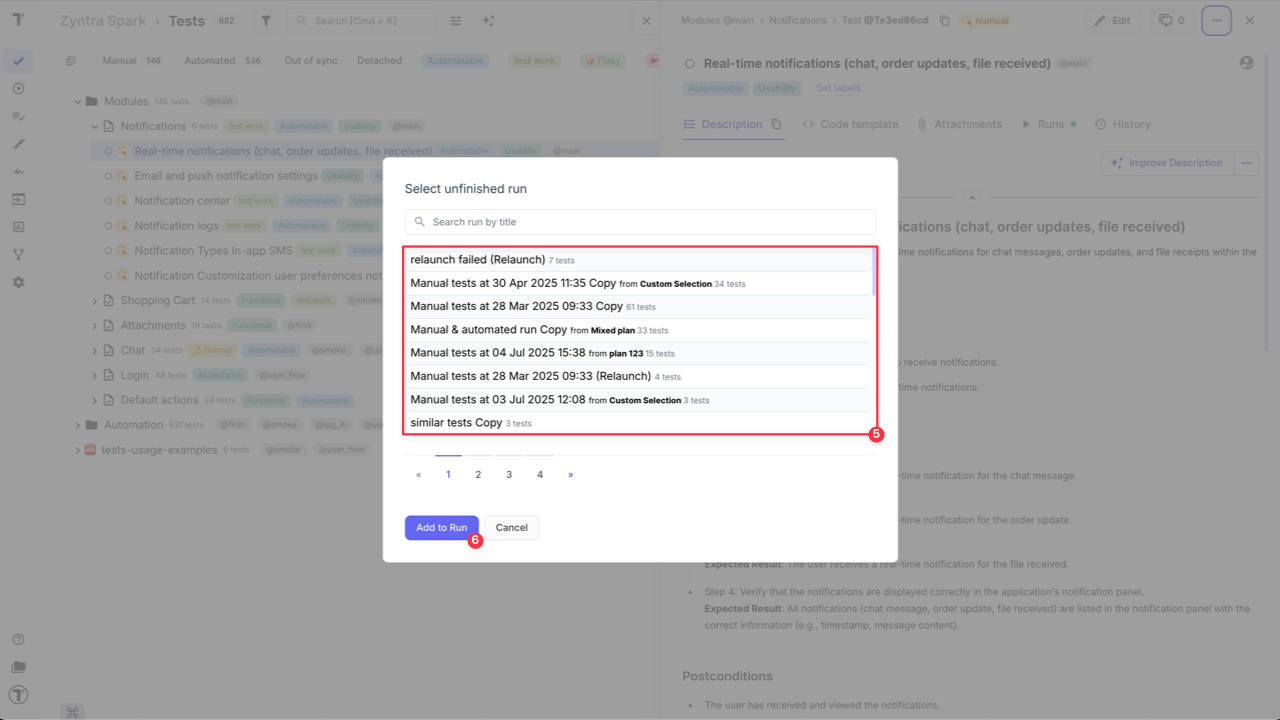
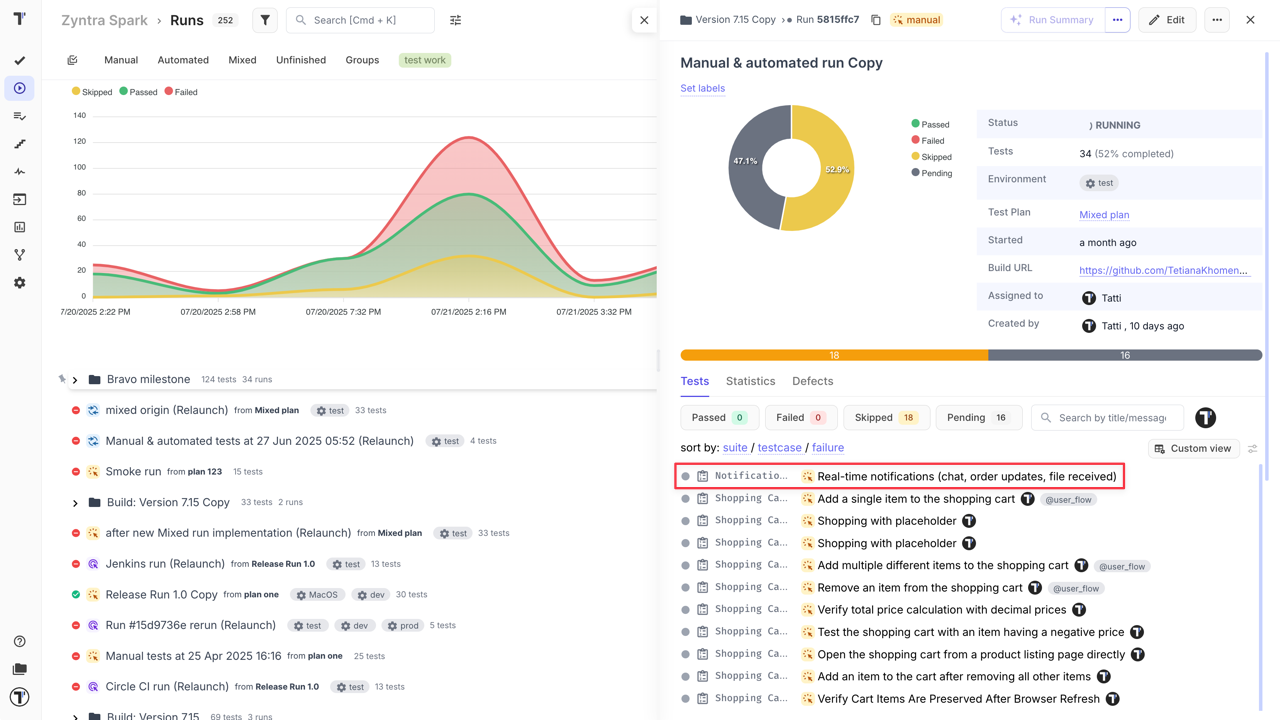
The test case is successfully added to the selected ongoing run:
As well you can use Multi-select option to add several tests to a run simultaneously.
- Go to the ‘Tests’ page.
- Enable ‘Multi-select’ option.
- Select a few test cases.
- Click the ‘Extra menu’ button in the multi-select menu panel.
- Select ‘Add to Run’ option.
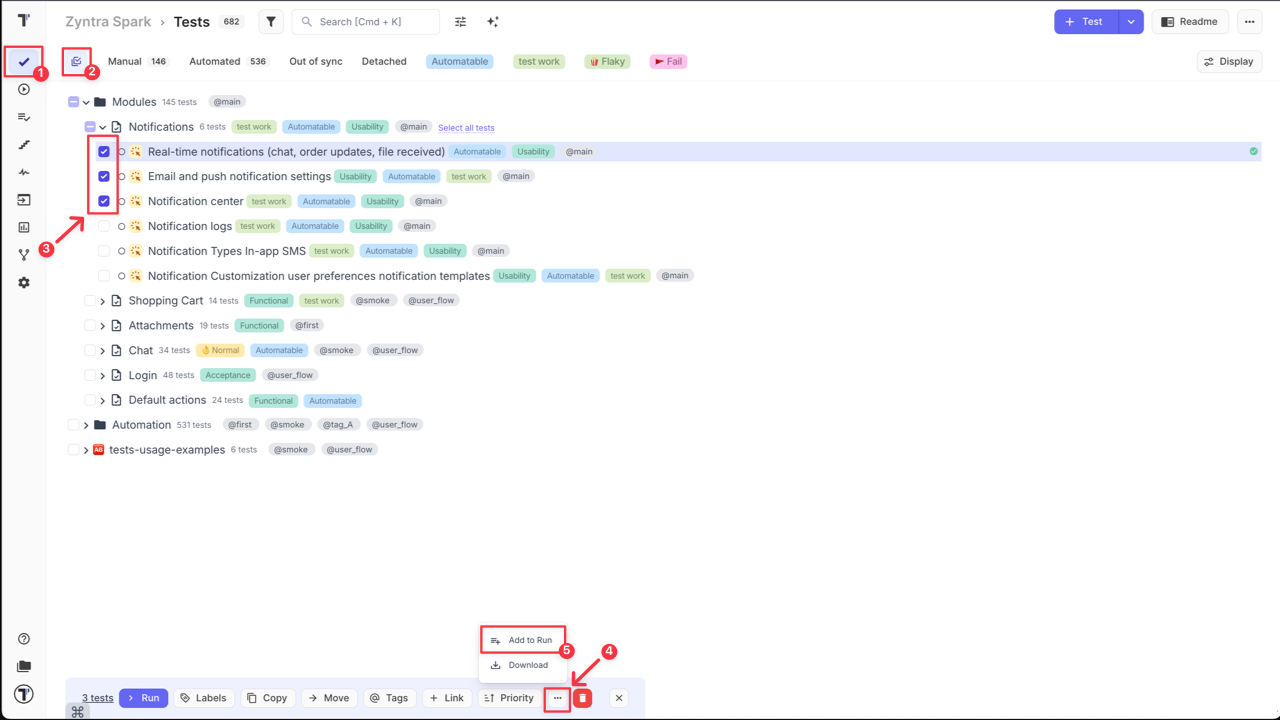
The selected tests will be immediately added to the ongoing test run, helping you to keep your execution plan up-to-date even while a run is already in progress.
How to Run a Suite from Tests Page
Section titled “How to Run a Suite from Tests Page”Testomat.io allows you to launch a run of a single suite or multiple suites directly from the ‘Tests’ page.
Run a Single Suite
Section titled “Run a Single Suite”- Go to the ‘Tests’ page.
- Click on the Suite that you want to Launch.
- Click the ‘Extra menu’ button on suite page.
- Select ‘Run Tests’ option from the dropdown menu.
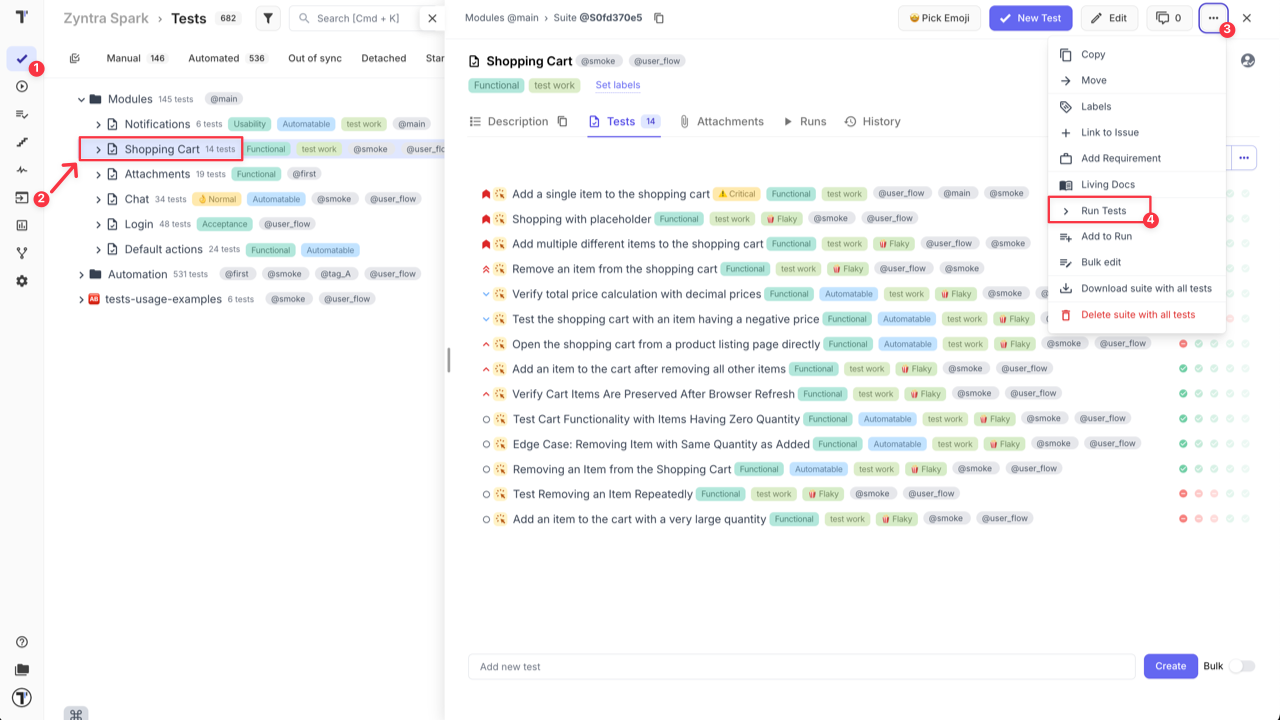
- Click the ‘Launch’ button on the displayed modal.

The Run window, displaying all test cases within the selected Suite, will appear automatically.
Run Several Suites
Section titled “Run Several Suites”Use the ‘Multi-select’ option to launch multiple suites in a single run.
- Go to the ‘Tests’ page.
- Enable ‘Multi-select’ option.
- Select a few suites.
- Click the ‘Run’ button.
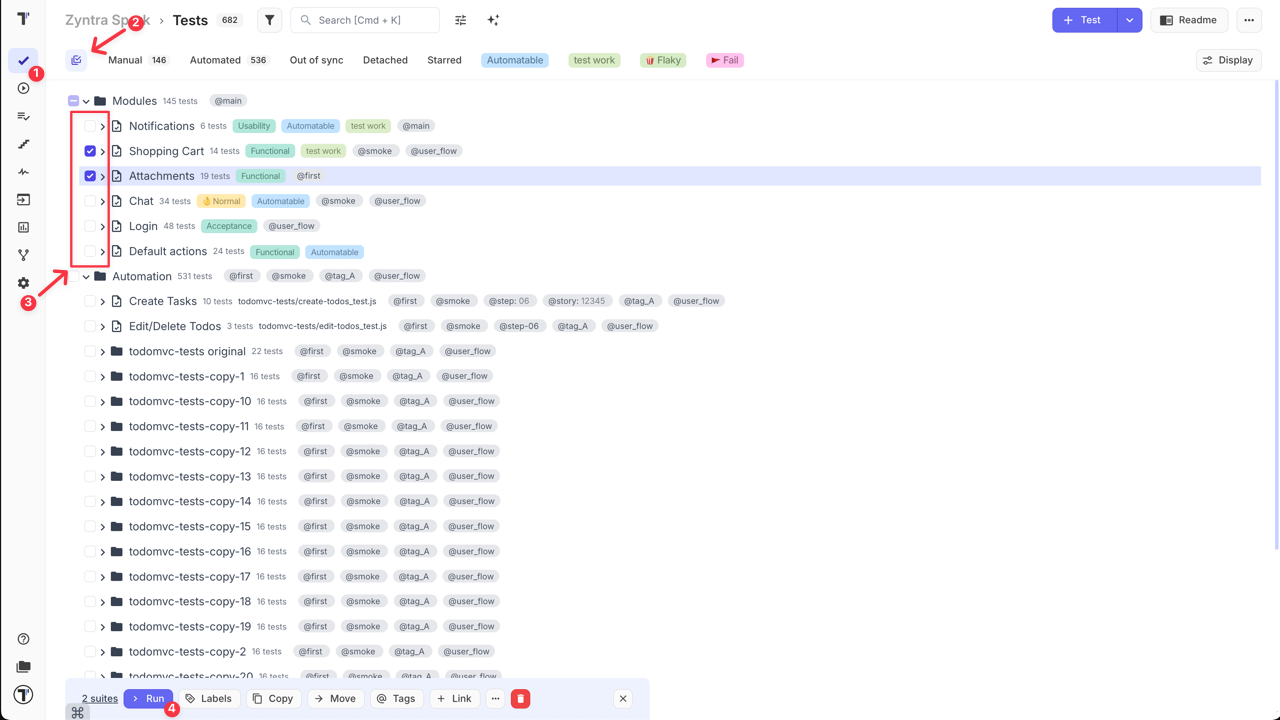
- Click the ‘Launch’ button on the displayed modal.
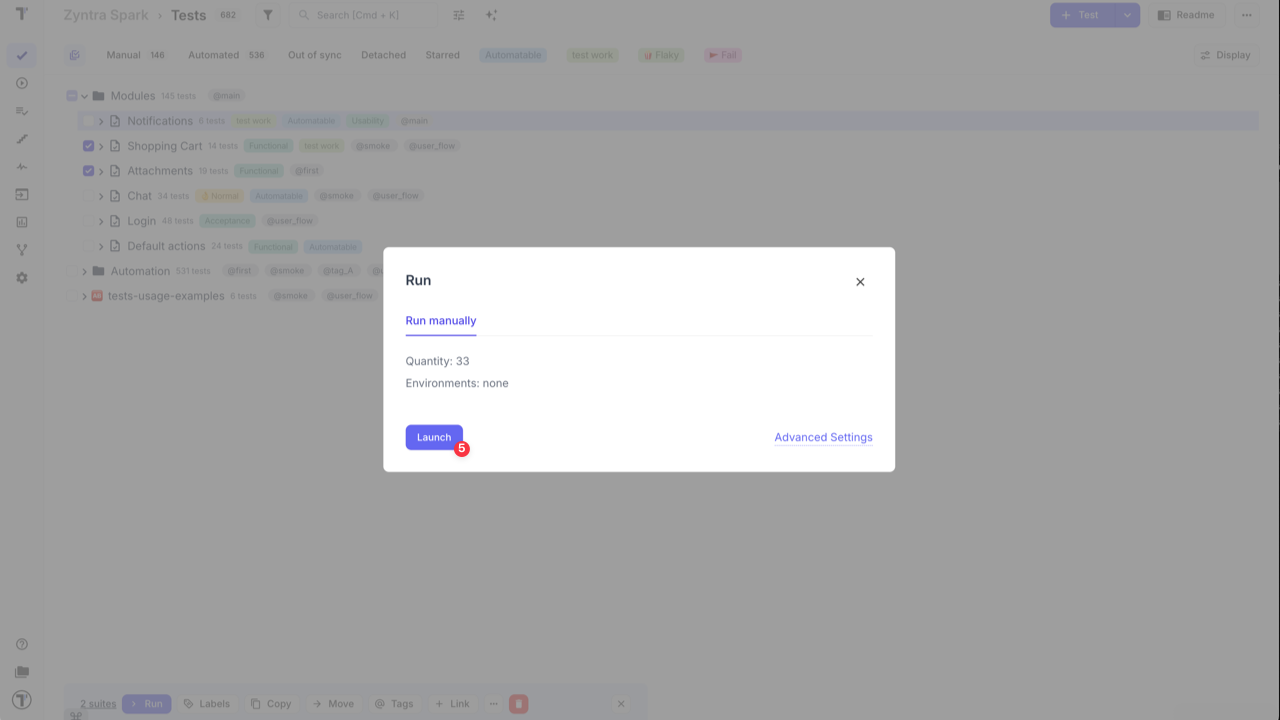
If you need to configure additional run settings (such as RunGroup or environment), click the ‘Additional Settings’ link on the displayed modal.
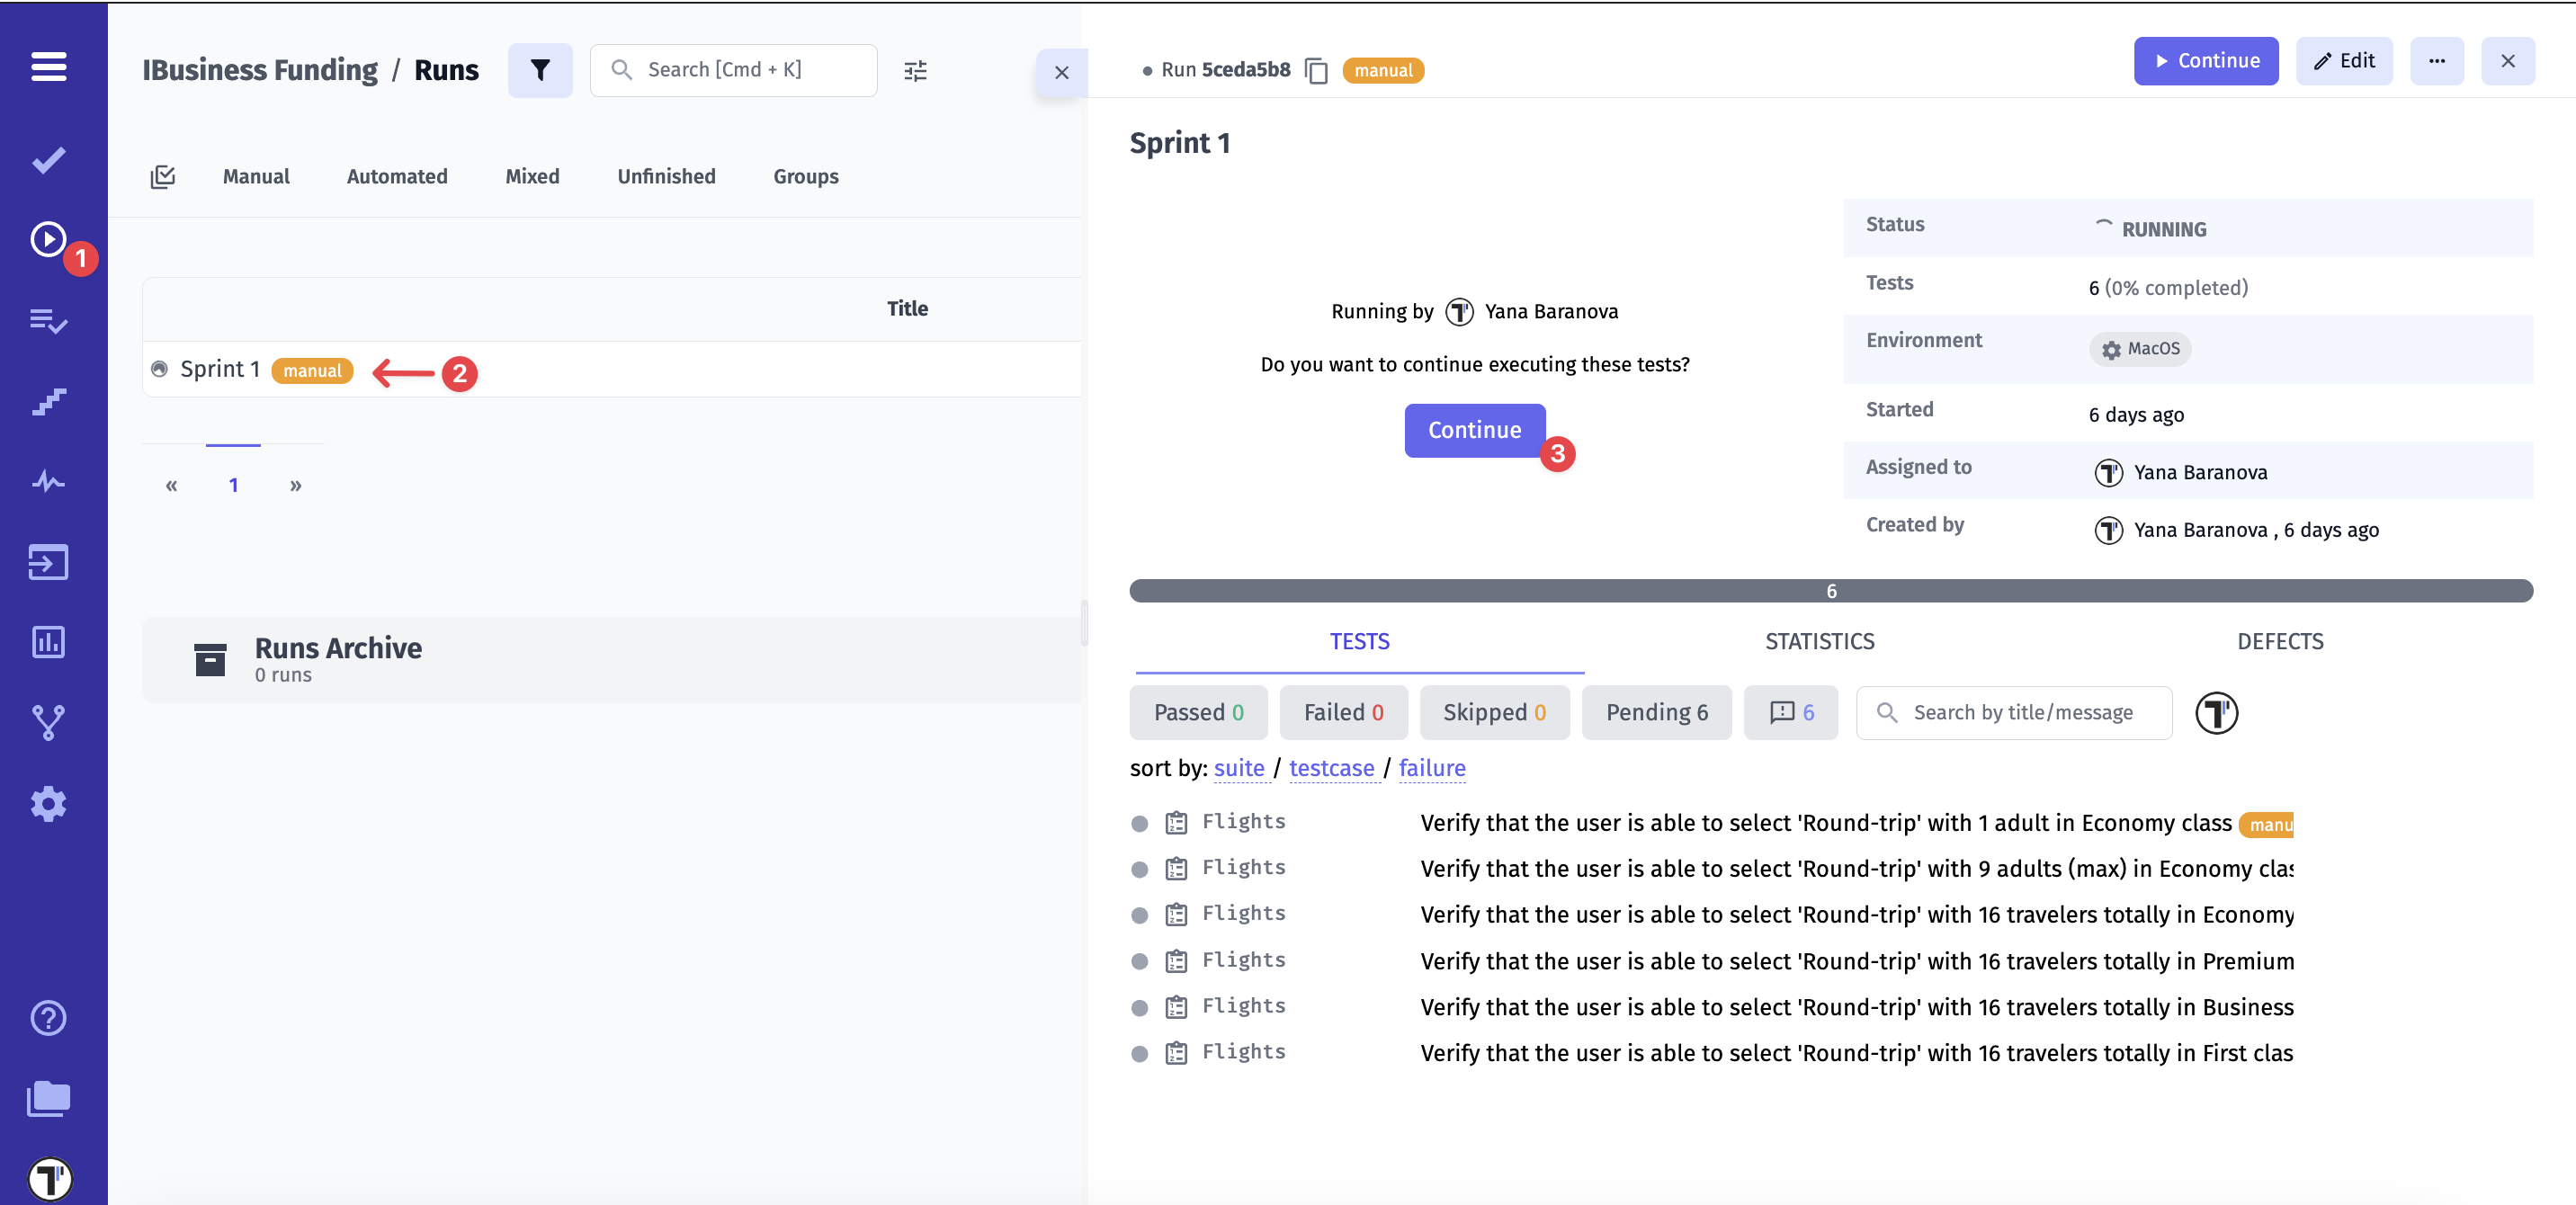
How to Launch from the Runs Page
Section titled “How to Launch from the Runs Page”From the Runs page, you can create and manage runs with flexible configuration options and full execution control. You can launch runs immediately or prepare and save them for later execution. Runs can include all tests in the project or predefined test plans, allowing you to organize testing according to your workflow.
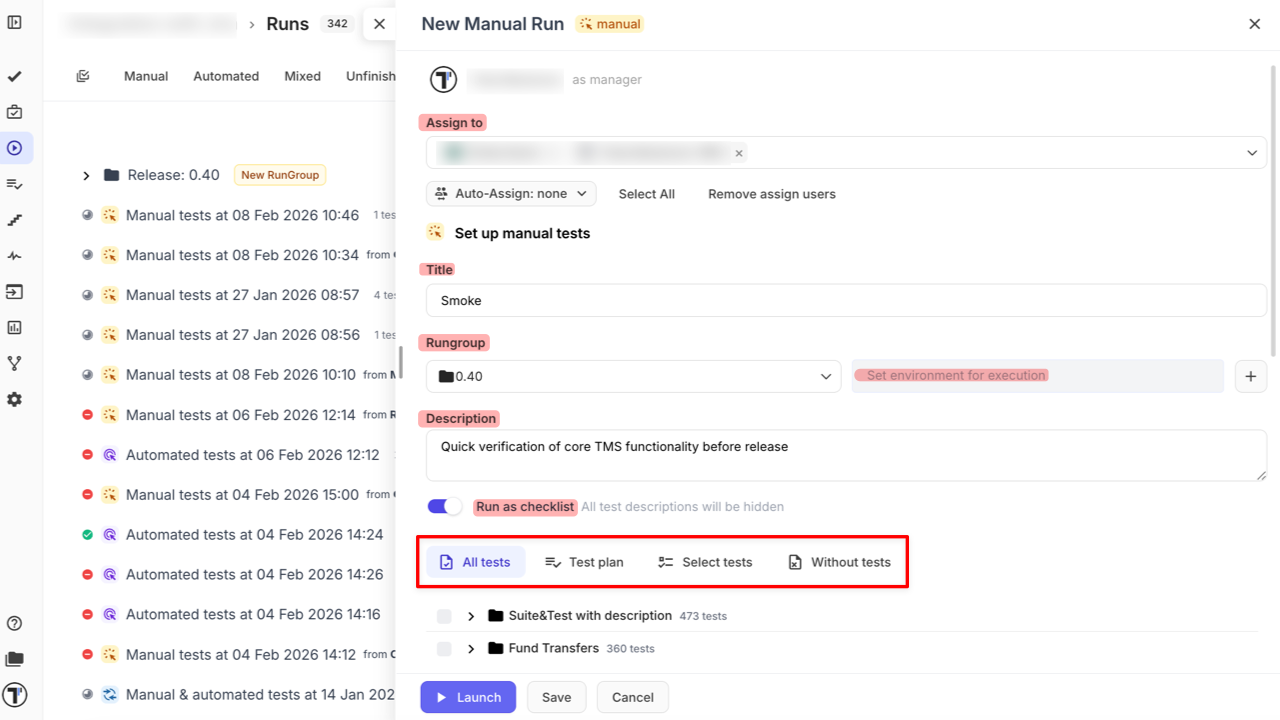
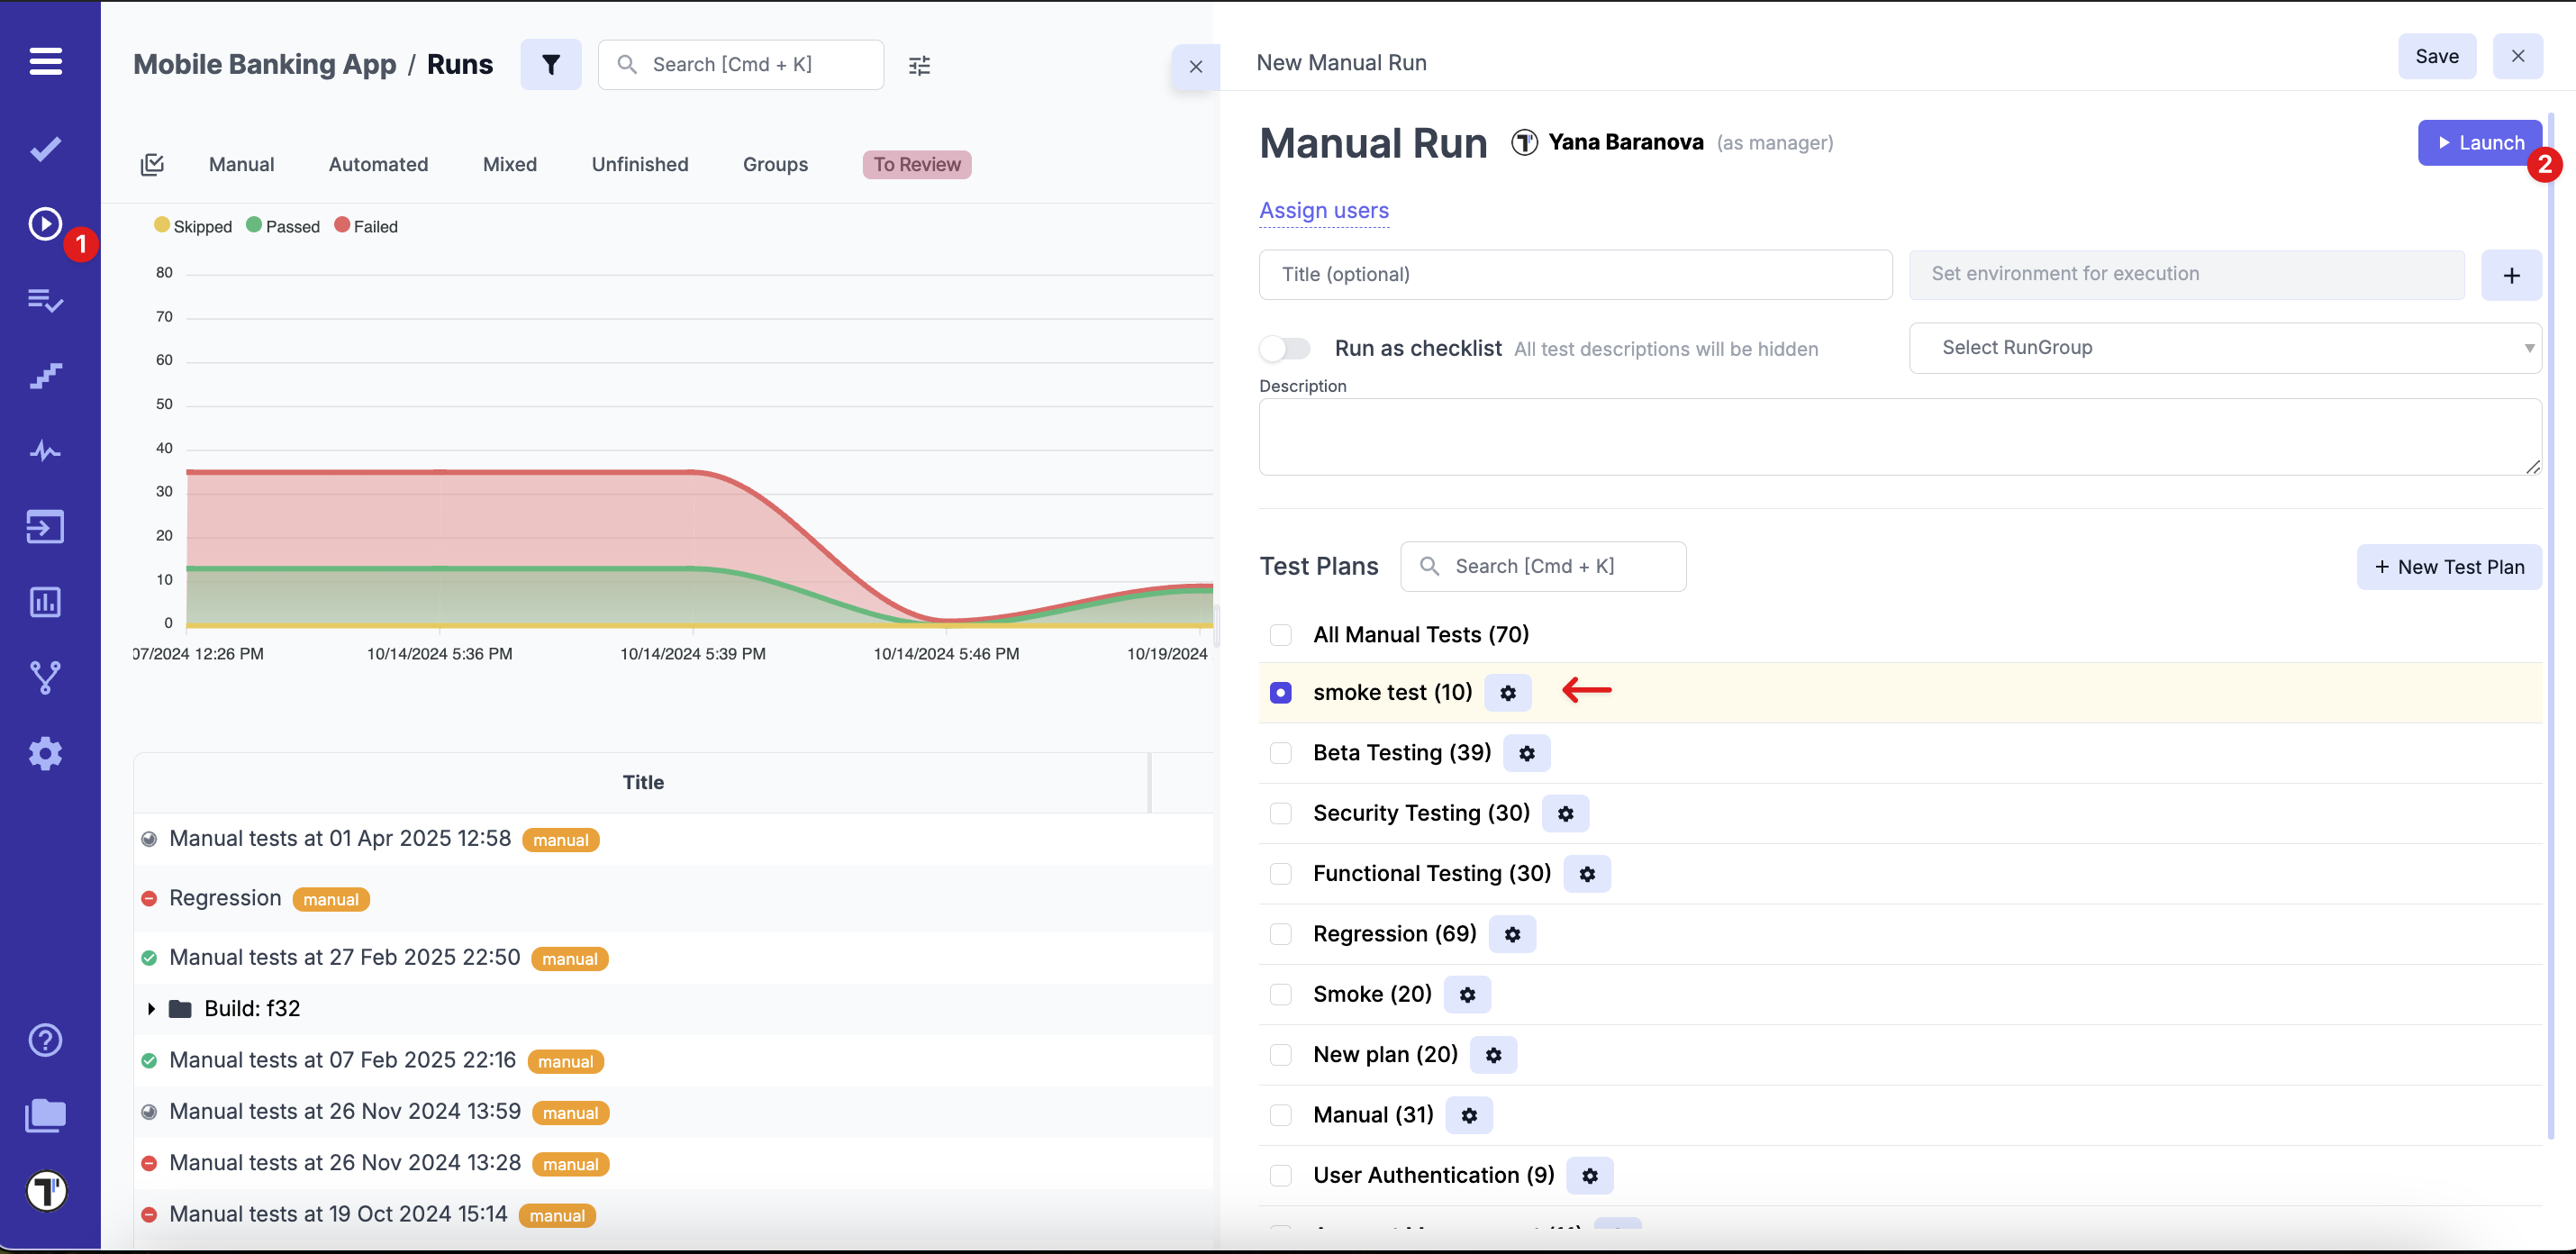
How to Configure a Manual Run
Section titled “How to Configure a Manual Run”When creating a manual run from the Runs page, the following options are available for configuration:
Options Overview:
-
All tests – launch all manual tests available in the project
-
Test plan – select from existing test plans
- Supports bulk selection
- You can also create a new test plan if needed (Learn more here)
-
Select tests – manually select tests from the tree structure, use search, or apply filters to narrow down your selection
- Supports bulk selection
- Filters and collections allow for advanced selection and grouping of tests
- Learn more about working with test collections & filters here
-
Without tests – create the run structure first and populate it later
Additional Configurations:
- Assign to – define who will execute the tests (See: How to Assign Users to the Run)
- Title (optional) – give your run a descriptive name
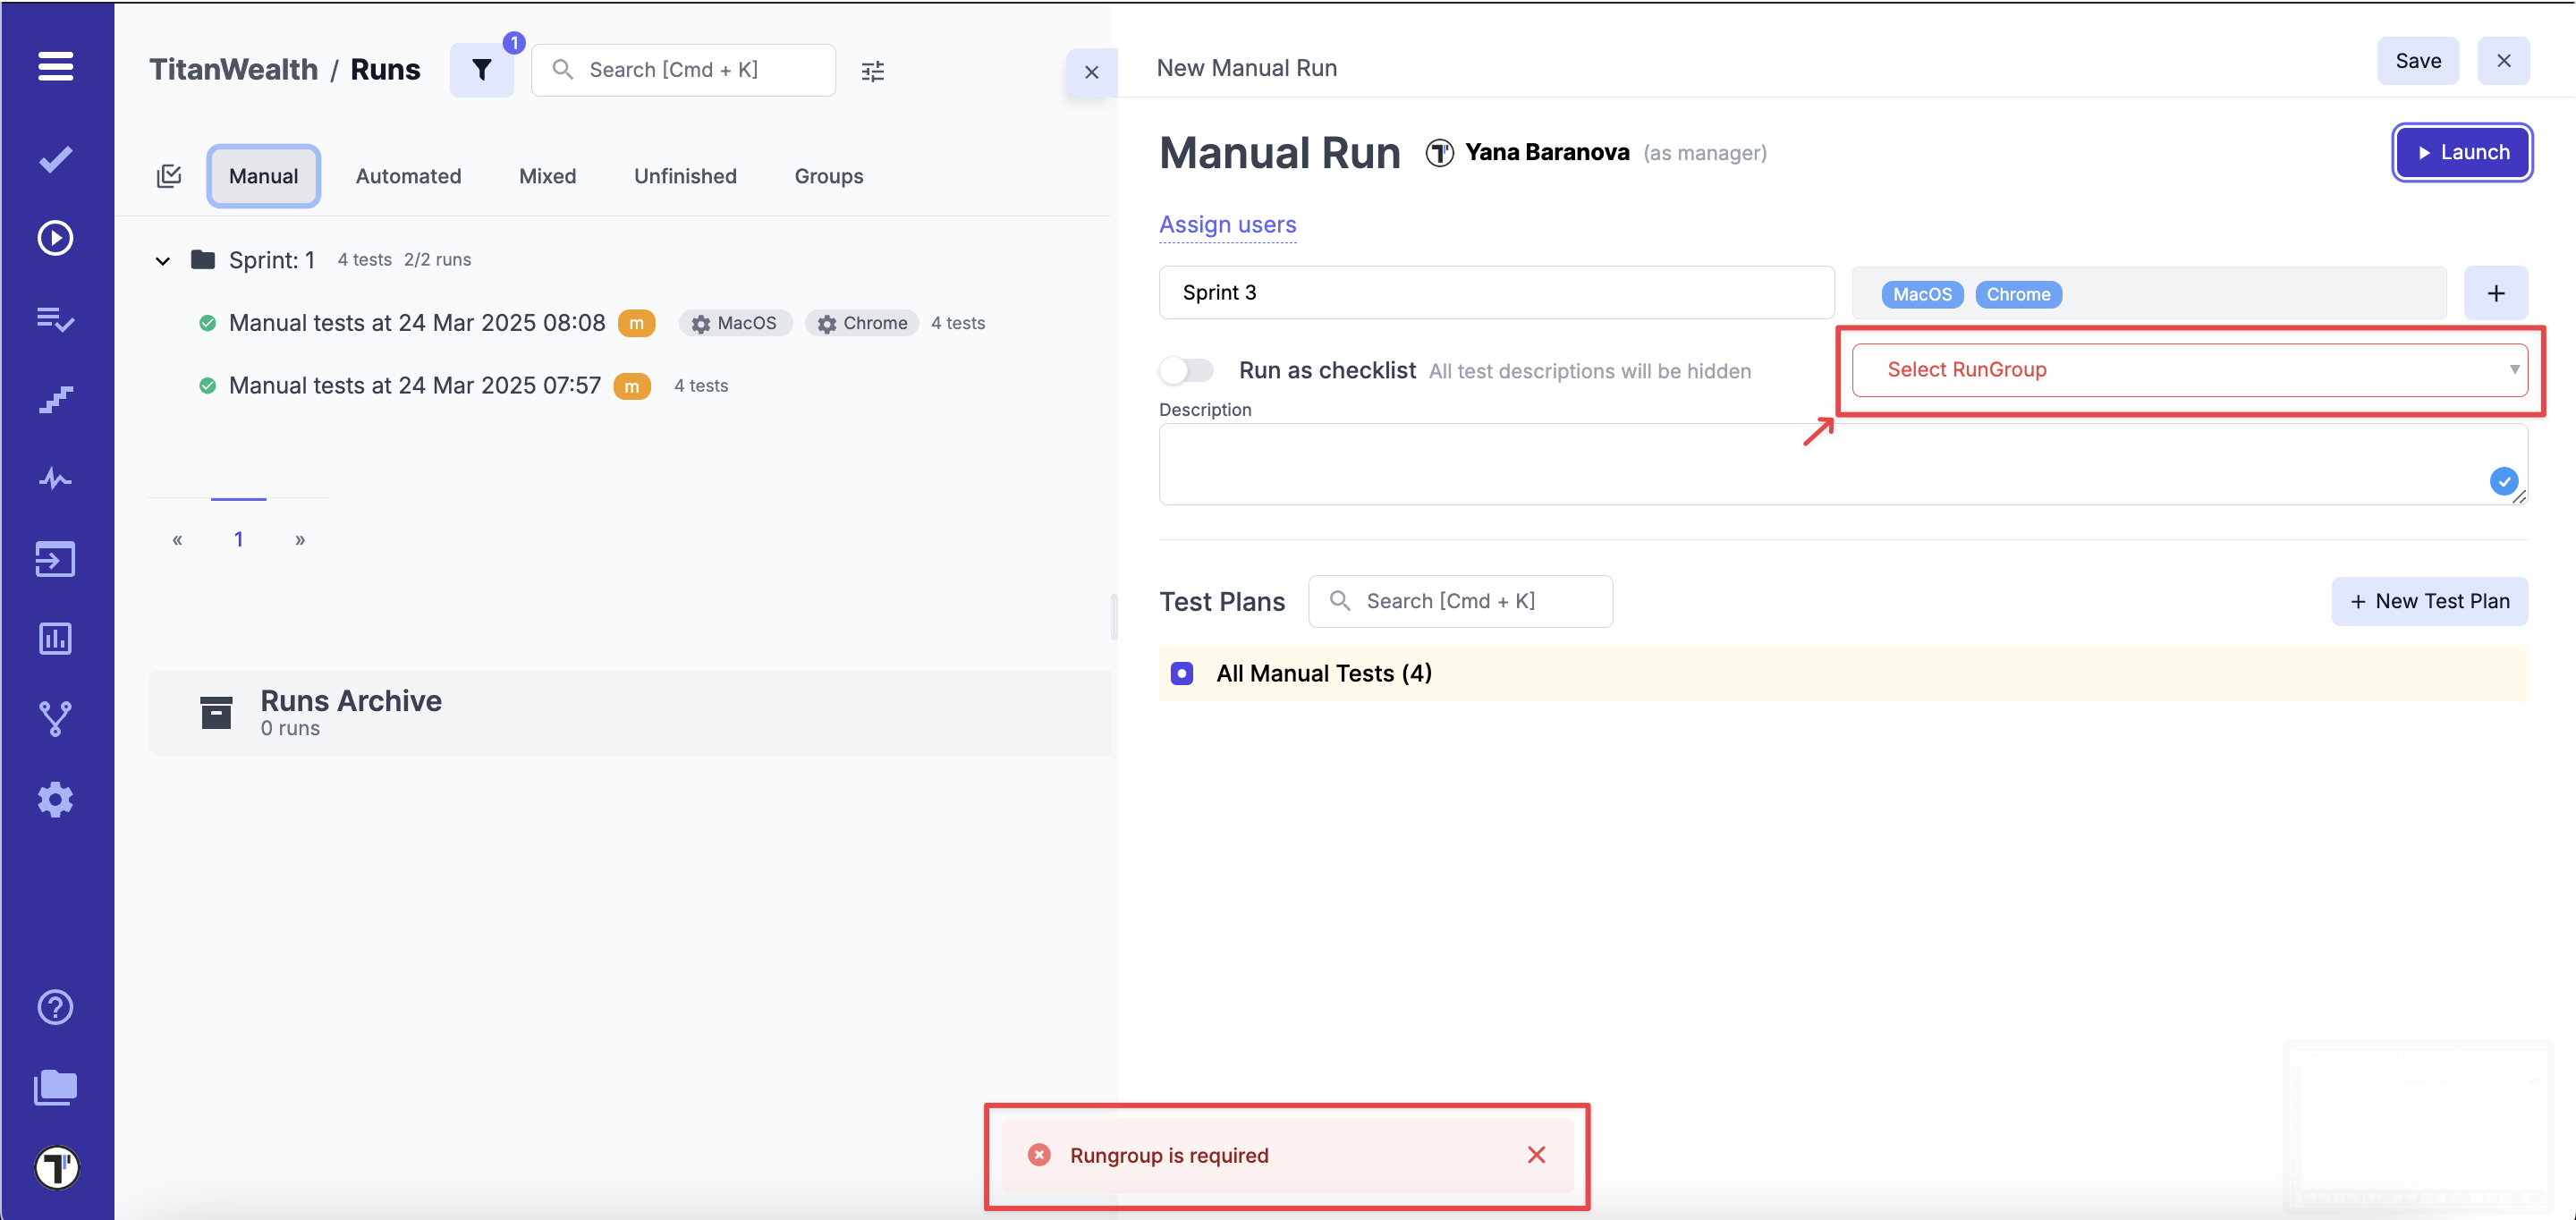
- Rungroup – group the run within a specific RunGroup for better organization (See: How to Run Tests in RunGroups)
- Set environment for execution – choose one or multiple environments for the run (See: How to Run Environments)
- Description (optional) – provide context for this run
- Run as checklist – hides test descriptions for faster execution, ideal for experienced testers (See: How to Run Tests As Checklist)
- Launch button – immediately start the run with the configured settings
- Save button – store the configured run without launching it, so it can be executed later
- Cancel - exit without saving; all changes will be lost
How to Set up Additional Manual Run options
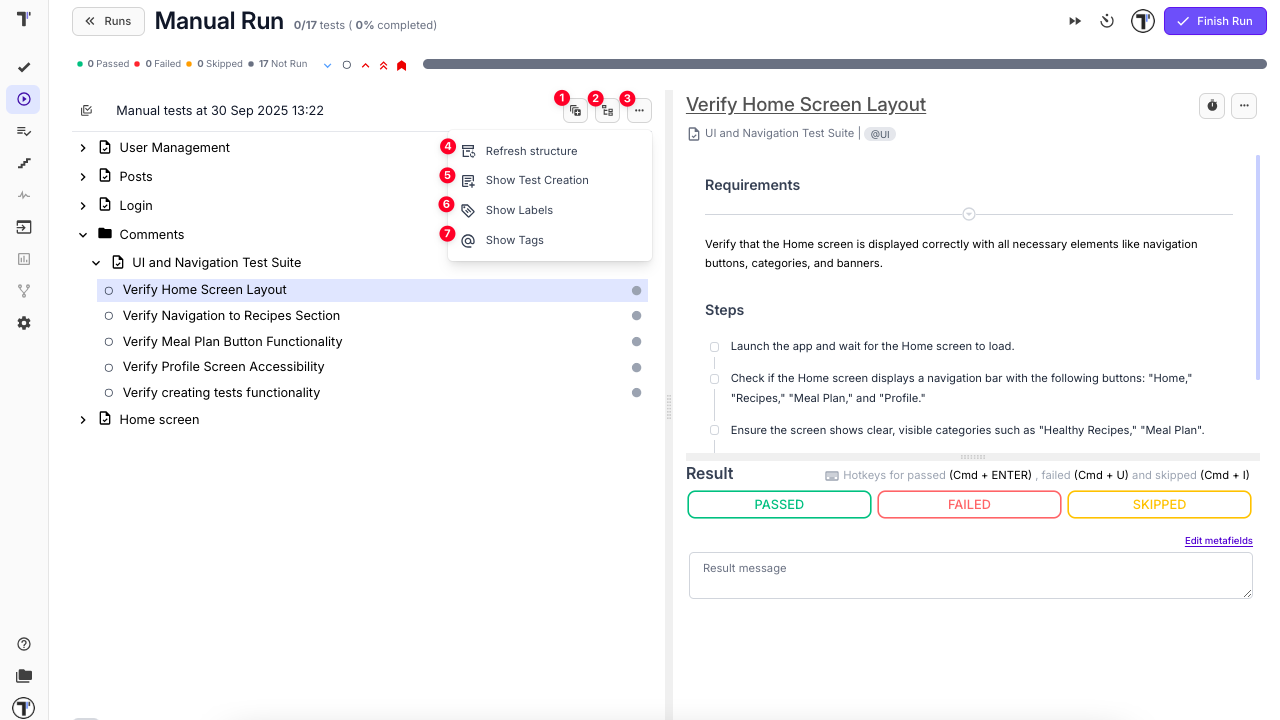
Section titled “How to Set up Additional Manual Run options”When manual run is launched, the following set up options are available:
- Collapse/Expand all - expands or collapses test suites within the run structure
- Tree view/list view - displays tests as a hierarchical tree or a flat list
- Extra options menu - displays the list of additional set up options
- Refresh structure - updates the test list to reflect any structural changes made during the run, such as moving, adding or removing tests
- Show/Hide Test Creation - enables or disables the visibility of the button used to create and add new test cases during the run
- Show/Hide Labels - shows or hides labels applicable to individual test cases
- Show/Hide Tags - shows or hides tags applicable to individual test cases
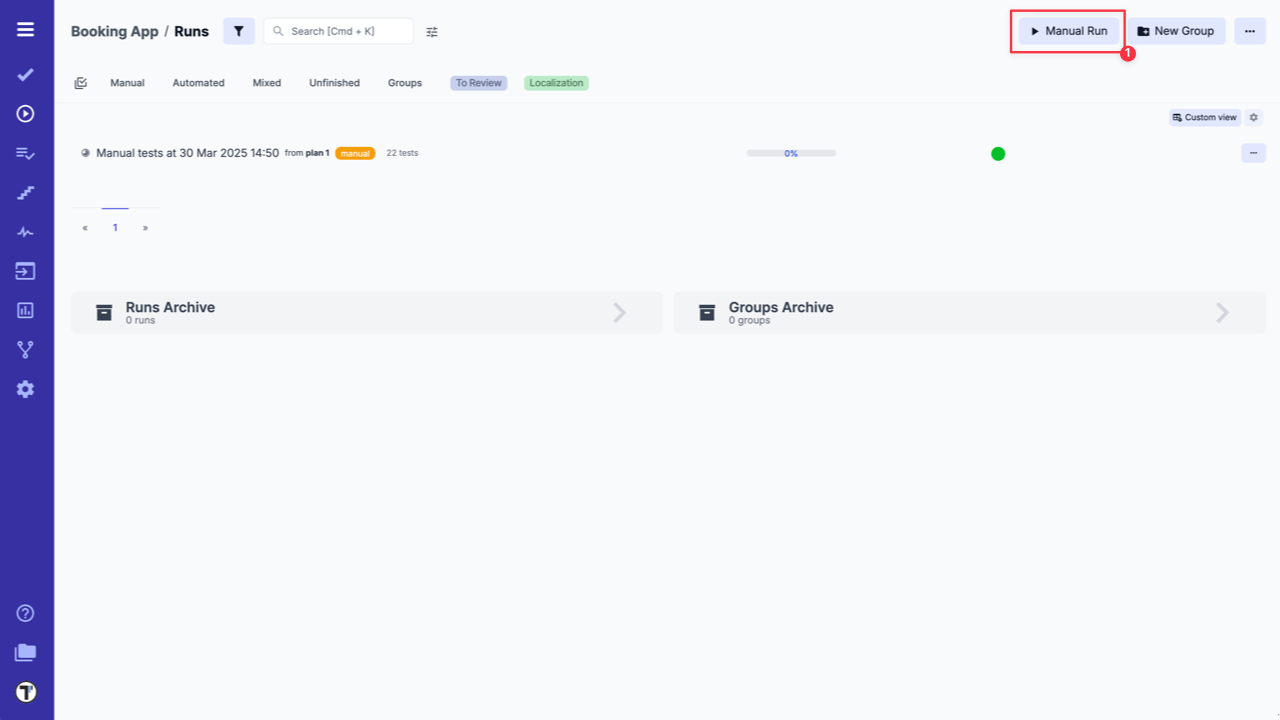
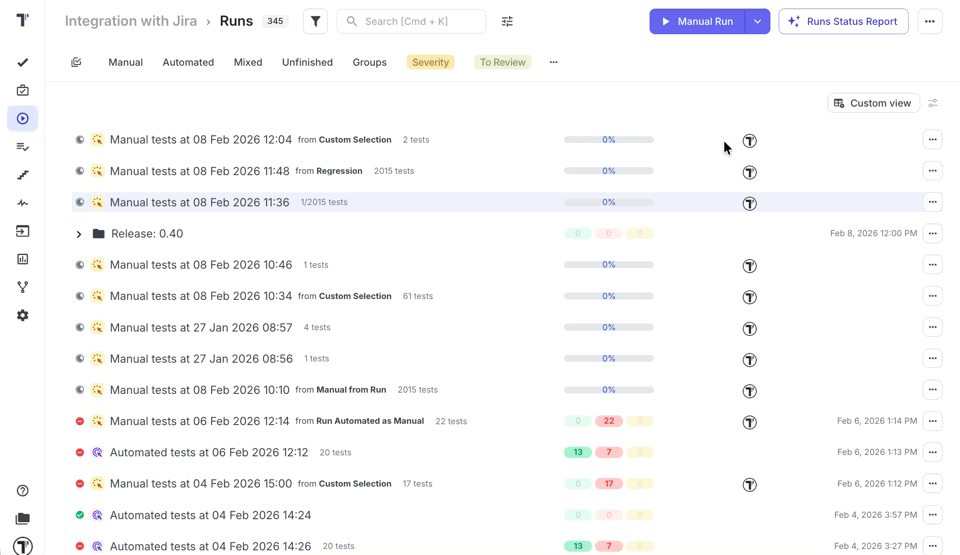
How to Run All Tests
Section titled “How to Run All Tests”To launch a Manual Run you need:
- Go to the Runs page
- Click the Manual Run button
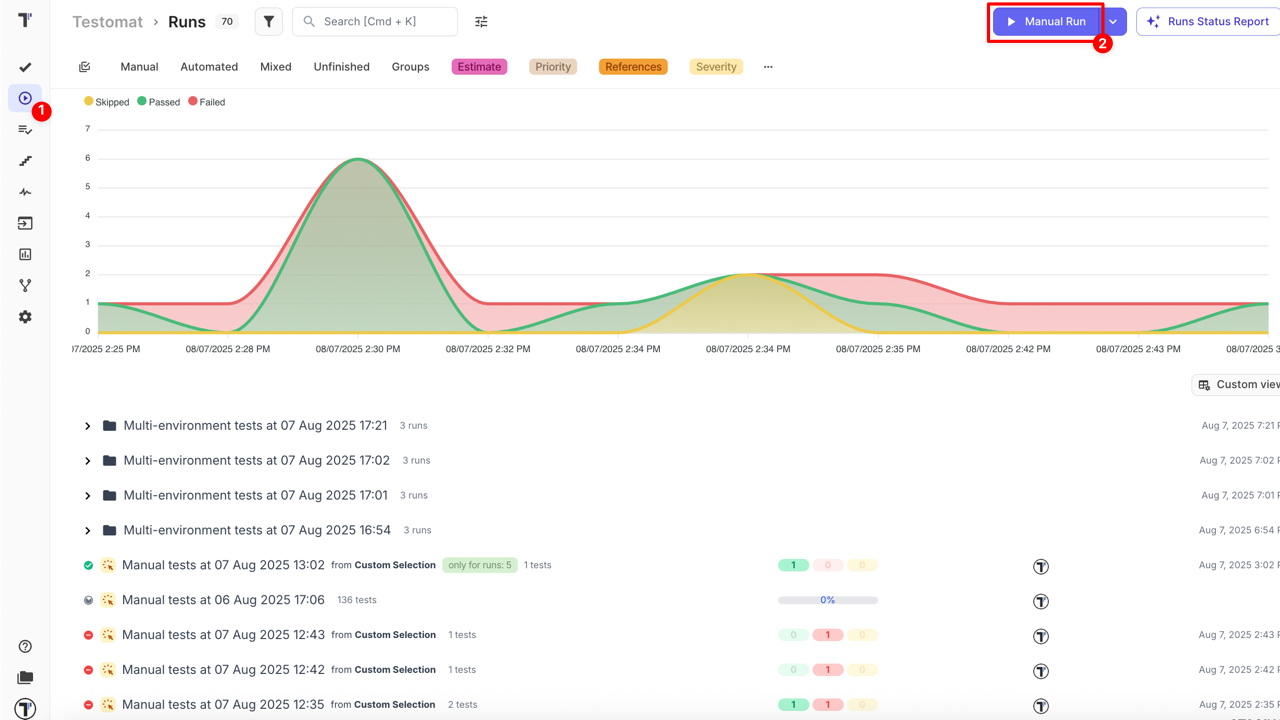
- Add additional configuration if needed (See: How set up additional configurations)
The ‘All tests’ tab is selected by default, meaning that all manual tests in the project will be included in this run.
- Click Launch to start the run
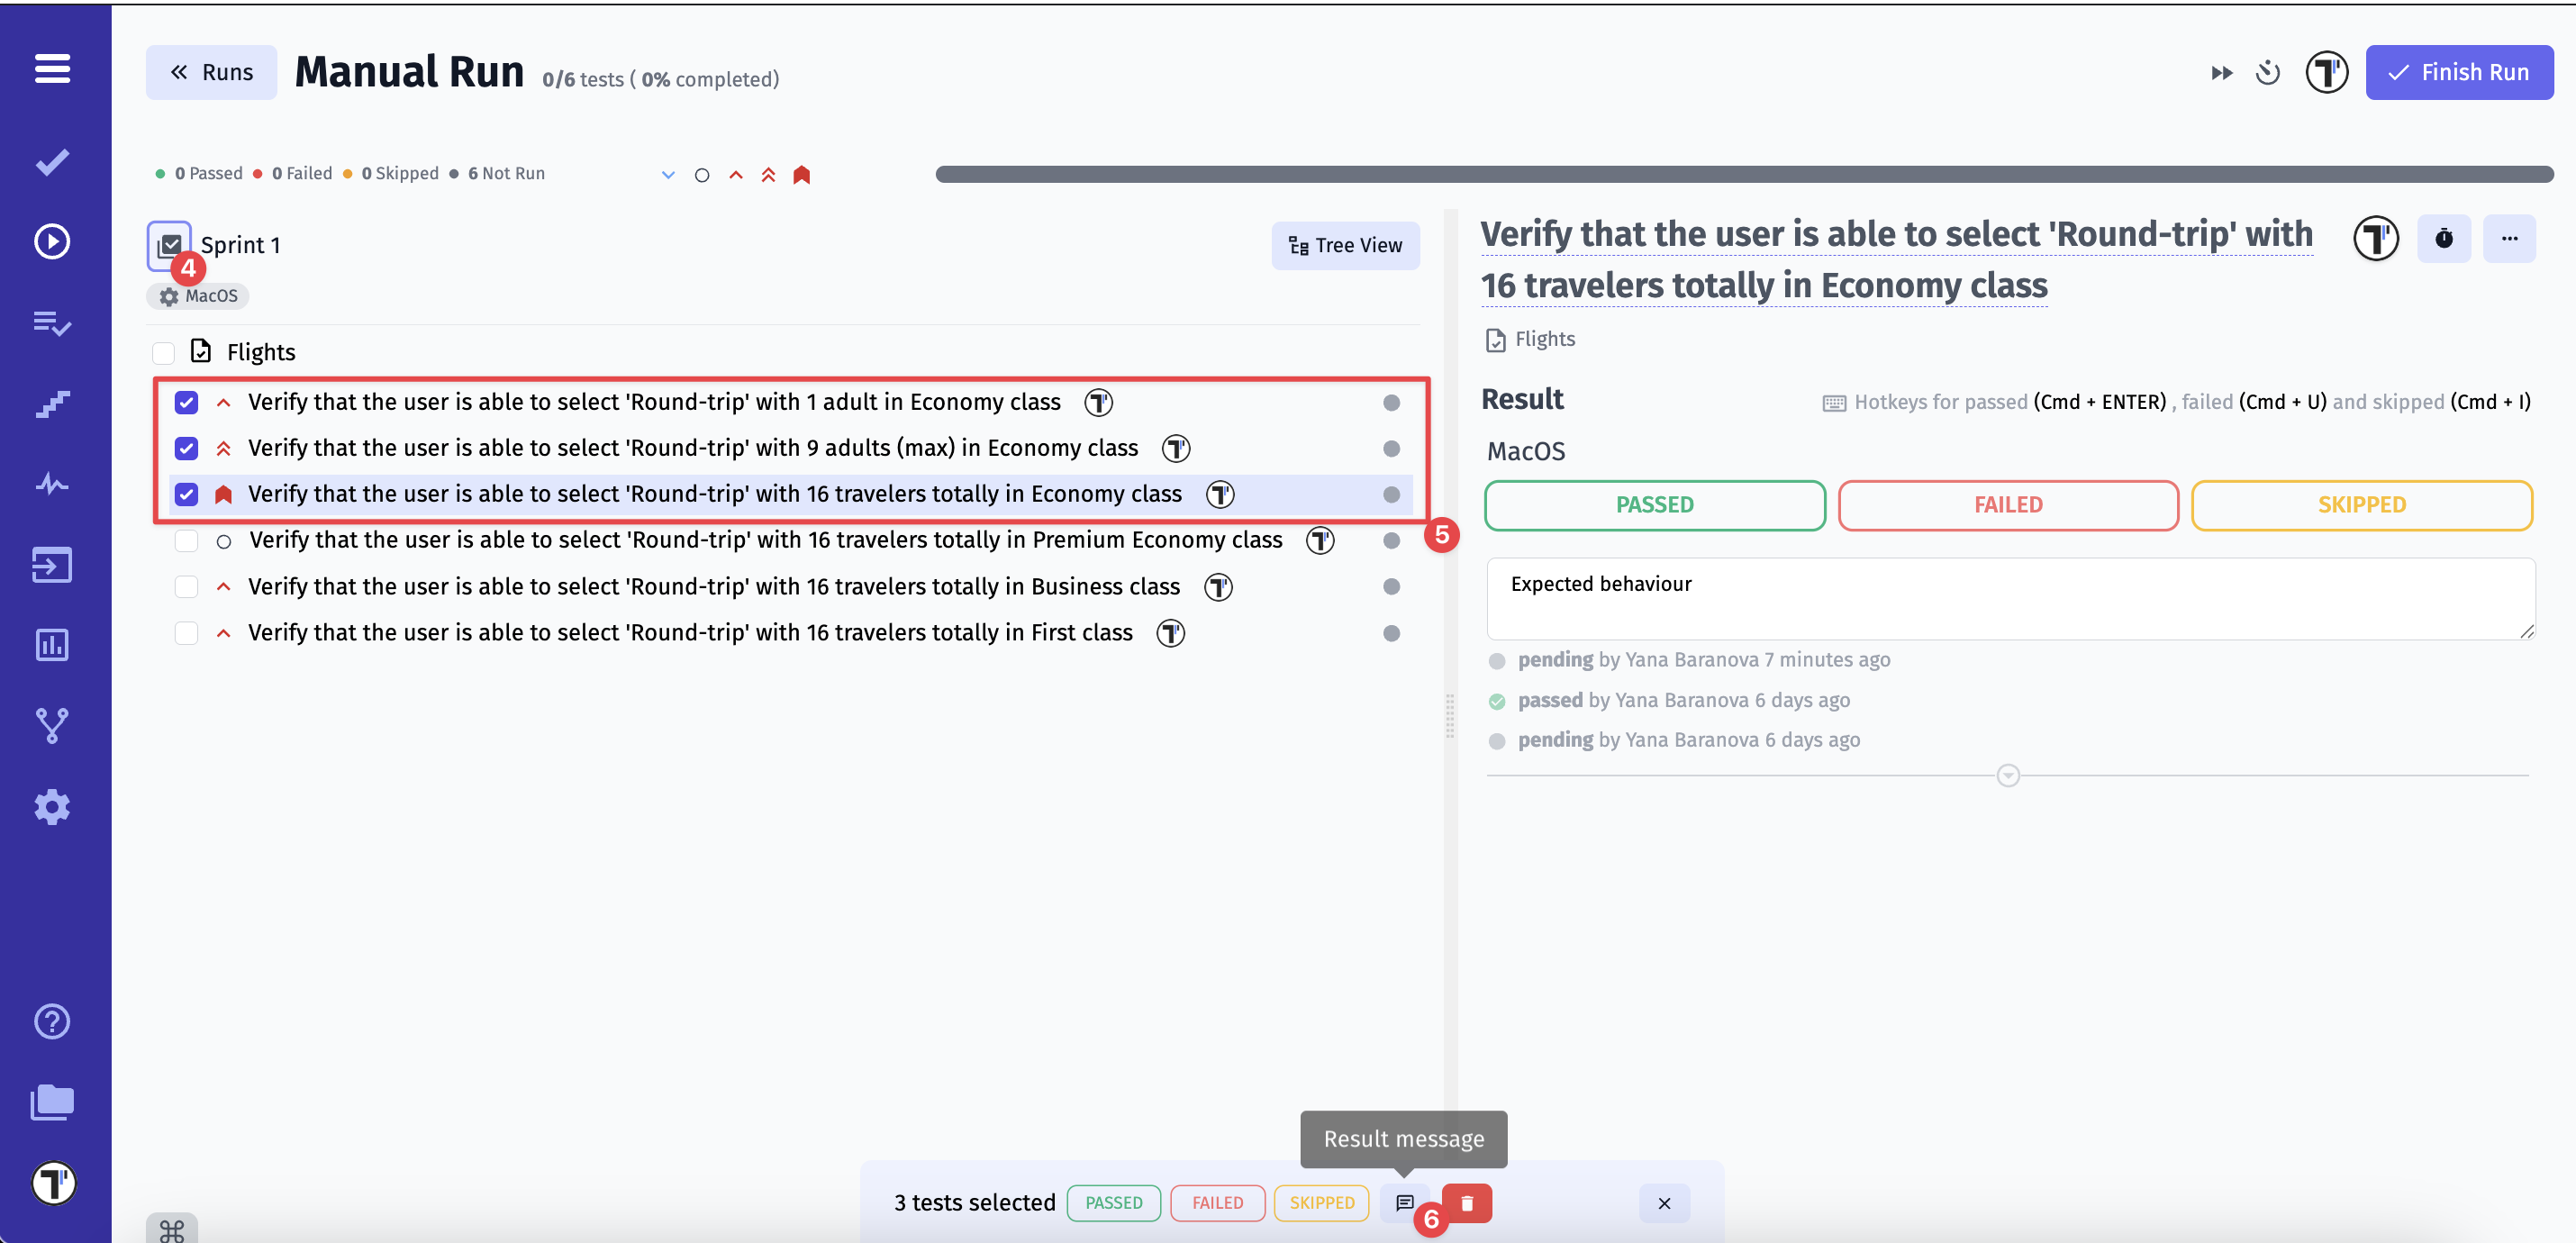
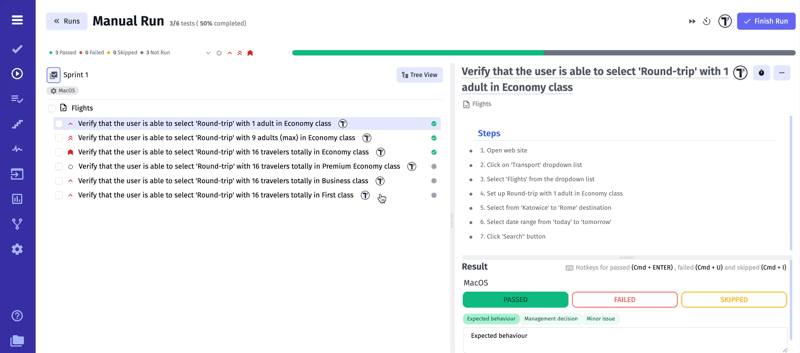
How to Set Test Case Results in Manual Run
Section titled “How to Set Test Case Results in Manual Run”Once a manual test run is launched, you need to set a Result for each test case. The available options are:
- PASSED – The test case was successfully executed;
- FAILED – The test case did not meet the expected result;
- SKIPPED – The test case was not executed;
Steps to Set Test Case Results, Messages, and Attach Files:
- Click on a test case
- Select the appropriate result: PASSED, FAILED, or SKIPPED
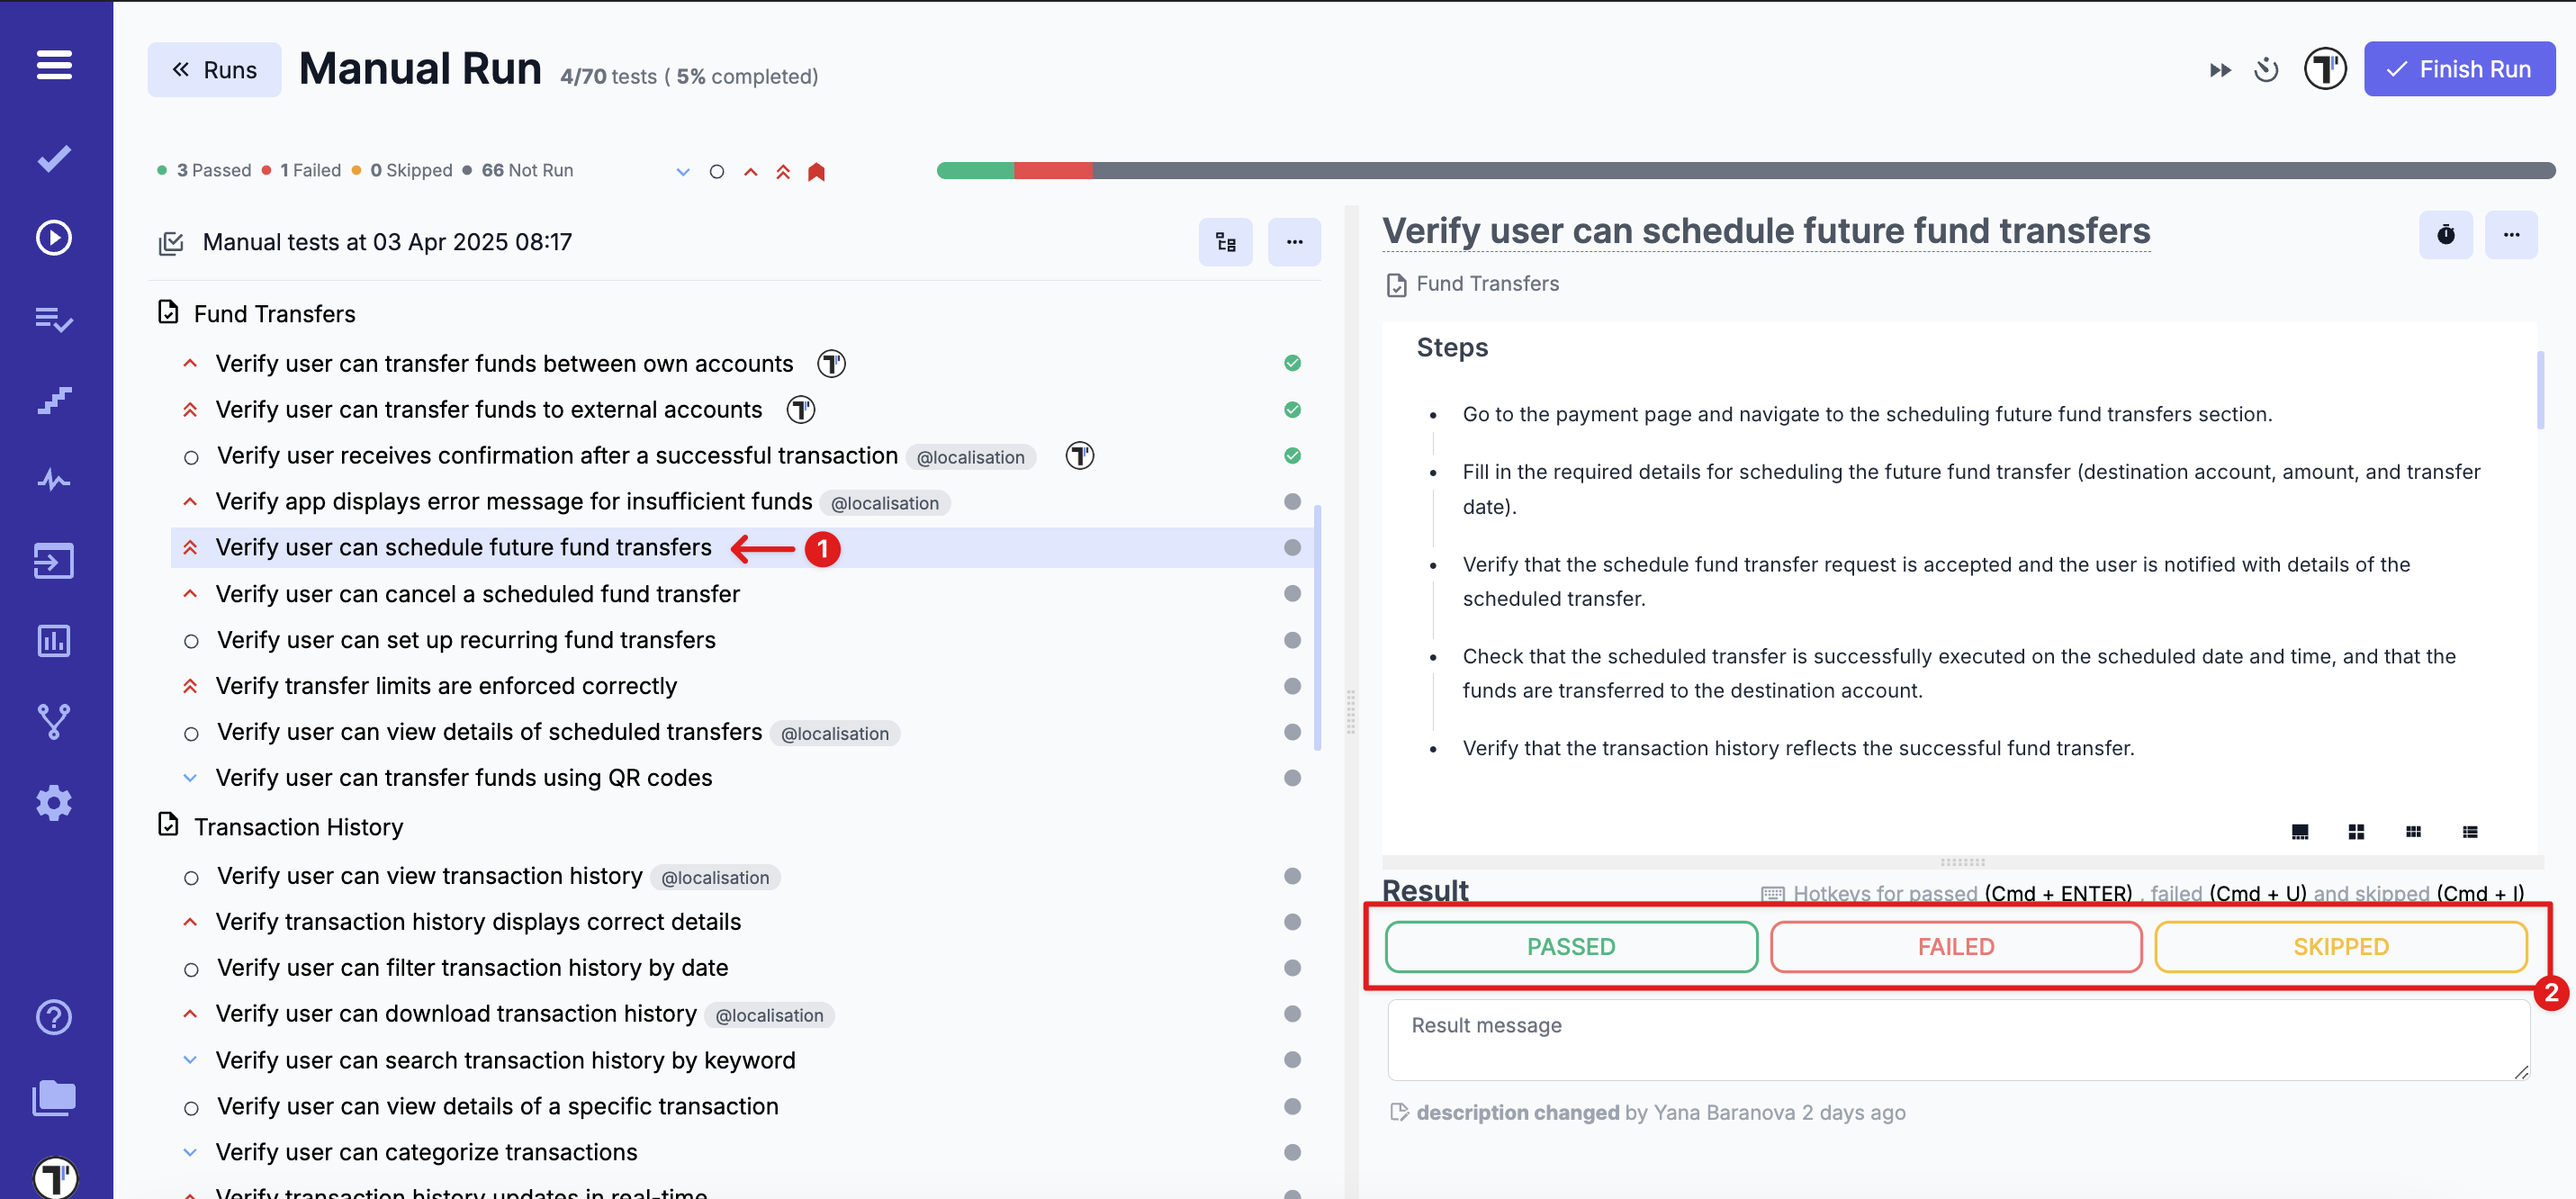
- Once the result is selected, you have the following options for the Test Result message field:
- Type your own message manually;
- Leave the field empty;
- Select a custom status from the available options and also type your own message in the field (as shown in the example below);
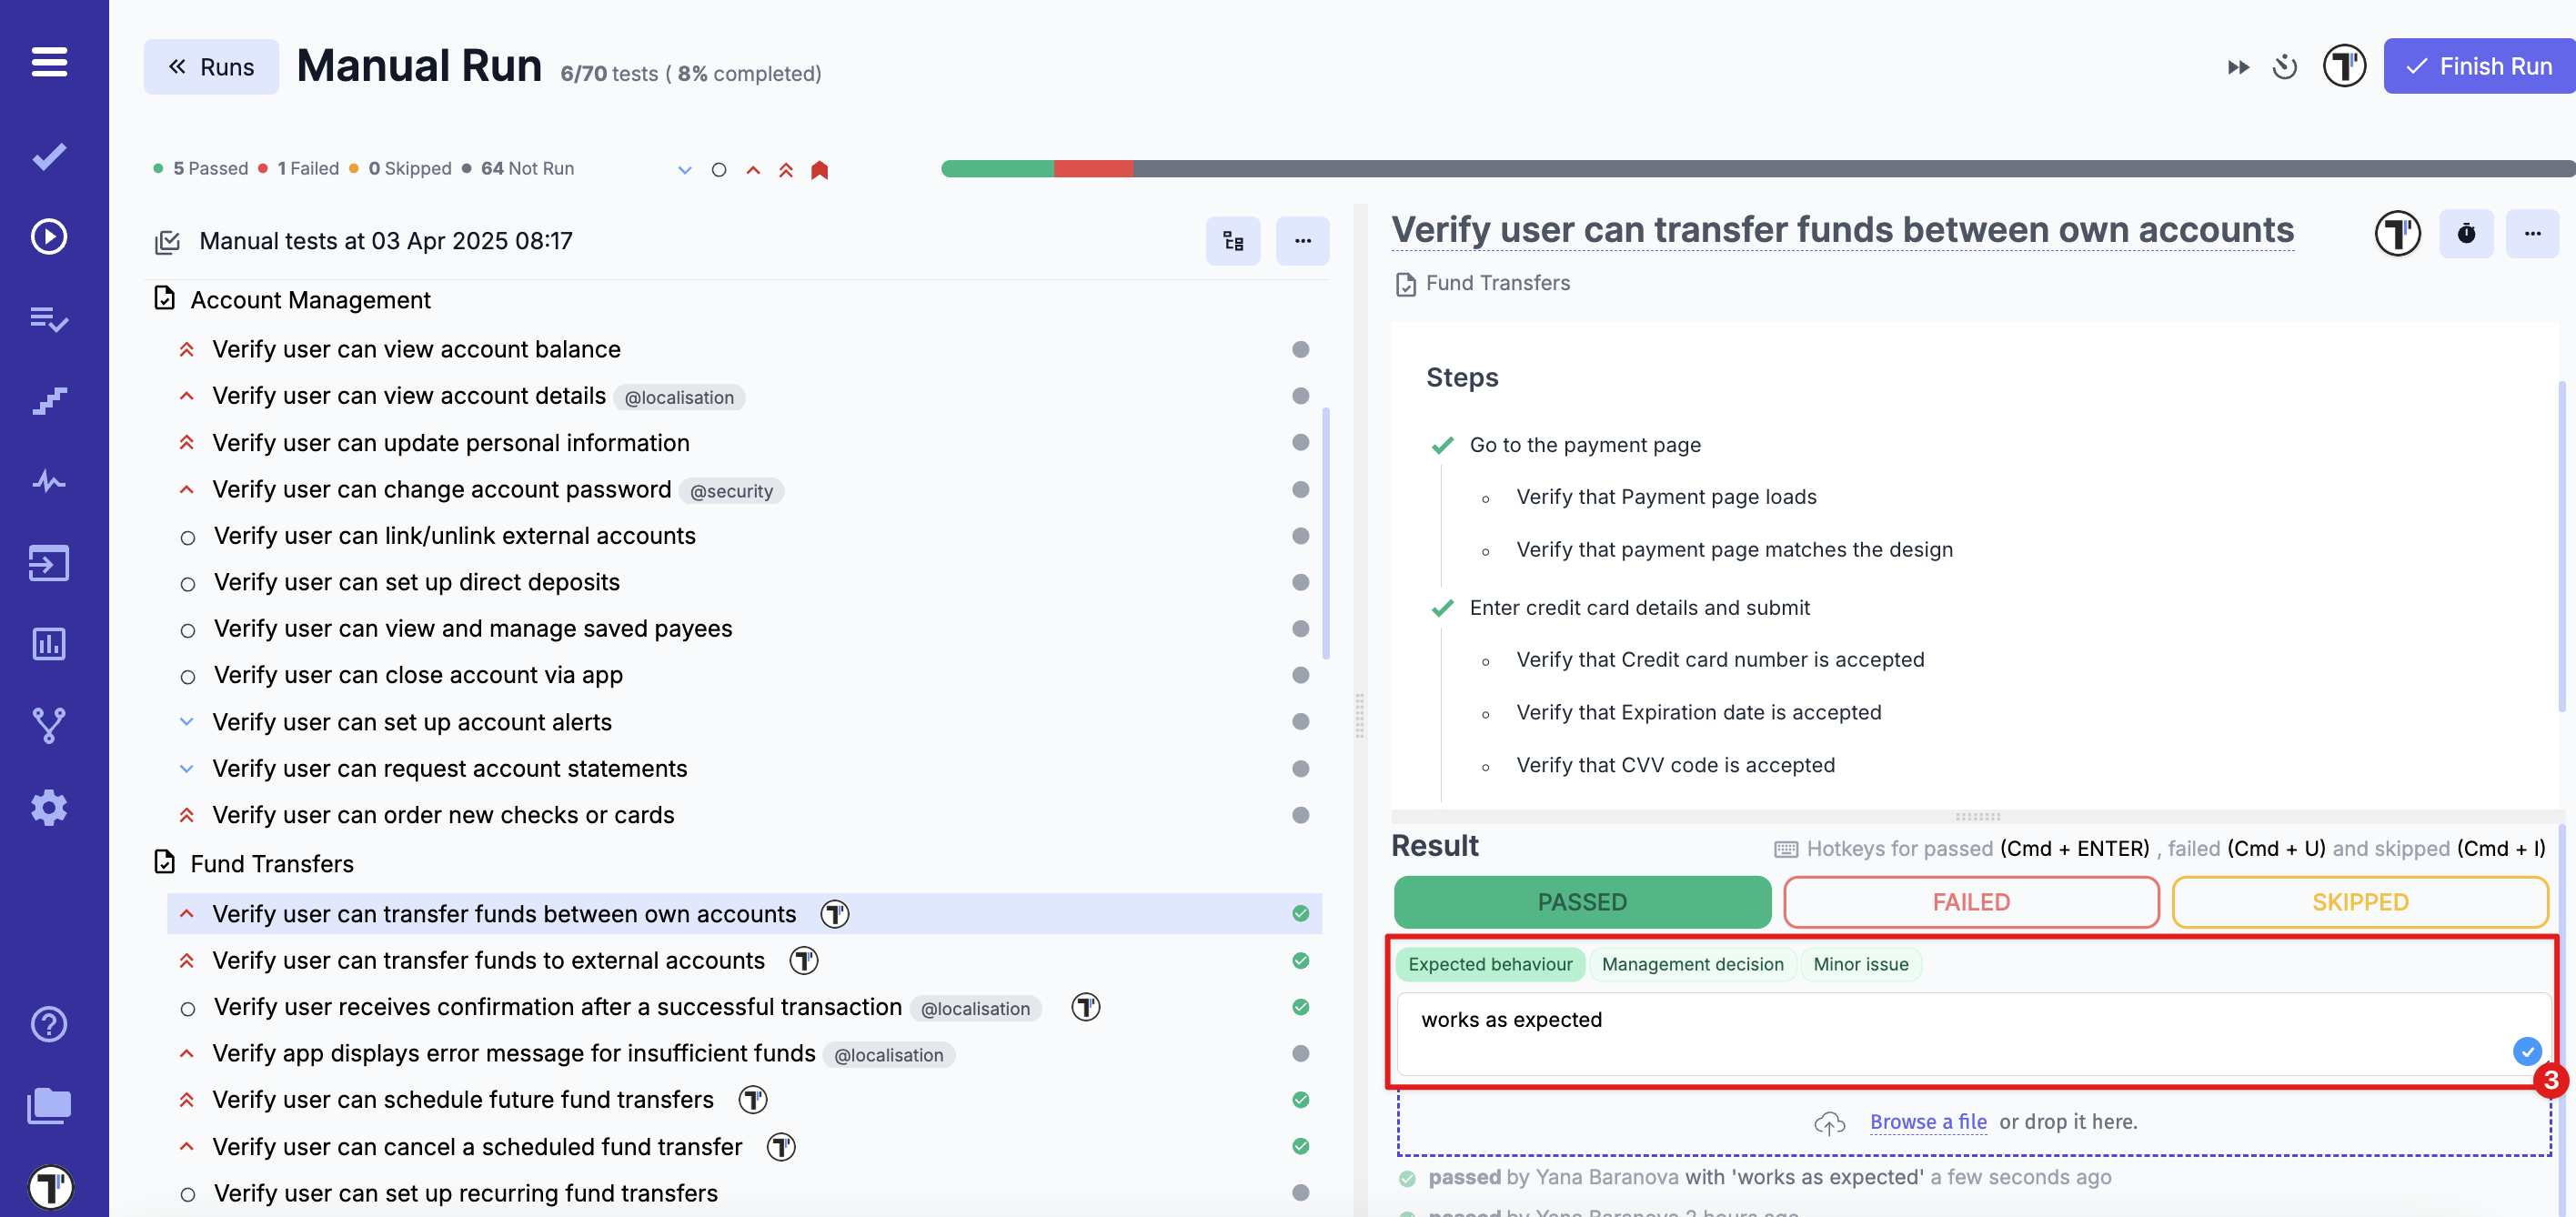
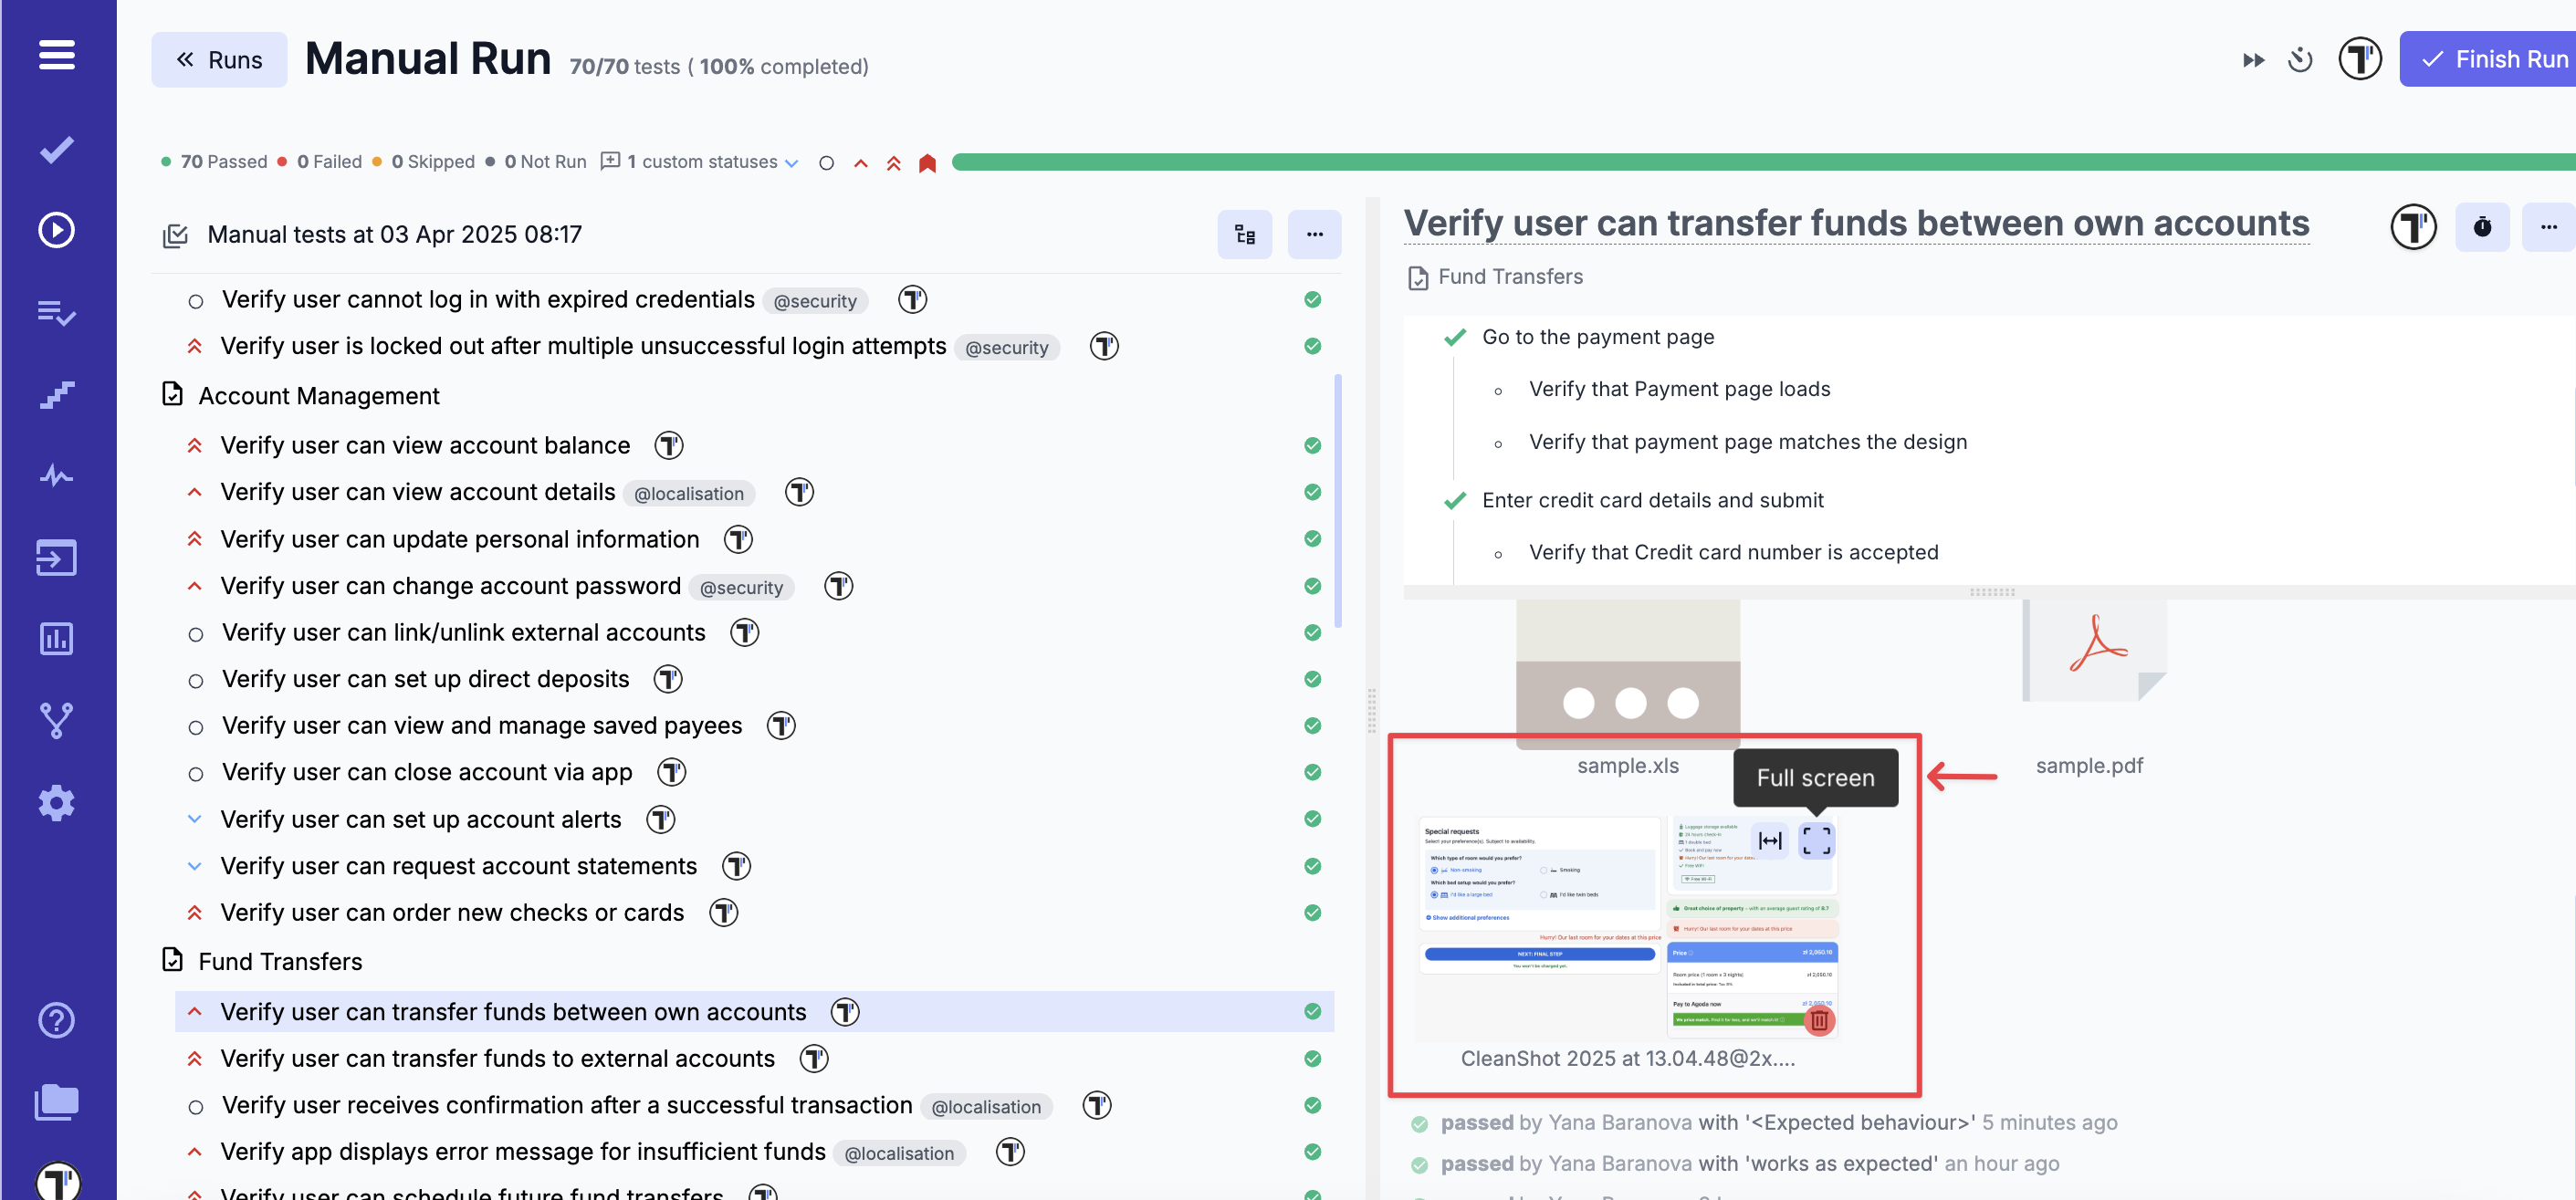
- Once the ‘Attaching a file’ field appears, allowing you to browse or drag-and-drop a file (e.g., screenshot, log file) to provide additional context for the result. This can help document evidence related to the test case, such as error logs or screenshots of the issue.
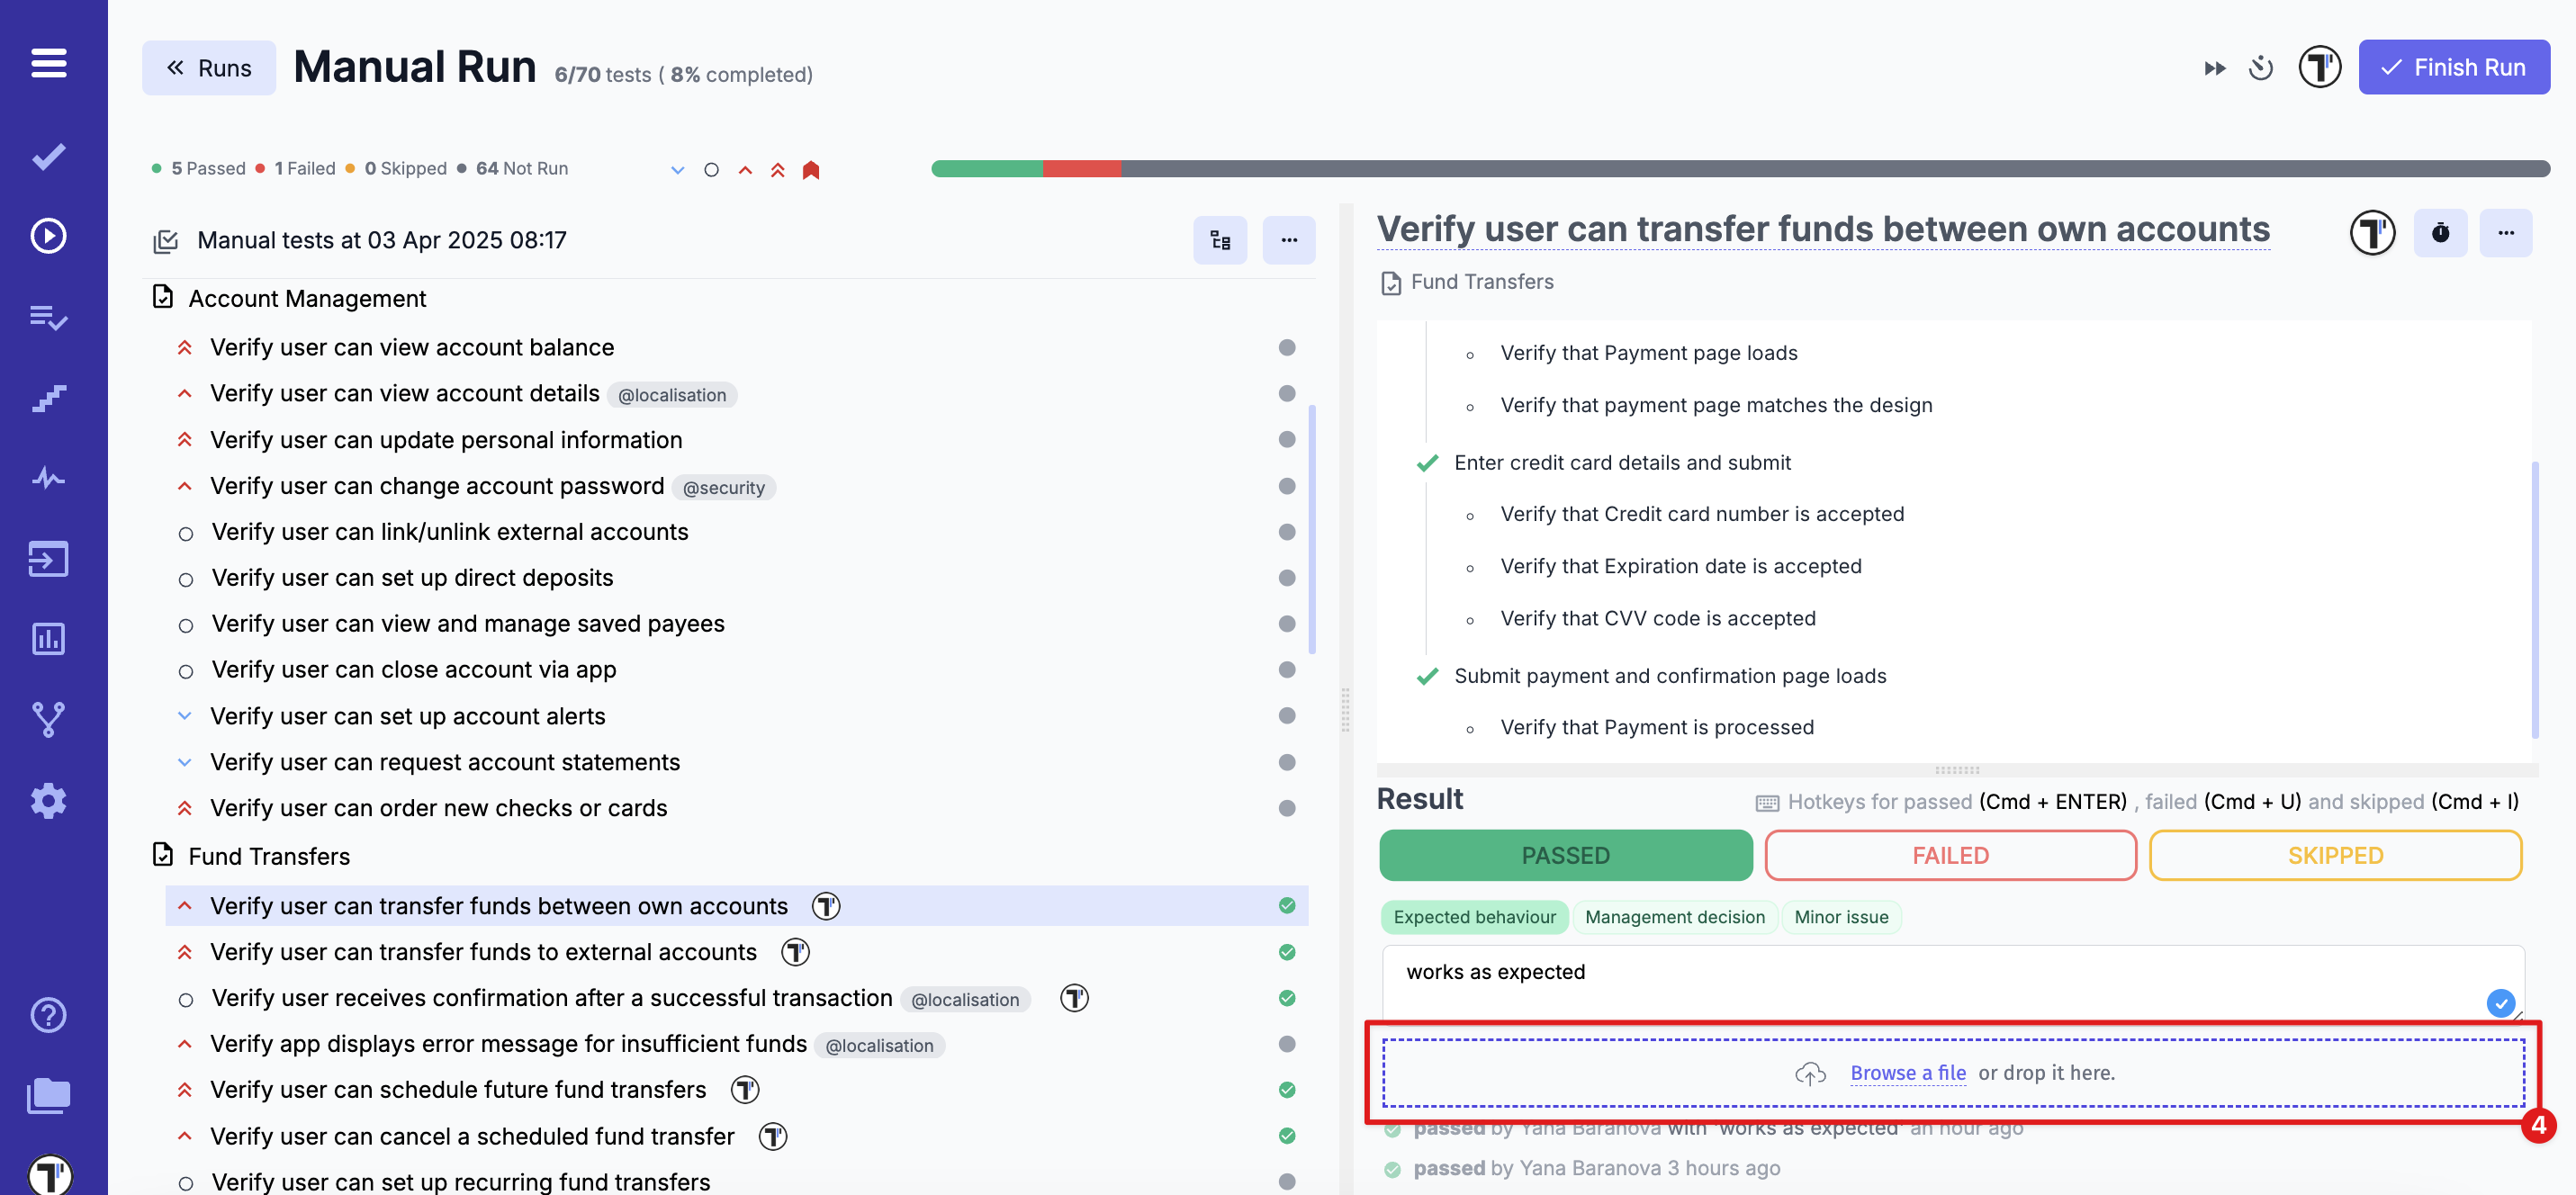
- You can also configure the view of attached files with the following options:
- Large Thumbnails;
- Small Thumbnails;
- Grid View;
- List View;
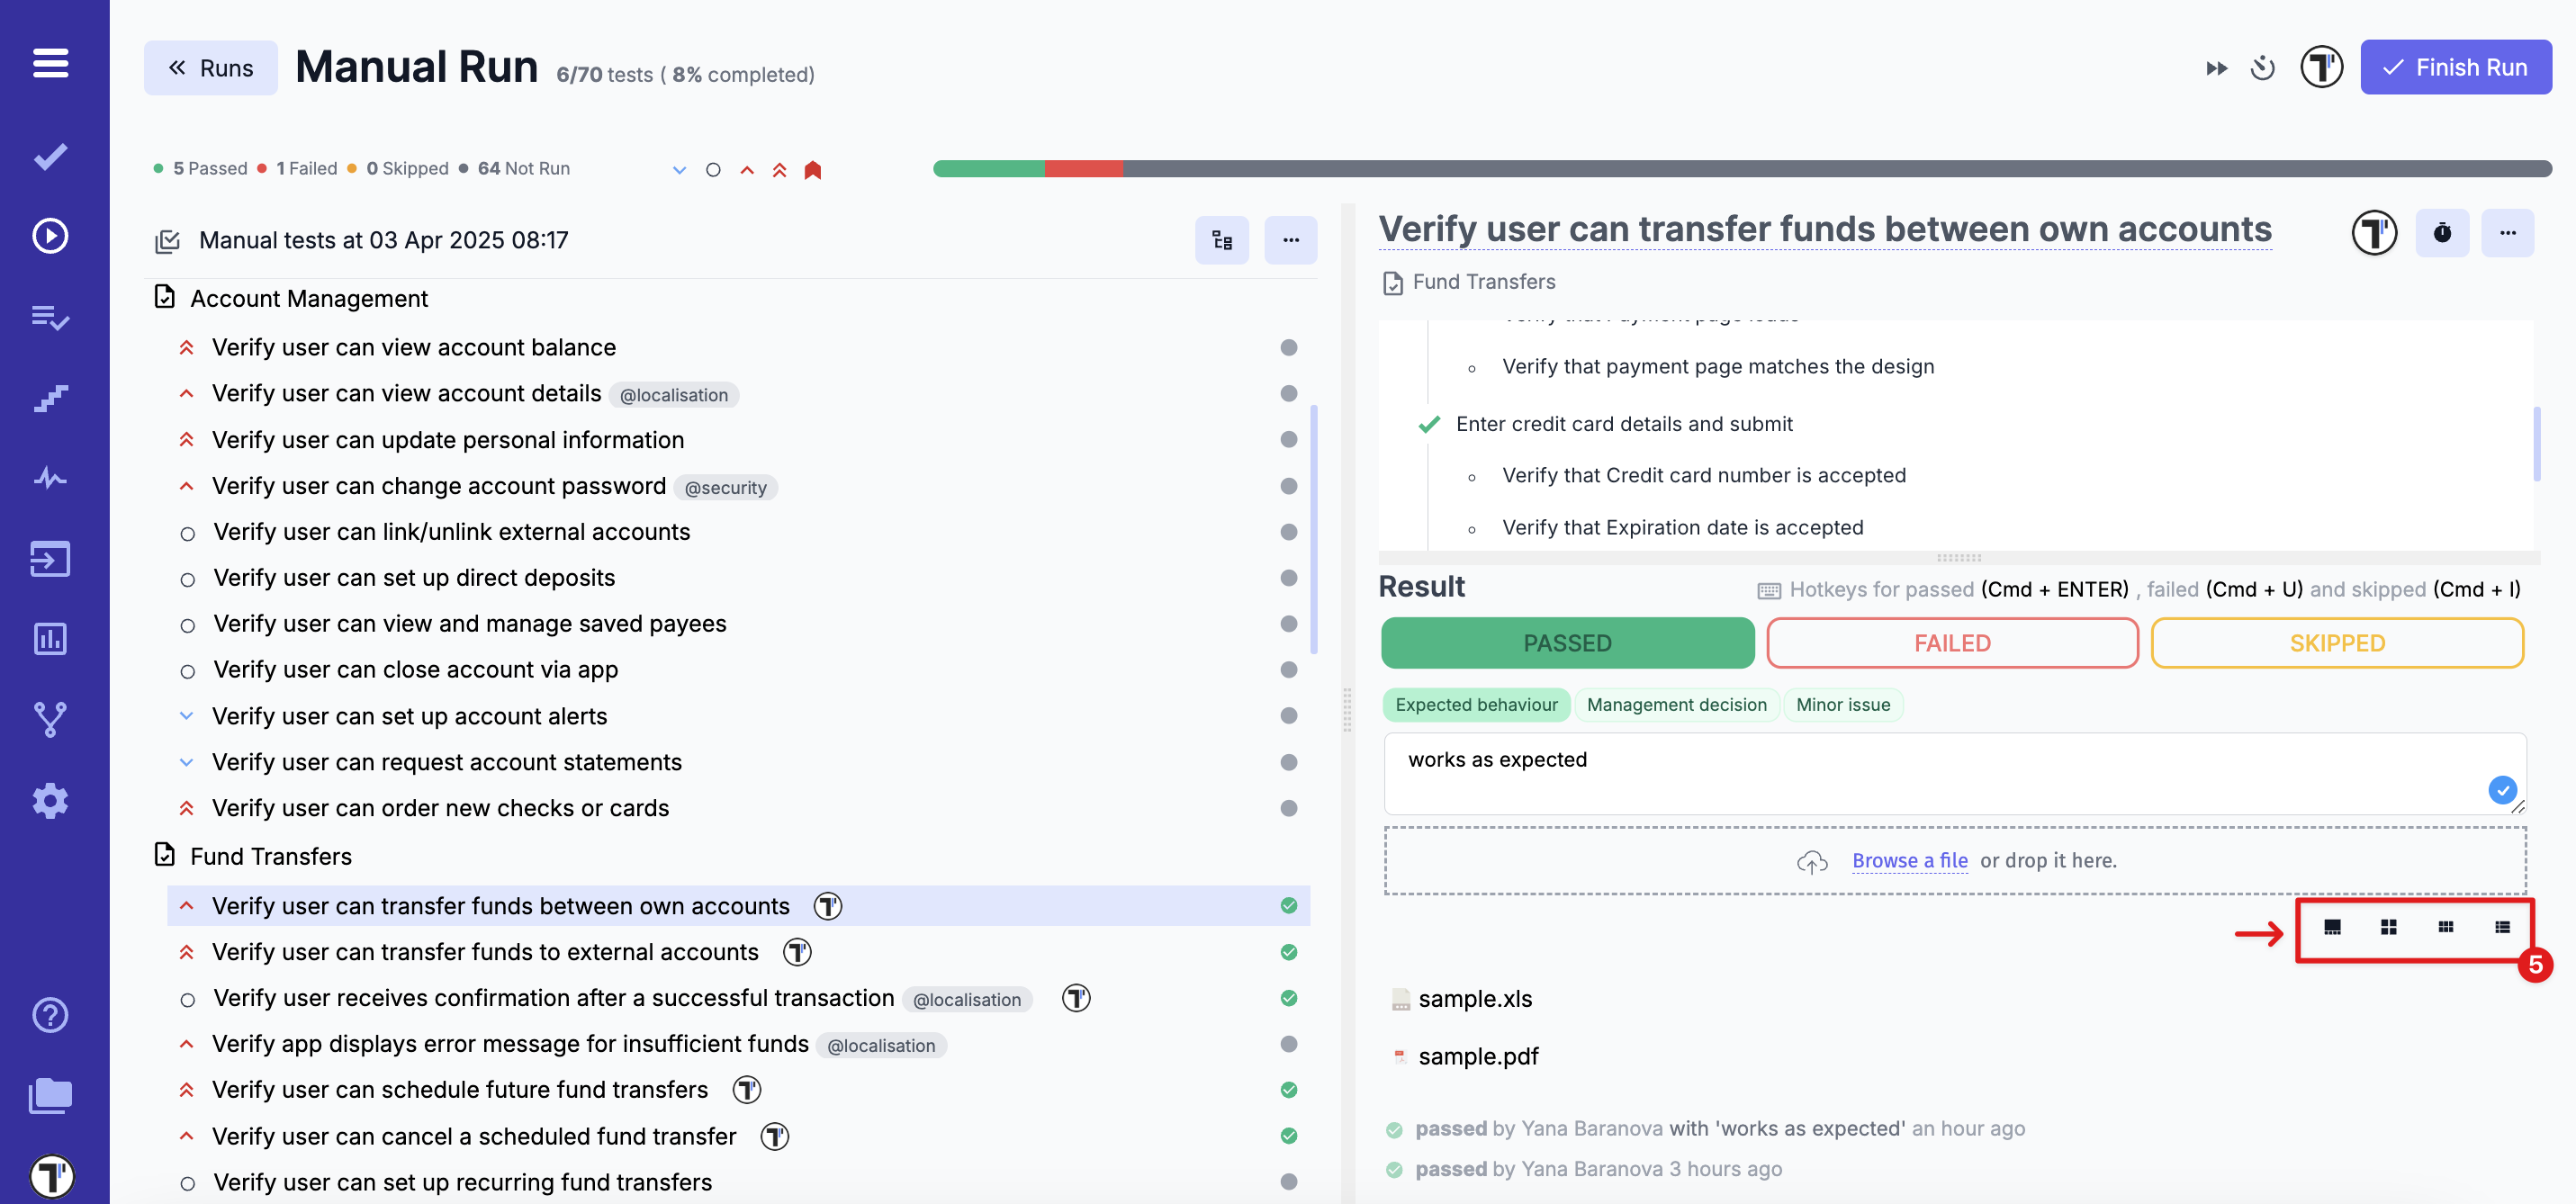
- Additionally, there are also two ways to view the specific file:
- Open and fit to width;
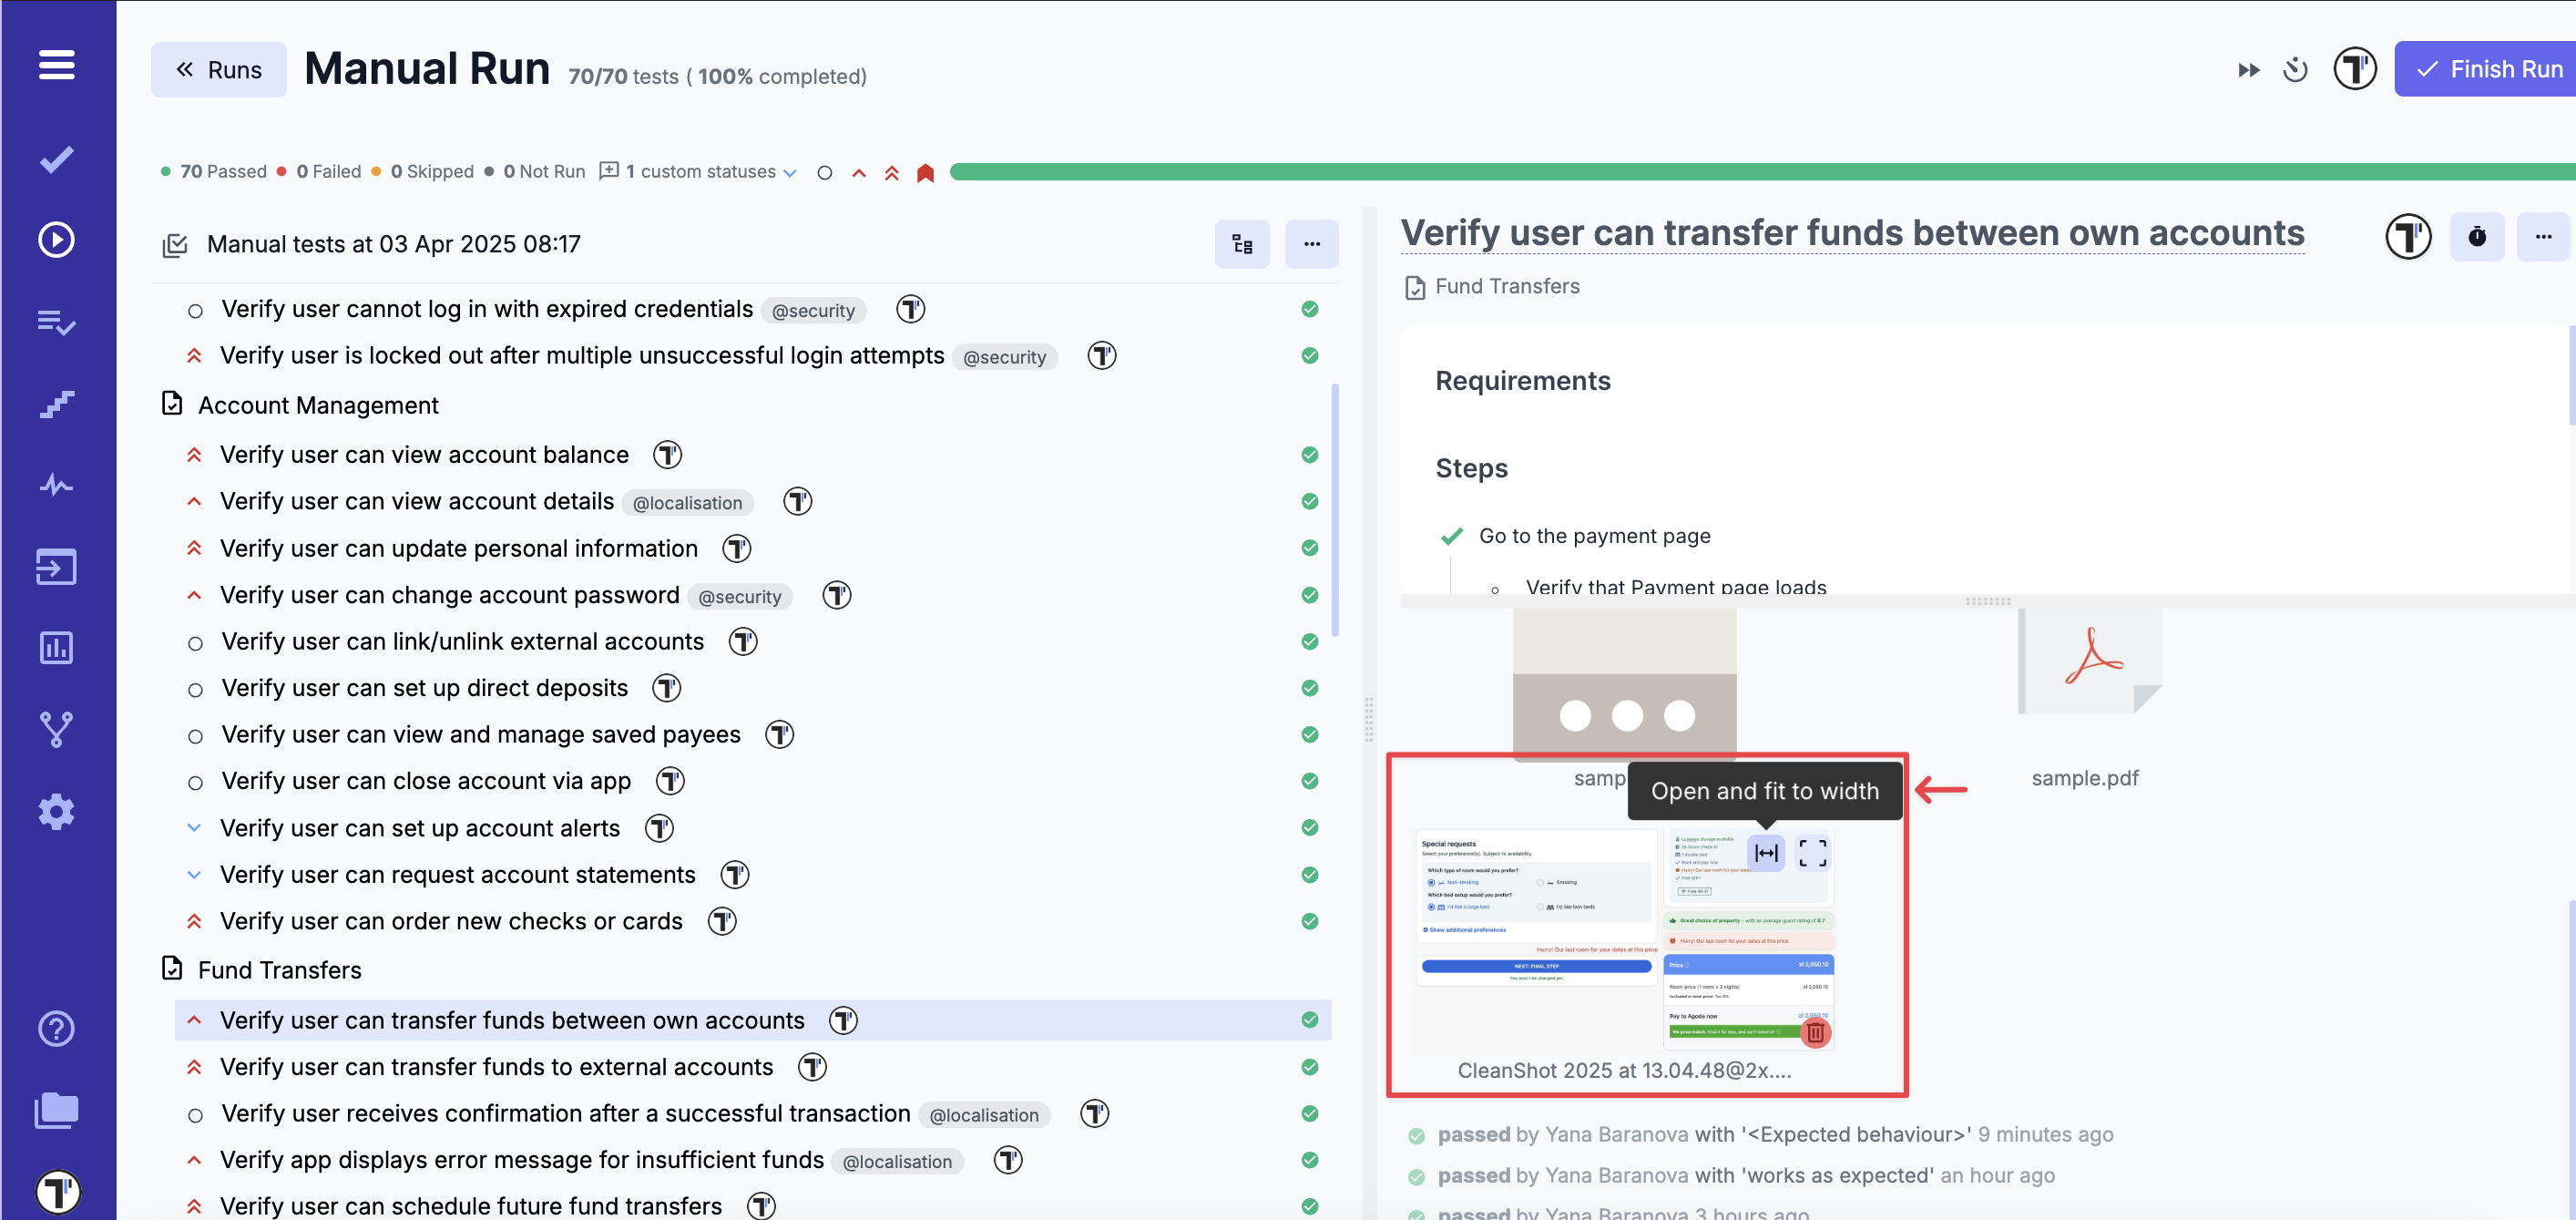
- Open and view a Full screen of the specific file;
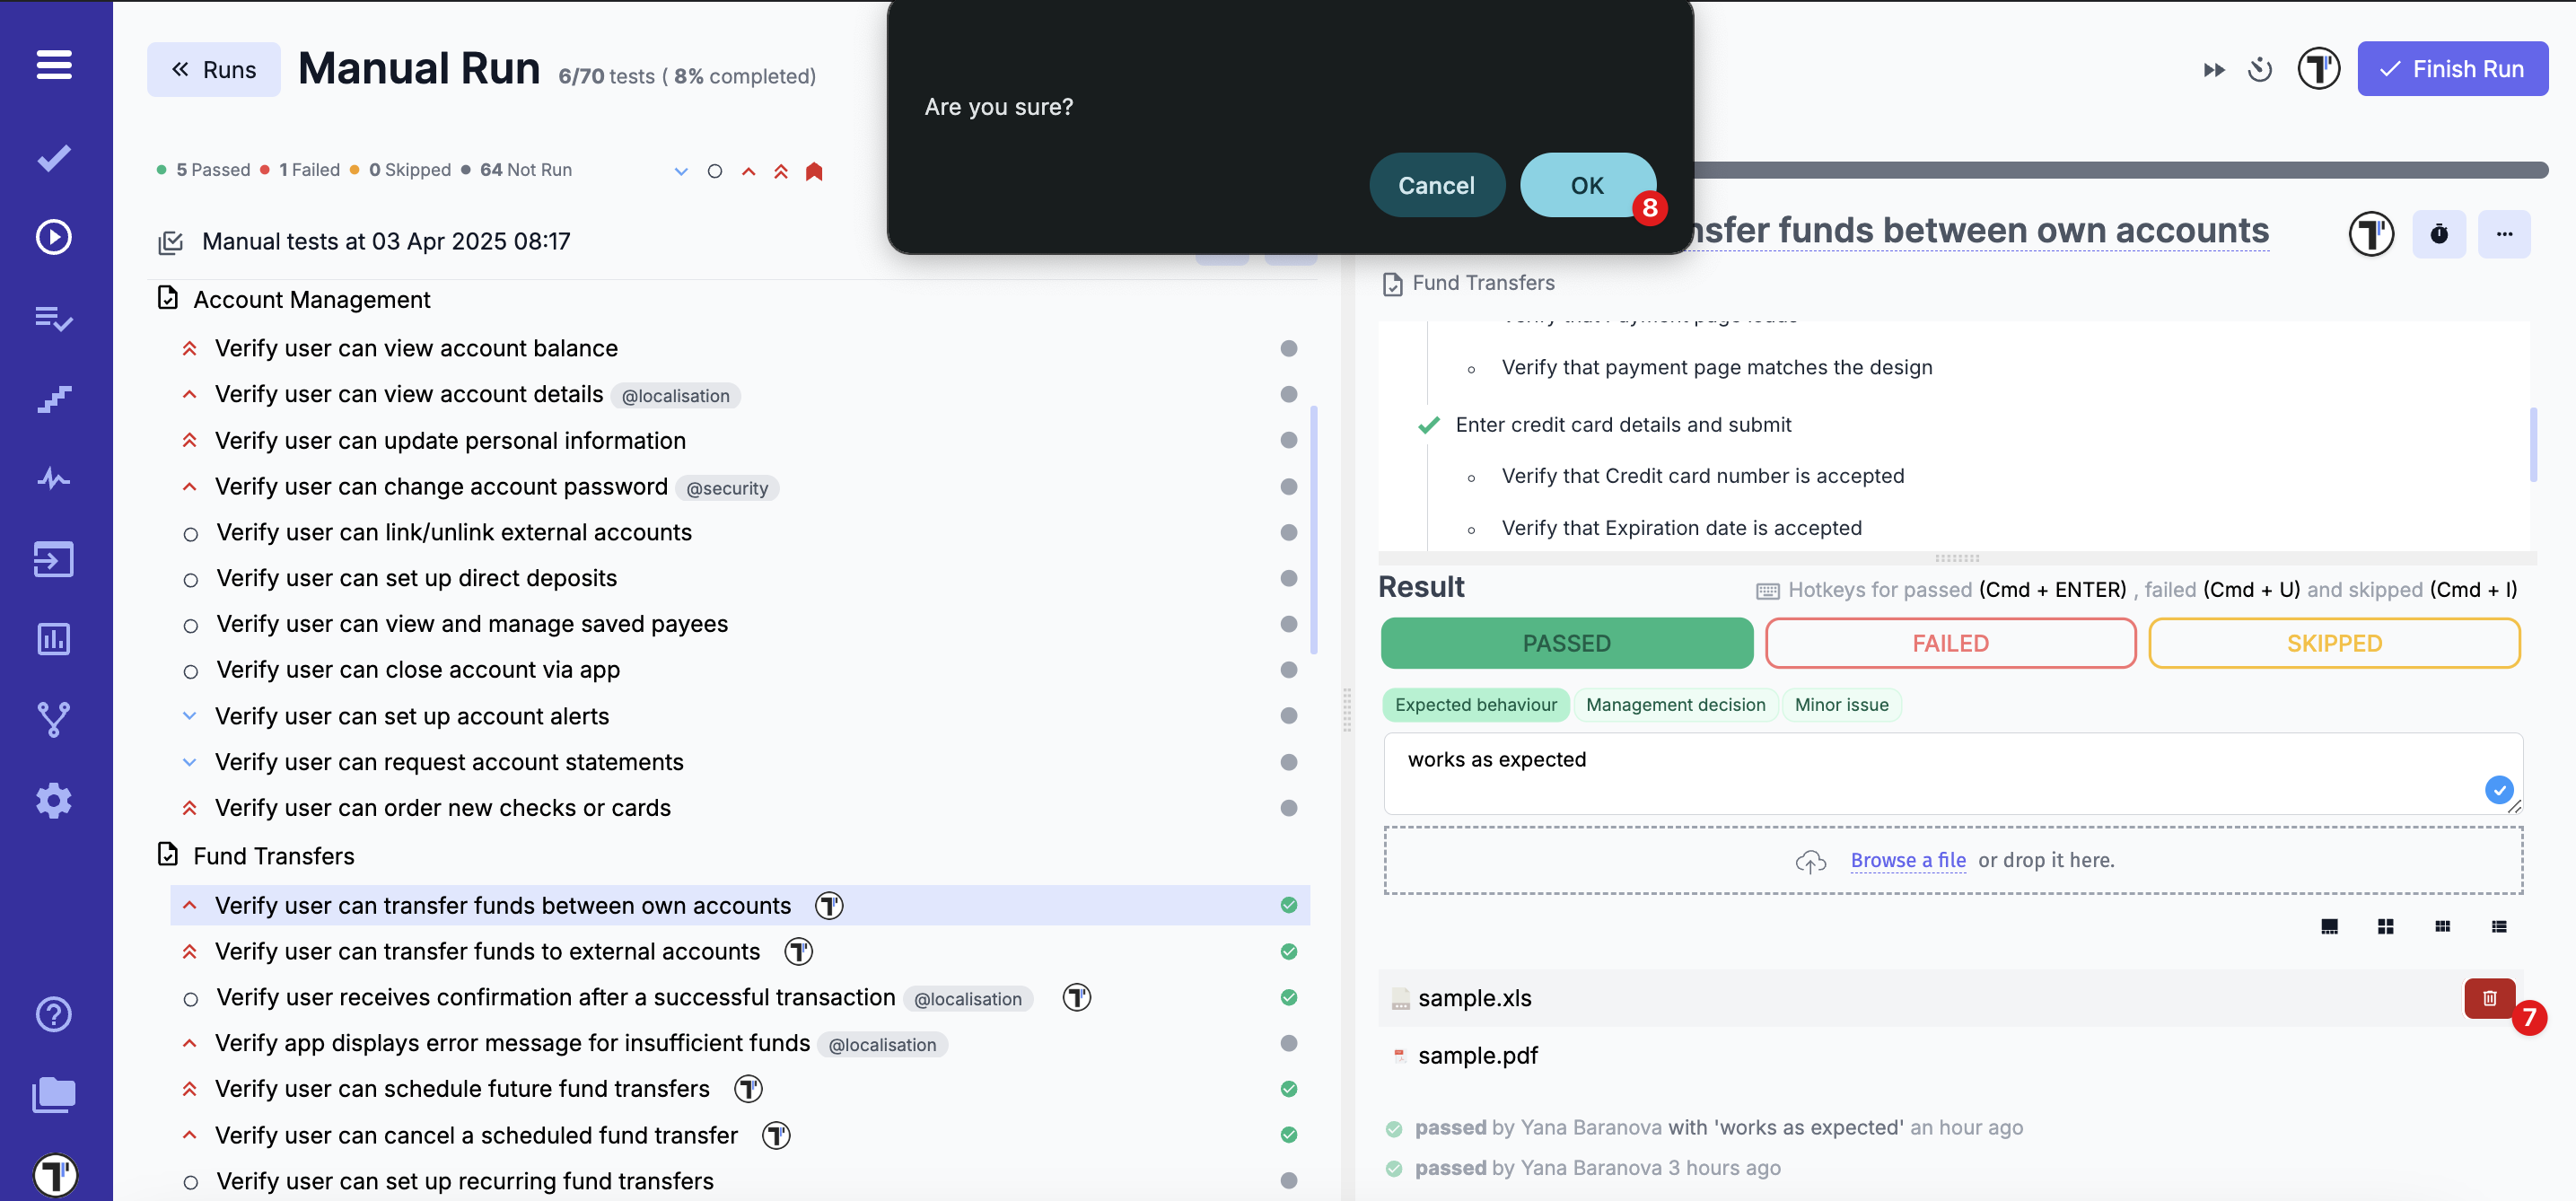
- To delete an attached file, click on the trash icon
- After warning message ‘Are you sure?’ appears, click OK button to confirm deletion
- Once all test cases are completed, click the Finish Run button to end the process
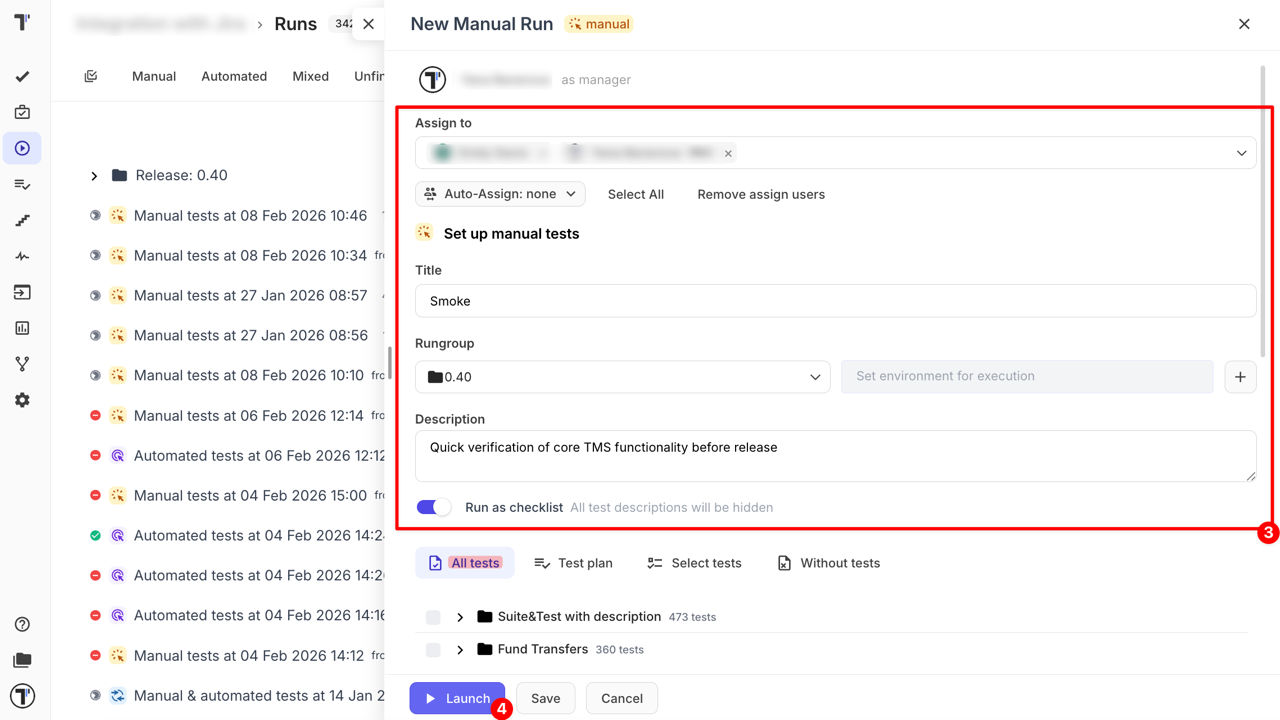
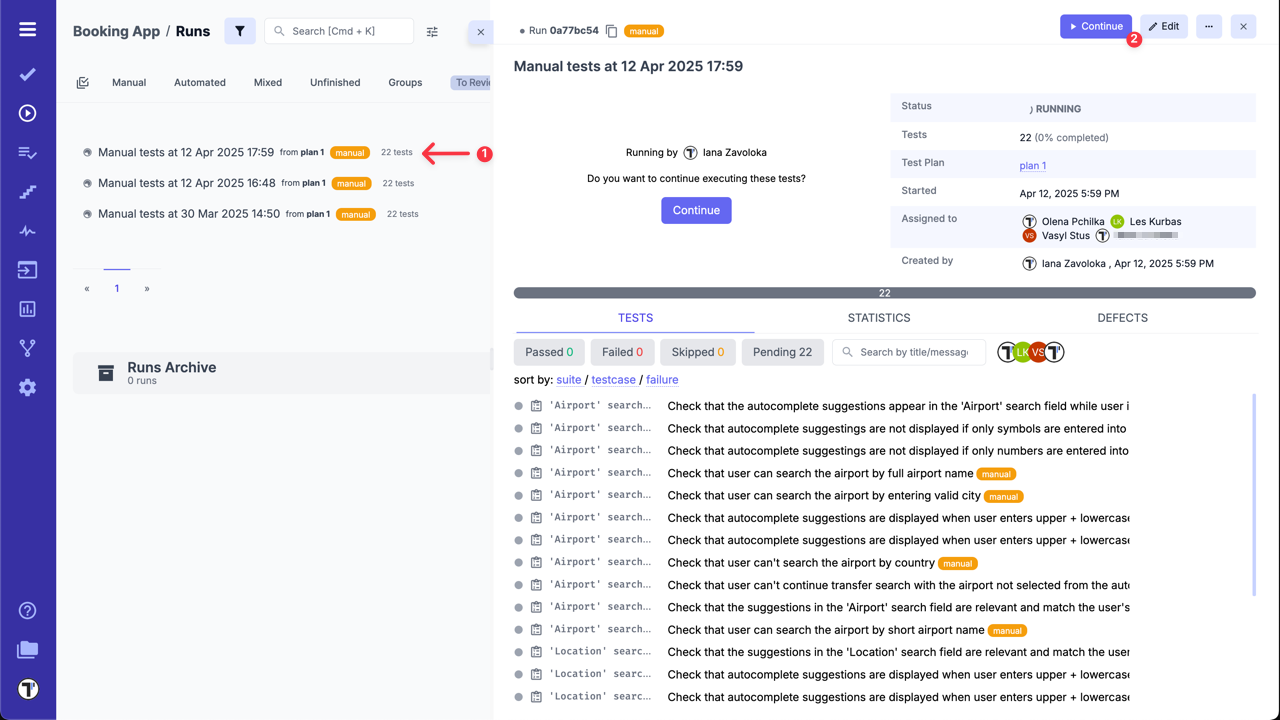
How to Assign Users to the Run
Section titled “How to Assign Users to the Run”By default, only the user who created the Run is added to it. However, Testomat.io allows you to assign multiple users to one Run:
- Click on ‘Manual Run’ button.
- Click on ‘Assign users’ option.

- Click on ‘Assign to’ dropdown list and select users.
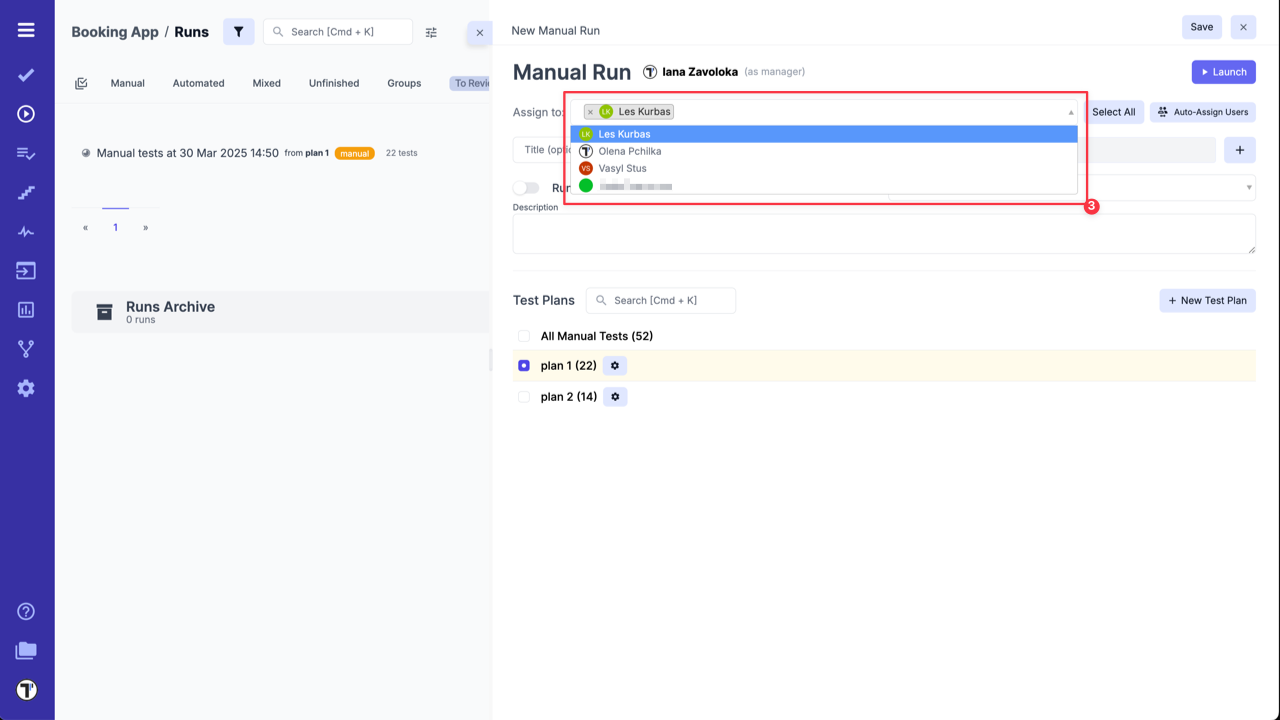
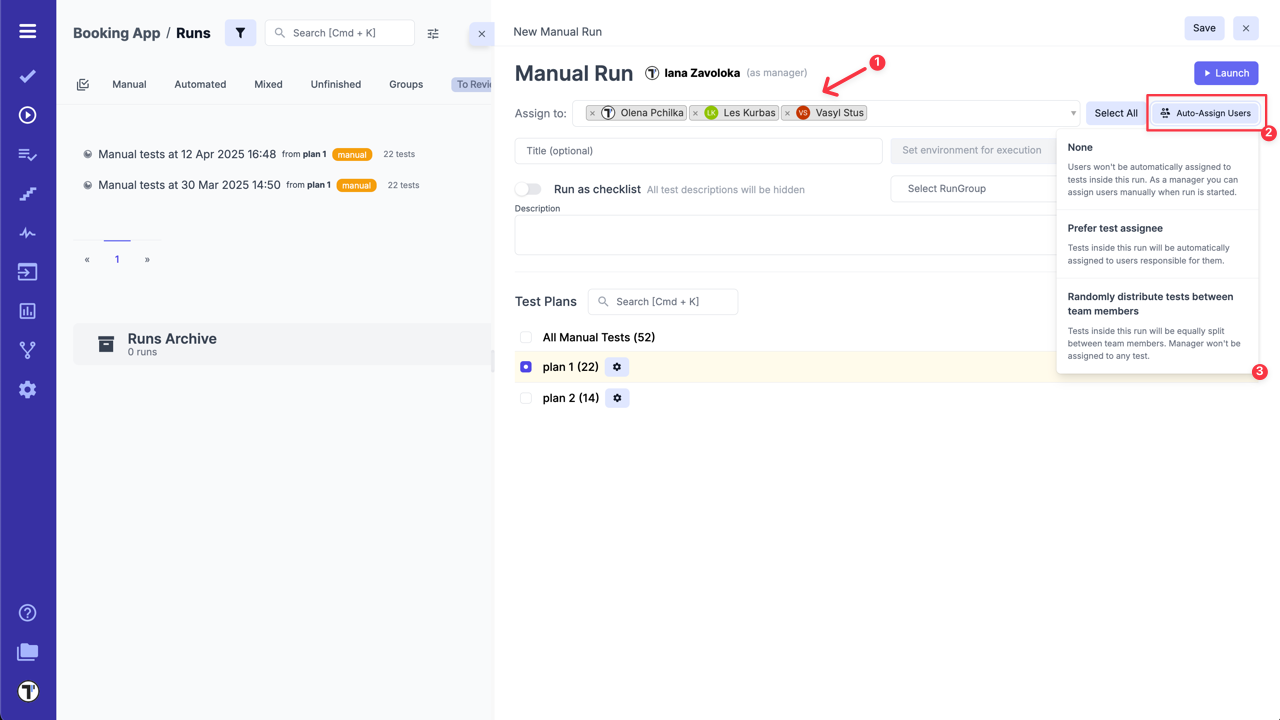
After selecting users, you can choose an assignment strategy, add a description, select/create a test plan, select an environment, etc., and then launch the test run.
Test Assignment Strategies:
-
None: Users won’t be automatically assigned to tests within this run. All users in the run can pick any test to assign, or you, as a manager, can manually assign users when run is started.
-
Prefer test assignee: The system respects assignments made at the test and suite levels. Tests within this run will be automatically assigned to users responsible for them.
-
Randomly distribute tests between team members: Tests within this run will be equally split between assigned team members. Manager won’t be assigned to any test.
To select Test Assignment Strategies:
- Assign at least one user to a Run.
- Click on ‘Auto-Assign Users’ button.
- Select a strategy from the list.
How to Assign Users to Specific Test Cases or Suites
Section titled “How to Assign Users to Specific Test Cases or Suites”During the Run you can assign different users to specific Test Cases, Suites or Folders within one Run.
To Assign a User to a Suite/Folder:
- Open Run with assigned users.
- Click on ‘Continue’ button.
- Click on ‘Assign to’ icon for specific Suite/Folder.
- Select a user for assignment from the list.

To Assign a User to Test Cases:
You can assign specific Test Cases only via Multi-Select button.
- Open Run with assigned users.
- Click ‘Continue’ button.
- Click ‘Multi-Select’ button.
- Select the Test Cases you would like to assign.
- Click the ‘Assign to’ button at the bottom.
- Select a user for assignment from the list.
- Click ‘OK’ in the ‘Are you sure you want to assign (username) to all selected tests?’ pop-up window.
Your Test Cases and Suites are now successfully assigned to different users.
How to Select a Test Environment
Section titled “How to Select a Test Environment”To select a testing environment you need:
- Click on Environment field
- Choose one or more environments from the dropdown list
- Click Save to apply your selection
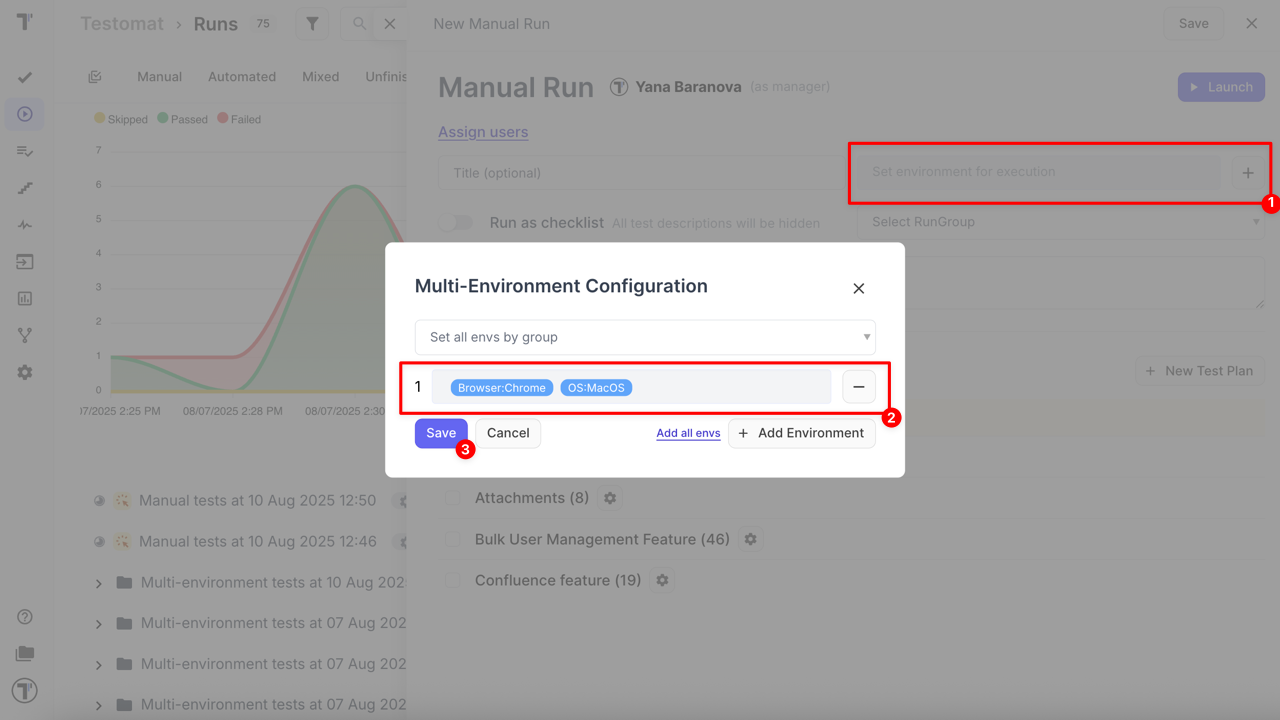
Testomat.io supports multiple strategies for running tests across different environments such as browsers, operating systems, devices, and deployment stages. You can run tests in single or multiple environments — sequentially or in parallel — depending on your project needs and infrastructure.
To learn more about configuring, managing, and running tests with environments, including multi-environment execution modes and CI/CD integration, please see the full guide here: How to Run Environments.
How to Run Tests in RunGroups
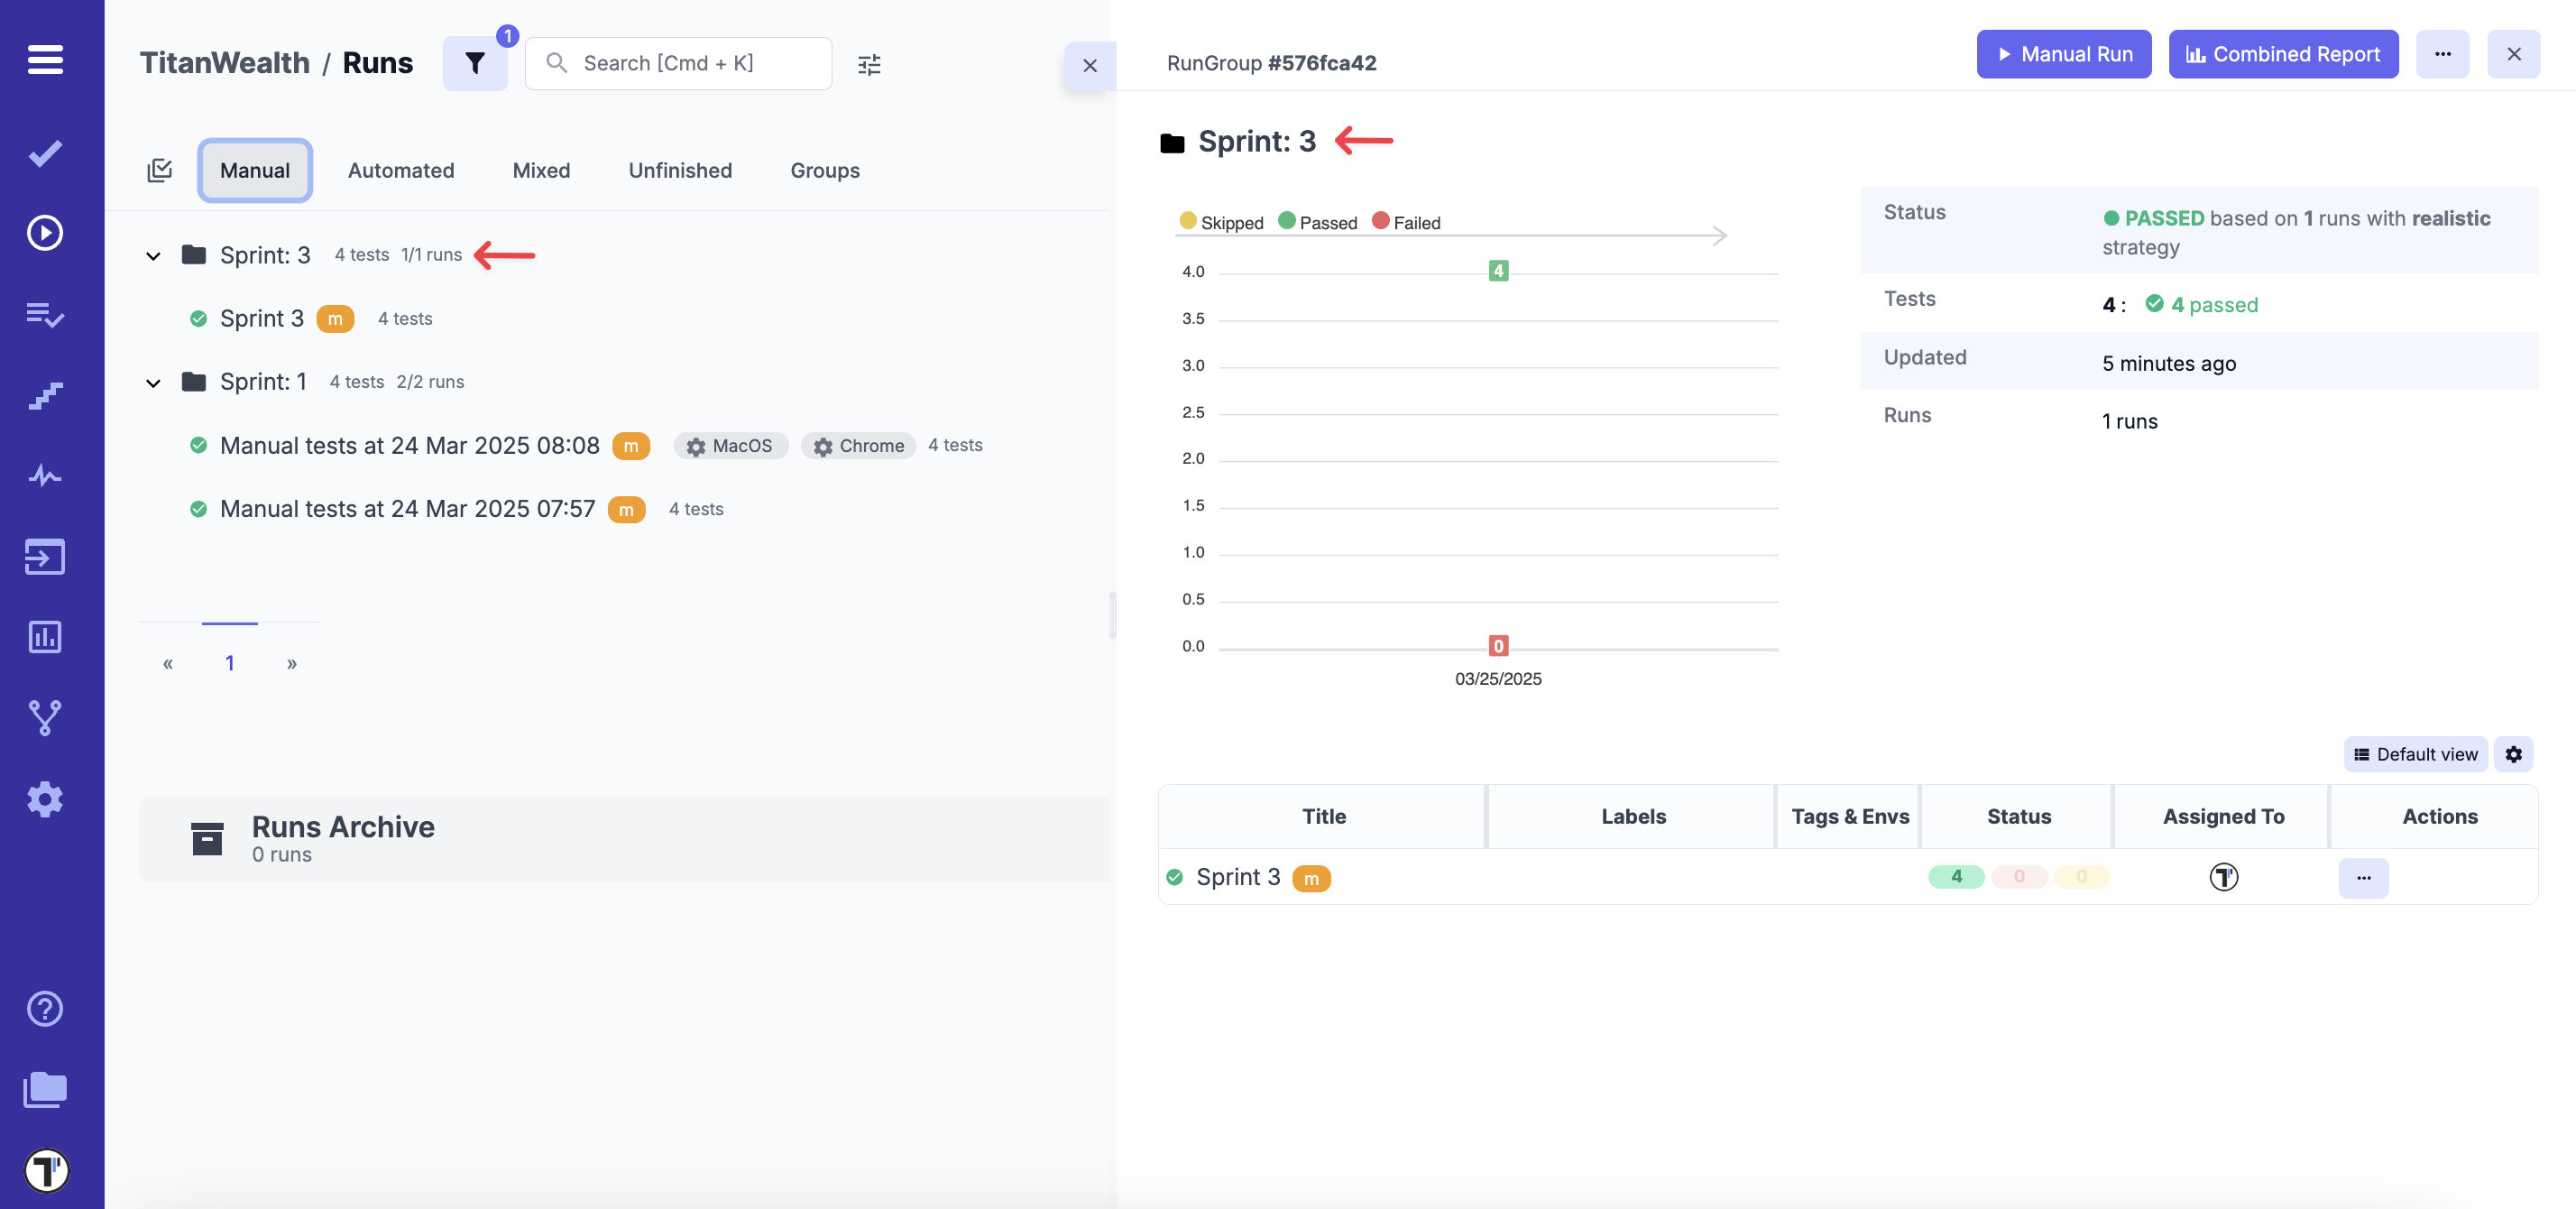
Section titled “How to Run Tests in RunGroups”RunGroups allow you to organize test runs into structured folders, making it easier to manage and analyze test execution. By grouping related runs, you can maintain better visibility over different testing phases, environments, or specific test suites.
Before proceeding, make sure you have created a RunGroup. For detailed instructions on how to create and manage RunGroups, refer to this guide for more details.
Enabling RunGroups for New Runs (Optional Setting)
This setting is optional and can be enabled if you need it. Overall, you can freely create runs inside and out of groups.
- Navigate to the Settings in the sidebar
- Click on the Project tab
- In the Runs settings, enable the option to require a RunGroup for new runs
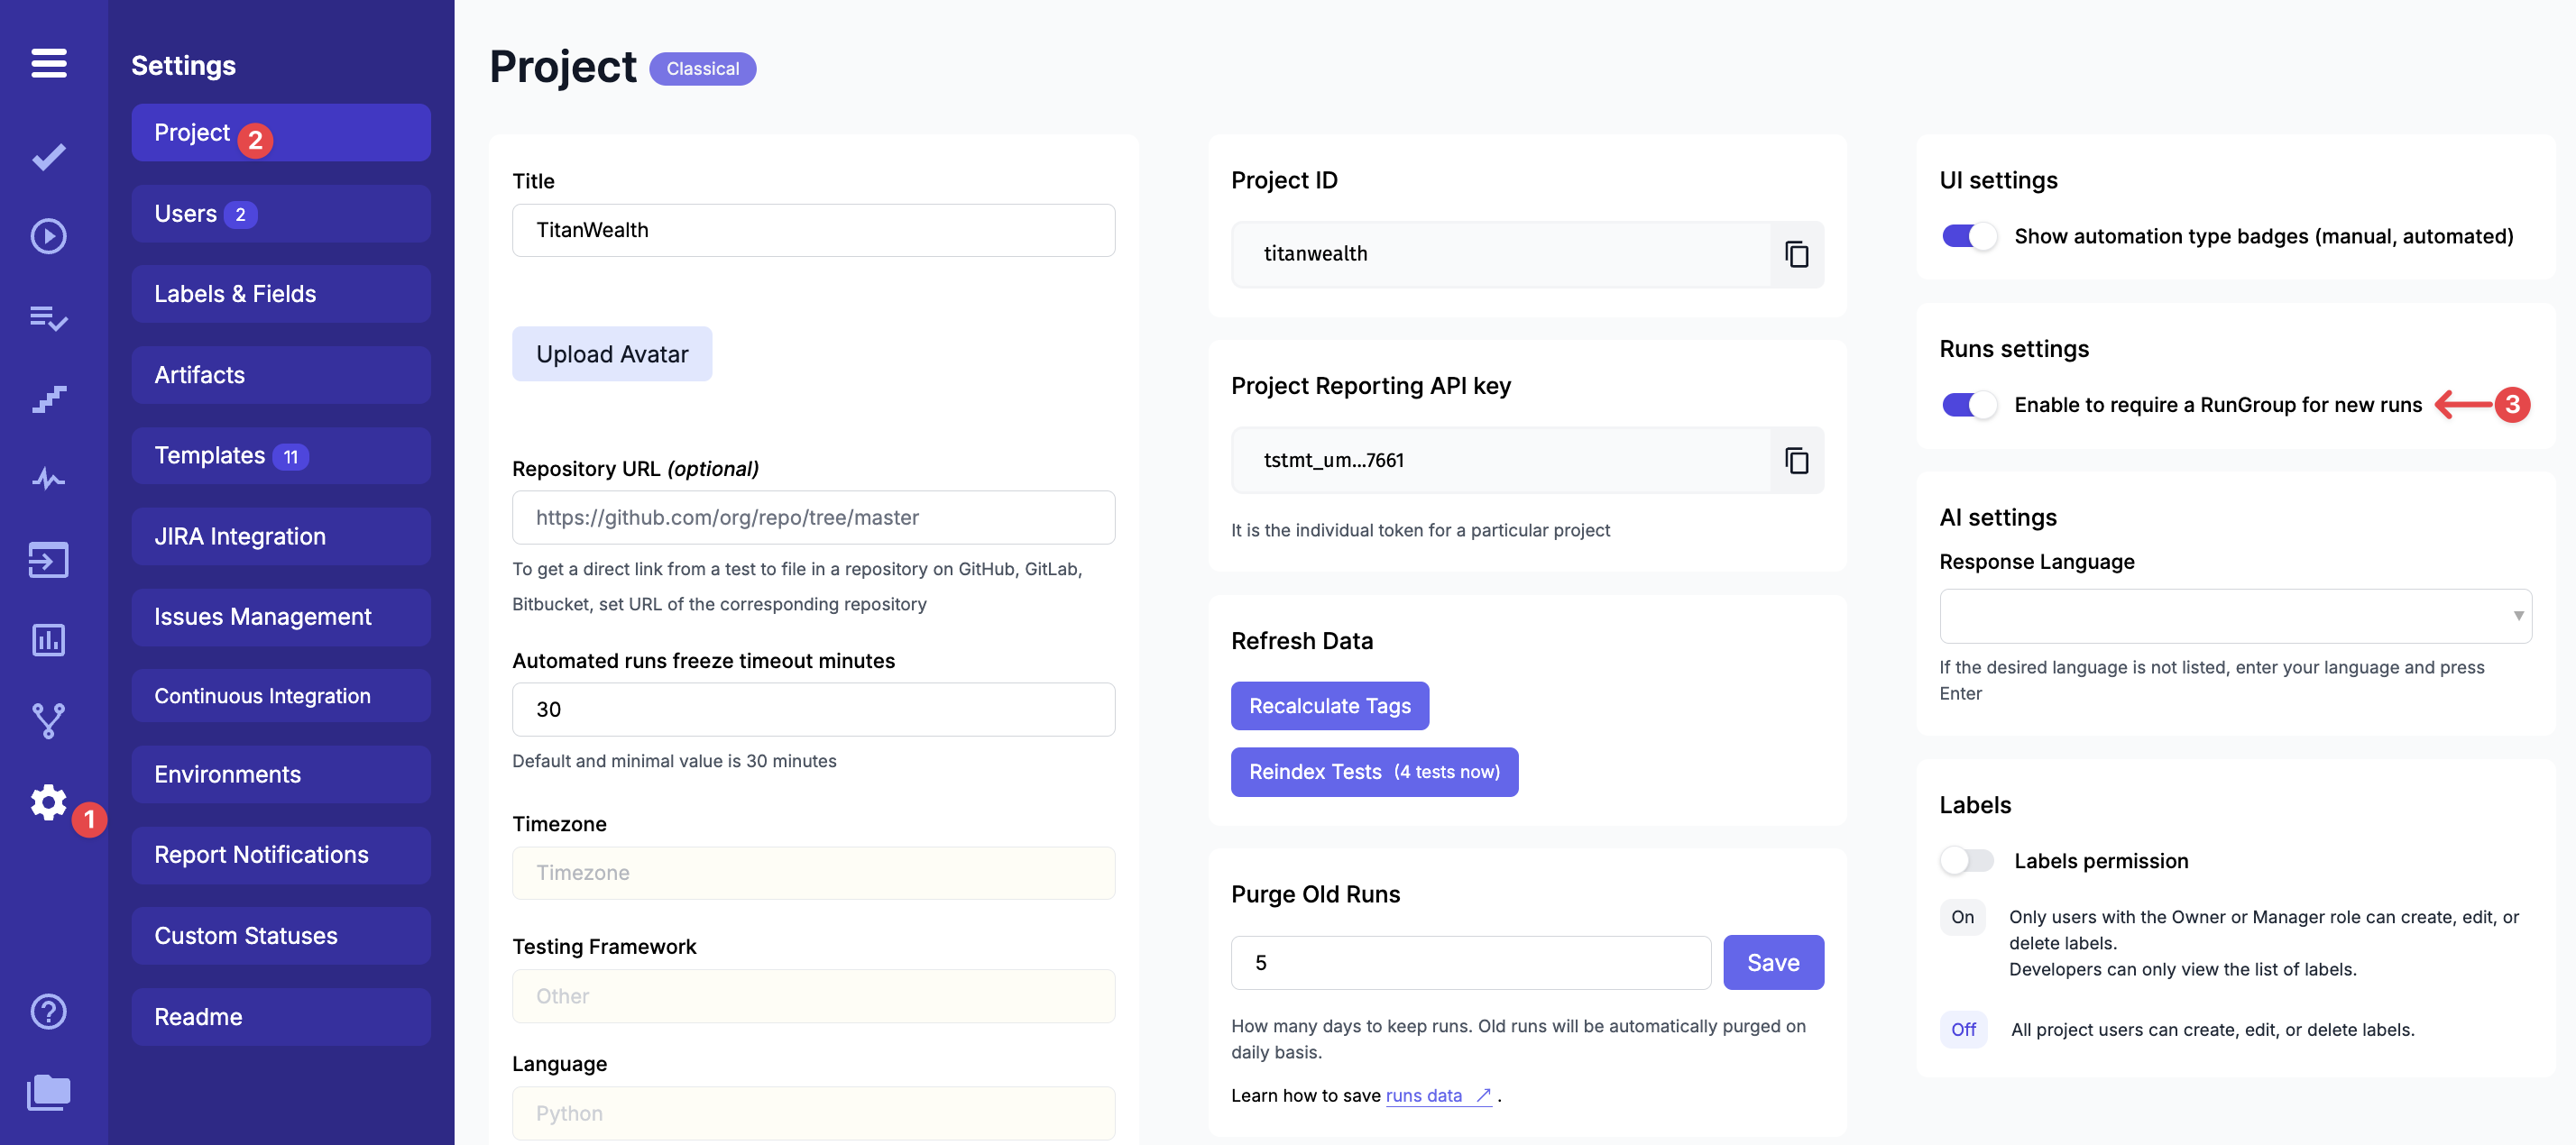
Once the RunGroup is enabled, you can start your runs within folders. Make sure the RunGroup Structure is also enabled.
Launching Runs in a Folder
- Navigate to the Runs tab
- Click the Manual Run button

- Select the required RunGroup from the dropdown
- Click the Launch button
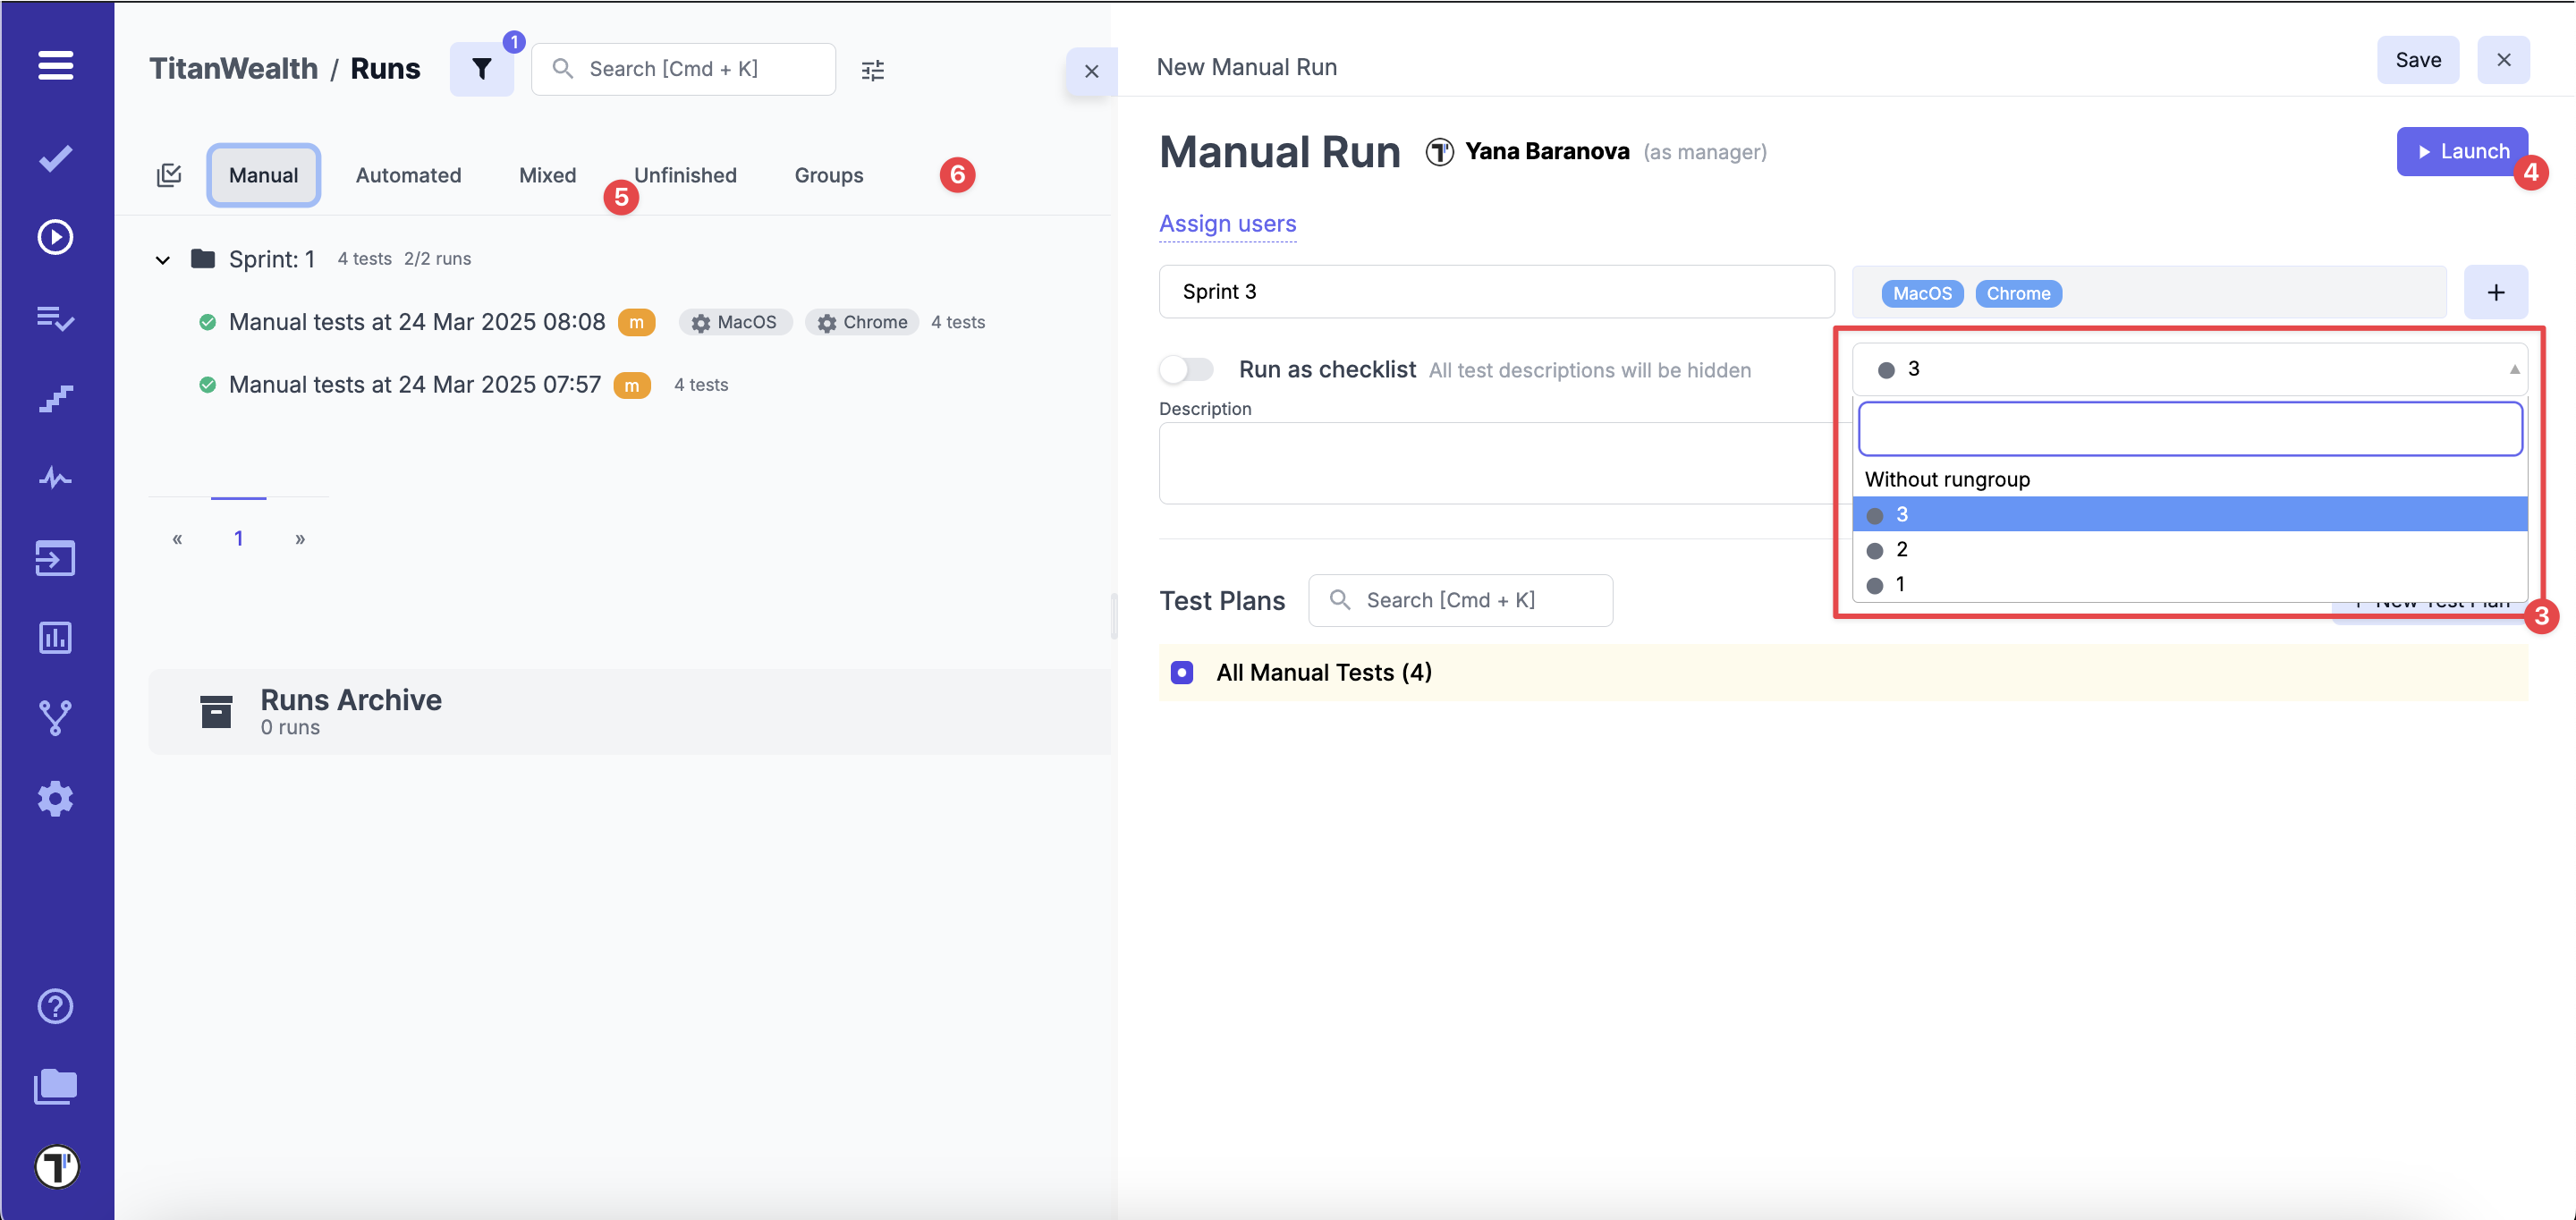
Important: If no RunGroup is selected, the field will be highlighted in red, and a warning message will appear, prompting you to choose a group before proceeding.
By following these steps, you can organize test runs within RunGroups, ensuring a structured and manageable testing workflow. See the result below:
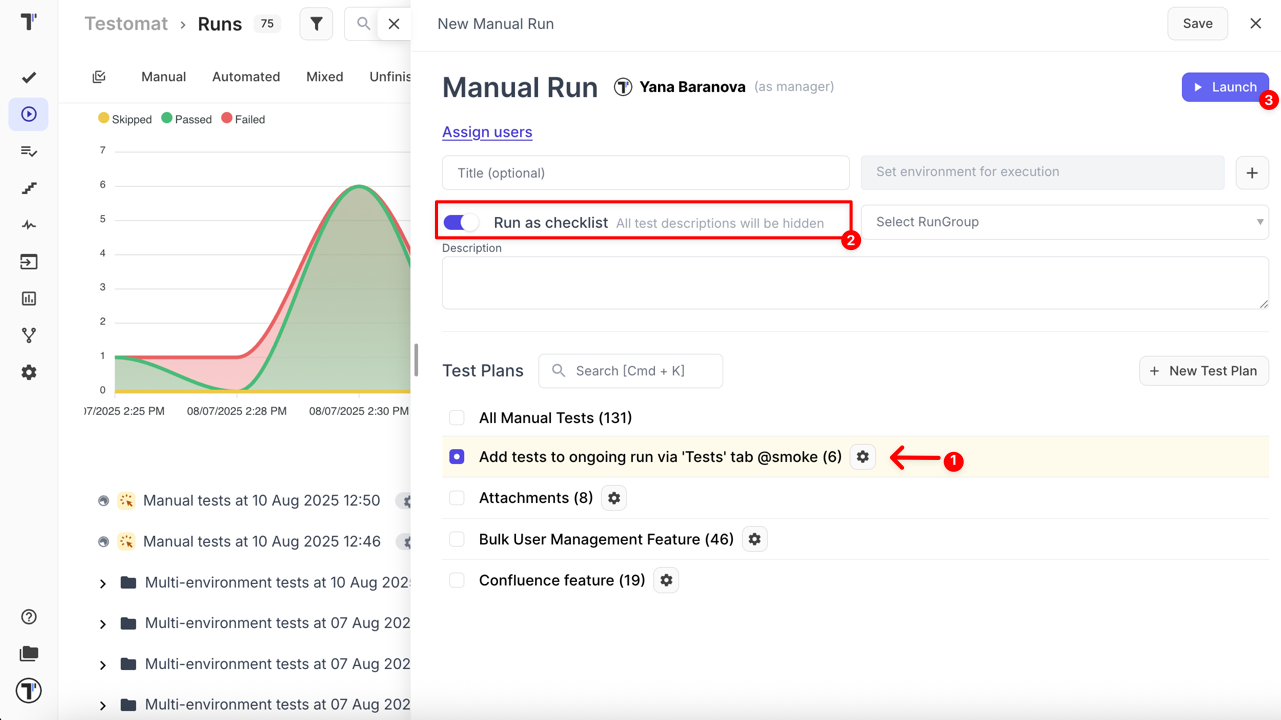
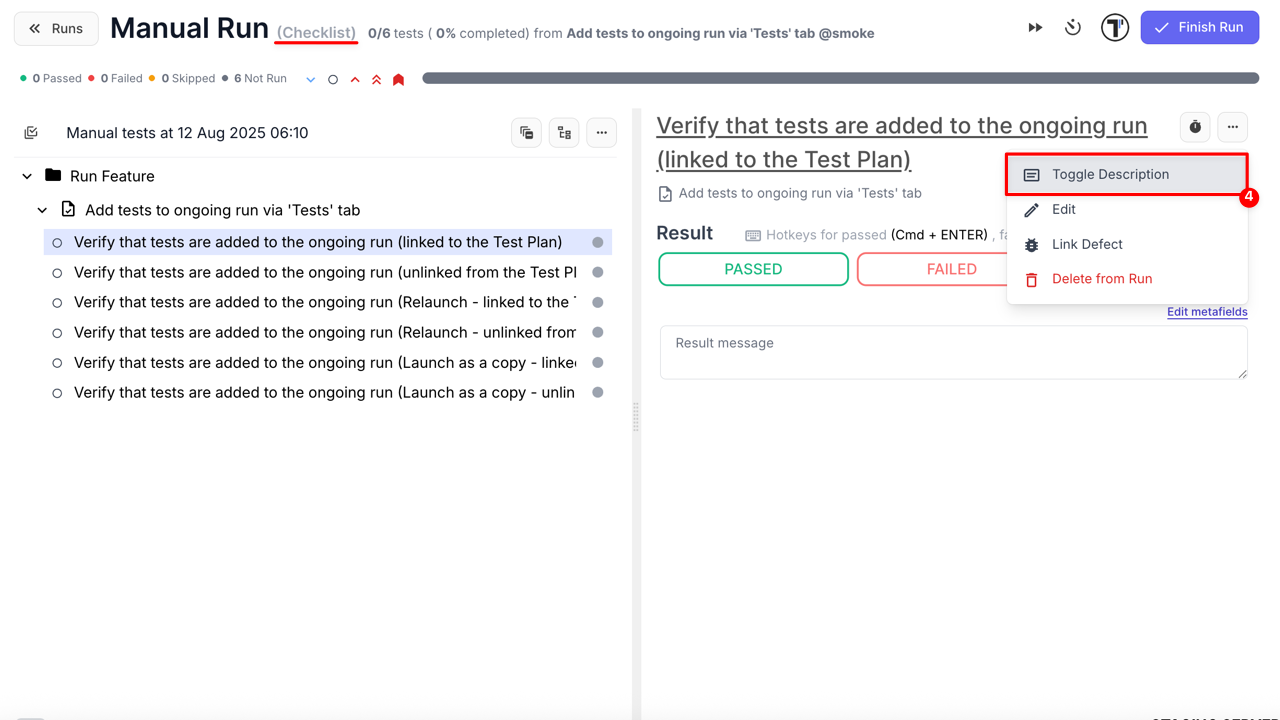
How to Run Tests As Checklist
Section titled “How to Run Tests As Checklist”Checklists are commonly used in manual testing to quickly execute a set of tests without distractions from additional details. In this mode, test descriptions are hidden by default, but you can still view them by clicking the Toggle Description button.
In the New Manual Run sidebar,
- Select a Test Plan or All Manual Tests
- Enable Run as checklist
- Click the Launch button
Once the manual run is launched, test descriptions will be hidden. To view a description for any test:
- Click the extra menu -> Toggle Description
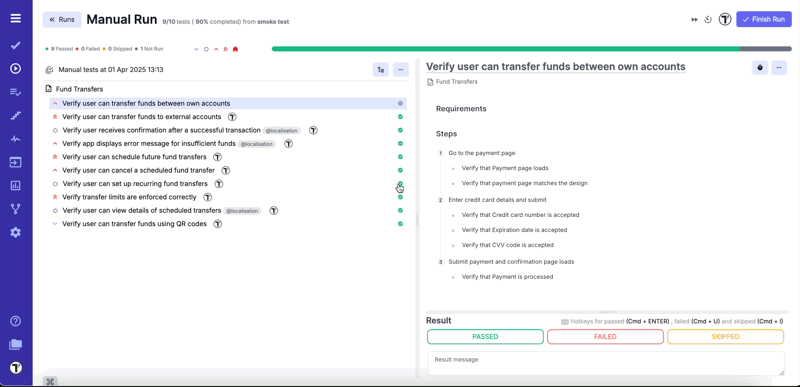
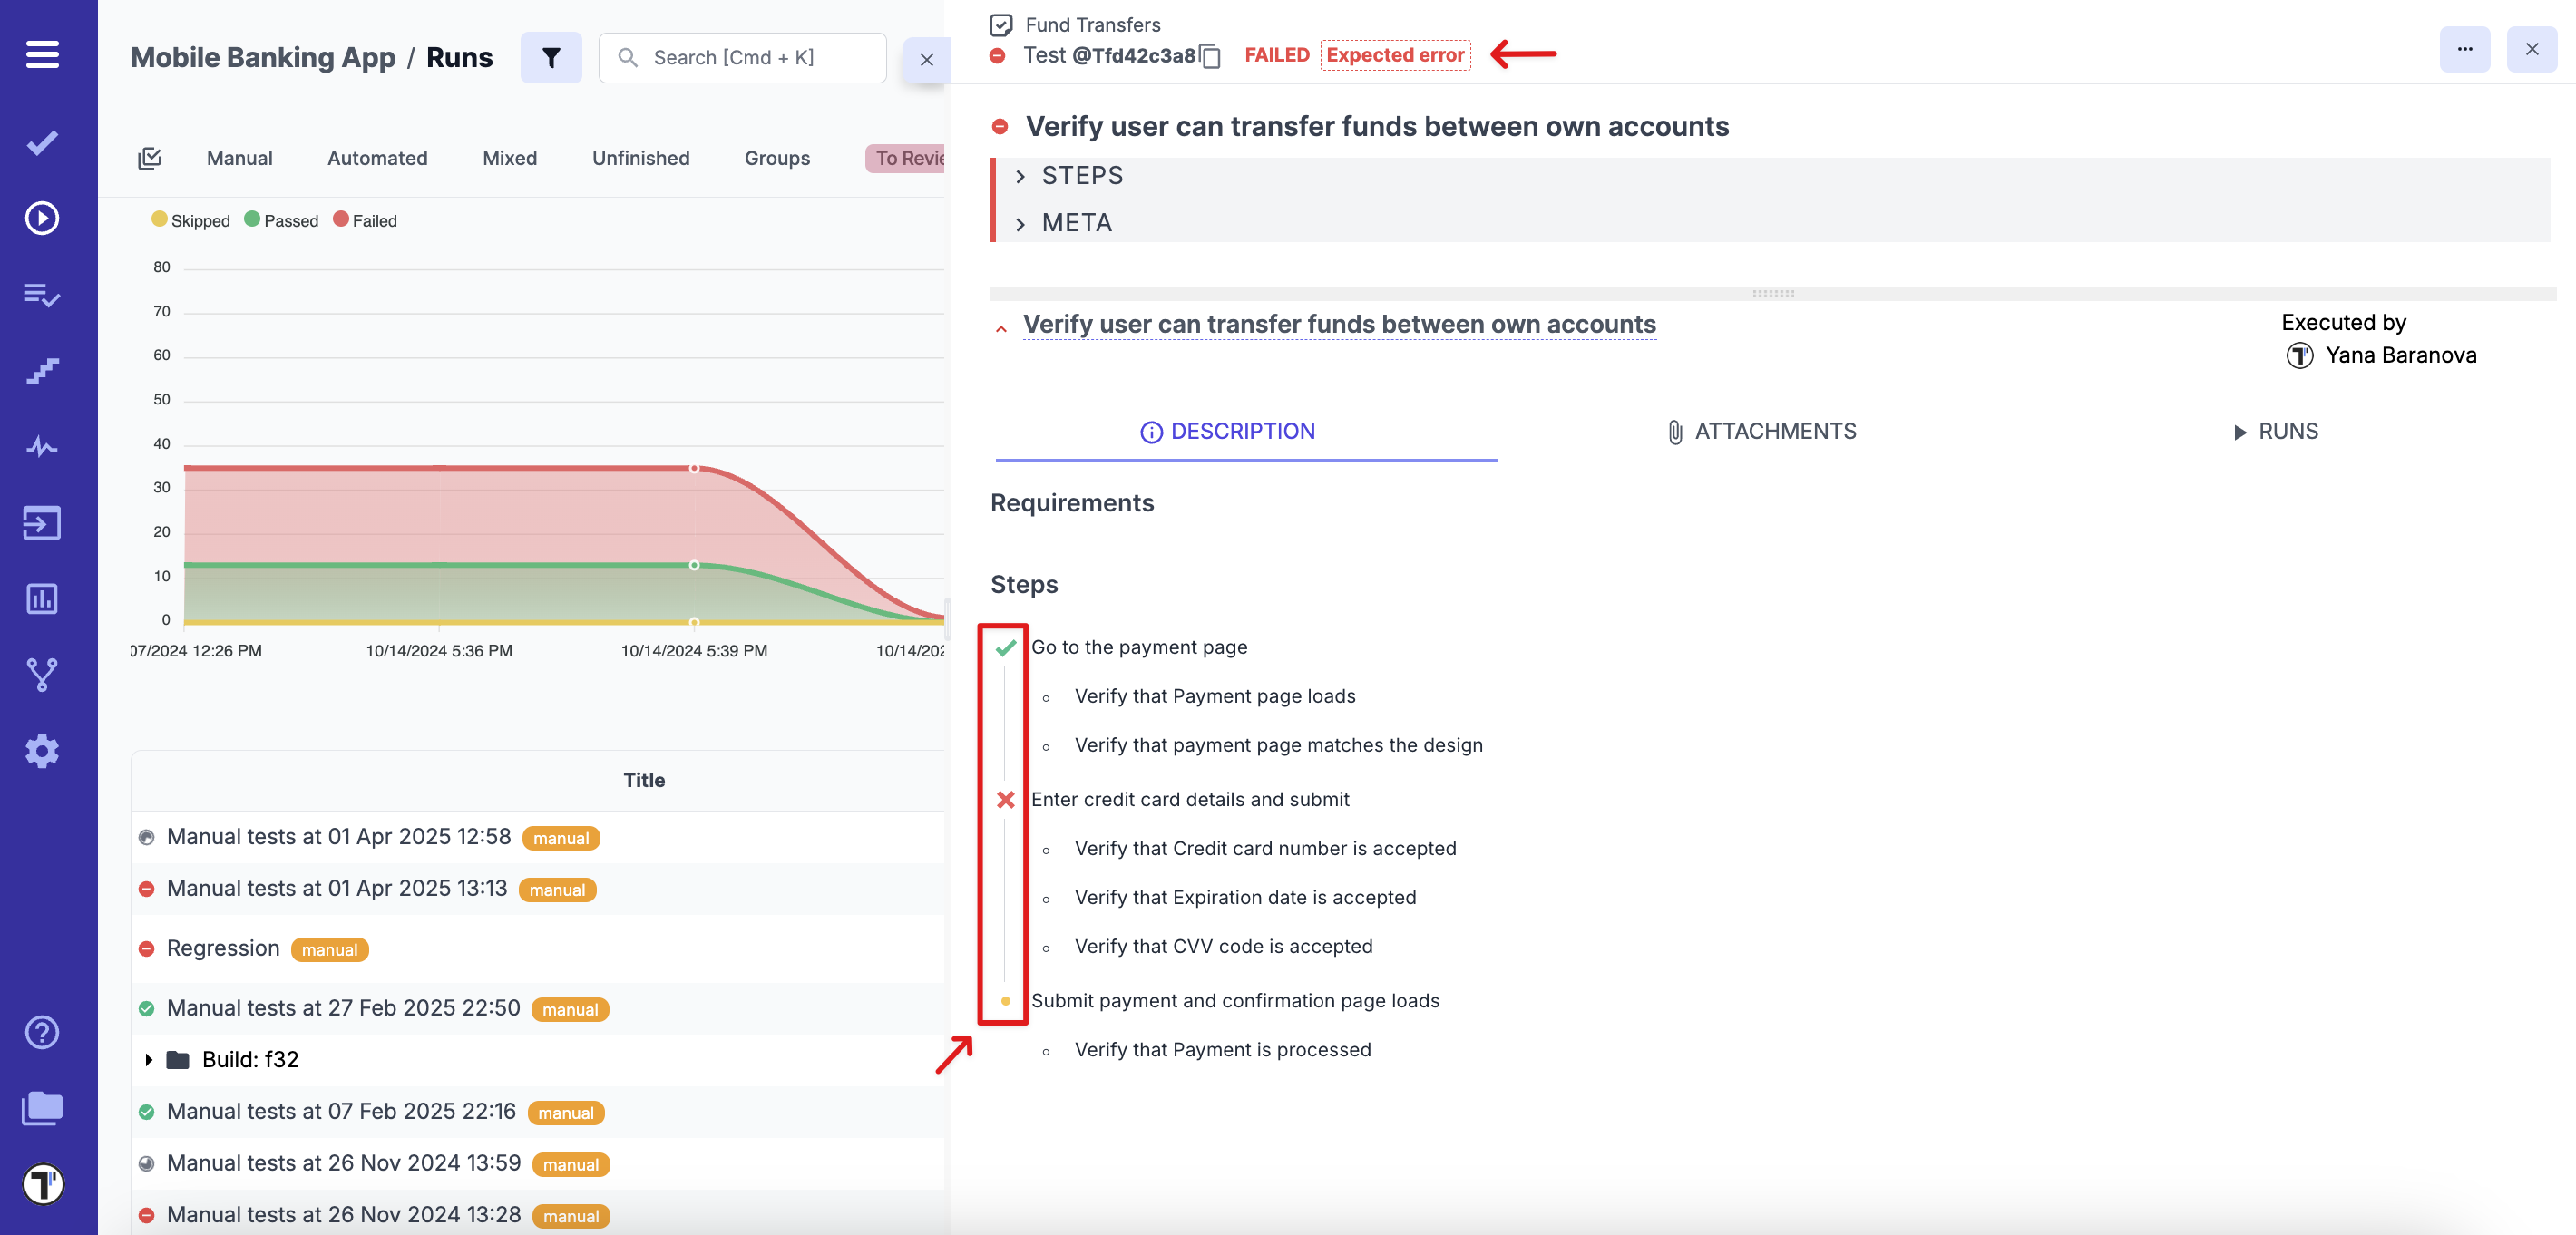
How to Run Test With Steps Execution
Section titled “How to Run Test With Steps Execution”Test execution by steps is a feature that enhances manual testing by allowing testers to track and manage the results of individual test steps. This ensures better traceability, improved defect detection, and a structured approach to test execution. By marking each step separately, QA teams gain deeper insights into the testing process and can effectively address issues as they arise.
- Click the Runs in the sidebar
- Launch a new manual run
- Select the test with detailed steps you want to execute
- Mark steps according to the results:
- Click a step once to mark it as Passed
- Click a step twice to mark it as Failed
- Click a step three times to mark it as Skipped
- Add a result with a message (optionally) for the test
- Click Finish Run to complete the test execution
Test execution by steps introduces a structured, transparent, and efficient way to conduct manual testing. By breaking down test results into individual actions, QA teams can improve accuracy, streamline defect resolution, and optimize their testing workflow. This feature plays a crucial role in ensuring high-quality software delivery by providing detailed insights into each phase of test execution.
Take a look at how the test result with step execution looks:
How to Run Automated Tests Manually
Section titled “How to Run Automated Tests Manually”Automated tests can be run manually in two ways:
-
Using a Test Plan – create a test plan and enable the Run Automated as Manual toggle. This method allows you to include automated tests in a plan. Learn more about creating plans here.
-
Directly from the Runs page – enable the Run Automated as Manual toggle during the run setup and select tests from the test tree.
How to Run Automated Tests Manually from the Runs Page
Section titled “How to Run Automated Tests Manually from the Runs Page”- Go to the Runs page
- Click the Manual Run button
- Switch to the Select tests tab
- Enable the Run Automated as Manual toggle
- Use the search, filters, or expand suites to select the automated tests you want to run
- Click Launch to start the run
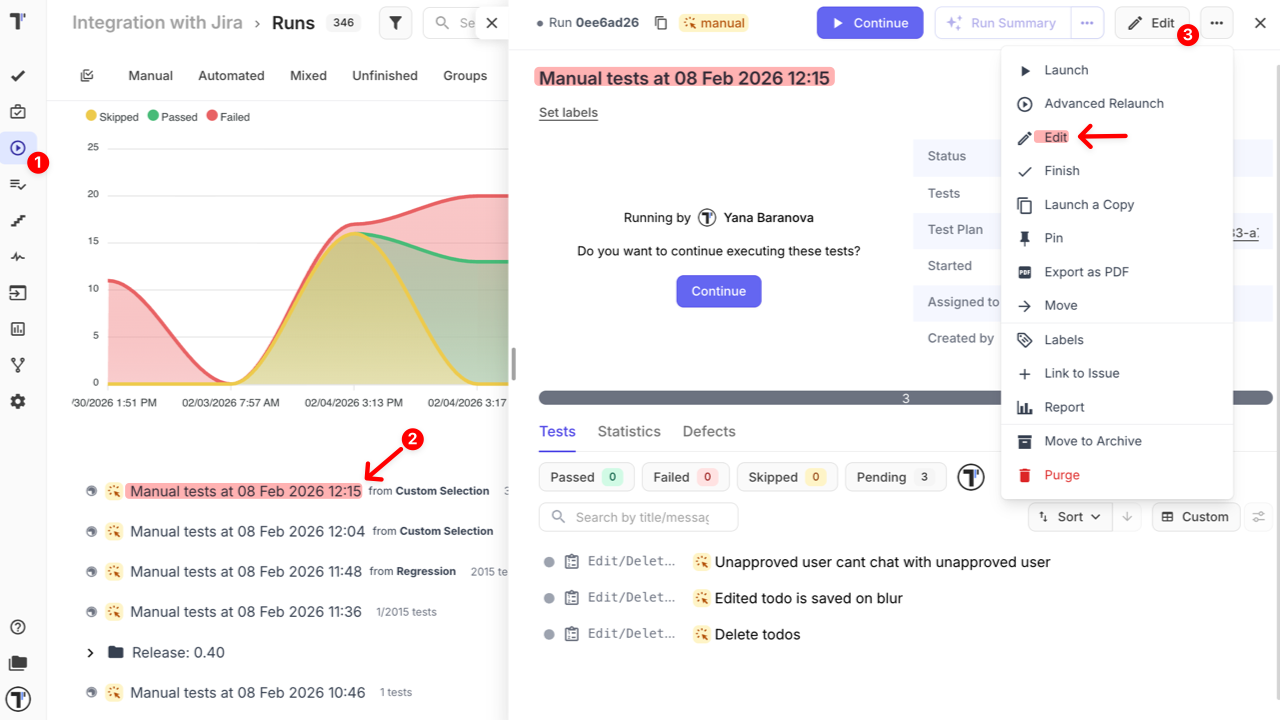
How to Make Changes in a Launched Run
Section titled “How to Make Changes in a Launched Run”During testing, you might encounter new scenarios that need to be added immediately. Testomat.io allows you to easily add tests to a run that’s already started. This way, you can cover unexpected cases without stopping your ongoing testing process.
This ensures flexibility, smooth testing workflow, and that no important scenarios are missed.
- Go to the Runs page
- Open the unfinished run you want to edit
- Click the Edit button (or open the ’…’ menu and select Edit)
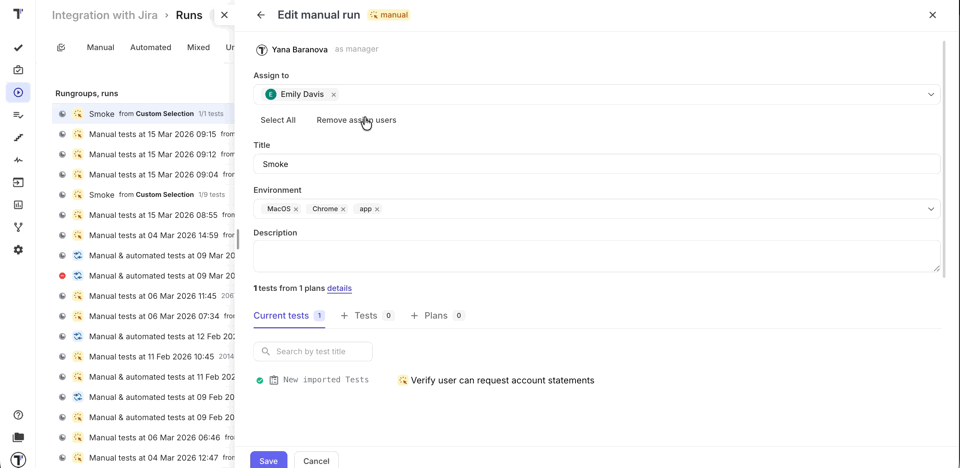
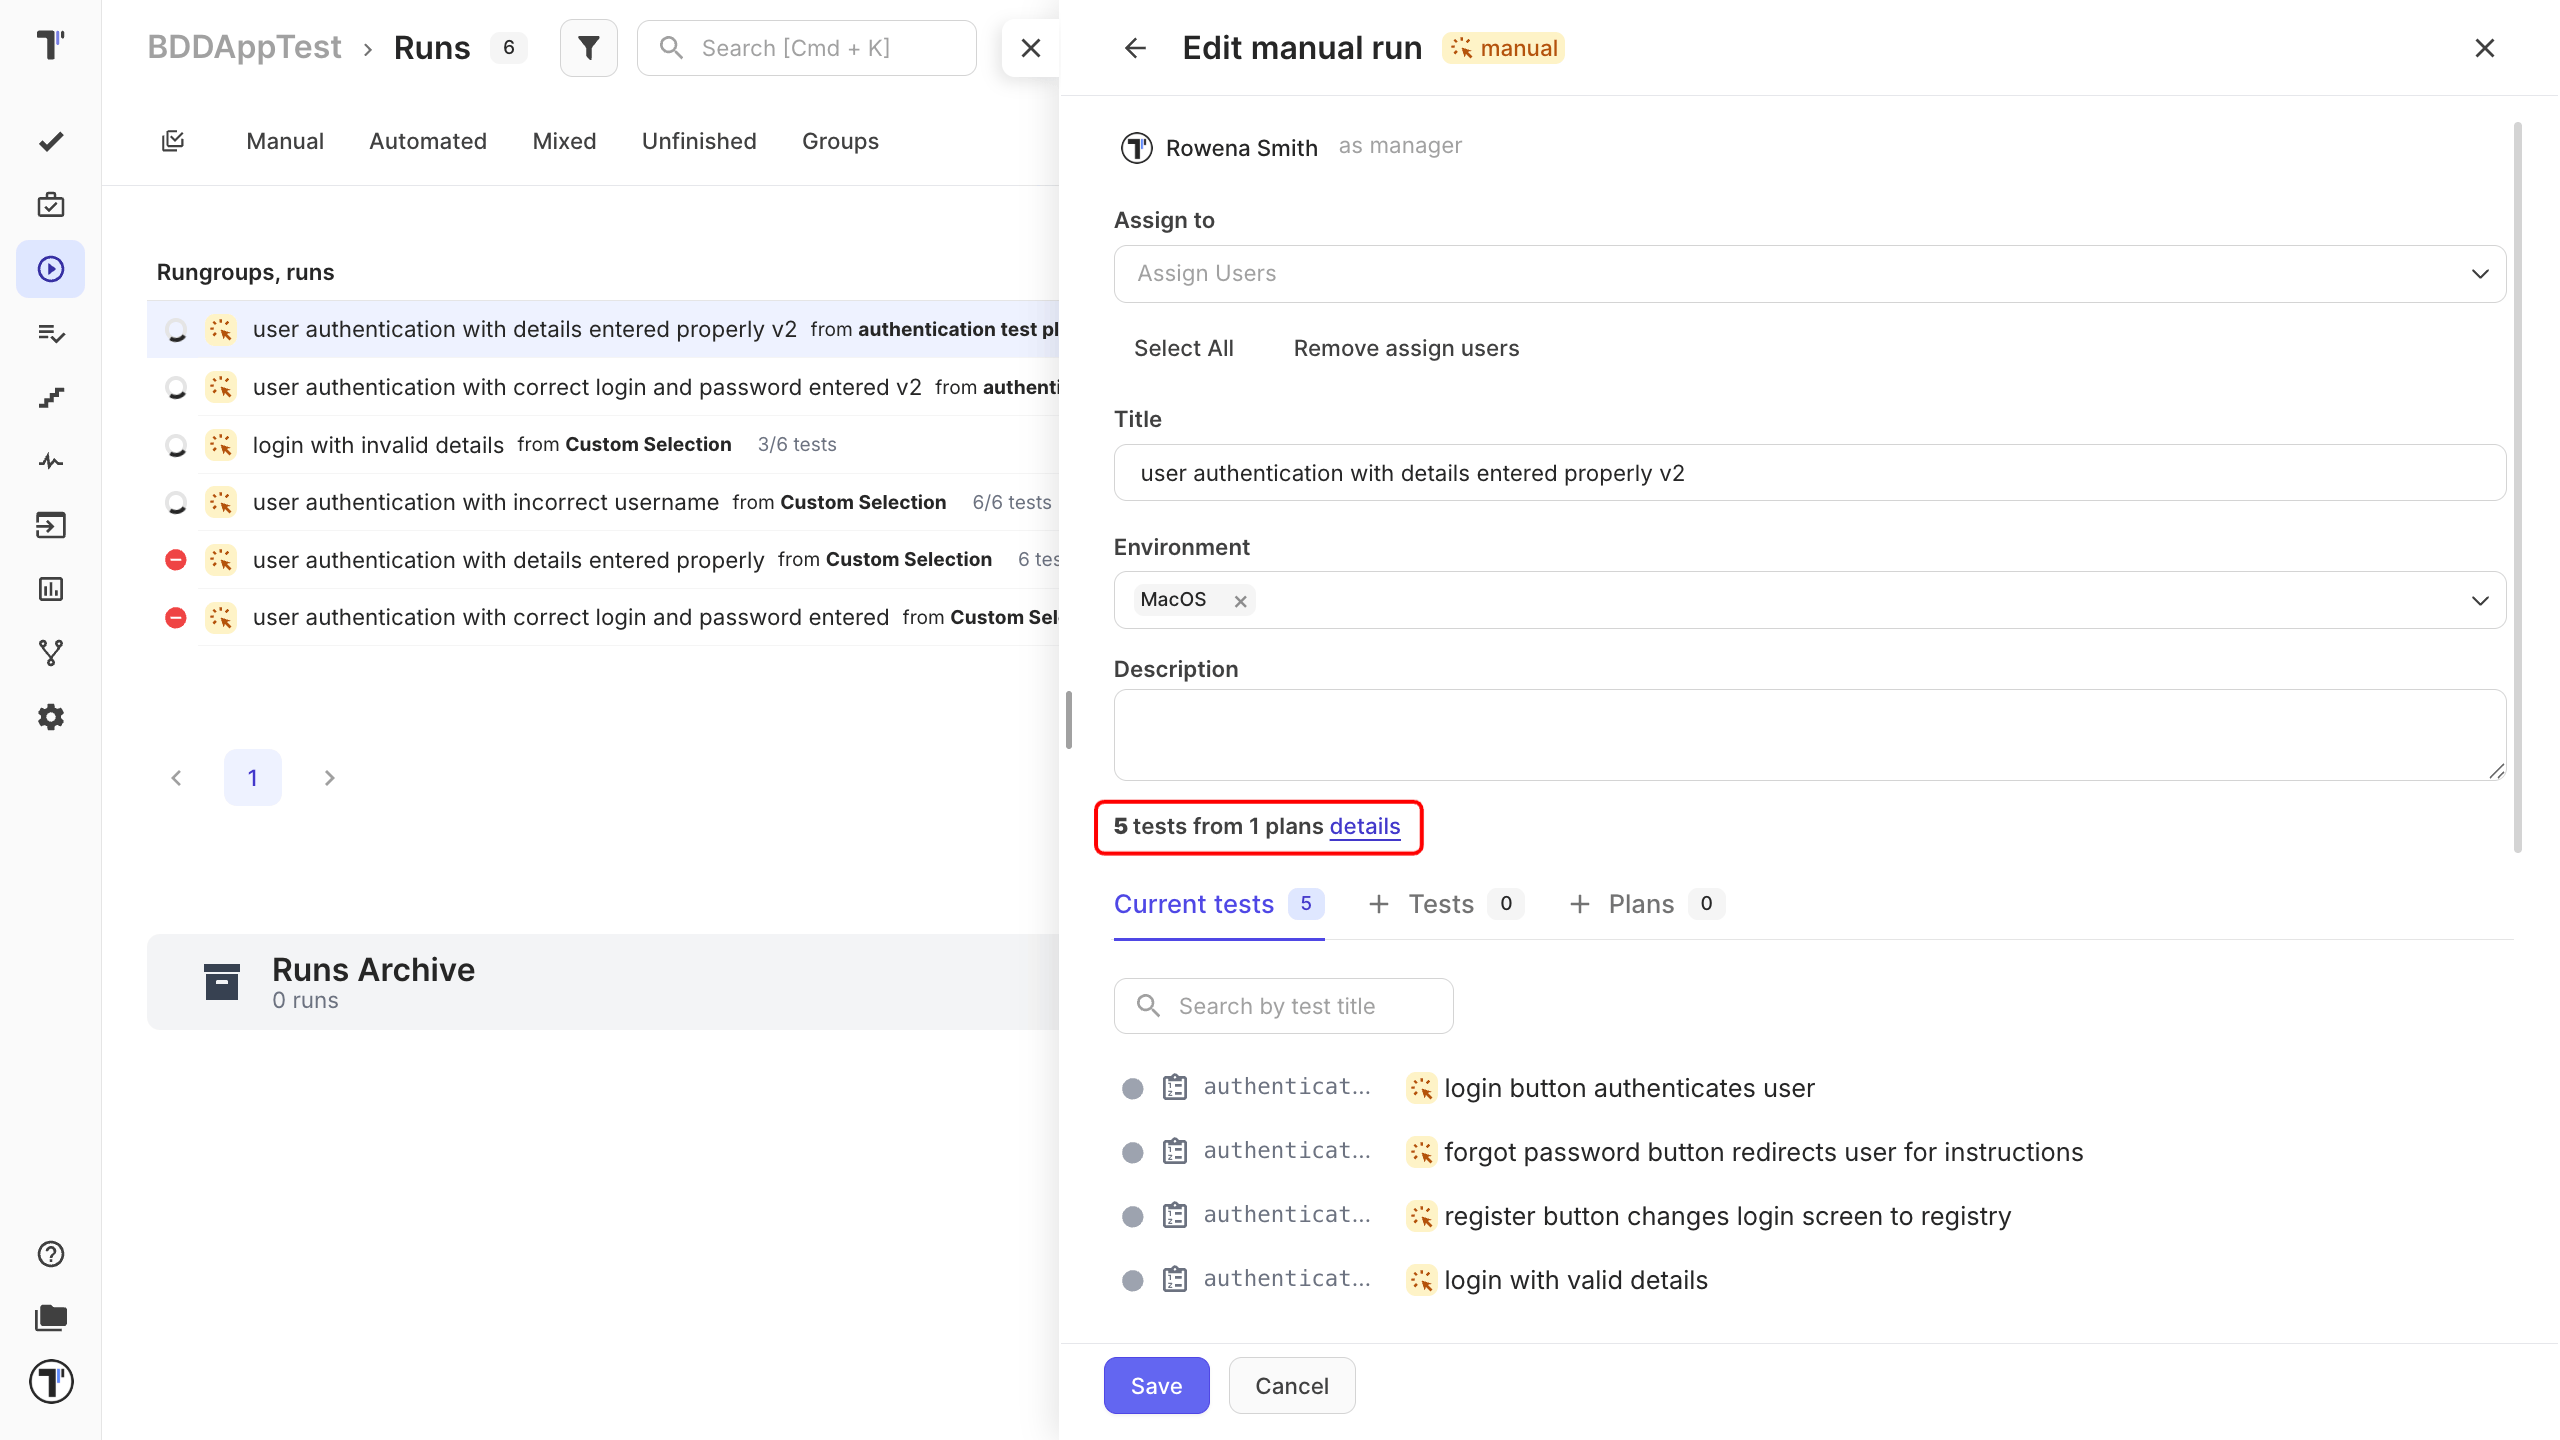
Once the Edit manual run view is opened, here’s what you can do:
- Assign to - Remove existing users or assign more to the run
- Title - Enter or change the run title
- Environment - Add or remove testing environments
- Description - Add or update the run description
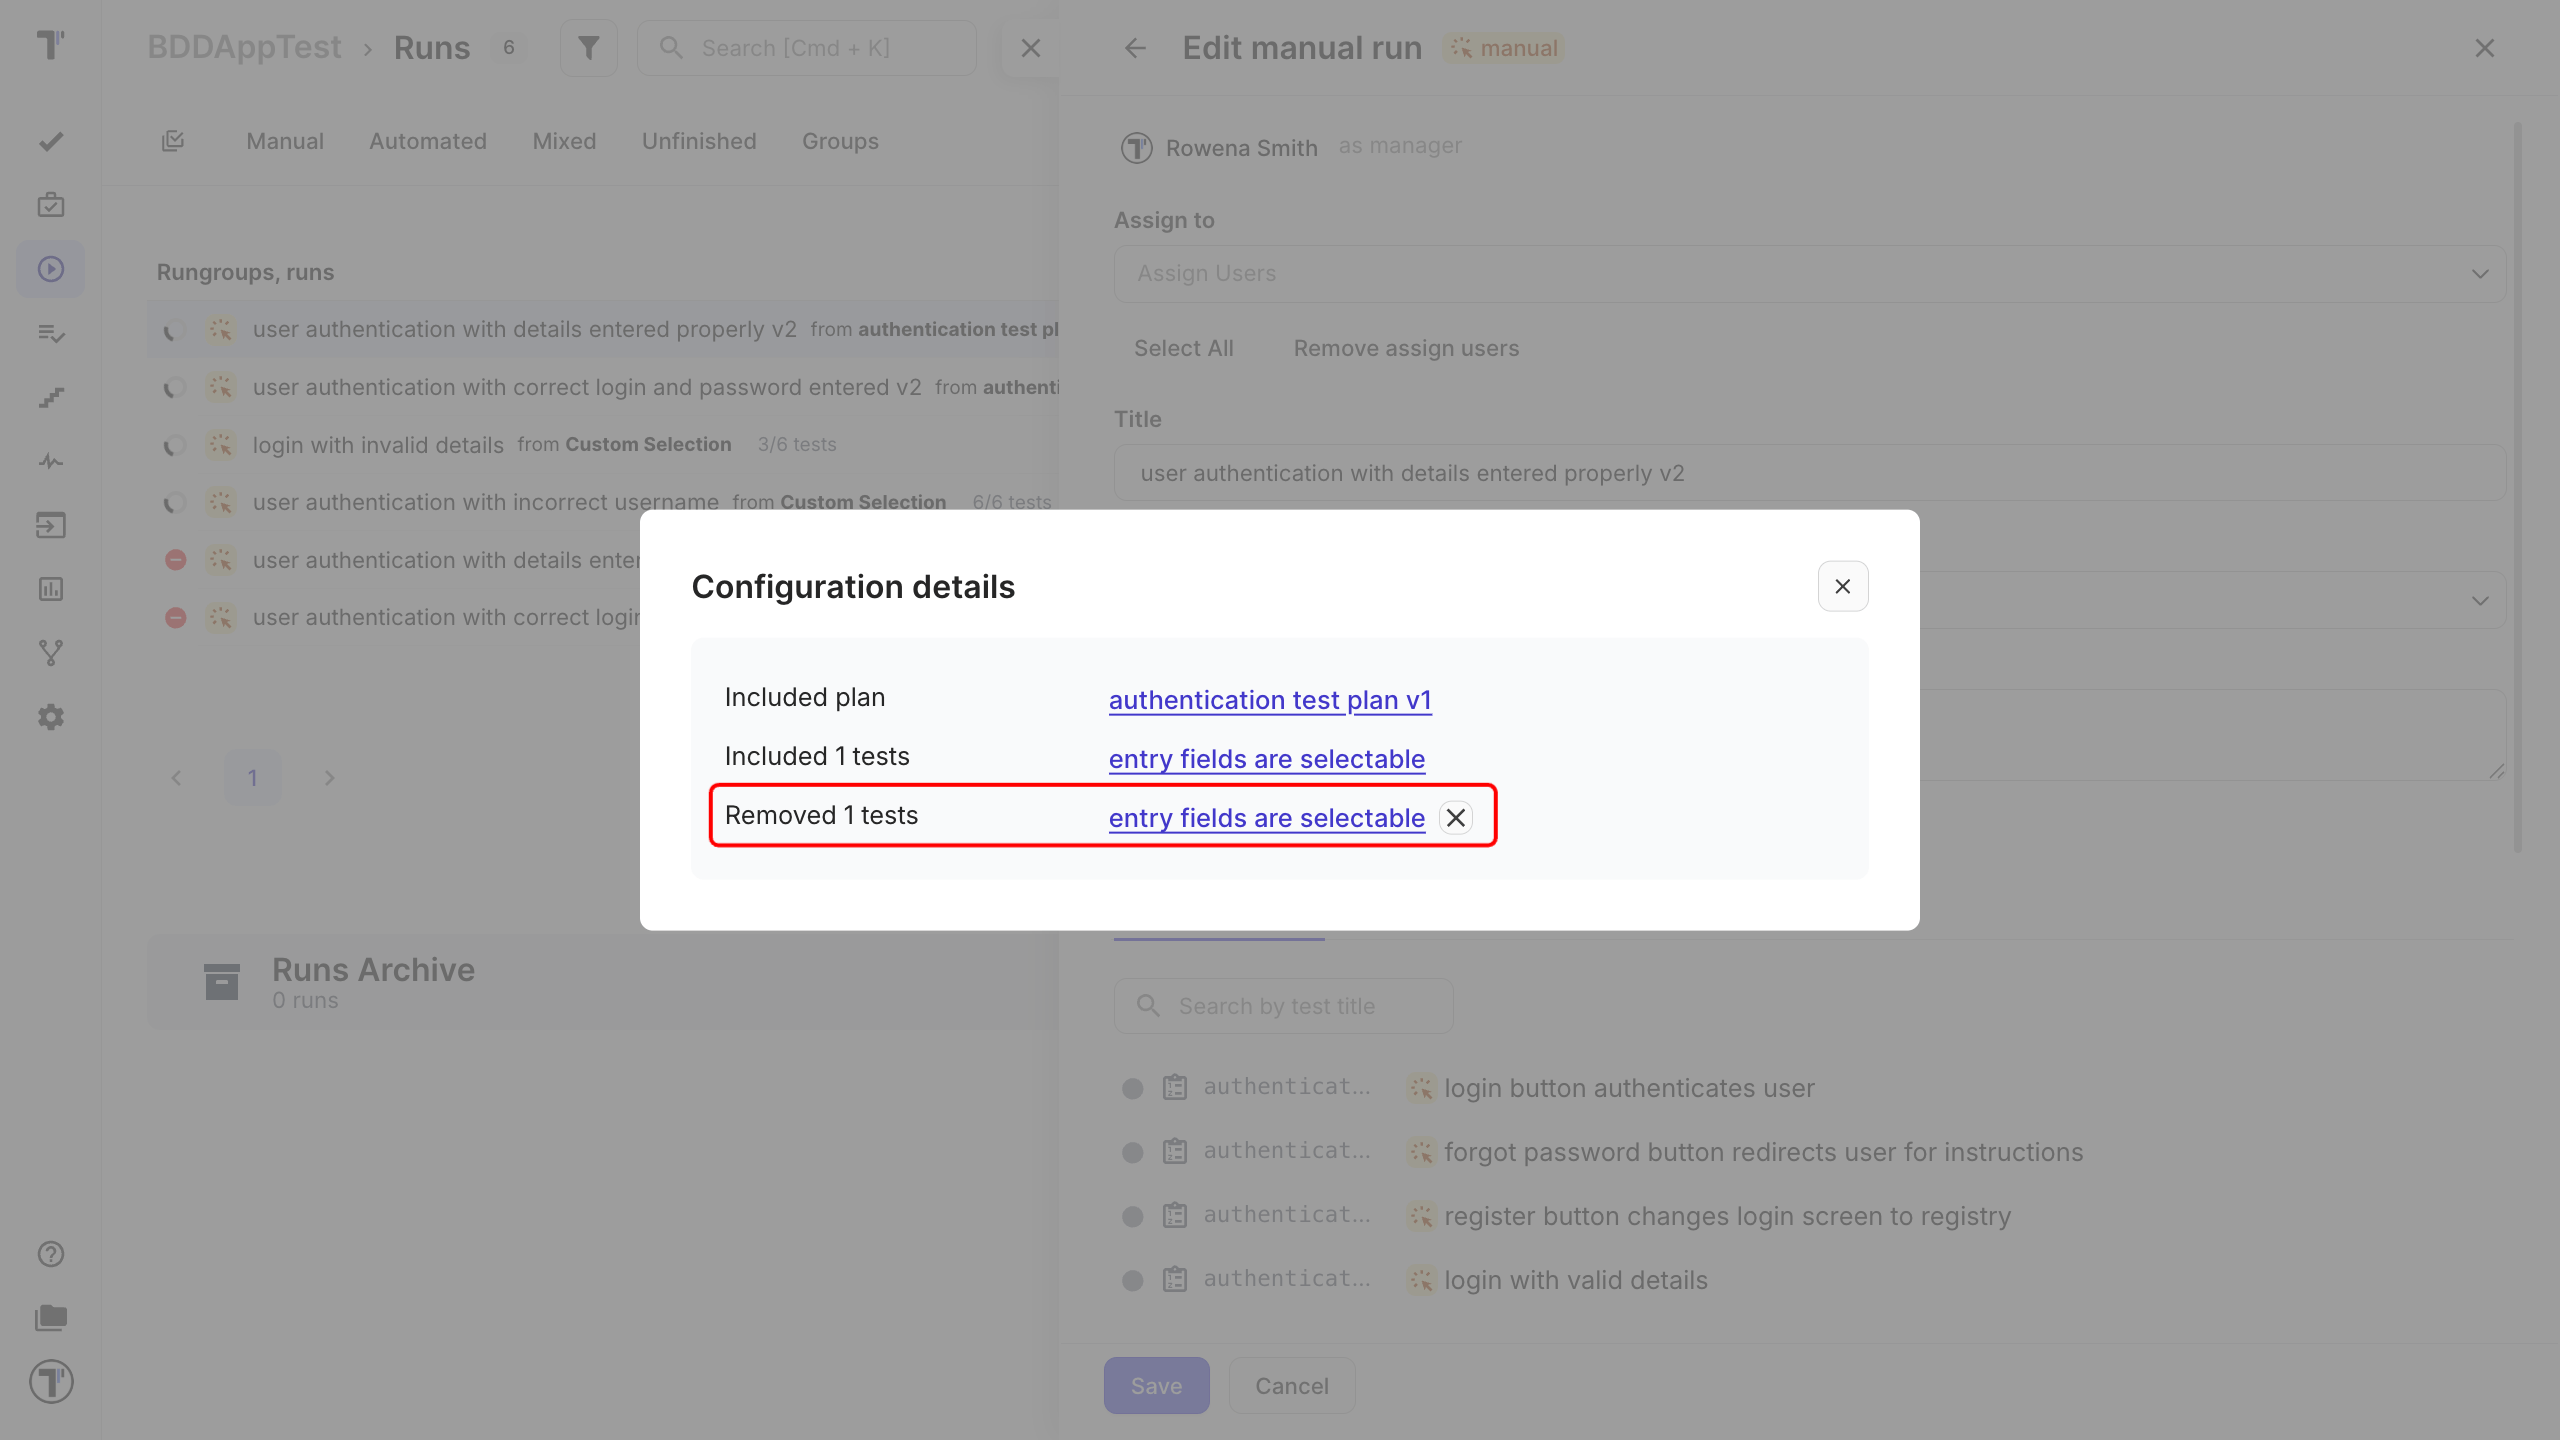
- details link - Check configuration details of the run
- Current tests – Shows all tests currently included in the run. Remove unnecessary tests by clicking the trash icon
- + Tests – Similar to the Select tests tab in a new manual run. You can browse the test tree, use search or filters, or expand suites to select manual tests to add to this run
- + Plans – Select tests from existing test plans. You can include one or multiple plans in the current run
How to Remove and Re-add a Test in a Run
Section titled “How to Remove and Re-add a Test in a Run”Removing a test does not delete it. You can remove a test from a running test run and bring it back later. Testomat.io marks the test as excluded and keeps it in the run configuration.
How to Return a Test to the Run
Section titled “How to Return a Test to the Run”If you remove a test and then add the same test again, the run holds two statuses at once, excluded and included. The excluded status has higher priority, so the test stays out of the run’s test list, even though Testomat.io confirms it was added.
If you only removed the test:
- Open the run and go to configuration details.
- Find the removed test and cancel the deletion.
- The test returns to the run.
If you removed the test and then added it again, it now shows both a removed and an added status:
- Open configuration details and find the test.
- Click the
xnext to the removed status to clear the exclusion.
The added status then takes effect, and the test appears in the run.
How to Adjust Test Case Description Block
Section titled “How to Adjust Test Case Description Block”In case you want to adjust the size of the test description block to see more details without scrolling or to minimize it, you can easily resize it by following these steps:
- Locate the vertical bar at the bottom of the test description block.
- Hover your cursor over the bar until it changes to a resize indicator (an up-and-down arrow).
- Click and hold the left mouse button on the bar.
- Drag the bar up to decrease the block size or down to increase it.
- Release the mouse button once you’ve adjusted the size to your preference.
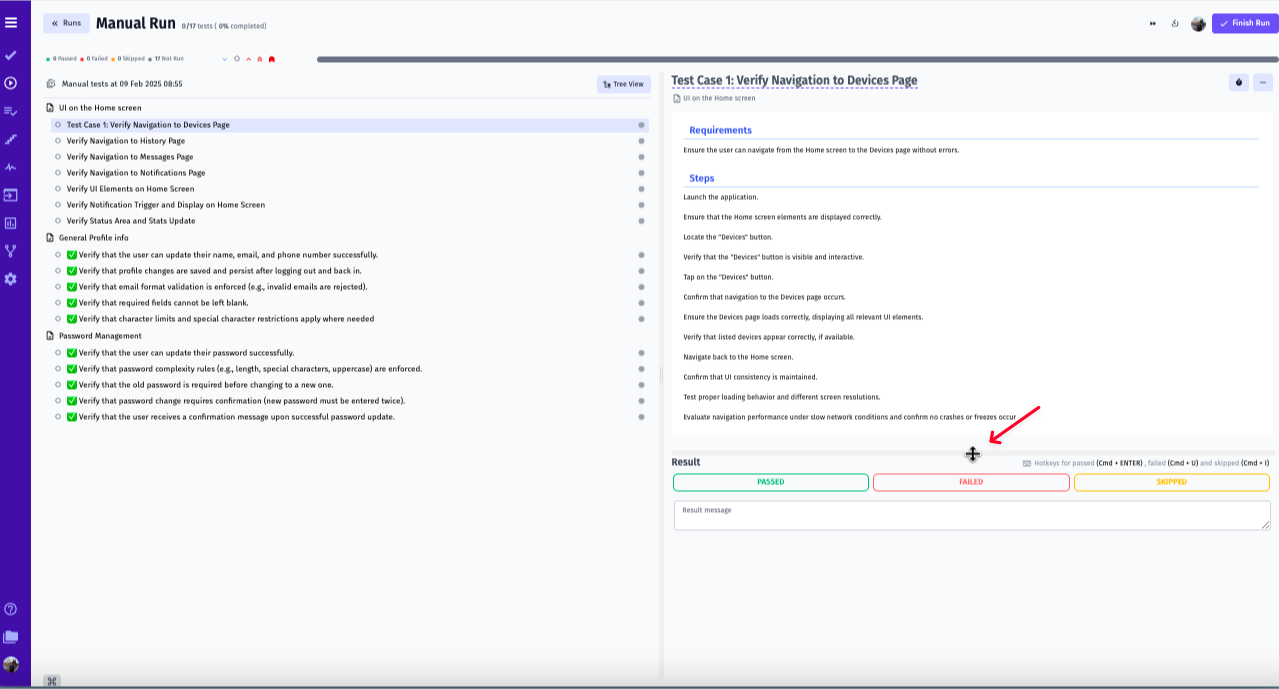
This way, you can customize the view to match your workflow.
Bulk Actions in Runs
Section titled “Bulk Actions in Runs”Managing test cases efficiently is crucial for smooth test execution. With bulk actions, you can perform multiple operations at once, reducing manual effort and saving time. Below are the available bulk actions you can use within test runs.
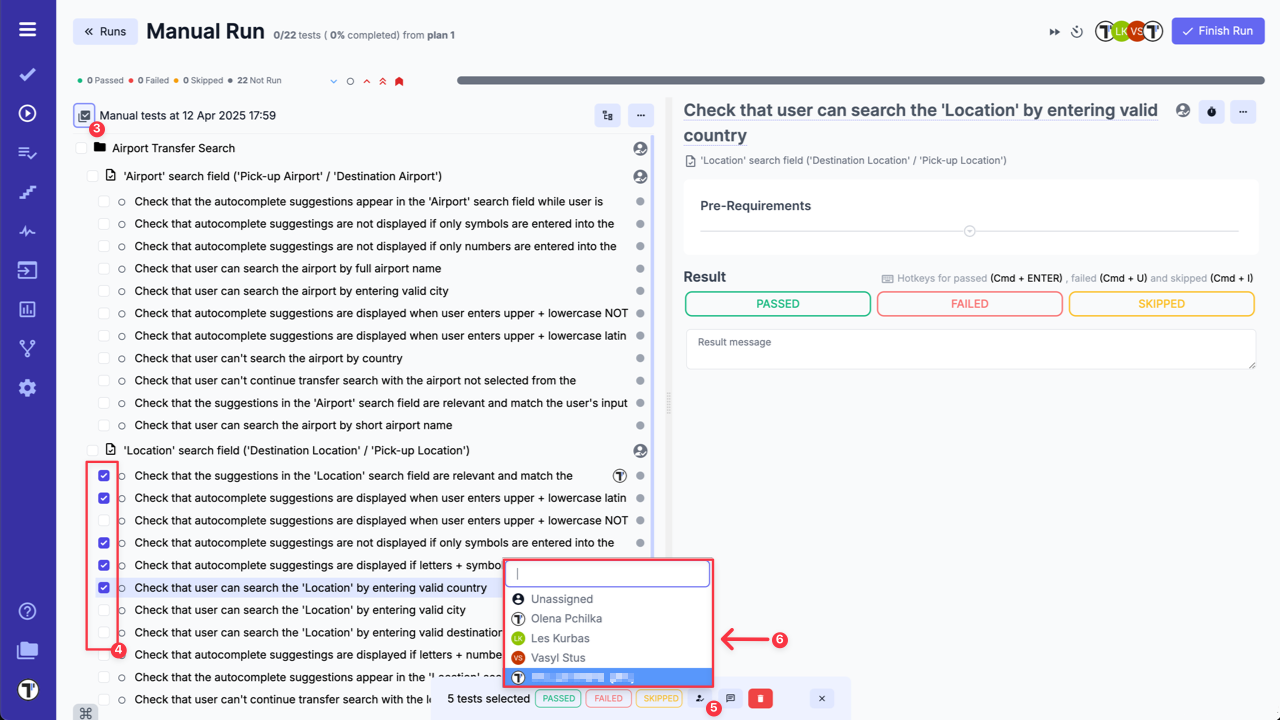
How to Reassign Multiple Test Cases
Section titled “How to Reassign Multiple Test Cases”If you need to reassign test cases to a different user, you no longer have to update each test case separately. Instead, follow these easy steps:
- Click ‘Runs’ button on the sidebar
- Open the test run you’re working on
- Click ‘Continue’ button
- Click ‘Multi-Select’ button
- Select the specific tests you would like to reassign
- Click the ‘Assign to’ button at the bottom
- Select a user you would like to reassign
- Click ‘OK’ in the ‘Are you sure you want to assign (username) to all selected tests?’ pop-up window
This feature significantly reduces manual effort and speeds up the reassignment process during test run.
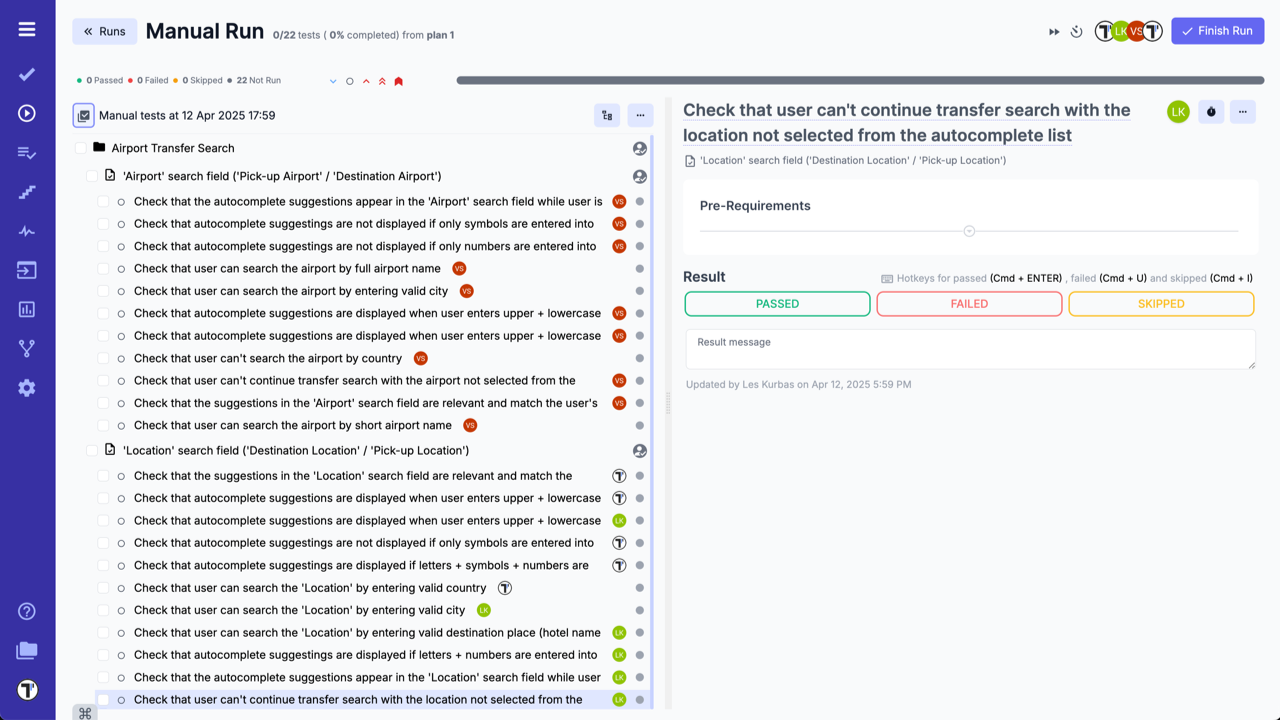
Let’s check how tests look like after changes.
How to Multi-Select Result Messages for Test Cases
Section titled “How to Multi-Select Result Messages for Test Cases”While running tests and selecting the appropriate status with a result message, you can multi-select result messages for test cases. Follow these steps to complete the process:
- Click ‘Runs’ button on the sidebar
- Open a test run you’re working on
- Click ‘Continue’ button
- Click ‘Multi-Select’ button
- Select the specific tests
- Click the ‘Result message’ button at the bottom
- Select an appropriate status, e.g., ‘PASSED’
- Choose a result message, e.g., ‘Expected behaviour’
- Also, type a result message in the provided field
- Click the ‘Apply’ button

This feature allows testers to update multiple test cases efficiently, ensuring consistency in reporting results.
By using bulk actions, you streamline test management, improve workflow efficiency, and maintain consistency across test runs.
Let’s verify the multiple message results in these test cases:
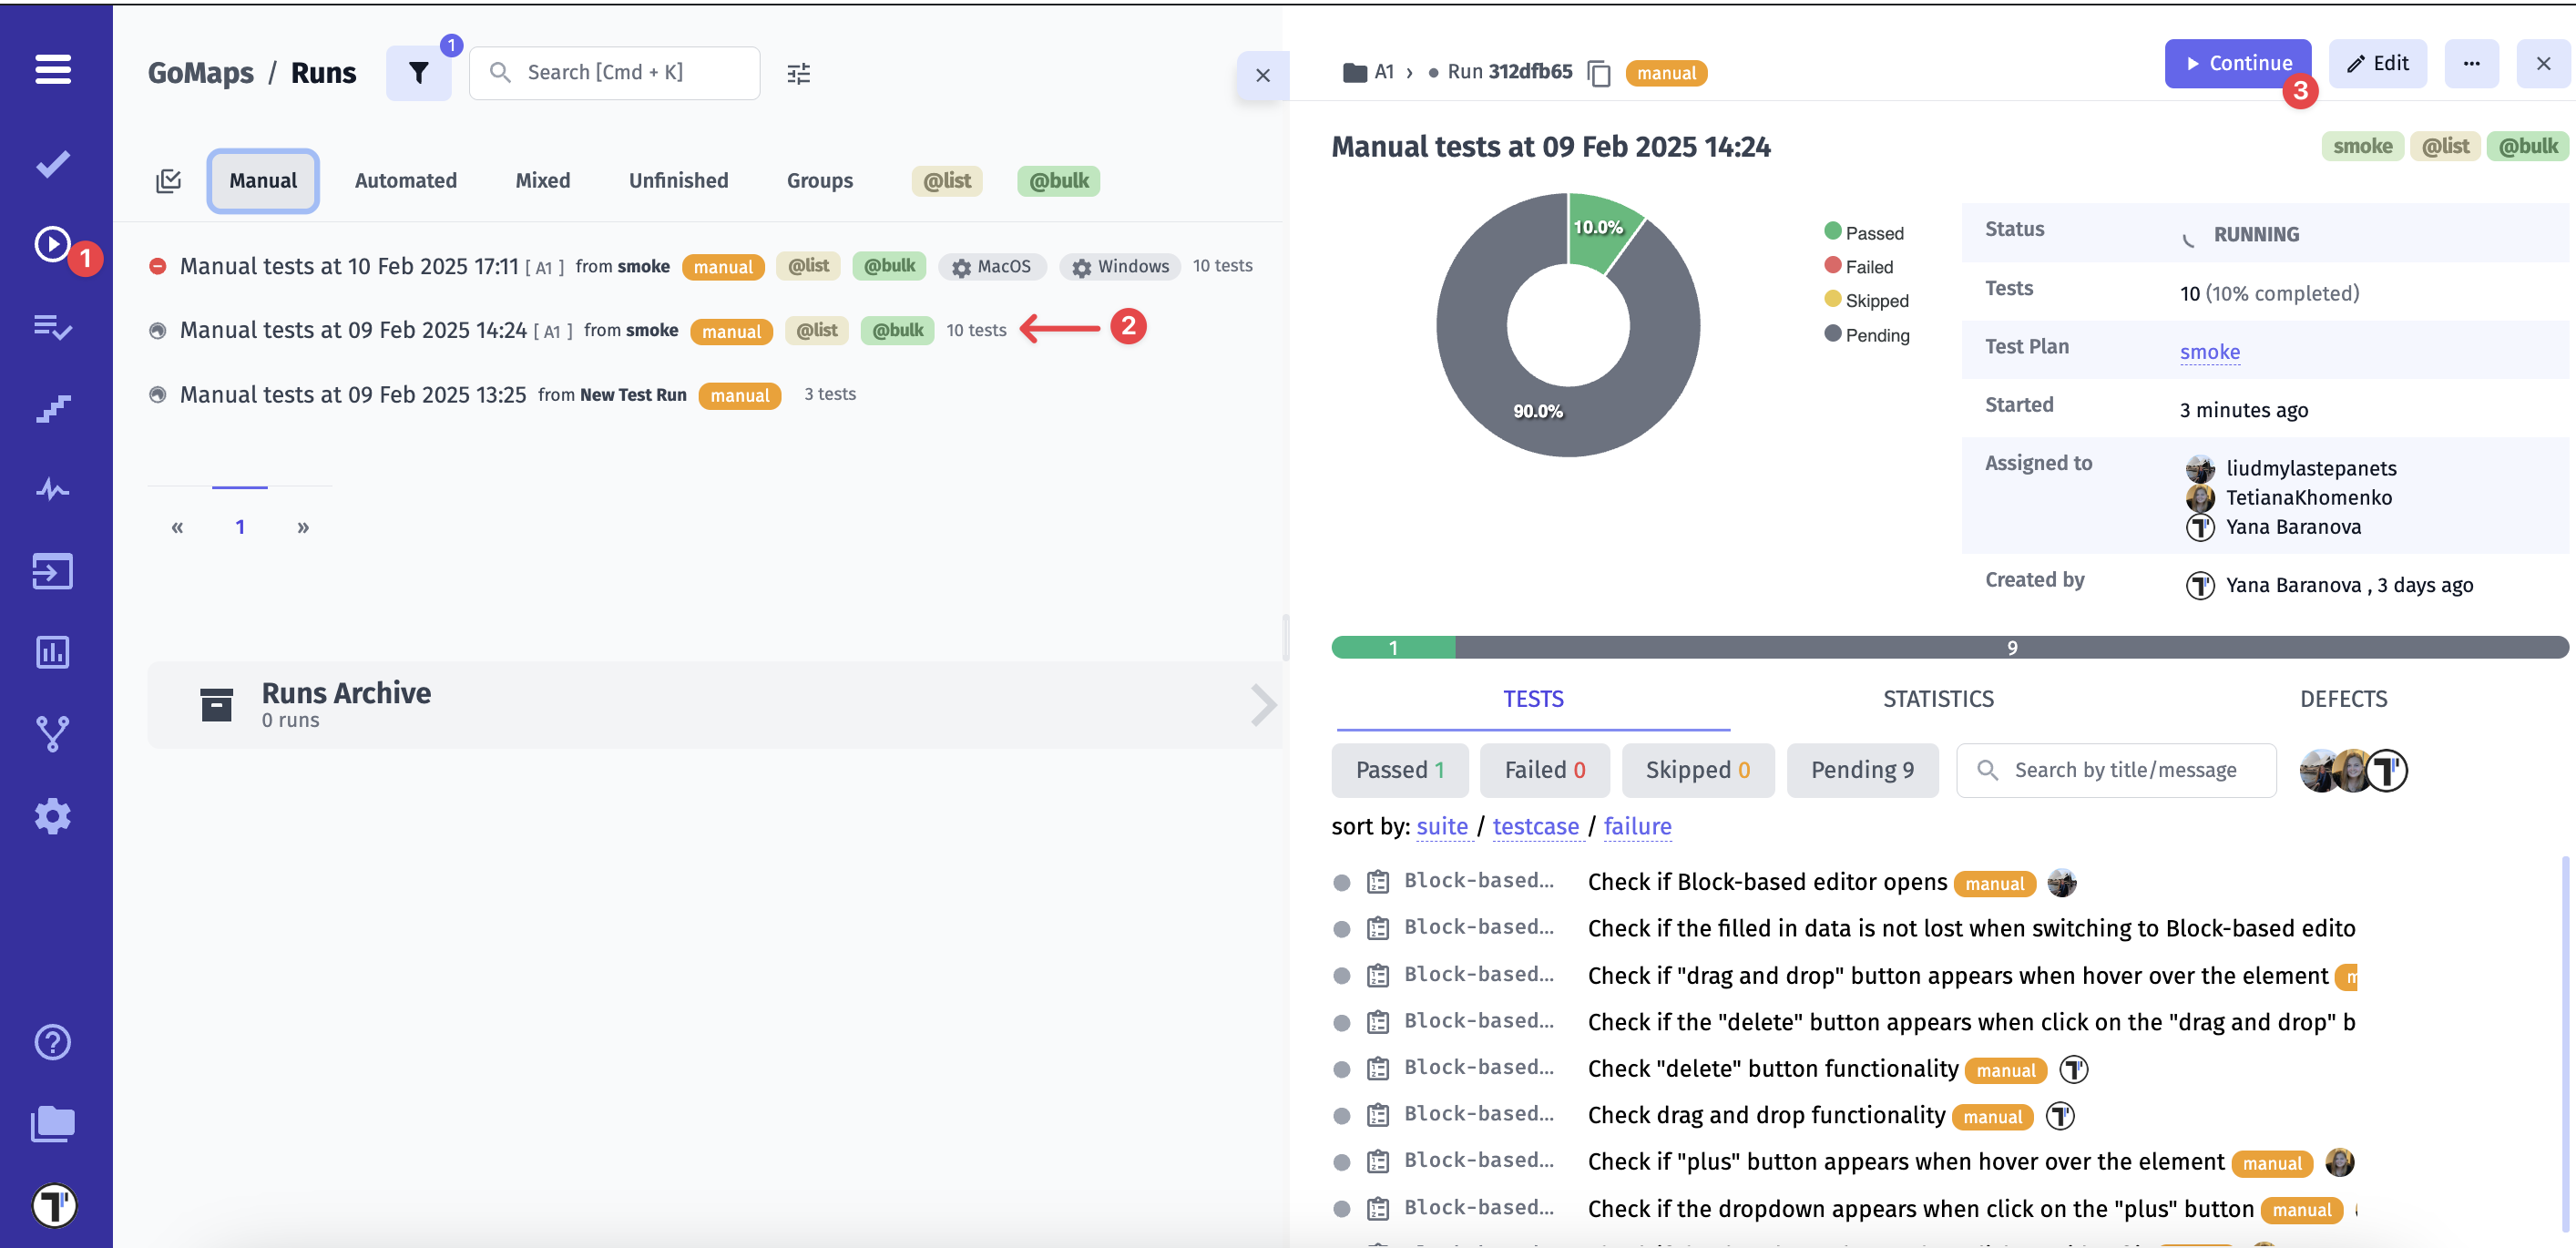
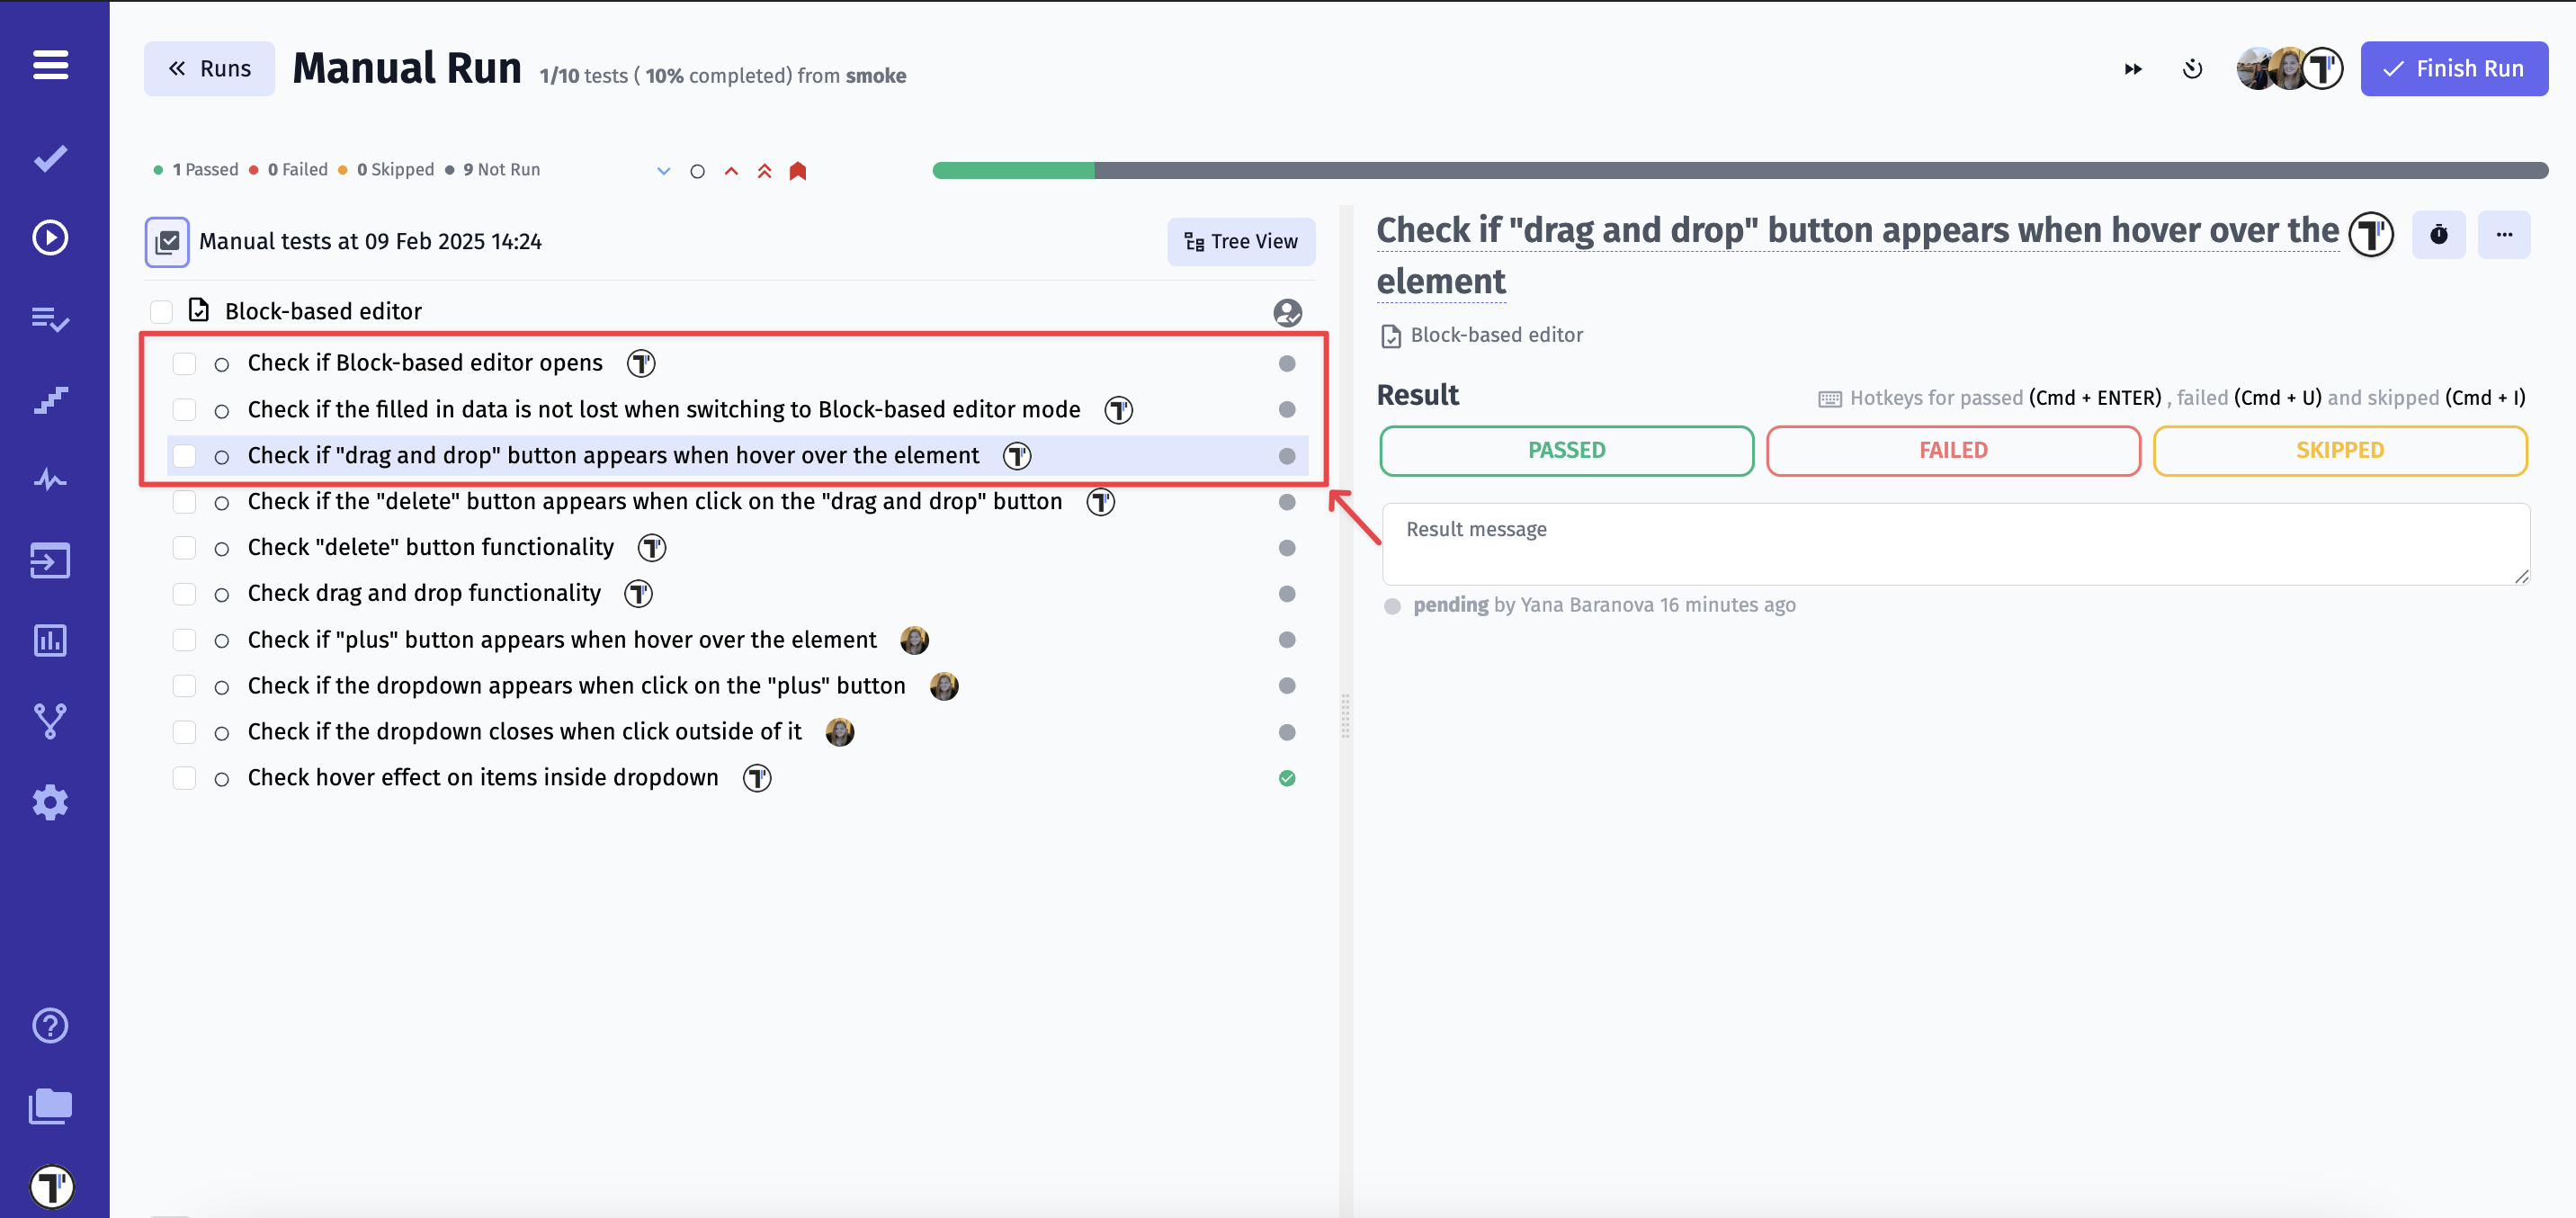
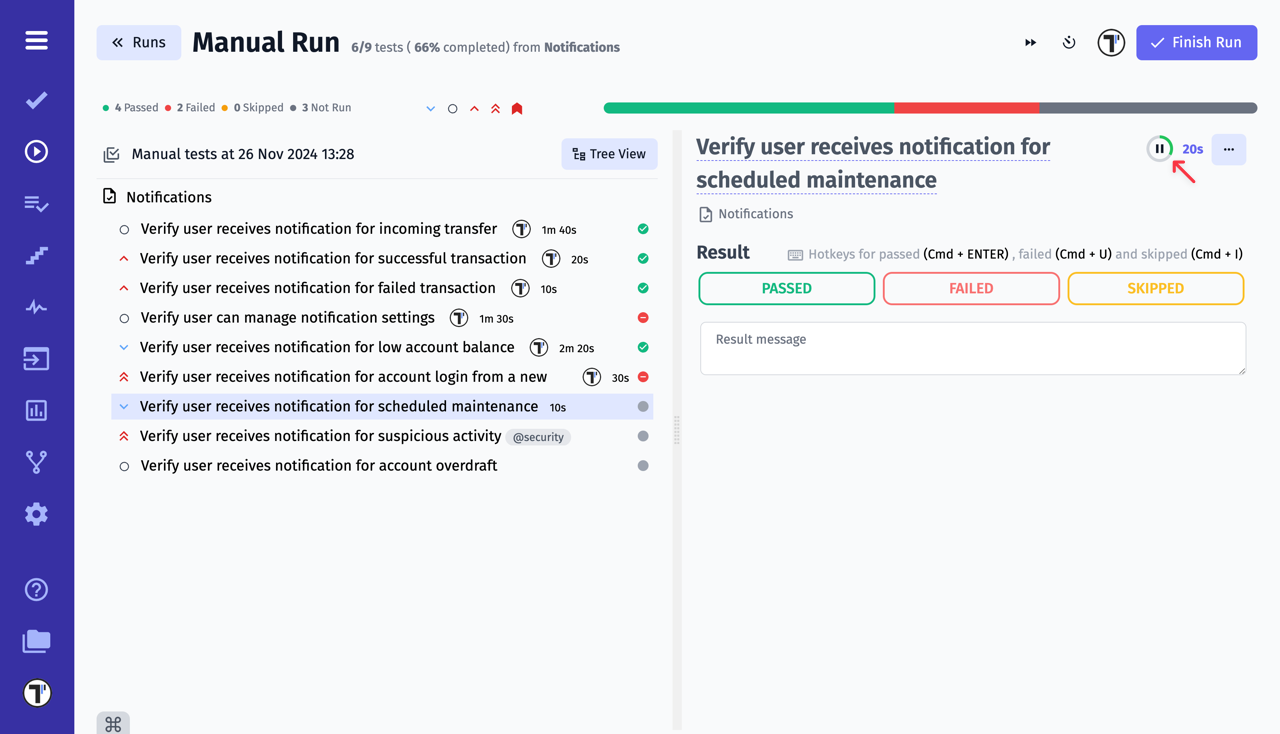
How to Track Test Time
Section titled “How to Track Test Time”You may find it useful to track the time spent on runs and specific test cases. For this purpose, Testomat.io has developed flexible time tracking.
The first thing you need to do is start a run. Сlick on the button with the stopwatch icon (1) and then click on the Track button (2). Every 10 seconds will be displayed in the time record. The time is also displayed next to the title of each test case.
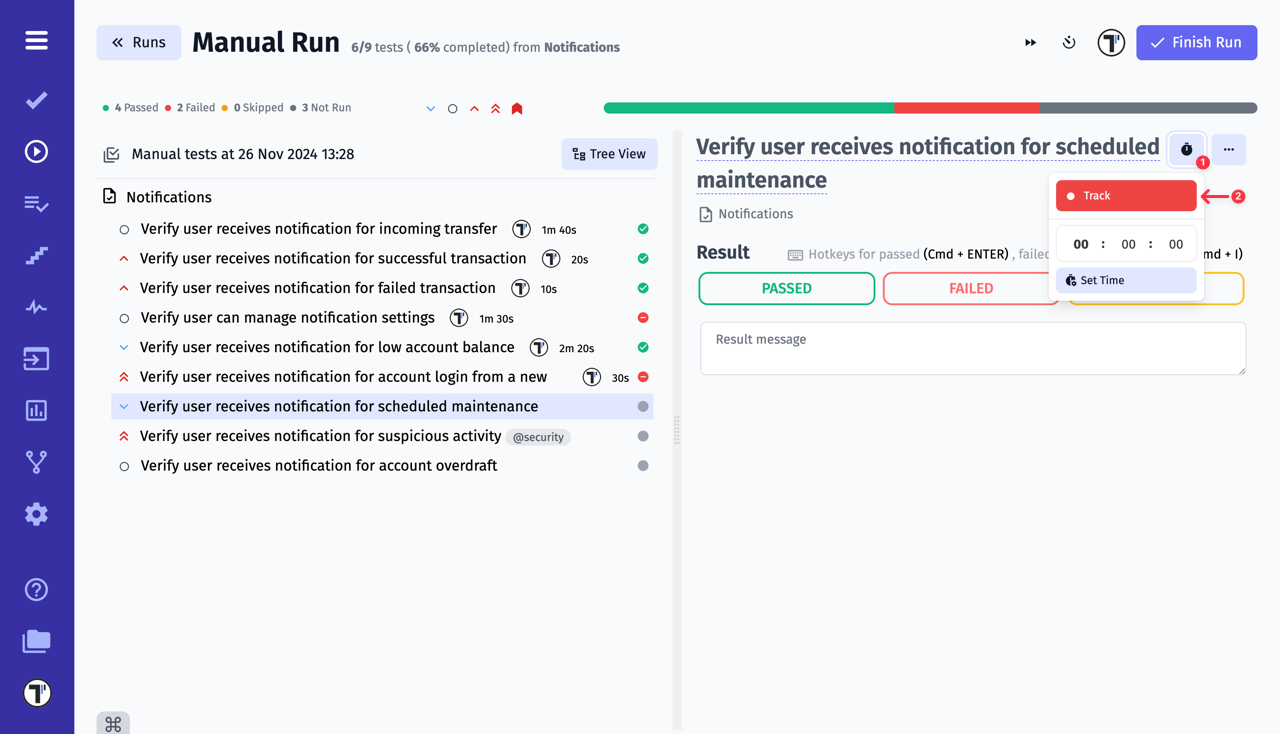
You can stop the tracking time if you need to leave during the testing process. And continue in the same way when you are ready.
If necessary, you can set the time manually. Сlick on the button with the stopwatch icon (1), enter the time (2) using arrows or enter it from the keyboard and then click on the Set Time button (2).
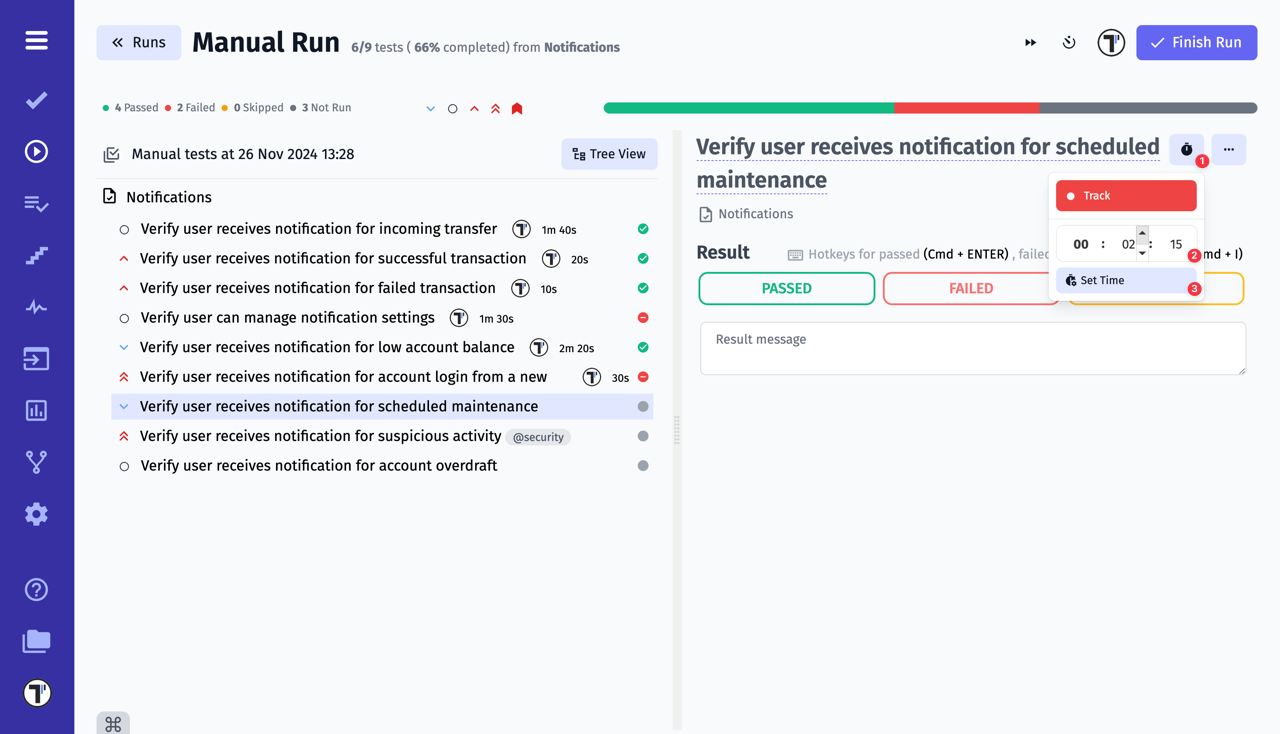
What’s more, you can use the Auto-Track feature to automatically start the tracking process when you move on to the next test.
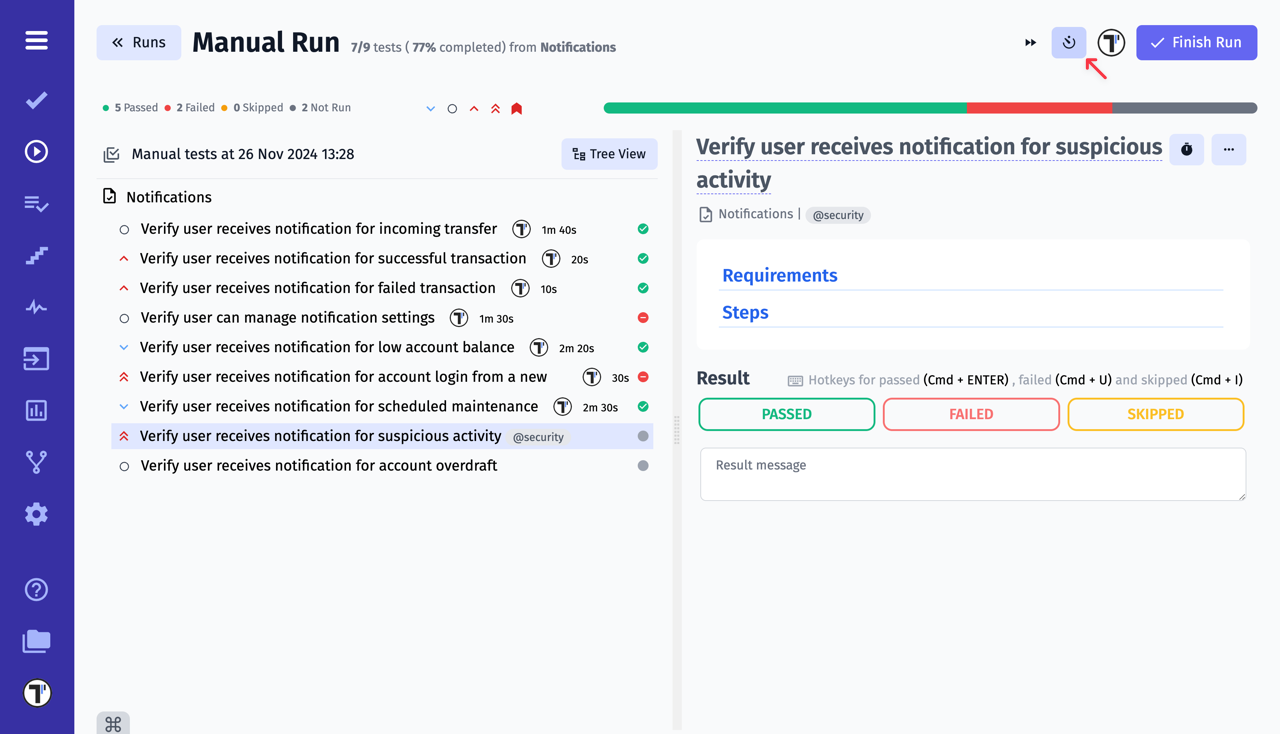
At the end of the run, the report will show you the time spent on a particular test case and the total time spent on all the test cases.

This can be useful for spreading the workload across all team members in future test runs.
How to Track Test Case History During One Run
Section titled “How to Track Test Case History During One Run”During a test run, the state or status of a test case may change multiple times. In some situations it can be important to review the history of all state changes, comments, and statuses for a specific test case before finishing the test run.
For this purpose, Testomat.io provides the test case history feature within the test run, displayed in chronological order beneath the selected test case.
To check the test case history, follow these steps:
- Open the test run
- Click ‘Continue’ button

- Click on the test case to see last 3 changes
- Click the arrow to expand the whole history, if needed

Now you can see the whole test case history

Search in Manual Runs
Section titled “Search in Manual Runs”Search functionality is available in manual runs, allowing users to quickly find specific tests and suites within a run. This makes it easier to navigate large manual runs by filtering items based on names or keywords, without scrolling through the full list.