RunGroups
First, let’s clarify what ‘RunGroups’ are in Testomat.io. RunGroups allow you to organize and group multiple test runs together based on criteria like sprint, release, functional area, or any other logical grouping. This helps in analyzing aggregated results and providing a consolidated view of your testing efforts.
How to Create a RunGroup
Section titled “How to Create a RunGroup”To create a new RunGroup:
- Open ‘Runs’ page.
- Click the ‘Additional options’ arrow button next to the ‘Manual run’ button.
- Select ‘New group’ option from the dropdown menu.

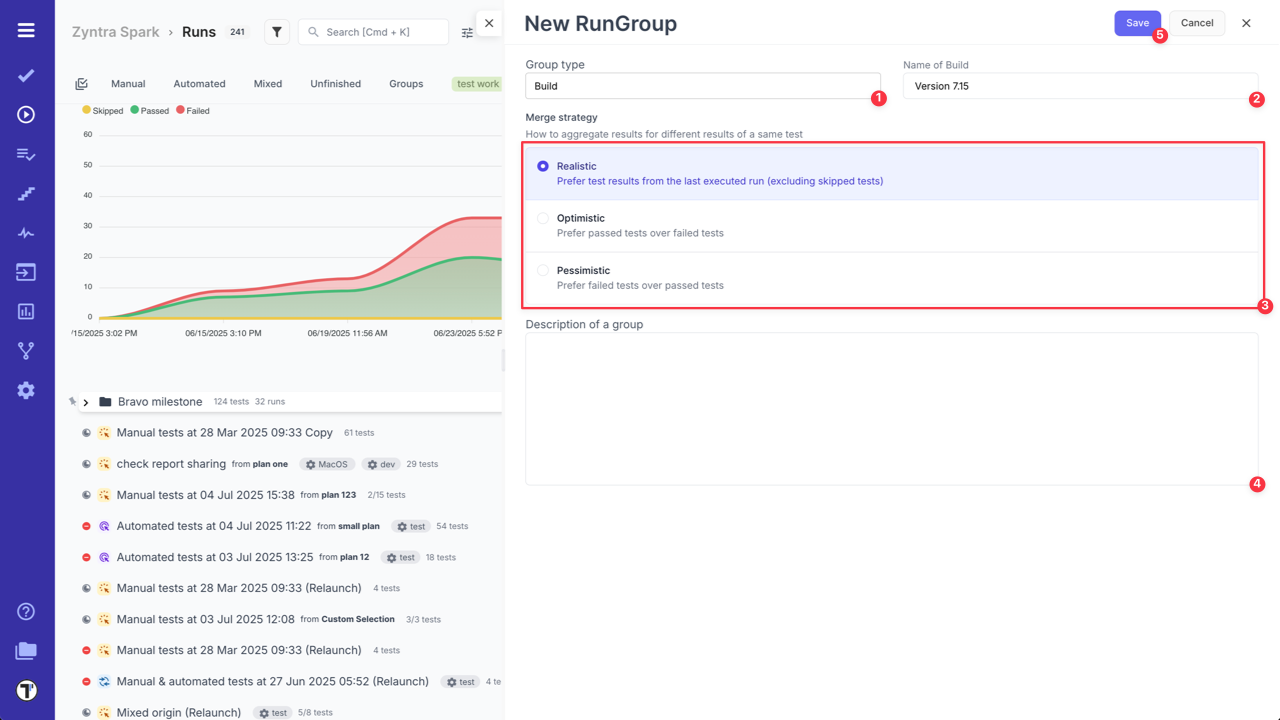
On New RunGroup screen you need:
- Choose a ‘Group Type’ (optional).
- Add a ‘Name of a Group’.
- Select ‘Merge strategy’ (For more details, refer to the Merge Strategies page in documentation).
- Add ‘Description of a group’, if needed.
- Click the ‘Save’ button.
The new RunGroup will appear on Runs page and will open automatically after creation.

After RunGroup is added, you can create new Manual/Automated/Mixed Runs inside it.
How to Create a Run in RunGroup
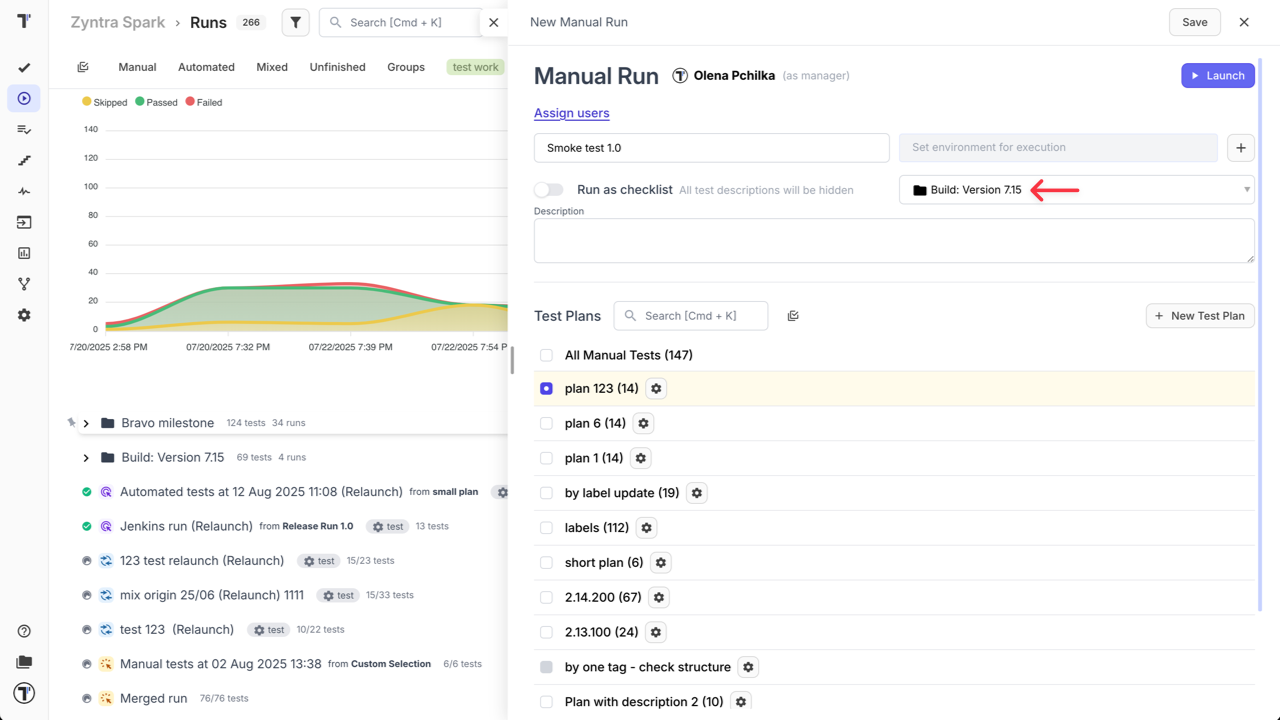
Section titled “How to Create a Run in RunGroup”- To create a new Manual Run, open the RunGroup and click on ‘Manual Run’ button.
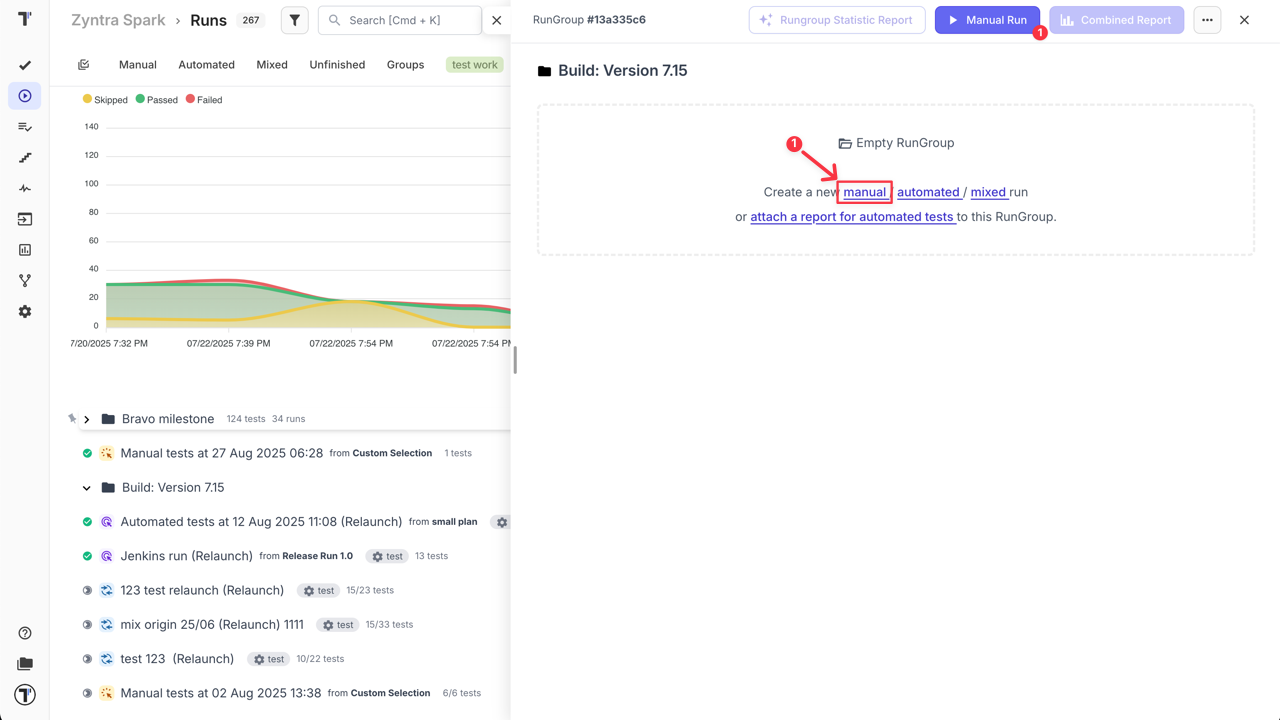
After this in the displayed window select a test plan from the list or create a new one, and fill in other data that you need for your run (like: assignee, title, environment, description).
- To add a new Automated Run to a RunGroup, execute your tests with Testomat.io, providing TESTOMATIO_RUNGROUP_TITLE=“Build ${BUILD_ID}”.
Now, by clicking on expand arrow, you can view Test Runs and their results within created RunGroup.
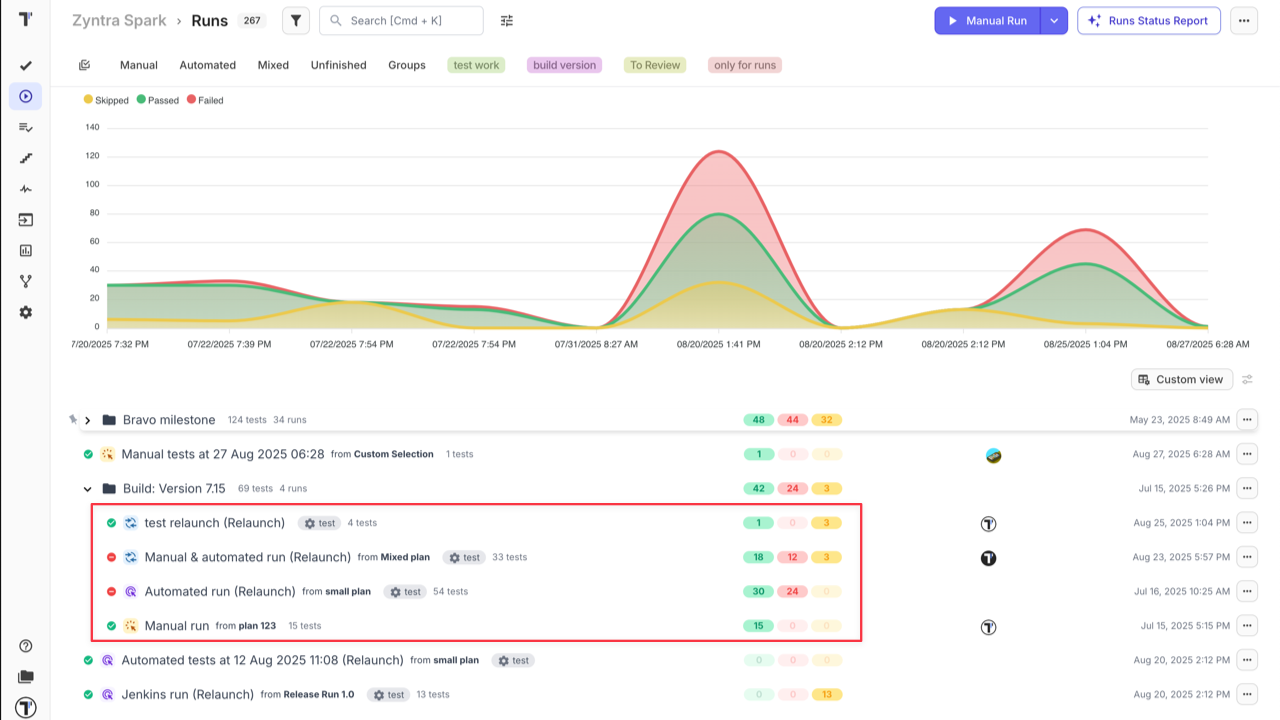
Clicking on RunGroup name will toggle RunGroup Report screen in basic view. Here you can view more detailed information about the runs inside selected RunGroup and total results.
For more details go to the relevant section - RunGroup Report in Basic View on ‘Reports’ page.
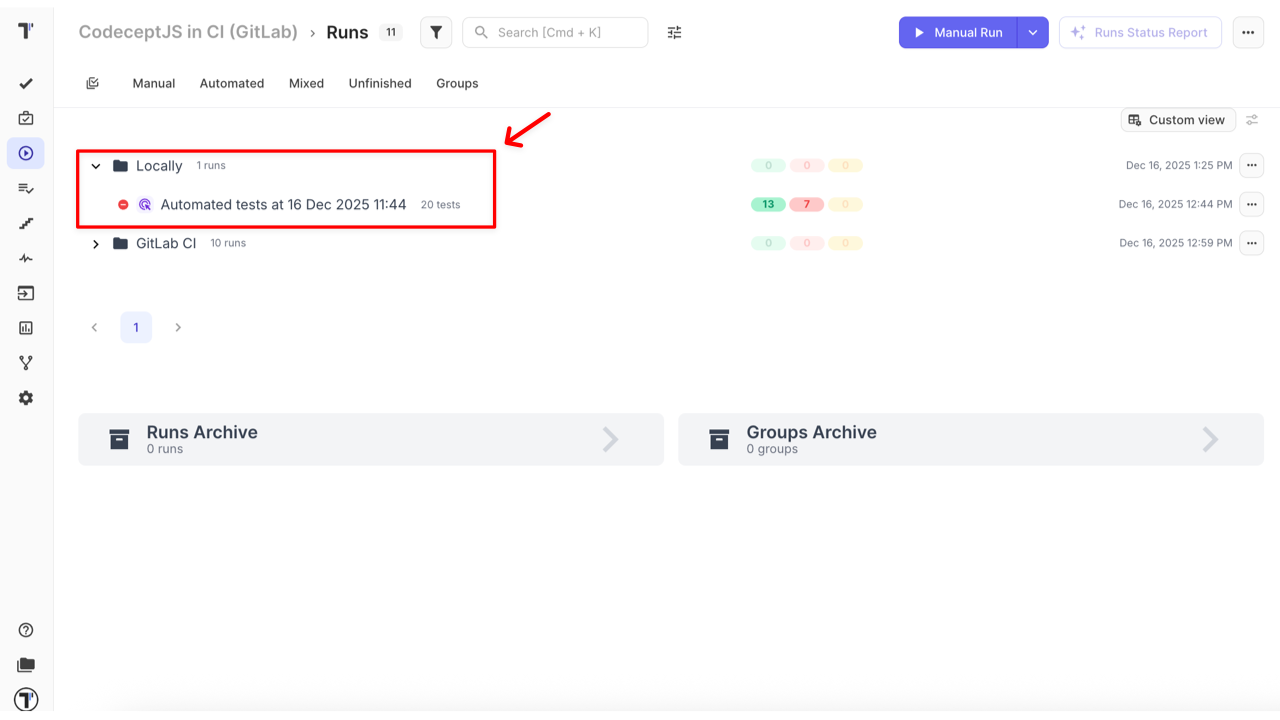
How to Move a Run to a RunGroup
Section titled “How to Move a Run to a RunGroup”You may need to move a Run to a specific RunGroup (e.g., to associate it with a particular release or build). There are two ways to do this in Testomat.io:
Method 1: Move a Run to a RunGroup
- Navigate to the ‘Runs’ page
- Select the Run you want to move
- Click the ‘Extra menu’ button
- Select the ‘Move’ from the dropdown menu
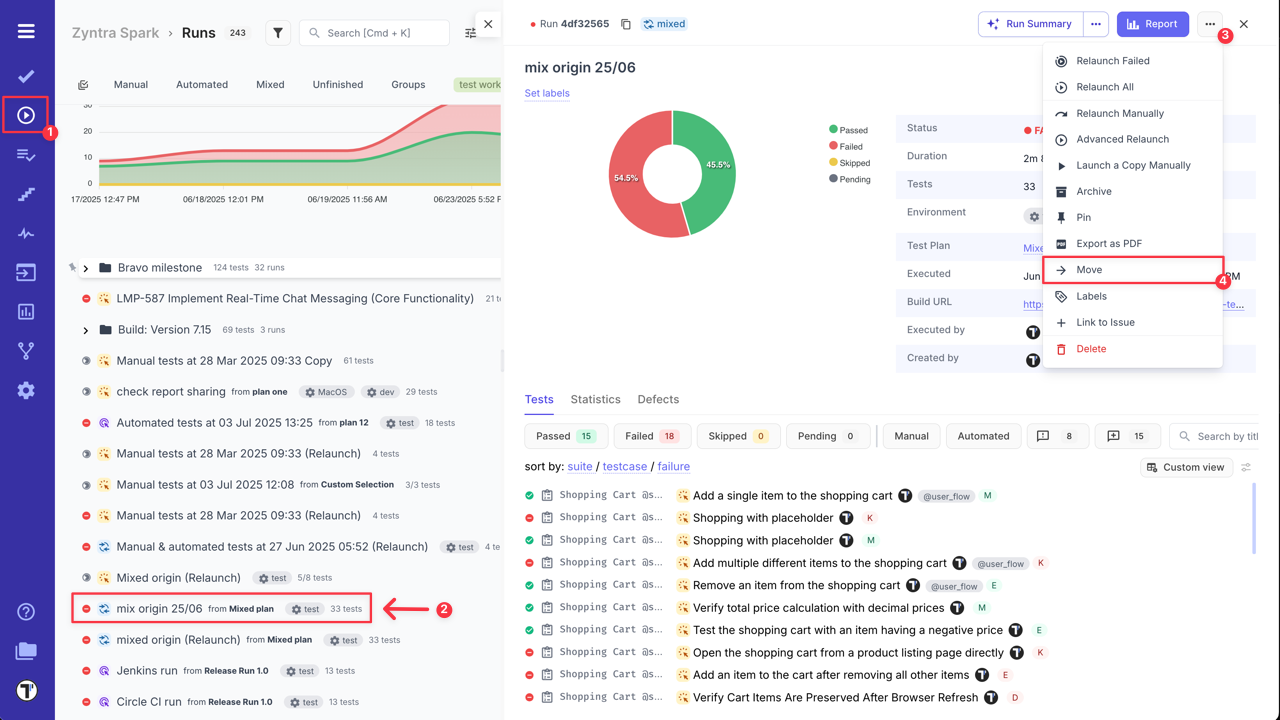
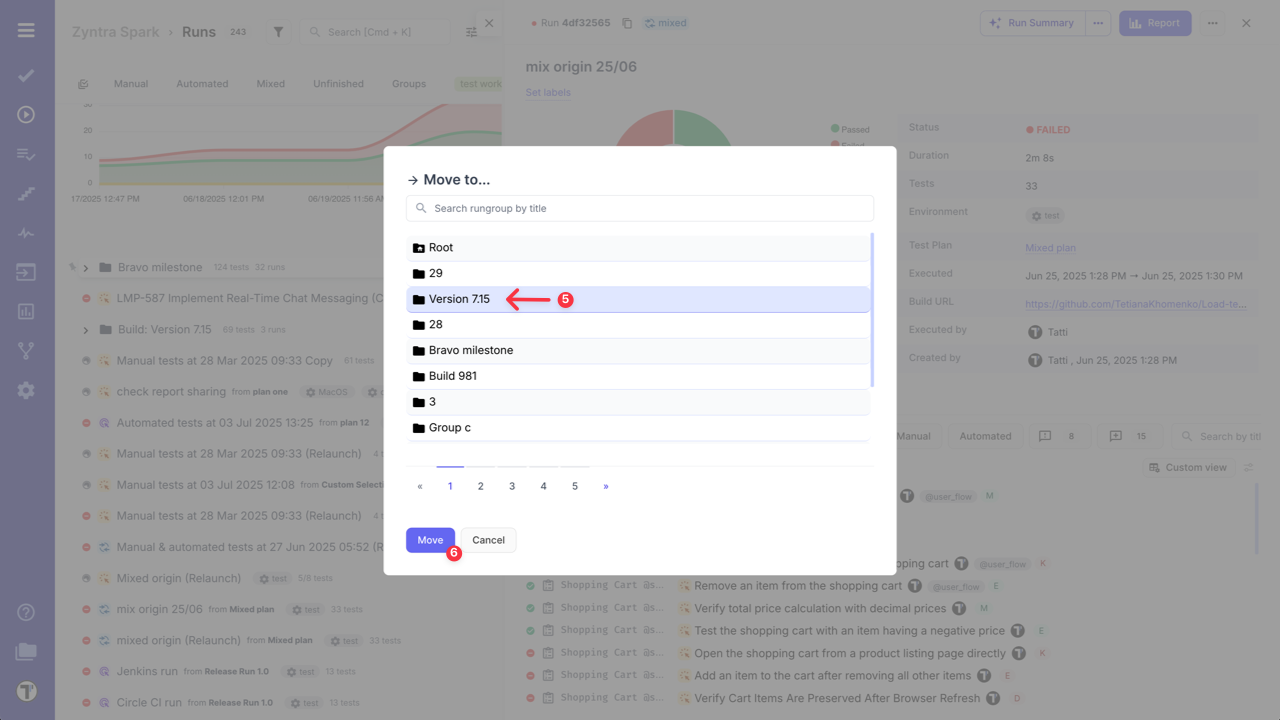
- In the pop-up window, choose the destination RunGroup
- Click the ‘Move’ button to confirm the action
Method 2: Add Existing Runs to the RunGroup
- Navigate to the ‘Runs’ page
- Click the ‘Extra menu’ next to the RunGroup you want to move Runs into
- Select the ‘Add Existing Run’ option
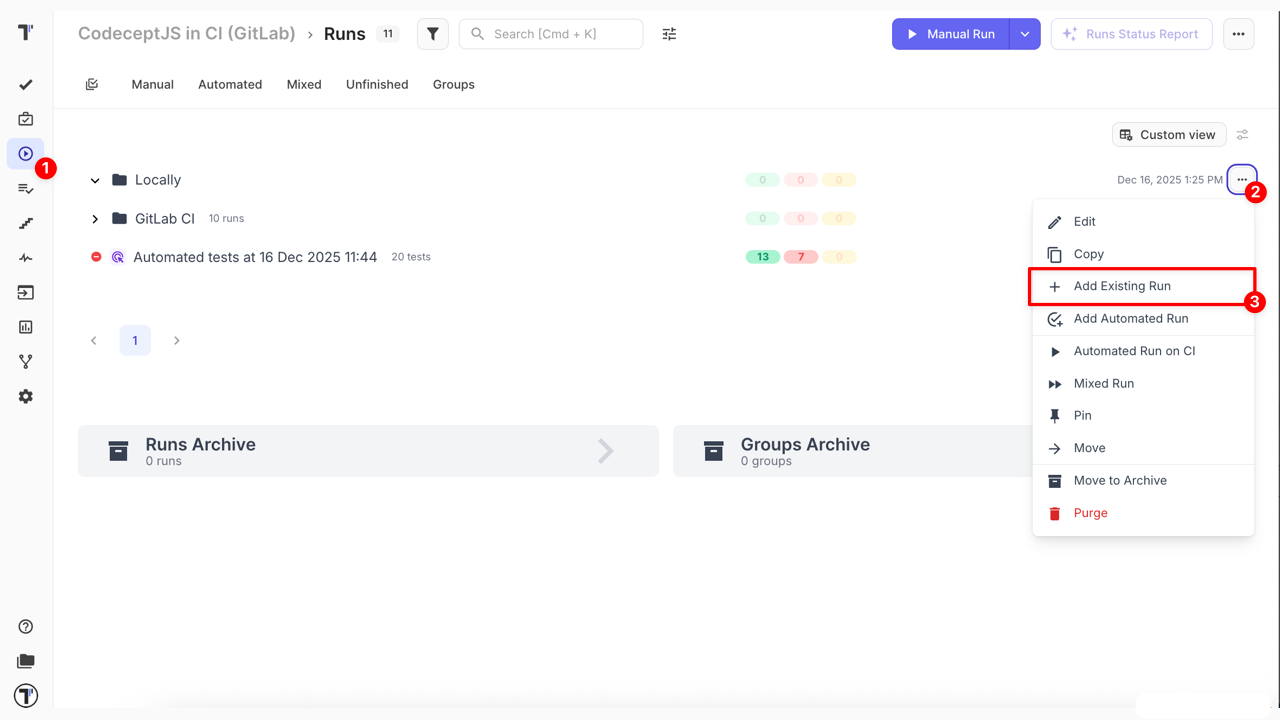
- In the modal window, select the Run(s) you want to move
- Click the Move Runs to Group button to confirm
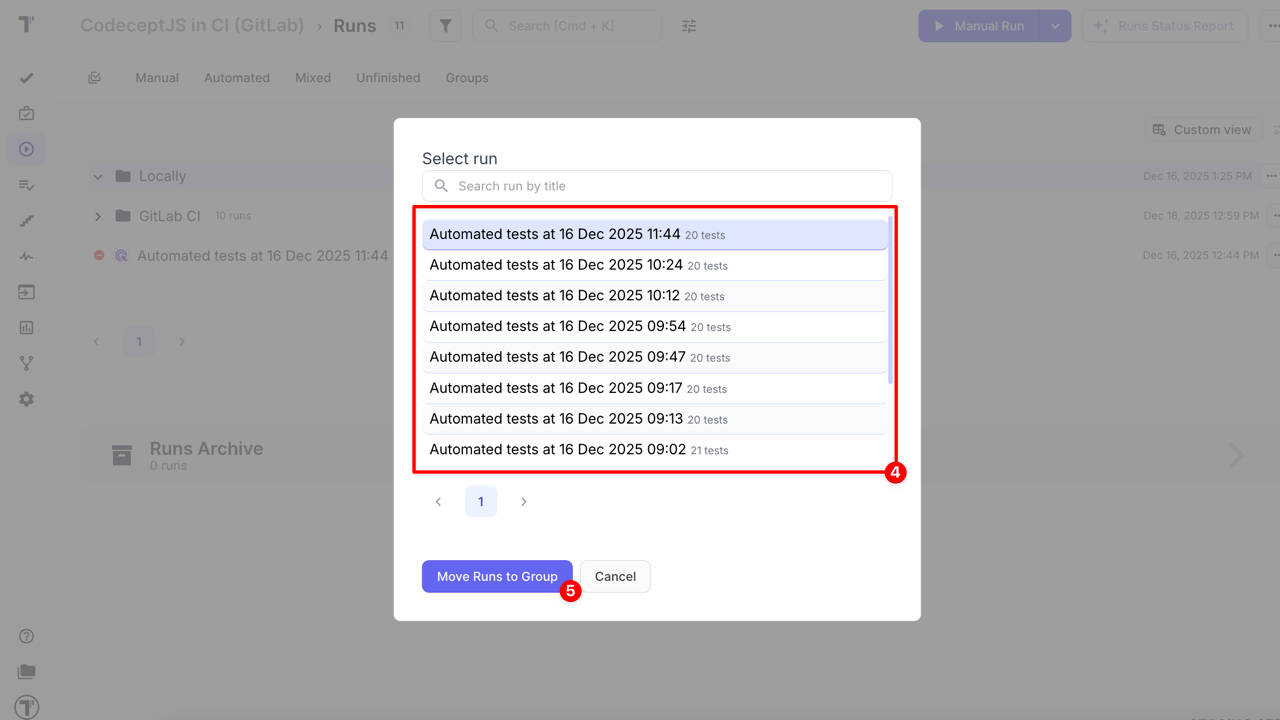
Moved or added Runs will appear in the selected RunGroup.
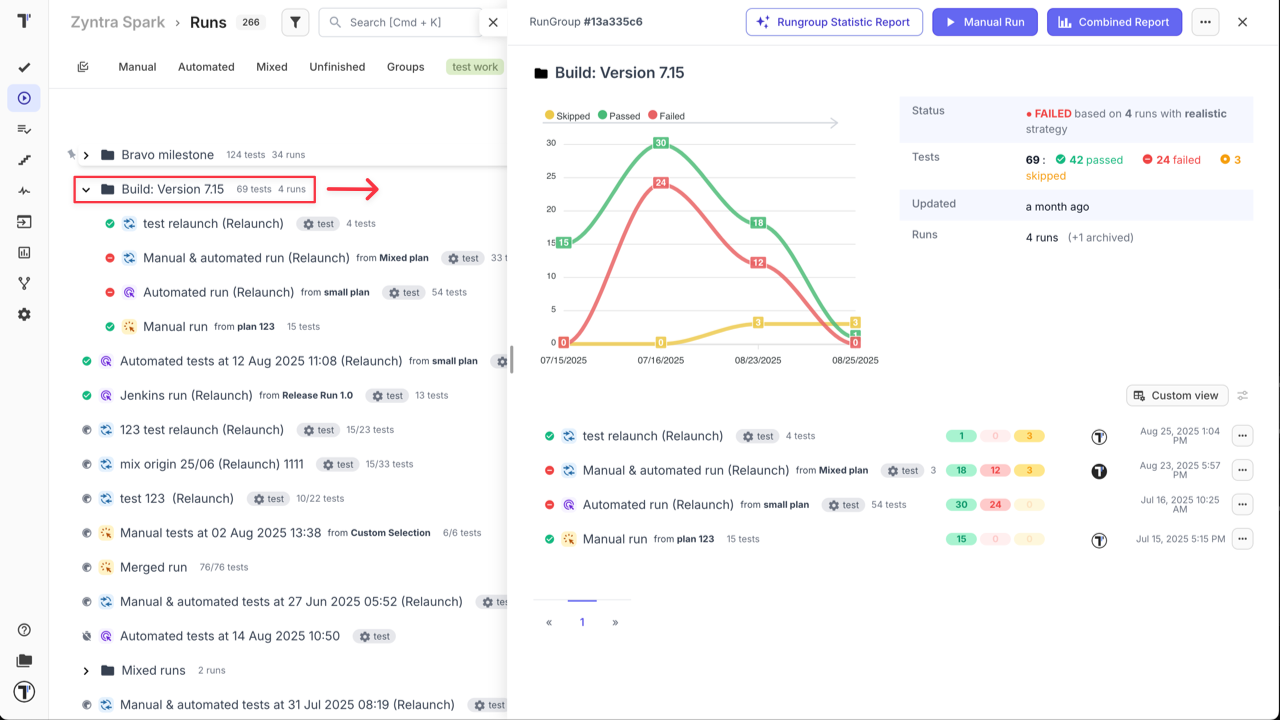
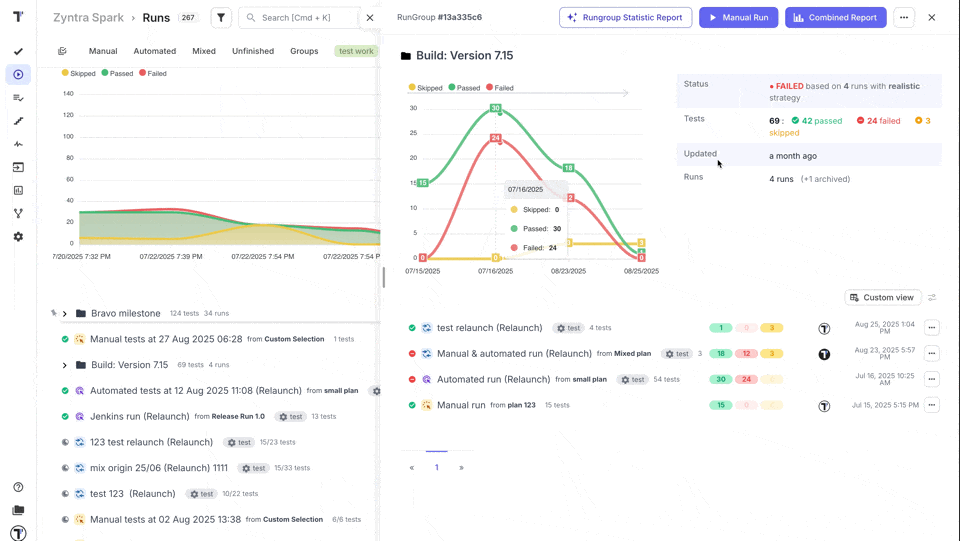
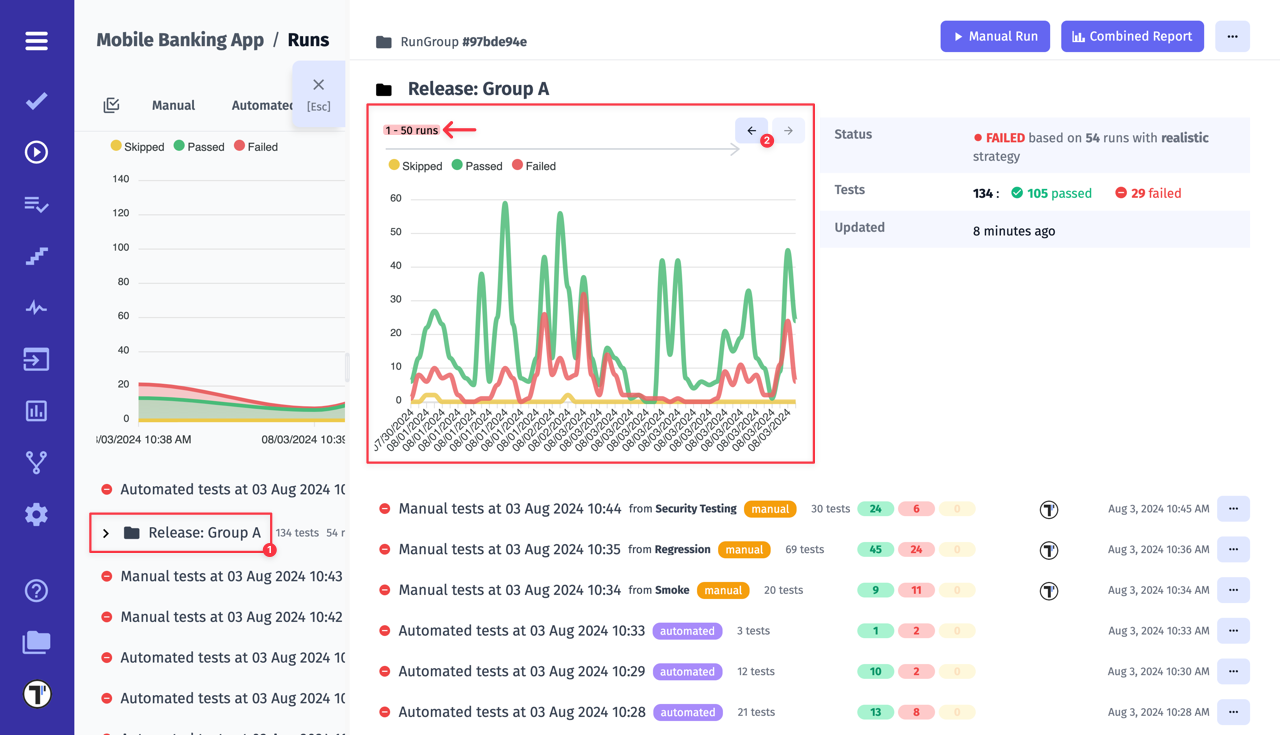
RunGroup Report Basic View
Section titled “RunGroup Report Basic View”You can view RunGroup Report by clicking on its name.
In this basic RunGroup Report, you can:
- View the RunGroup Chart.
- Review ‘RunGroup summary section’ with general information based on the selected Merge Strategy.
- View a list of test runs, their statuses with the number of Passed, Failed, Skipped tests, along with the run assignee and executed time.
- Customize your RunGroup Report view (Read more in the How to Customize Runs List View section below).
- Check ‘Combined Report’ (Read more in the Combined Report for RunGroups section below).
- Add a new Manual Run to the selected RunGroup.
- Generate a Rungroup Statistic Report(AI-feature should be enabled on ‘Company Settings’ page).
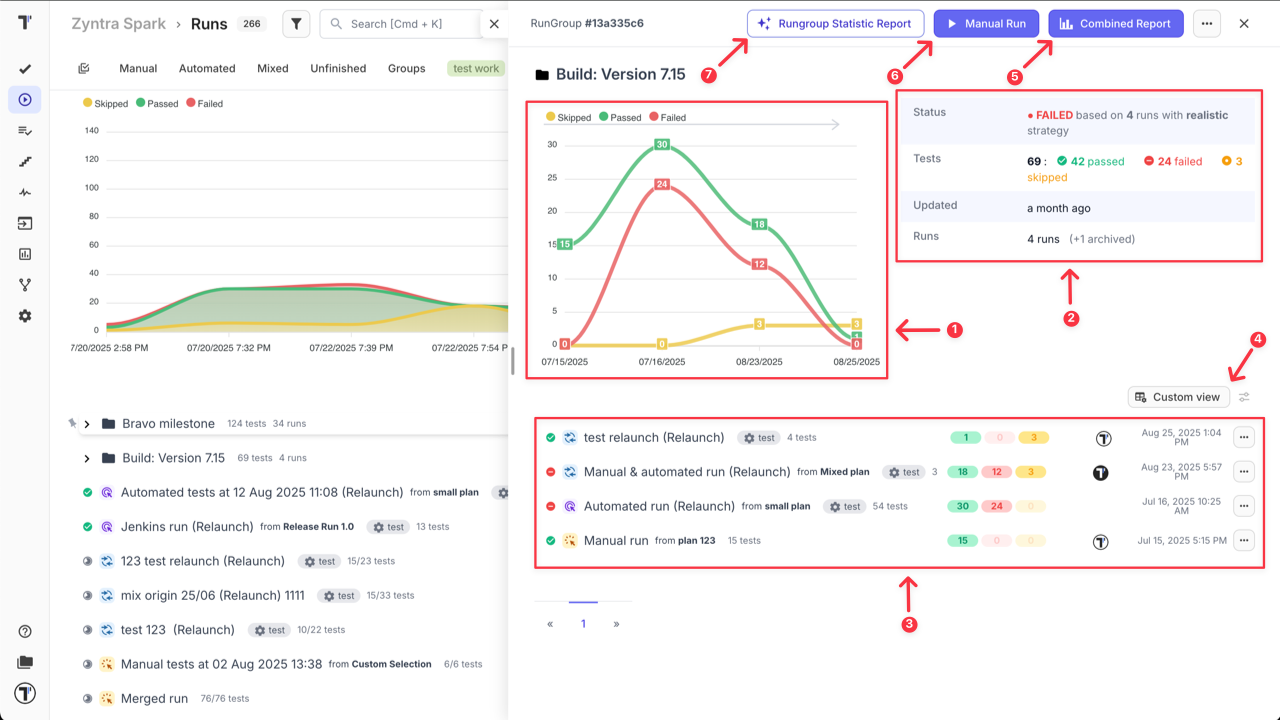
The ‘RunGroup summary section’ displays a counter with the number of included and analyzed runs in the RunGroup. Archived runs are excluded from this counter and do not affect the total RunGroup result. You can see how many runs were archived, and by clicking on archived counter, you will be redirected to the ‘Groups Archive’ page, where runs are already filtered by selected RunGroup.
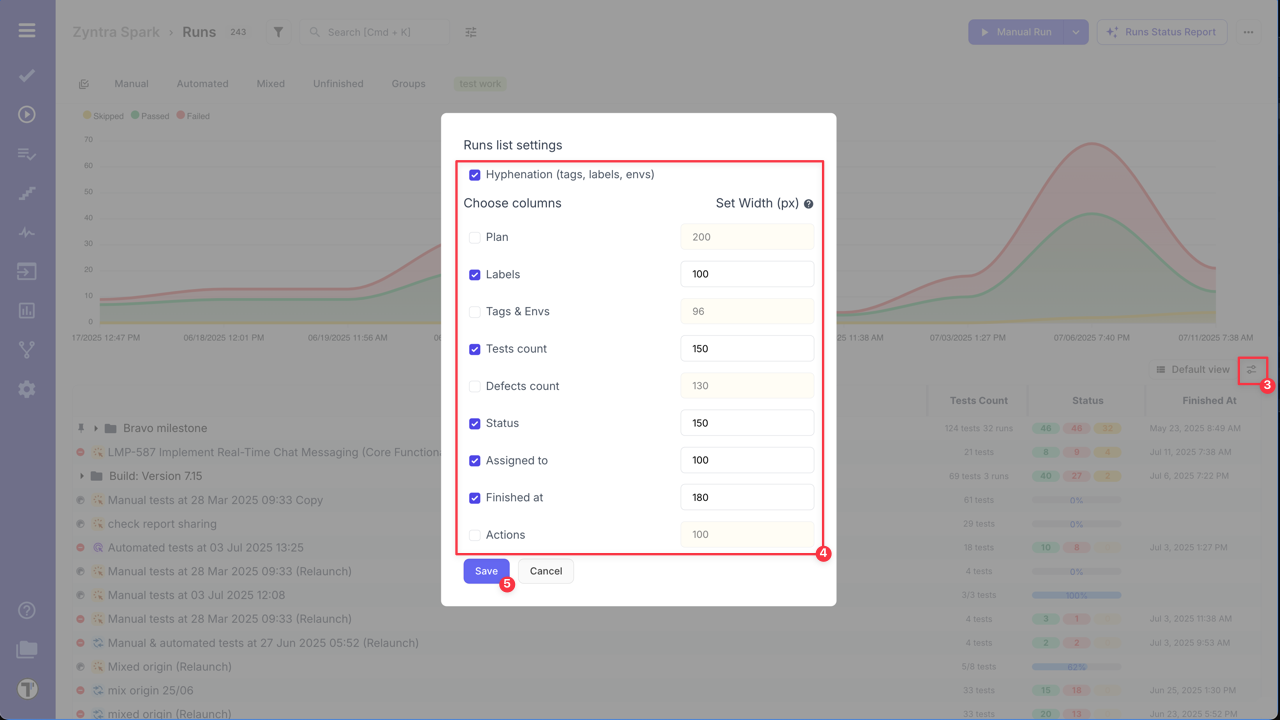
How to Customize Runs List View
Section titled “How to Customize Runs List View”When working with test runs inside RunGroup or Runs Dashboard Flow, you can adjust the table layout to fit your needs. Instead of using the default view, you can customize the runs table layout within RunGroup page or directly from the main Runs Dashboard.
RunGroup Flow
- Go to ‘Runs’ page.
- Select RunGroup.
- Click the ‘Custom view’ button.
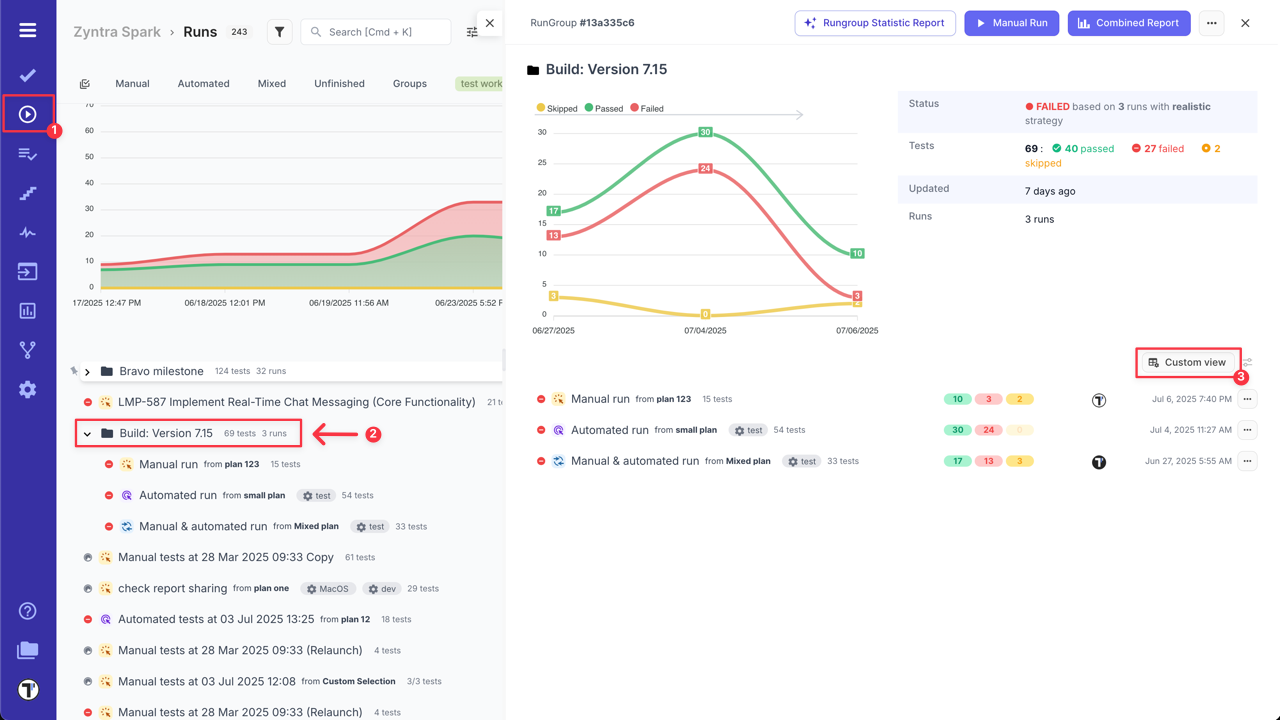
You can use the default custom view or personalize the table layout:
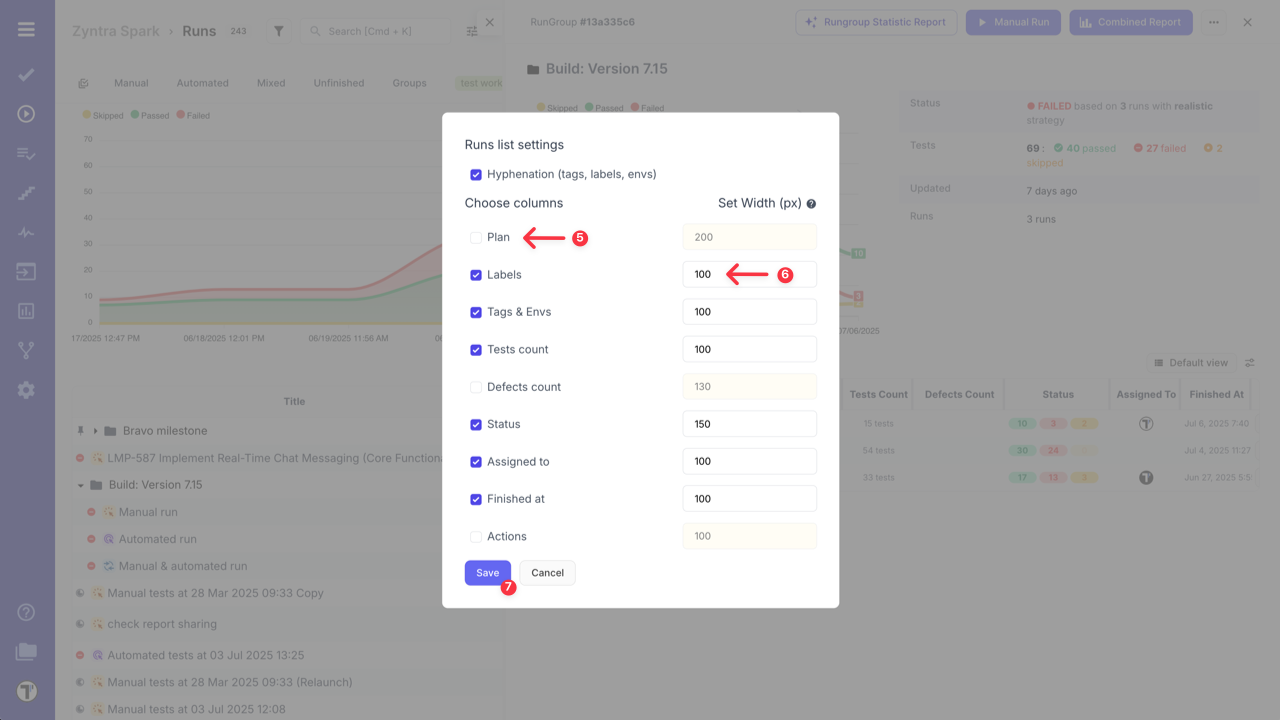
- Click the ‘Settings’ icon to access ‘Runs List Settings’.

- Select or deselect columns to show only the data you need.
- Set the column width (px), if needed, to improve readability.
- Click the ‘Save’ button to apply your changes.
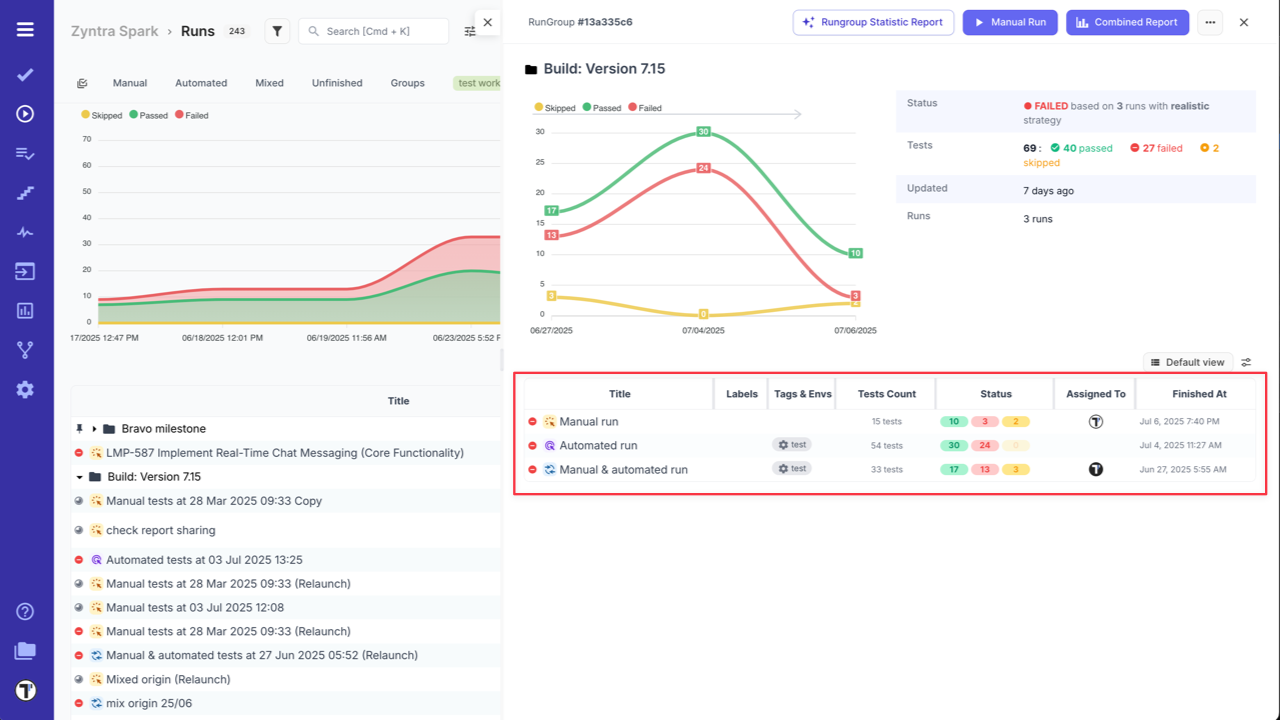
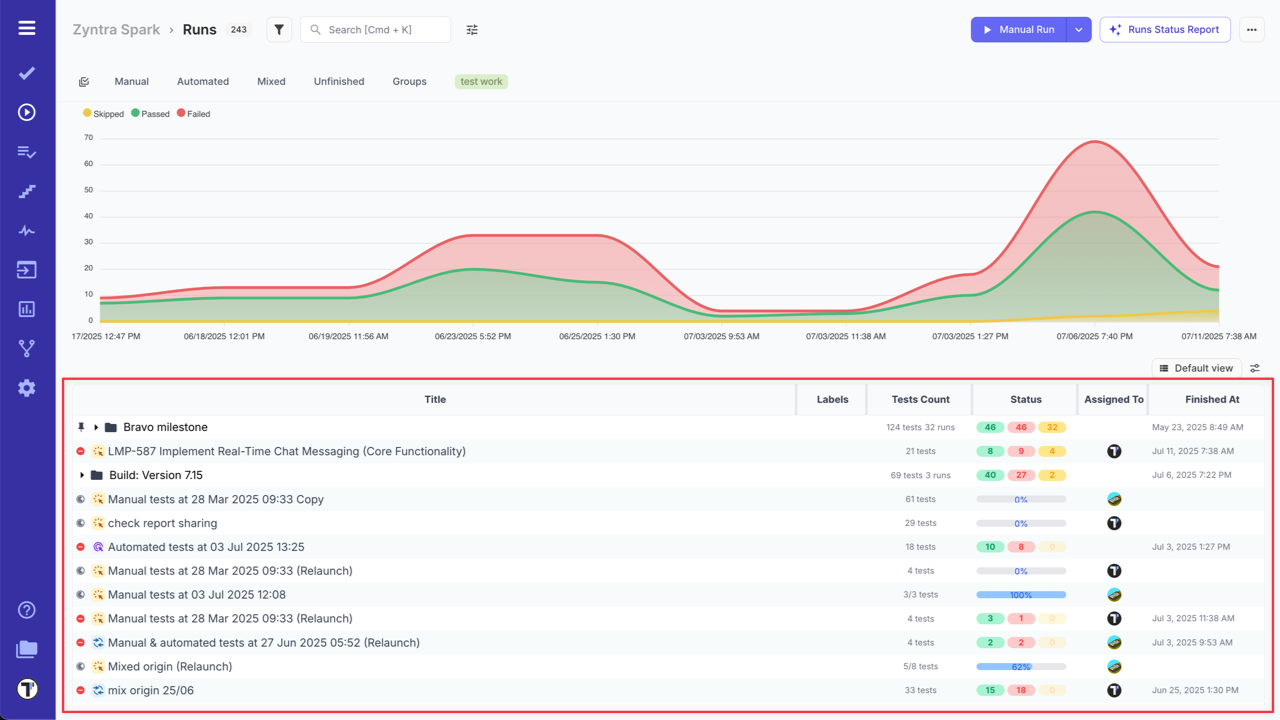
Here’s how your customized table within a RunGroup will appear after customization:
Runs Dashboard Flow
Similarly, customize the runs view from the main Runs Dashboard:
- Go to ‘Runs’ page.
- Click the ‘Custom view’ button.
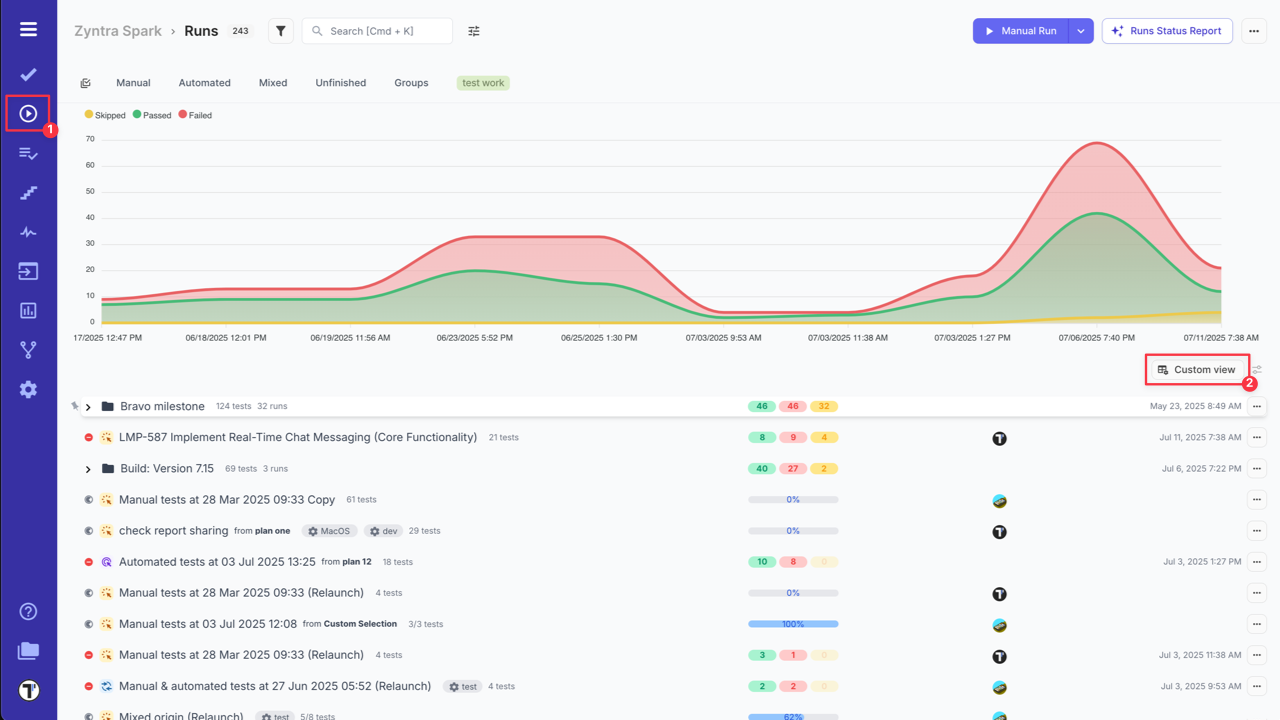
- Click the ‘Settings’ icon to access ‘Runs List Settings’.
- Customize your view in the ‘Runs list settings’.
- Click the ‘Save’ button to apply your changes.
Here’s how your customized table will appear.
RunGroup Chart
Section titled “RunGroup Chart”The chart displays up to 50 of the latest test runs belonging to the group. If you have more runs, use the pagination arrows to view the results of the previous runs.
Combined Report for RunGroups
Section titled “Combined Report for RunGroups”Testomat.io provides a ‘Combined Report’ feature for RunGroups. This report is designed to help you aggregate and analyze the results of all test runs within the RunGroup in a single view.
You can open ‘Combined Report’ for a RunGroup by clicking on ‘Combined Report’ button from the RunGroup Report Basic View window.
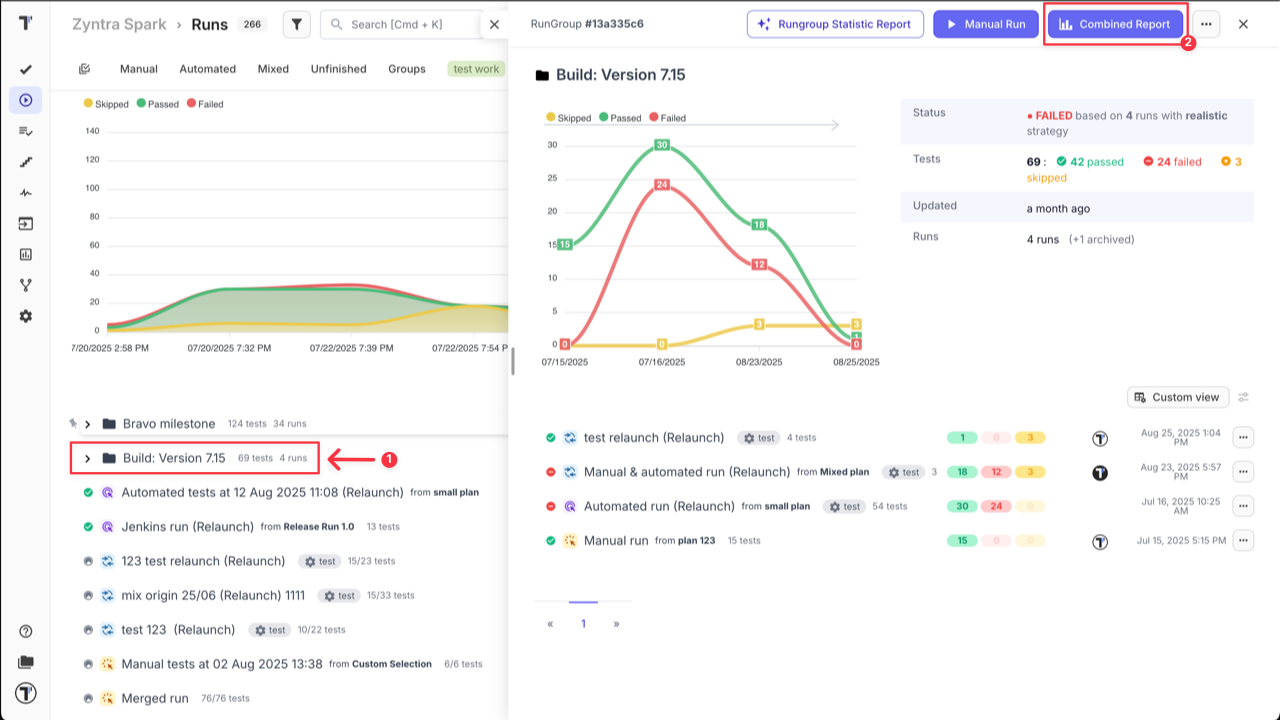
The comparison of runs is based on the first (main) launch. The statuses counters on the left side are calculated based on the main run.
To change the main run, click the ‘Compare To’ button. Note that the counters of loaded tests is above them. The final summary on the right side is calculated based on the loaded tests.
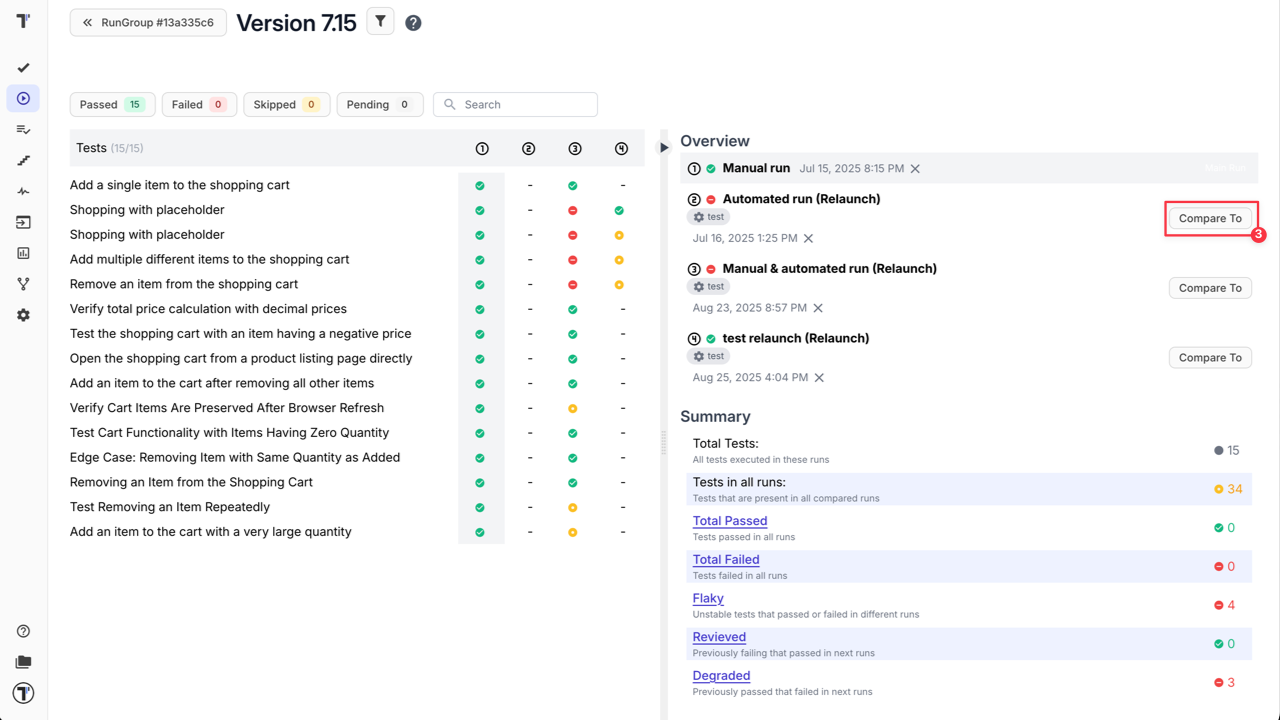
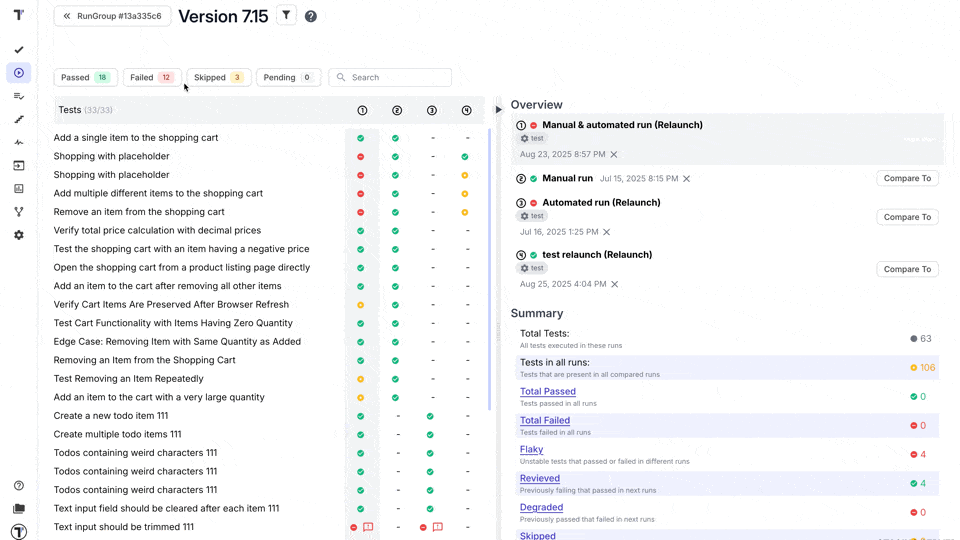
Inside the ‘Combined Report’, you can get a quick overview of the pass/fail rates for all tests within the Group. You can also see the total number of tests present in all compared runs, as well as the total number of flaky (unstable tests that passed or failed in different runs), reviewed (previously failing that passed in next runs), and degraded (previously passed that failed in next runs) tests.
Additionally, you can use filters and search features to view the data most relevant to your needs.
Key benefits:
-
Analyze Trends: By seeing the results from multiple runs in one place, you can identify trends in test performance and stability over time.
-
Consolidate Data: The combined report is especially useful for “mixed runs” (runs that include both manual and automated tests), as it consolidates all results into a single, cohesive report.
-
Compare Runs: Testomat.io also has a separate ‘Compare Test Runs’ feature that can be used within a RunGroup. This allows you to side-by-side compare the results of different runs to pinpoint changes, regressions, or improvements. (Go to Compare Test Runs section on ‘Run reports’ page to read more about this feature.)
This feature is a powerful tool for project managers, QA leads, and stakeholders who need to make informed decisions based on a holistic view of testing activities, without having to manually compile data from individual reports.
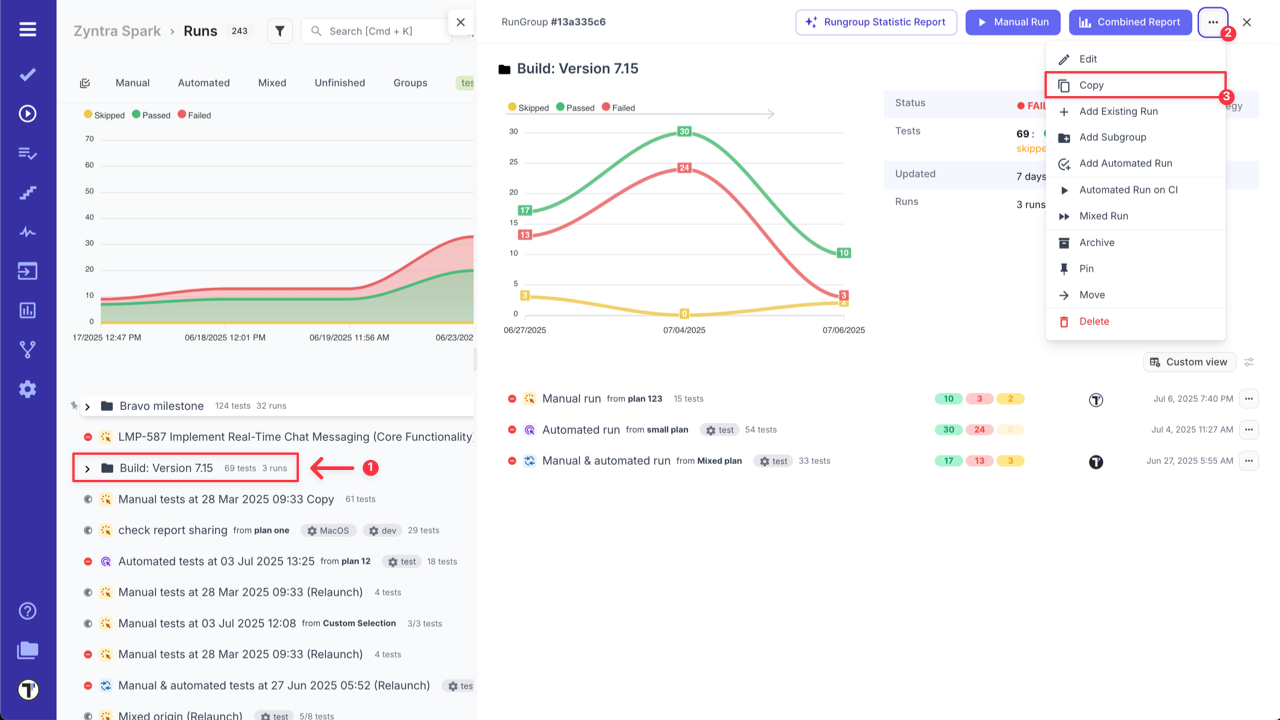
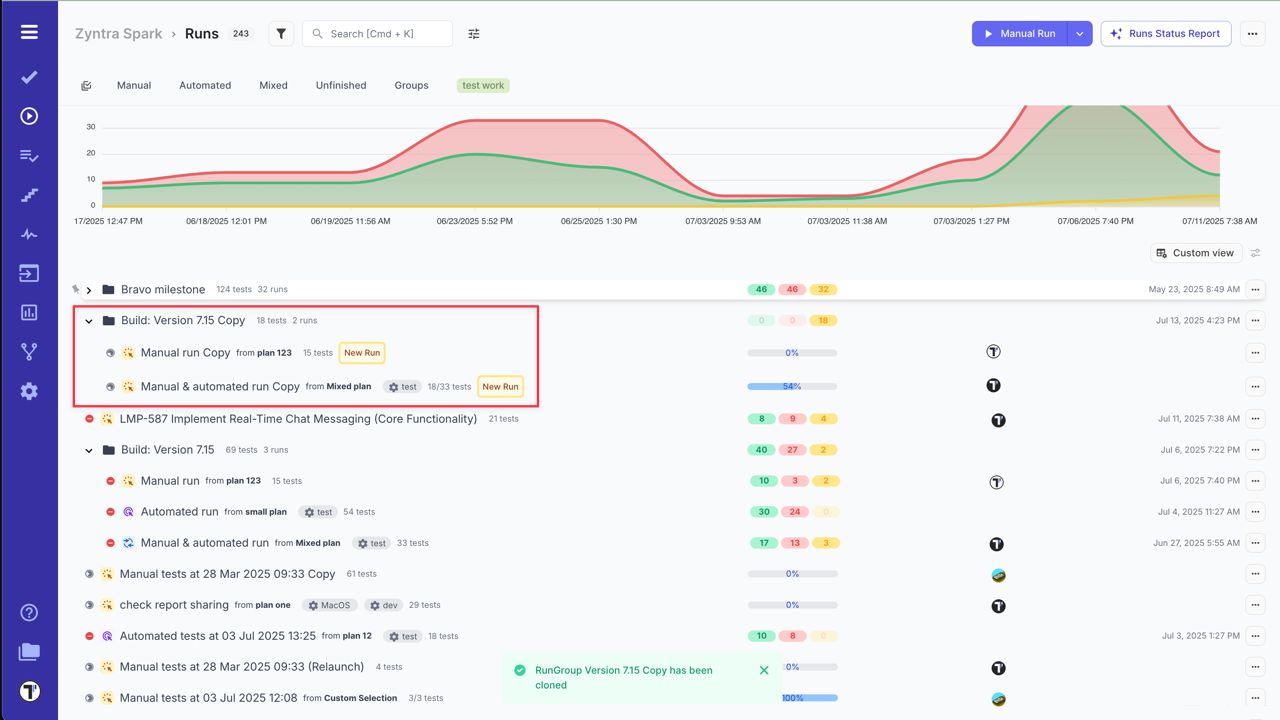
How to Copy RunGroup
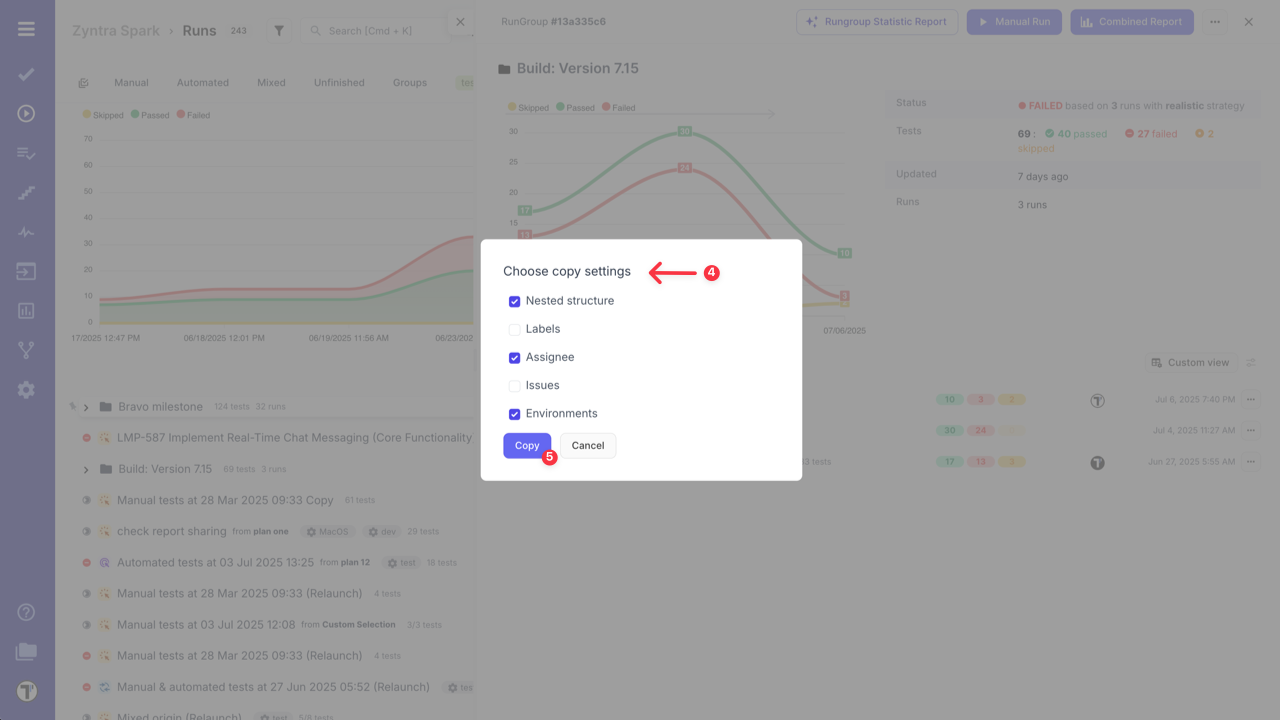
Section titled “How to Copy RunGroup”You can easily create a new RunGroup, completely independent of any previous runs, by copying all relevant tests exactly as they are. You can configure what data should be copied, namely:
- Assignee: Define assignee details separately, preventing them from being copied.
- Issues: Choose whether to include or exclude linked issues during duplication.
- Labels: Decide whether labels should be duplicated or omitted in the new test run.
- Environments: Control the duplication of environment settings based on your requirements.
- Nested Structure: Preserve or exclude the nested structure of your test groups as you duplicate them.
Follow these steps:
- Open the RunGroup.
- Click the ‘Extra menu’ button.
- Select ‘Copy’ option form the dropdown menu.
- Select configuration options.
- Click the ‘Copy’ button.
- Verify the created RunGroup.
How to Pin a RunGroup
Section titled “How to Pin a RunGroup”Testomat.io allows users to pin RunGroups to the top of the Dashboard. This provides quick access to critical or frequently used tests or test runs, helping teams stay focused on the most relevant tasks. Pinning supports faster navigation, improved focus, and customizable workflows—ideal for monitoring regression tests, environment-specific runs, or production hotfixes.
For more details, refer to the How to Pin a Run or RunGroup section.
How to Archive RunGroup
Section titled “How to Archive RunGroup”Testomat.io gives you an opportunity to archive a RunGroup, including all its contained Test Runs. This helps maintain better visibility on your main Run Dashboard.
For more information on archiving, visit the Archive Runs & RunGroups page.
How to Unarchive RunGroup
Section titled “How to Unarchive RunGroup”Archived RunGroups can be unarchived and moved back to the main Run Dashboard. Restoring a RunGroup also restores all its archived runs.
Read more in the How to Unarchive Runs & RunGroups section.
Purge Run Groups
Section titled “Purge Run Groups”Starting from October 2025, Testomat.io introduces the new Purge approach for Run Groups. This update extends the same two-step purge-to-archive logic that was introduced for individual Runs in September 2025, ensuring data safety and consistency across all Run types.
The Delete option for Run Groups is now replaced with a Purge option.

Compress and Move to Archive (Purge)
Section titled “Compress and Move to Archive (Purge)”When a Run Group is purged (either manually or automatically):
- The group itself is deleted
- All nested Runs are moved to the Archive page
- All nested Runs are marked with the purged badge for easy identification
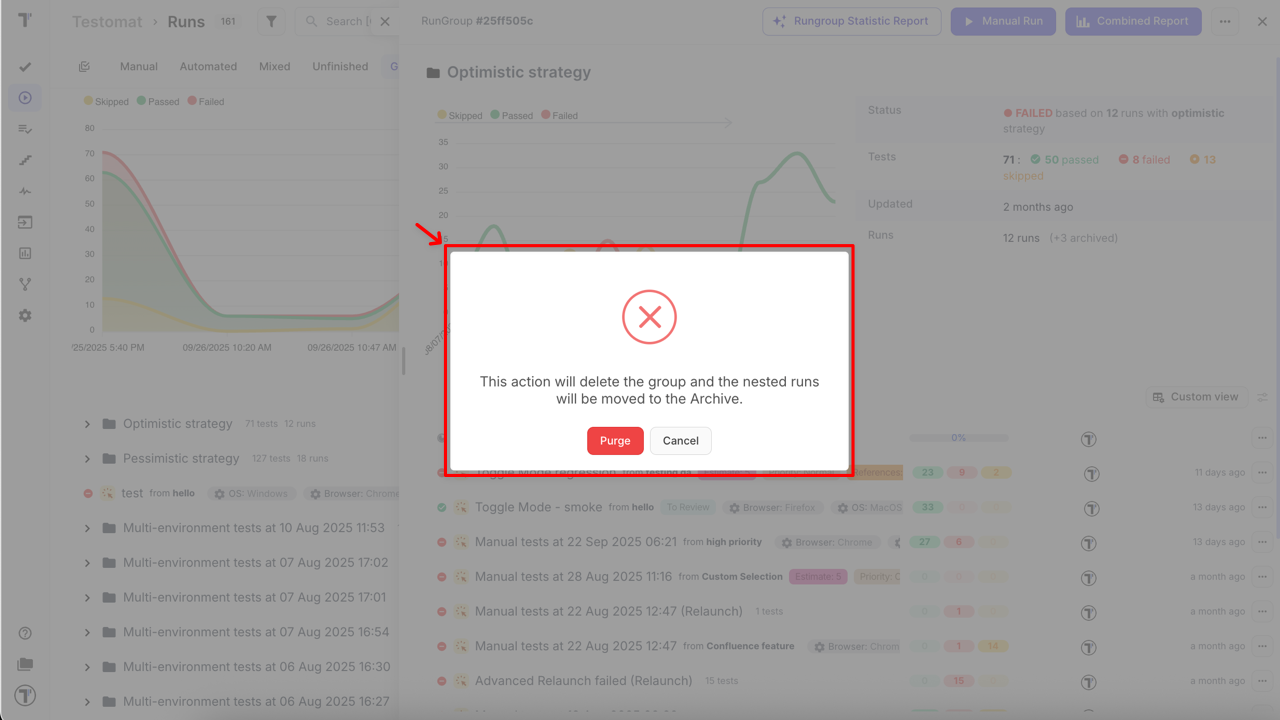
During this step:
- Stack traces are removed to reduce storage size
- Essential data is preserved, including:
- Test results
- Artifacts (attachments, logs, screenshots)
- Custom statuses and metadata
- Purged Runs remain available in the Archive page and can be restored at any time
Automatic Purge Flow
Section titled “Automatic Purge Flow”The same two-step purge-to-archive logic applies to automatically purged Run Groups via Project Settings → Purge Old Runs.
When an automatic purge is triggered:
- The group itself is deleted
- All nested Runs are moved to the Archive page
- All nested Runs are marked with the purged badge for easy identification
Limitations
Section titled “Limitations”Permanent Deletion from Archive
Section titled “Permanent Deletion from Archive”
Summary
Section titled “Summary”By extending the Purge functionality to Run Groups, Testomat.io ensures that all grouped executions follow the same safe, transparent, and recoverable process as individual Runs.
Teams can efficiently manage large-scale test executions while maintaining complete data traceability and control.