Runs & Reports in Jira
With the Testomat.io plugin in Jira, your team can efficiently execute and manage test runs directly from Jira. Launch manual, automated, or mixed tests, configure environments and assignees, group related runs, and get a clear overview of all test executions with their current statuses. This integration keeps QA, development, and management aligned, providing full visibility into testing workflows without leaving Jira.
This page explains how to:
- Launch Manual, Mixed, or Automated in CI/CD runs from Jira issues or linked test plans
- Configure Advanced Settings such as environment, assignee (email), RunGroup, CI profiles, and custom parameters
- Track execution progress and view the current status of each run directly in Jira
- Receive Report Notifications in Jira for failed test runs, with automatically created issues containing detailed run results and optional public report links
Run Flow
Section titled “Run Flow”Testomat.io supports three types of test executions directly in Jira:
- Manual Run - execute tests manually
- Automated Run (CI/CD) - execute automated tests via connected CI service
- Mixed Run - run a combination of manual and automated tests in a single execution
Choose the type of run that fits your workflow and follow the detailed steps below to execute tests directly in Jira.
How to Launch a Manual Run
Section titled “How to Launch a Manual Run”Use Manual Run in Jira to execute tests step-by-step directly from the Jira issue. Ideal for fully manual test cases, exploratory testing, or verifying features not yet automated. You can launch a Manual Run in Jira in three different ways:
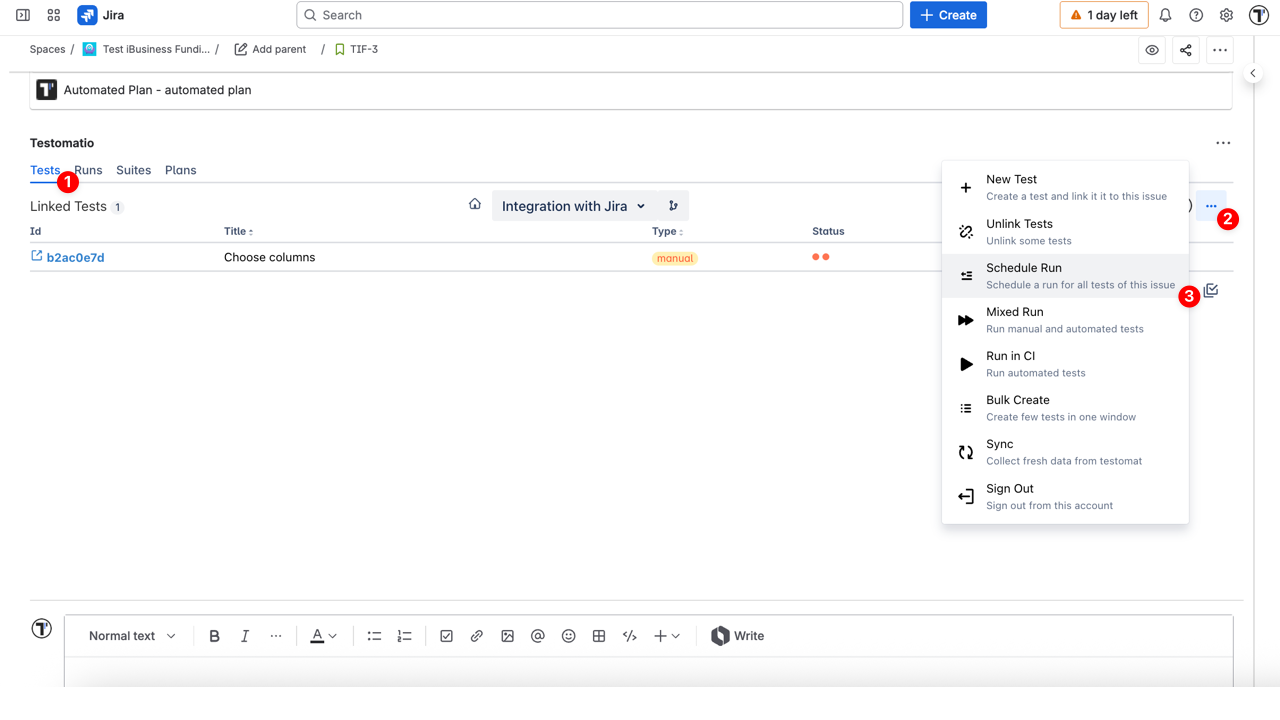
Option 1 – From the ’…’ Menu on the Tests Tab
- Navigate to the Tests tab
- Click the ’…’ (extra menu) button on the Tests tab
- Select Schedule Run from the dropdown list
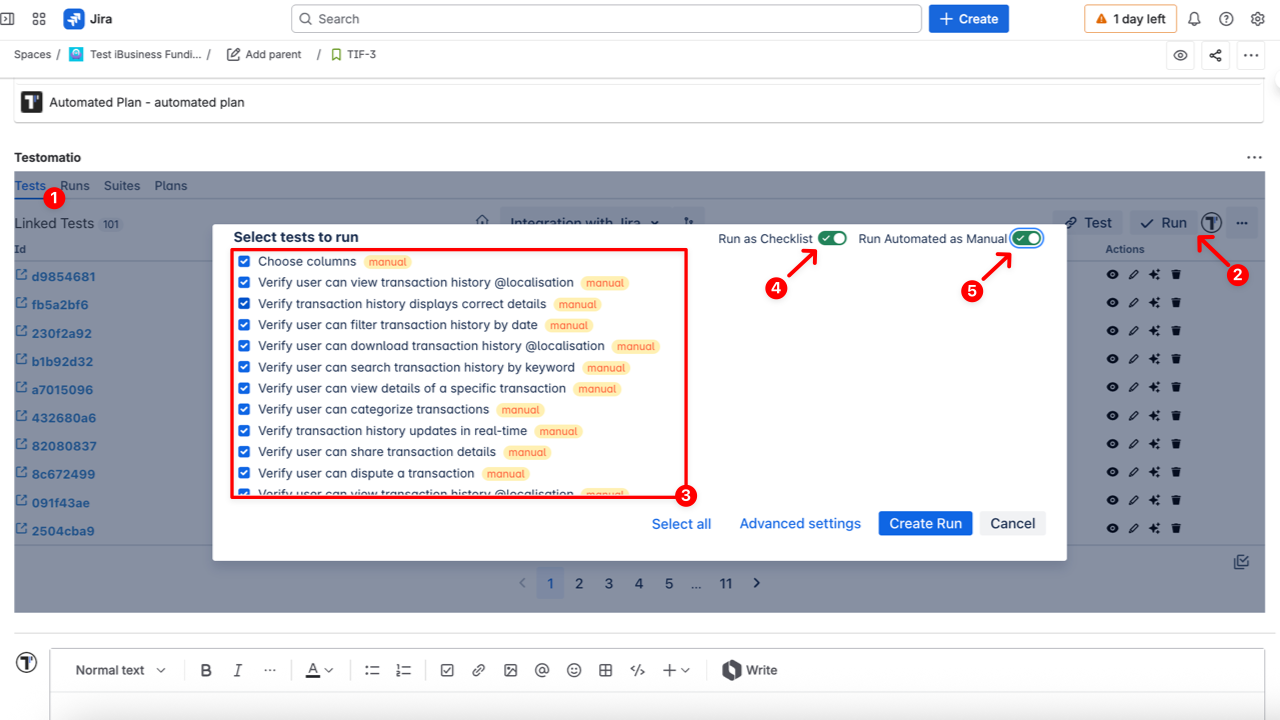
- In the ‘Select tests to run’ dialog, choose the tests you want to include
- (Optional) Enable Run as Checklist toggle - if enabled, marks tests to be executed as checklist
- (Optional) Enable Run Automated as Manual toggle - if enabled, allows automated tests to be executed manually
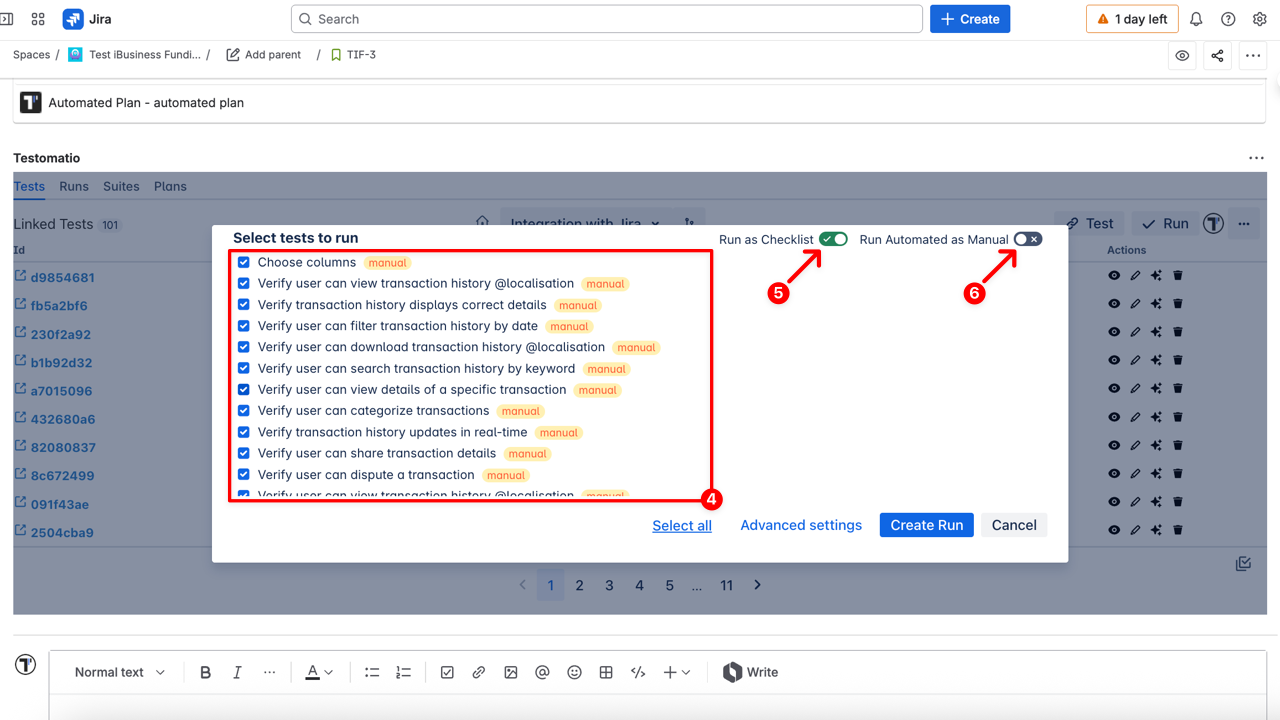
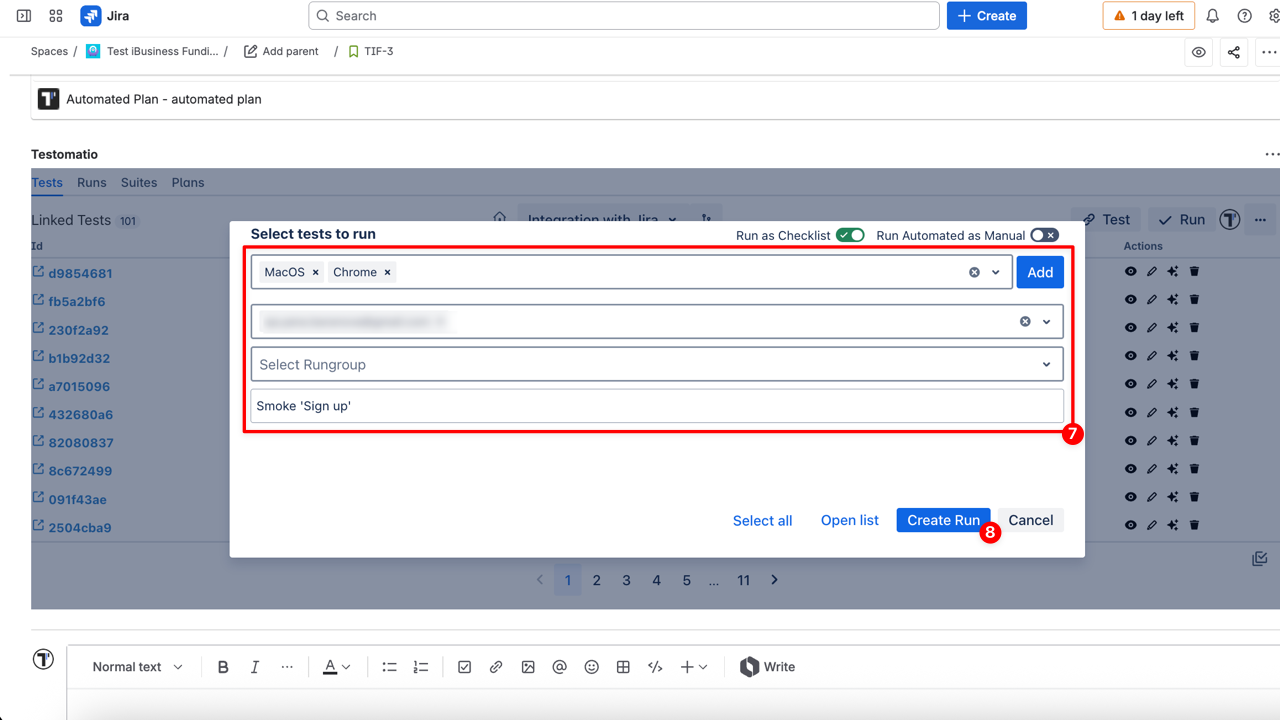
- (Optional) Open the Advanced settings to select:
- Environment – select where the tests will run (e.g., macOS, Chrome, staging, production)
- Assign user – select the email of the user added to the project who is responsible for this run
- RunGroup – optional grouping of related runs for easier tracking and reporting
- Title - provide a descriptive title for the run
- Click ‘Create Run’ to start execution
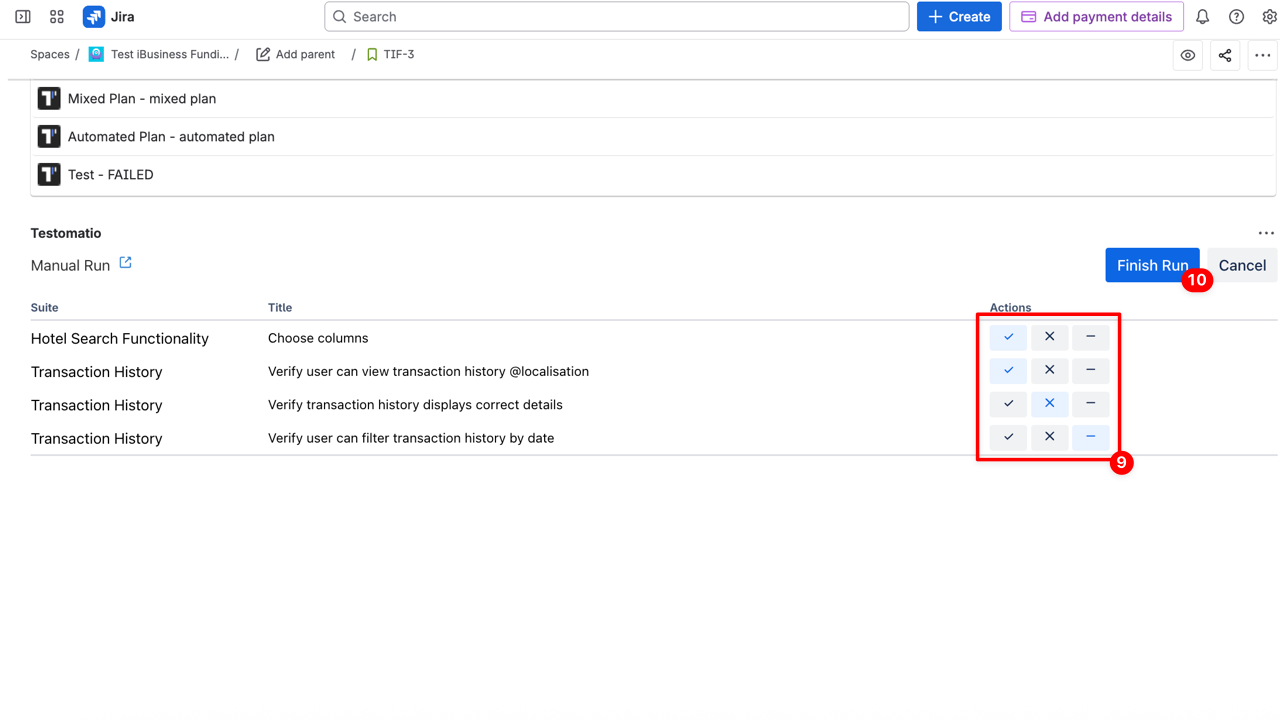
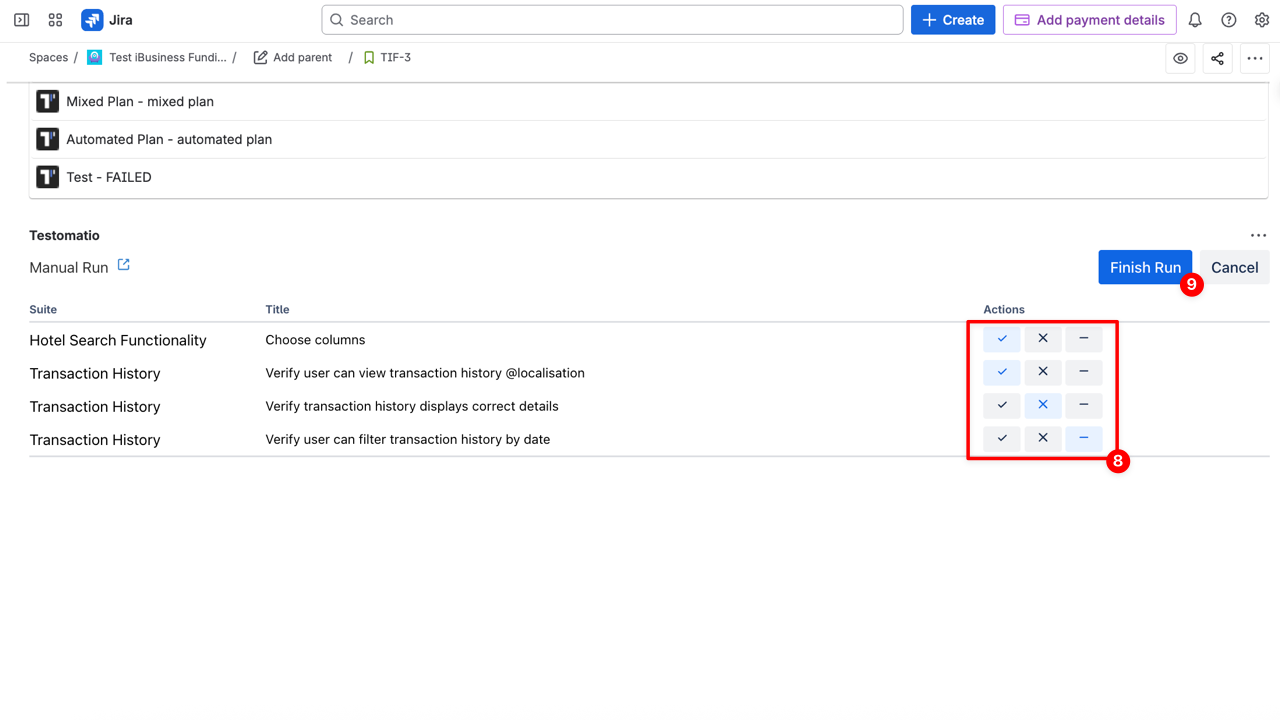
- Mark all tests with specific status (e.g., ✔ passed / ✖ failed / ➖ skipped)
- Click the Finish Run button
Option 2 – Using the ‘Run’ Button on the Tests Tab
- Navigate to the Tests tab
- Click the ’✔ Run’ button
- In the ‘Select tests to run’ dialog, choose the tests you want to include
- (Optional) Enable Run as Checklist toggle - if enabled, marks tests to be executed as checklist
- (Optional) Enable Run Automated as Manual toggle - if enabled, allows automated tests to be executed manually
- (Optional) Use Advanced settings to select:
- Environment – select where the tests will run (e.g., macOS, Chrome, staging, production)
- Assign user – select the email of the user added to the project who is responsible for this run
- RunGroup – optional grouping of related runs for easier tracking and reporting
- Title - provide a descriptive title for the run
- Click ‘Create Run’ to start execution

- Mark all tests with specific status (e.g., ✔ passed / ✖ failed / ➖ skipped)
- Click the Finish Run button
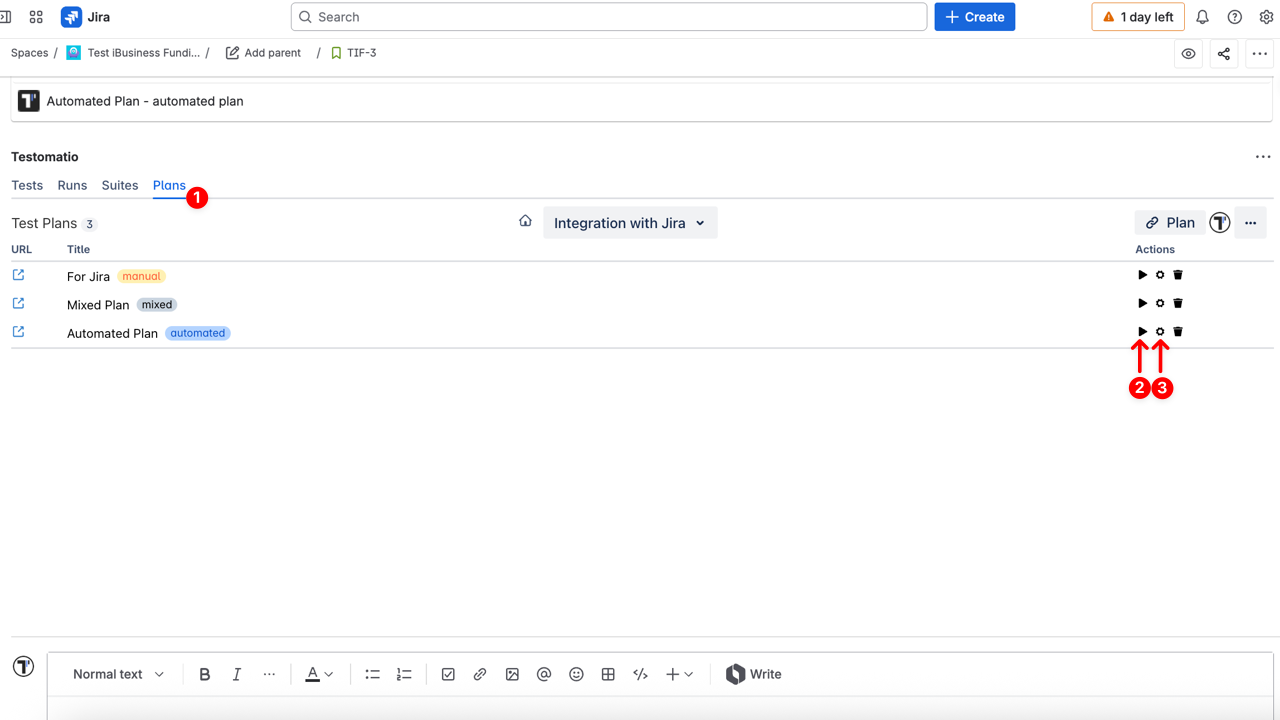
Option 3 – From the ‘Plans’ Tab
- Navigate to the Plans tab in the Jira issue
- Click the ▶︎ icon (Launch a plan) next to the linked Plan to quickly start a run
- or click the ⚙︎ icon (Launch with advanced options) to configure Advanced Settings
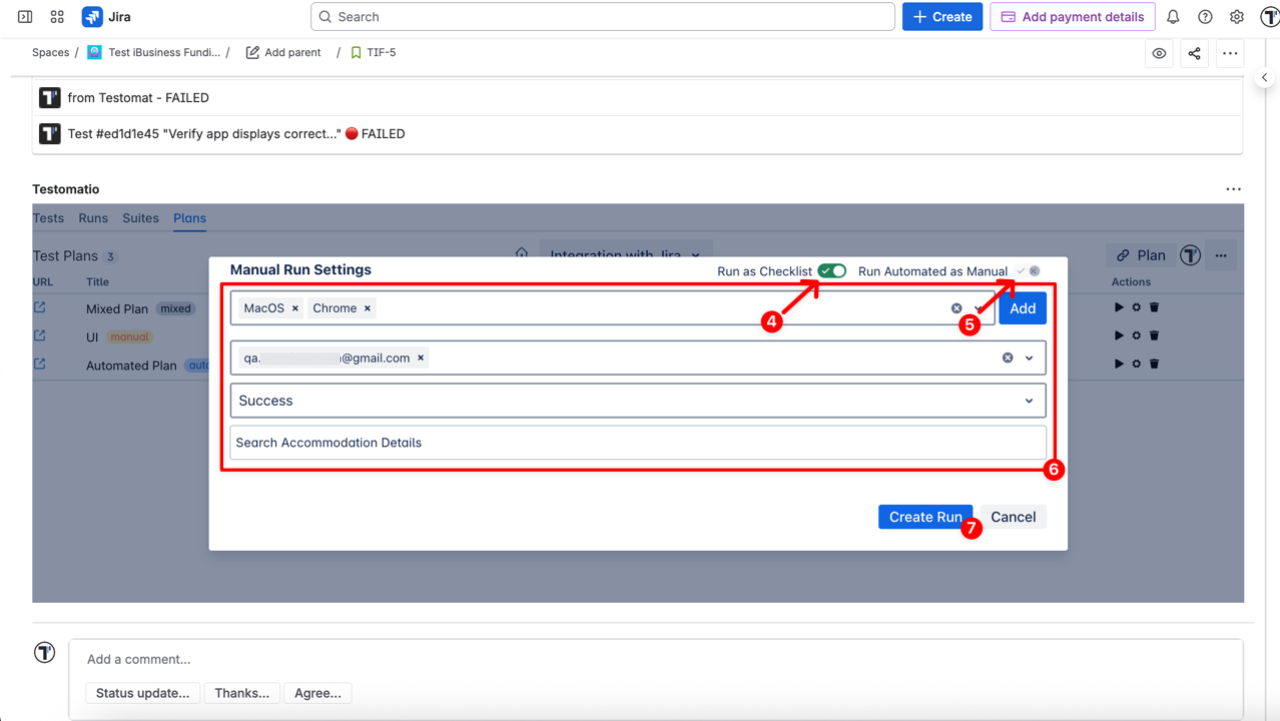
Once the Manual Run Settings window opens (this appears only if you clicked the ⚙︎ icon):
- (Optional) Enable Run as Checklist toggle - if enabled, marks tests to be executed as checklist
- (Optional) Enable Run Automated as Manual toggle - if enabled, allows automated tests to be executed manually
- Configure Advanced Settings
- Environment – select where the tests will run (e.g., macOS, Chrome, staging, production)
- Assign user – select the email of the user added to the project who is responsible for this run
- RunGroup – optional grouping of related runs for easier tracking and reporting
- Title - provide a descriptive title for the run
- Click ‘Create Run’ to start execution
- Mark all tests with specific status (e.g., ✔ passed / ✖ failed / ➖ skipped)
- Click the Finish Run button
How to Launch an Automated Run (CI/CD)
Section titled “How to Launch an Automated Run (CI/CD)”Use Automated Run in Jira to trigger tests automatically via a connected CI/CD service without leaving your Jira issue. Ideal for running regression suites, nightly builds, or executing fully automated test cases directly from the Jira interface.
Option 1 – From the ’…’ menu on the Tests Tab
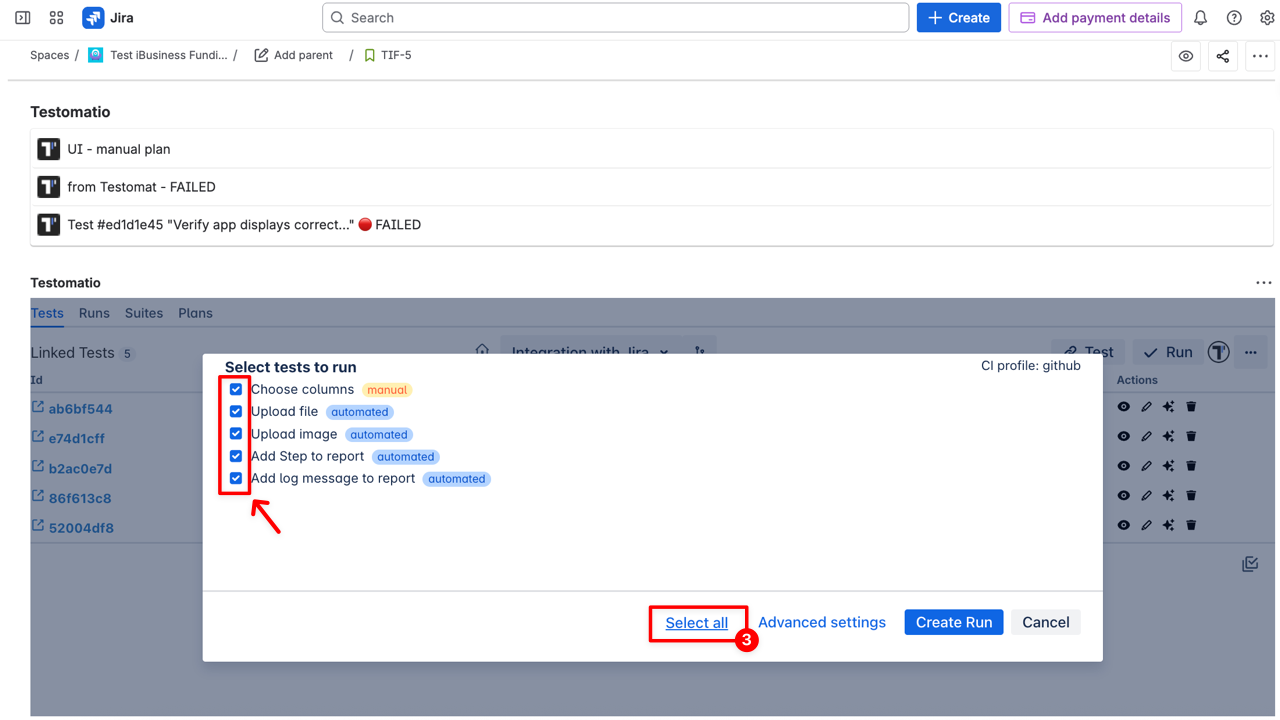
- Click the ’…’ (extra menu) button on the Tests tab
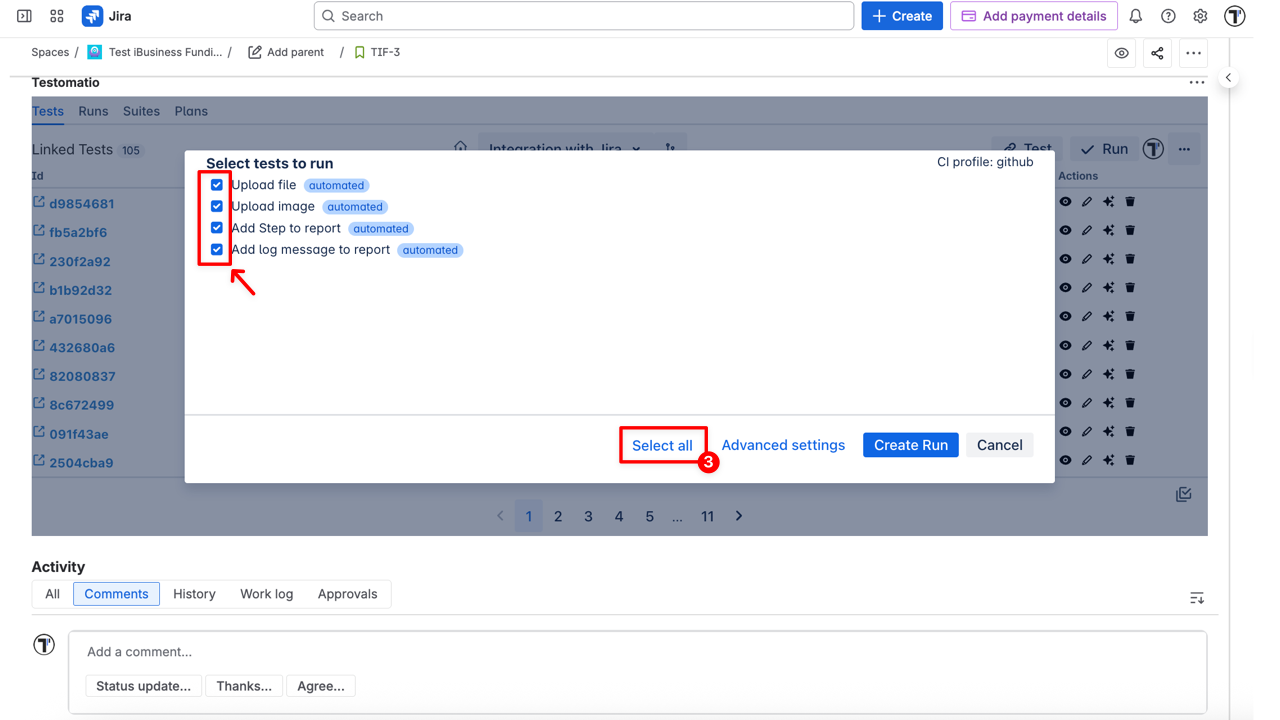
- Select Run in CI from the dropdown list
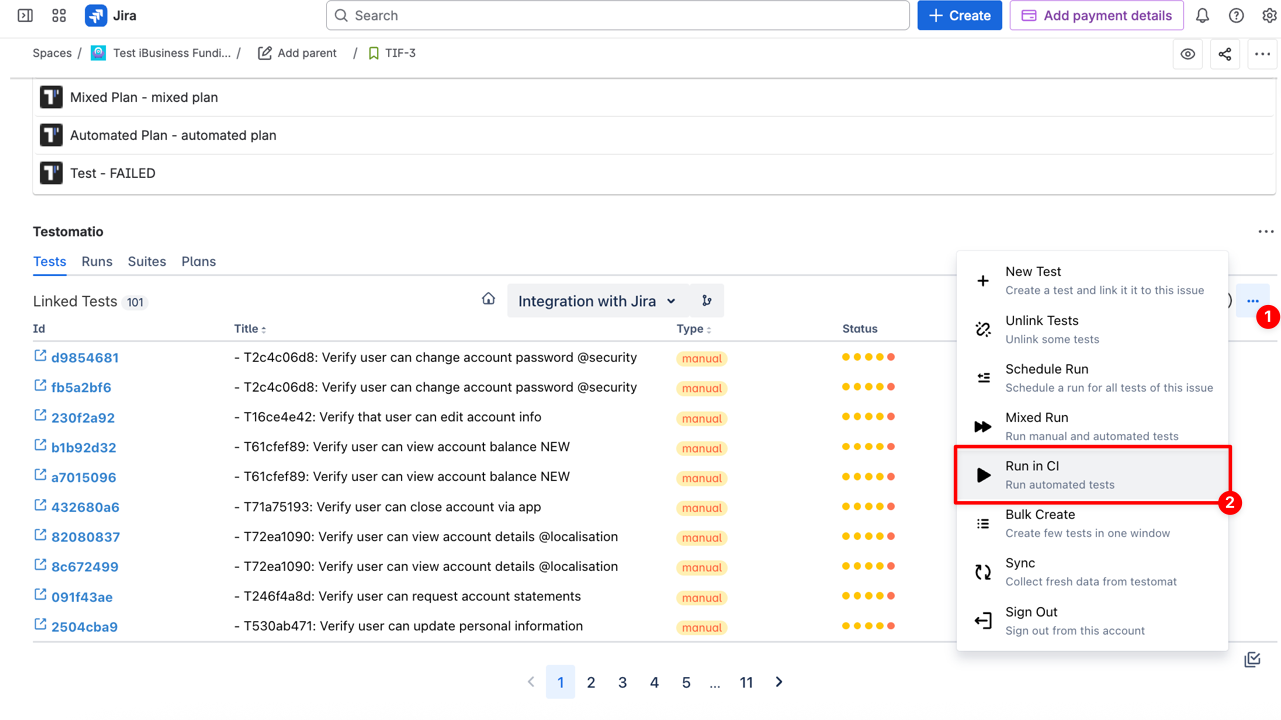
- Add specific tests to run by selecting one by one or Select all option
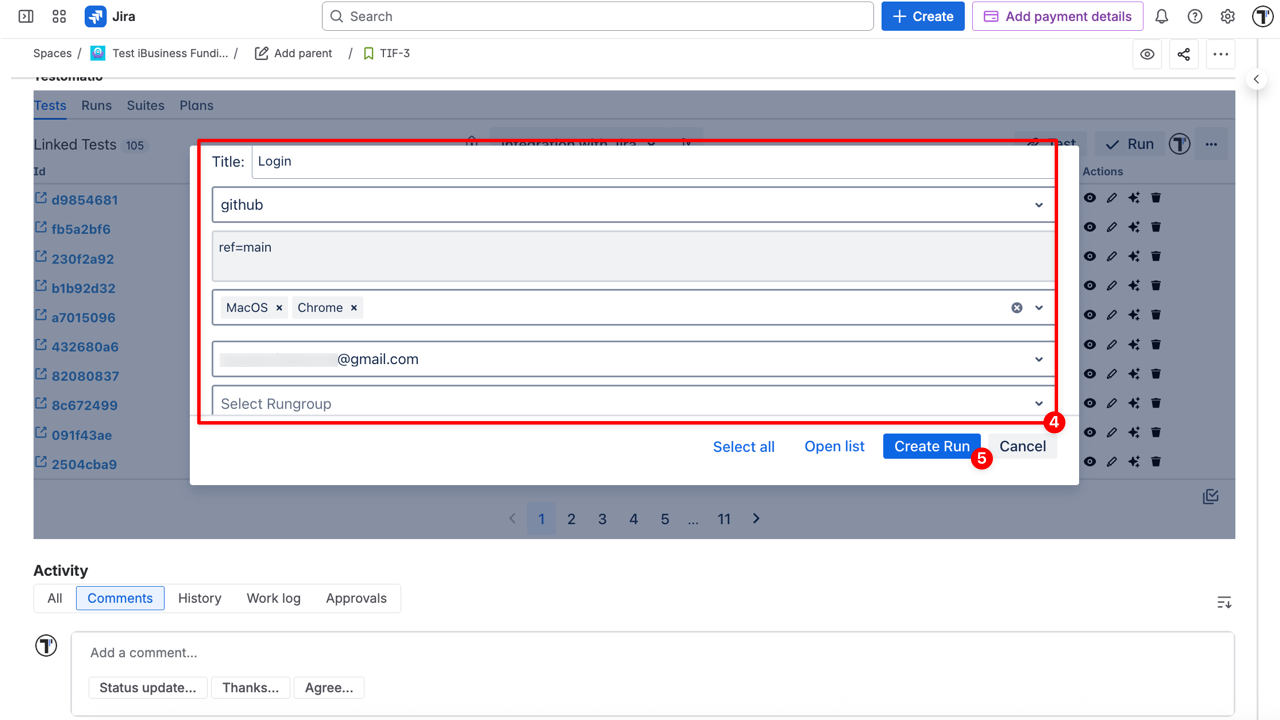
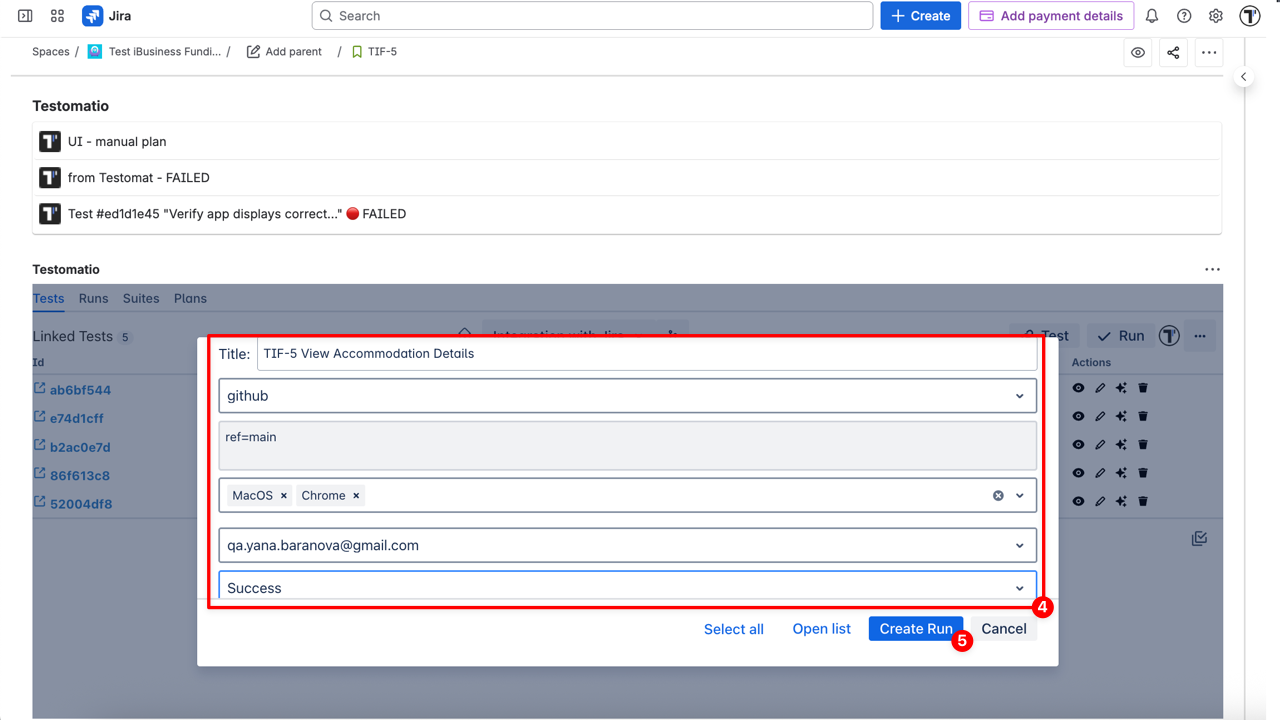
- (Optional) Open the Advanced settings to select:
- Title - provide a title for the run
- CI profile – select the CI configuration profile for automated test execution
- Enter config – specify custom environment variables (e.g.
ref=main) - Environment – select where the tests will run (e.g., macOS, Chrome, staging, production)
- Assign user - select the email of the user added to the project who is responsible for this run
- RunGroup - optional grouping of related runs for easier tracking and reporting
- Click ‘Create Run’ to start execution
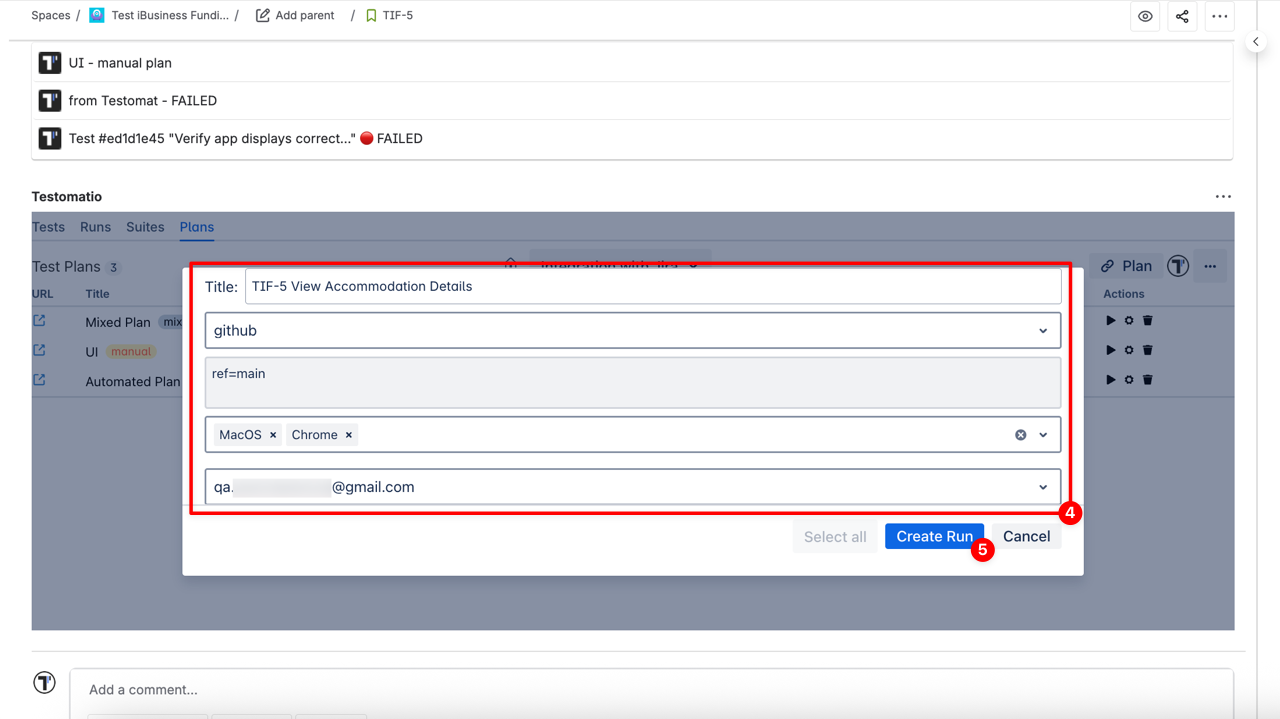
Option 2 – From the ‘Plans’ Tab
- Navigate to the Plans tab in the Jira issue
- Click the ▶︎ icon (Launch a plan) next to the linked Plan (recommended) in CI
- or click the ⚙︎ icon (Launch with advanced options)
- Once the Run settings window opens (this appears only if you clicked the ▶︎ icon), select:
- Title - provide a title for the run
- CI profile – select the CI configuration profile for automated test execution
- Enter config – specify custom environment variables (e.g.
ref=main) - Environment – select where the tests will run (e.g., macOS, Chrome, staging, production)
- Assign user – select the email of the user added to the project who is responsible for this run
- RunGroup - optional grouping of related runs for easier tracking and reporting
- Click ‘Create Run’ to start execution
- Once the automated run is created, it appears in the Runs tab with the Pending status
- The test results will update automatically when your CI job completes — showing the final status
- No manual action is required in Jira
How to Launch a Mixed Run
Section titled “How to Launch a Mixed Run”Use Mixed Run in Jira to execute both manual and automated tests in a single run directly from the Jira issue. Ideal when part of the test suite is automated, but some tests still require manual verification. You can launch a Mixed Run in Jira in two different ways:
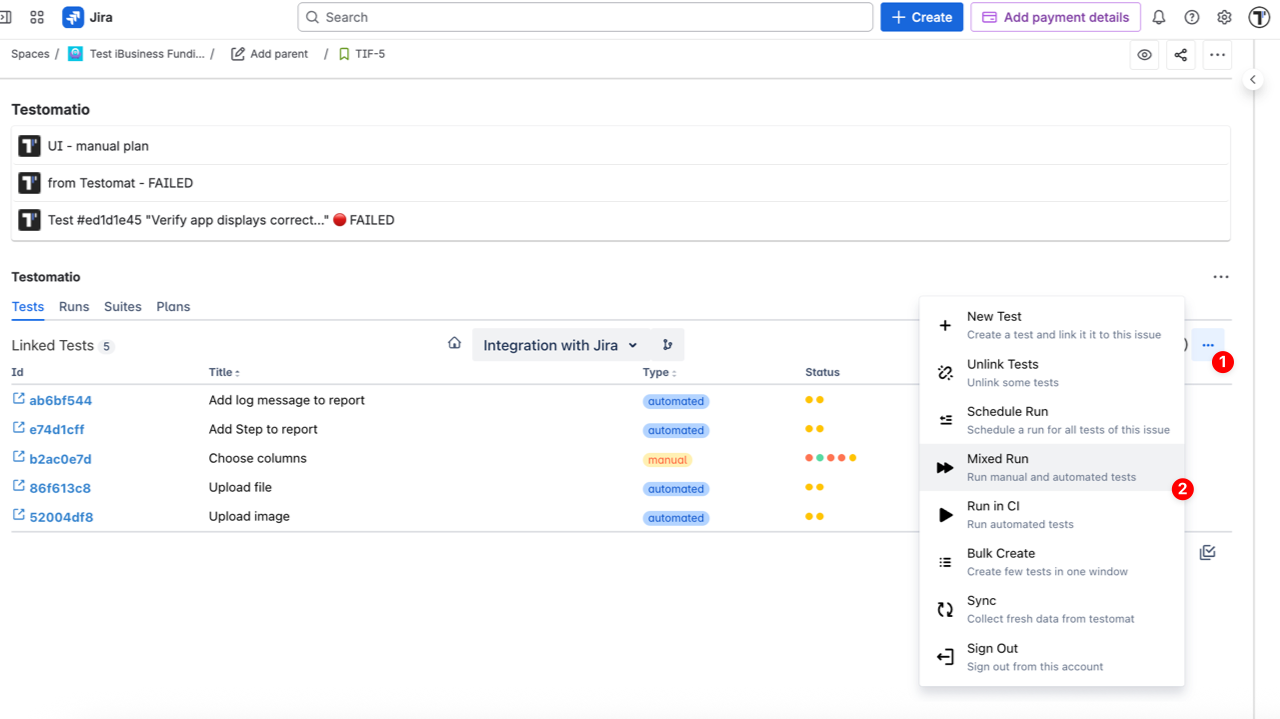
Option 1 – From the ’…’ Menu on the Tests Tab
- Click the ’…’ (extra menu) button on the Tests tab
- Select Mixed Run from the dropdown list
- In the ‘Select tests to run’ dialog, choose the tests you want to include
- Configure Advanced Settings:
- Title - provide a title for the run
- CI profile – select the CI configuration profile for automated test execution
- Enter config – specify custom environment variables (e.g.
ref=main) - Environment – select where the tests will run (e.g., macOS, Chrome, staging, production)
- Assign user - select the email of the user added to the project who is responsible for this run
- RunGroup - optional grouping of related runs for easier tracking and reporting
- Click ‘Create Run’ to start execution
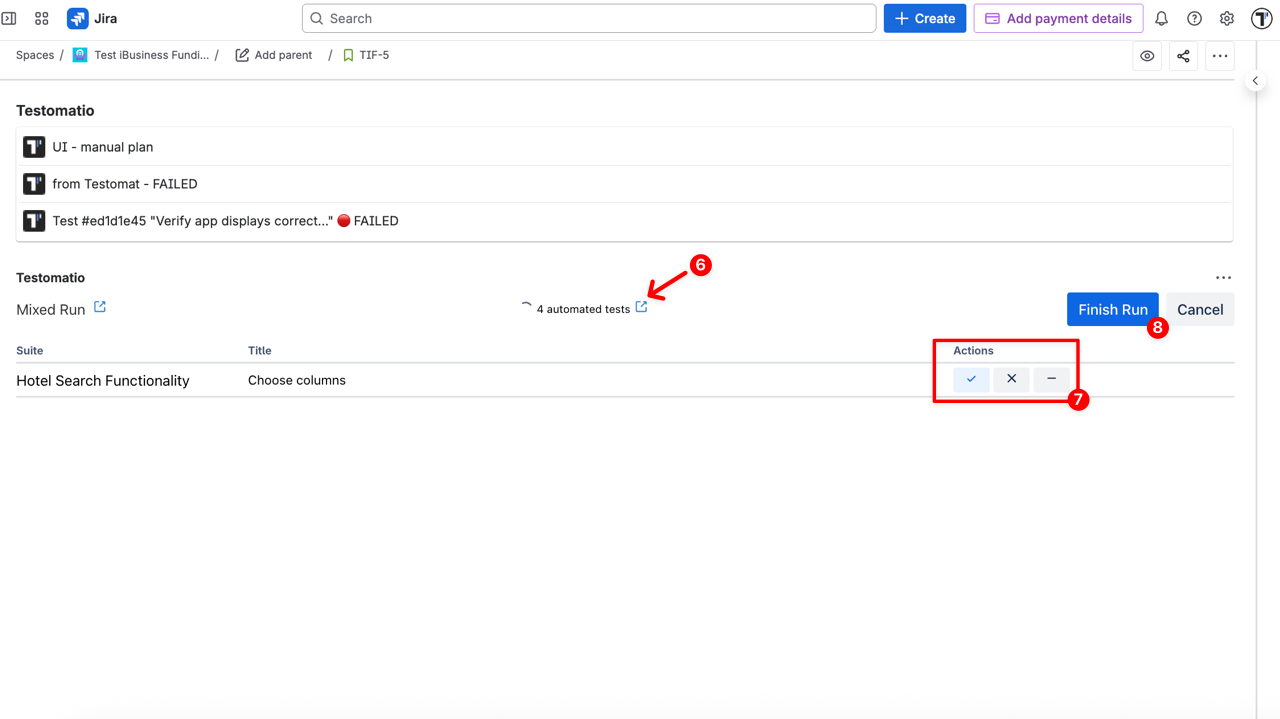
Once the mixed run starts:
- Automated tests are sent to your connected CI service for execution. Their results will update automatically in Jira once the CI job completes.
- Manual tests can be executed directly inside Jira — mark each test with its result (e.g., ✔ passed / ✖ failed / ➖ skipped)
- Click the Finish Run button to close the run
Option 2 – From the ‘Plans’ Tab
- Navigate to the Plans tab in the Jira issue
- Click the ▶︎ icon (Launch a plan) next to the linked Plan
- or click the ⚙︎ icon (Launch with advanced options)
- Once the Run settings window opens (this appears only if you clicked the ▶︎ icon), select:
- Title - provide a title for the run
- CI profile – select the CI configuration profile for automated test execution
- Enter config – specify custom environment variables (e.g.
ref=main) - Environment – select where the tests will run (e.g., macOS, Chrome, staging, production)
- Assign user – select the email of the user added to the project who is responsible for this run
- RunGroup - optional grouping of related runs for easier tracking and reporting
- Click ‘Create Run’ to start execution
- Automated tests are sent to your connected CI service for execution. Their results will update automatically in Jira once the CI job completes.
- Manual tests can be executed directly inside Jira — mark each test with its result (e.g., ✔ passed / ✖ failed / ➖ skipped)
- Click the Finish Run button to close the run
Run Reports in Jira
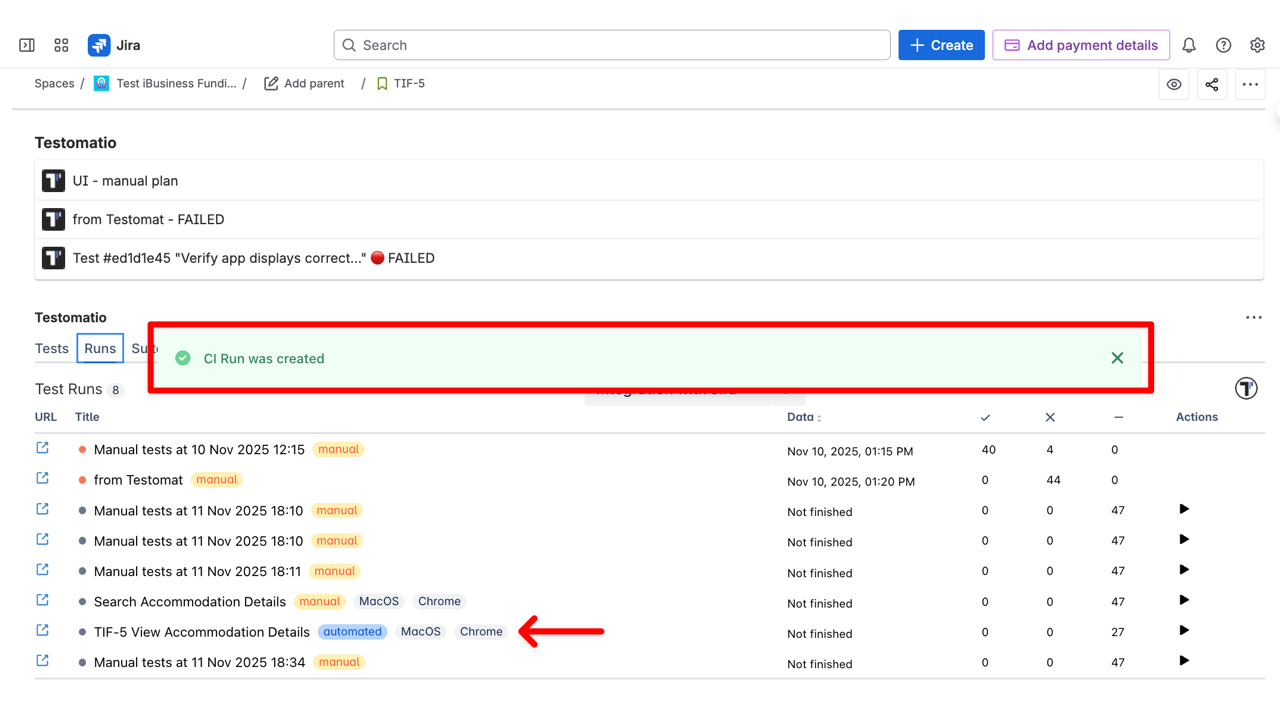
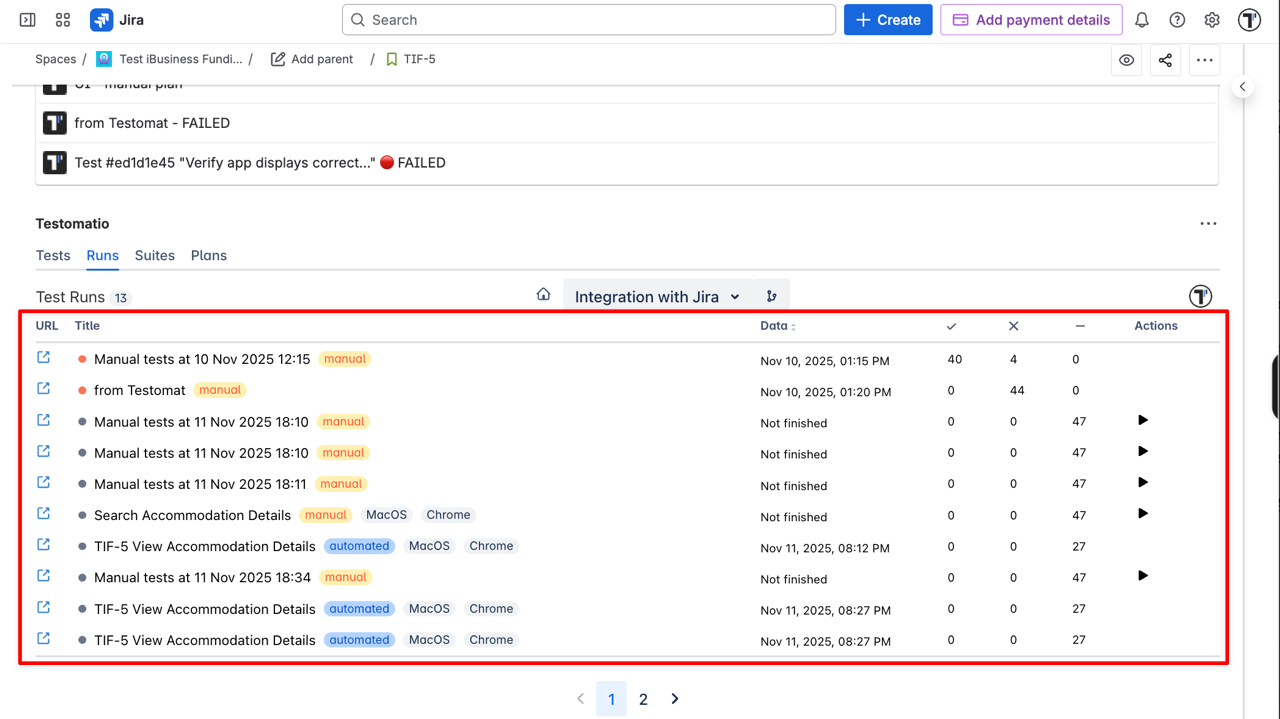
Section titled “Run Reports in Jira”Once a run is completed, it automatically appears in Testomat.io and in the Runs tab within Jira. In this tab, you can view all runs that were launched in Jira or linked in Testomat.io project, and quickly access key information about each run.
- External link (URL) – opens the detailed report in Testomat.io
- Status icon – shows the color of the run’s status (Passed / Failed / Skipped)
- Title – the title provided for the run
- Run type – a badge indicating the type of run (e.g., manual / automated / mixed)
- Environment – selected environments for the run (e.g., macOS, Chrome, staging)
- Execution date – date the run was completed (or Not finished)
- Test statuses – number of tests with each status (e.g., ✔ Passed / ✖ Failed / ➖ Skipped)
- Actions – ▶︎ icon appears if the run is not yet completed
For full report options (filters, exports, comparisons, etc.), you can open the Run Reports in Testomat.io, or to learn more, visit the Run Reports documentation.
Receive Reports in Jira
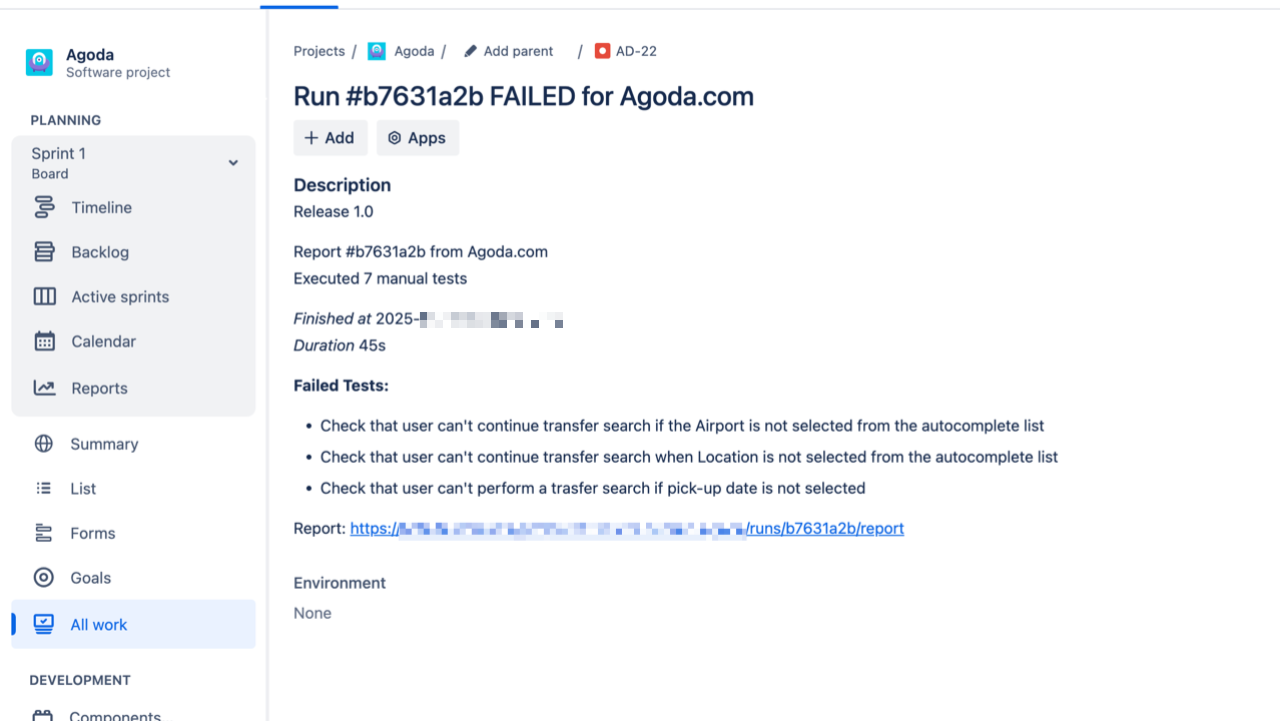
Section titled “Receive Reports in Jira”You can receive a summary report directly inside Jira by enabling Report Notifications in your Testomat.io project settings. This integration automatically posts key information about each test run into your Jira project, including:
- Run ID and Status
- Project name
- Number of Executed Tests
- Execution Date and Duration
- Failed Tests
- Environment
- Link to Full Report
This summary allows you to quickly see the key results of each run directly in Jira, while full details remain accessible via the Testomat.io report link.
Learn how to set it up in Report Notifications in Jira.
Tests Coverage
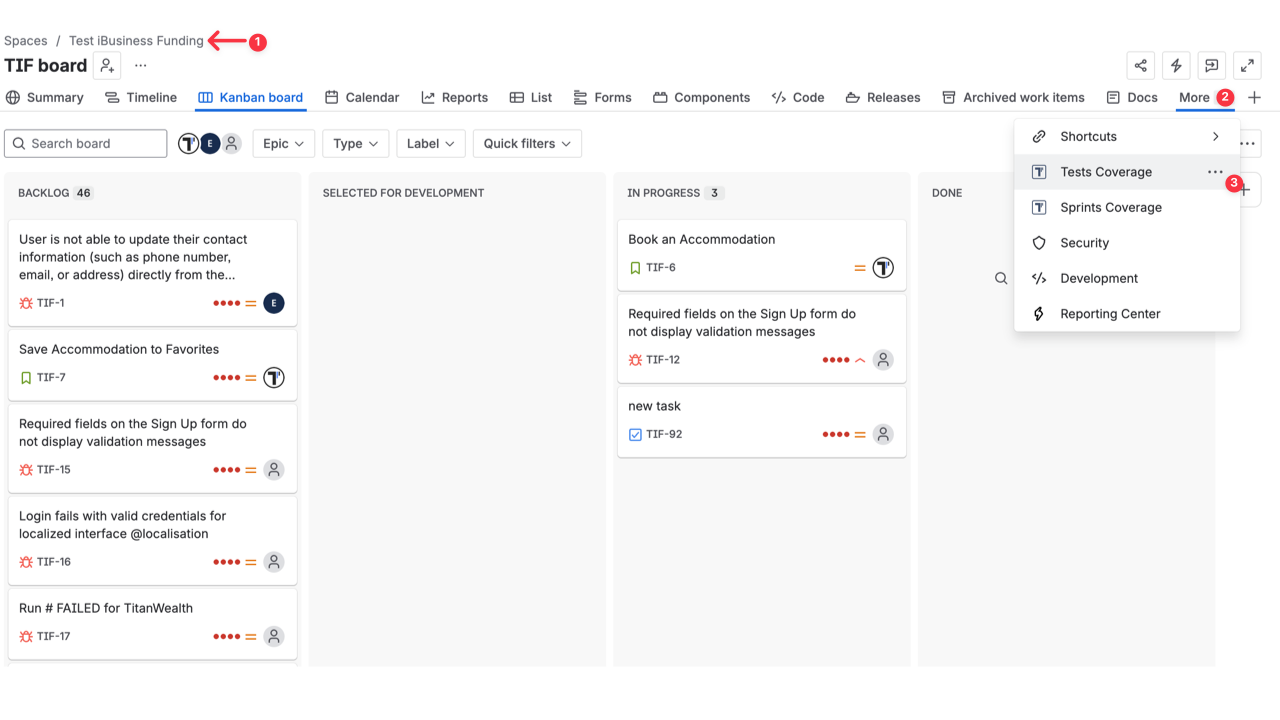
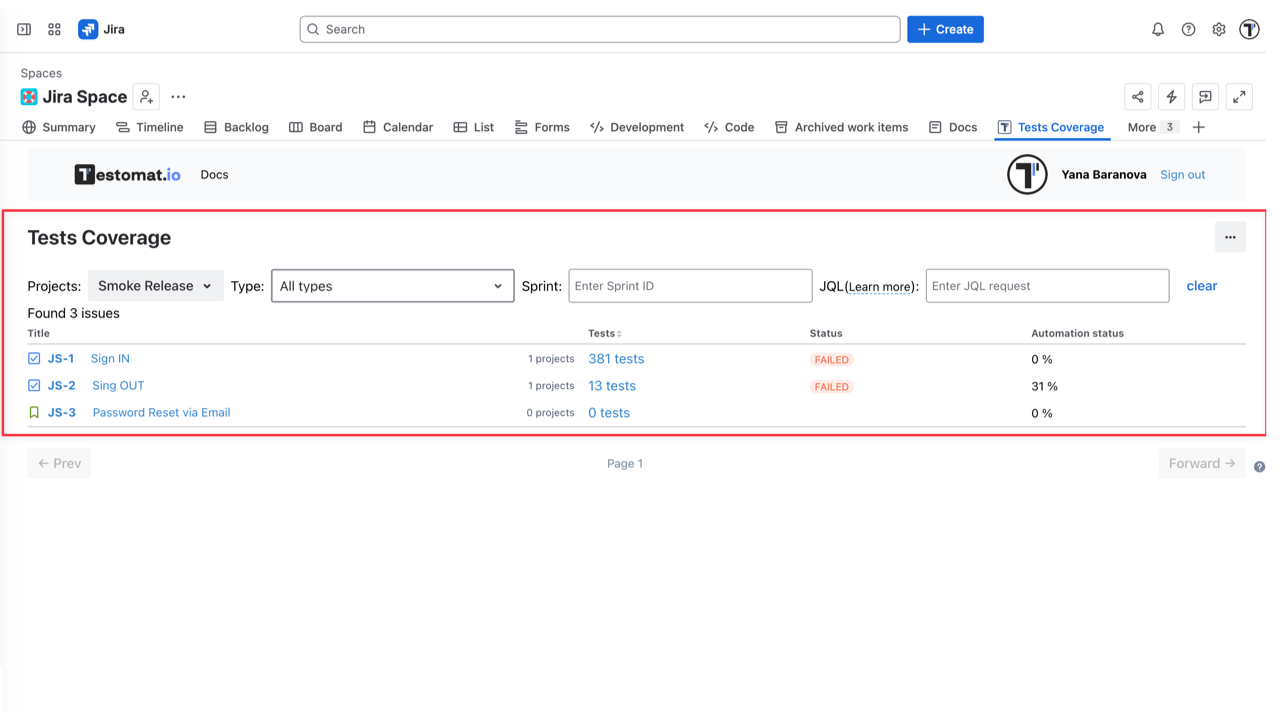
Section titled “Tests Coverage”The Tests Coverage screen provides a traceability matrix showing all Jira issues with their linked tests. For each issue you can see:
- Title — Jira issue key and name
- Tests — number of linked tests
- Status — current test run status (e.g., Failed, Passed)
- Automation status — percentage of automated tests among linked ones
This gives the team a quick overview of which requirements are covered, how many tests back each issue, and how far automation has progressed per story.
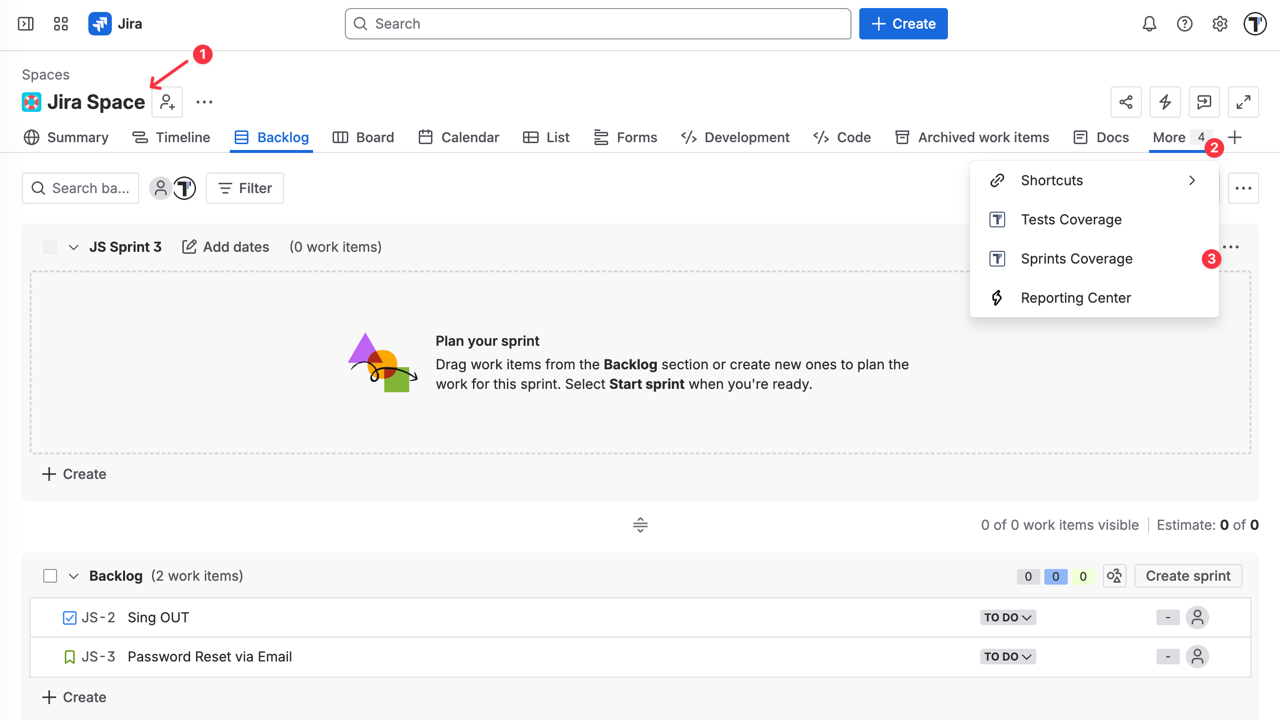
To open the Tests Coverage screen:
- Open the specific space
- Click the ‘More’ option
- Select the ‘Tests Coverage’ tab
The automation percentage reflects how many of the linked tests are automated — from 0% (all manual) to 100% (fully automated). Issues with no linked tests signal coverage gaps that need attention.
Sprint Coverage
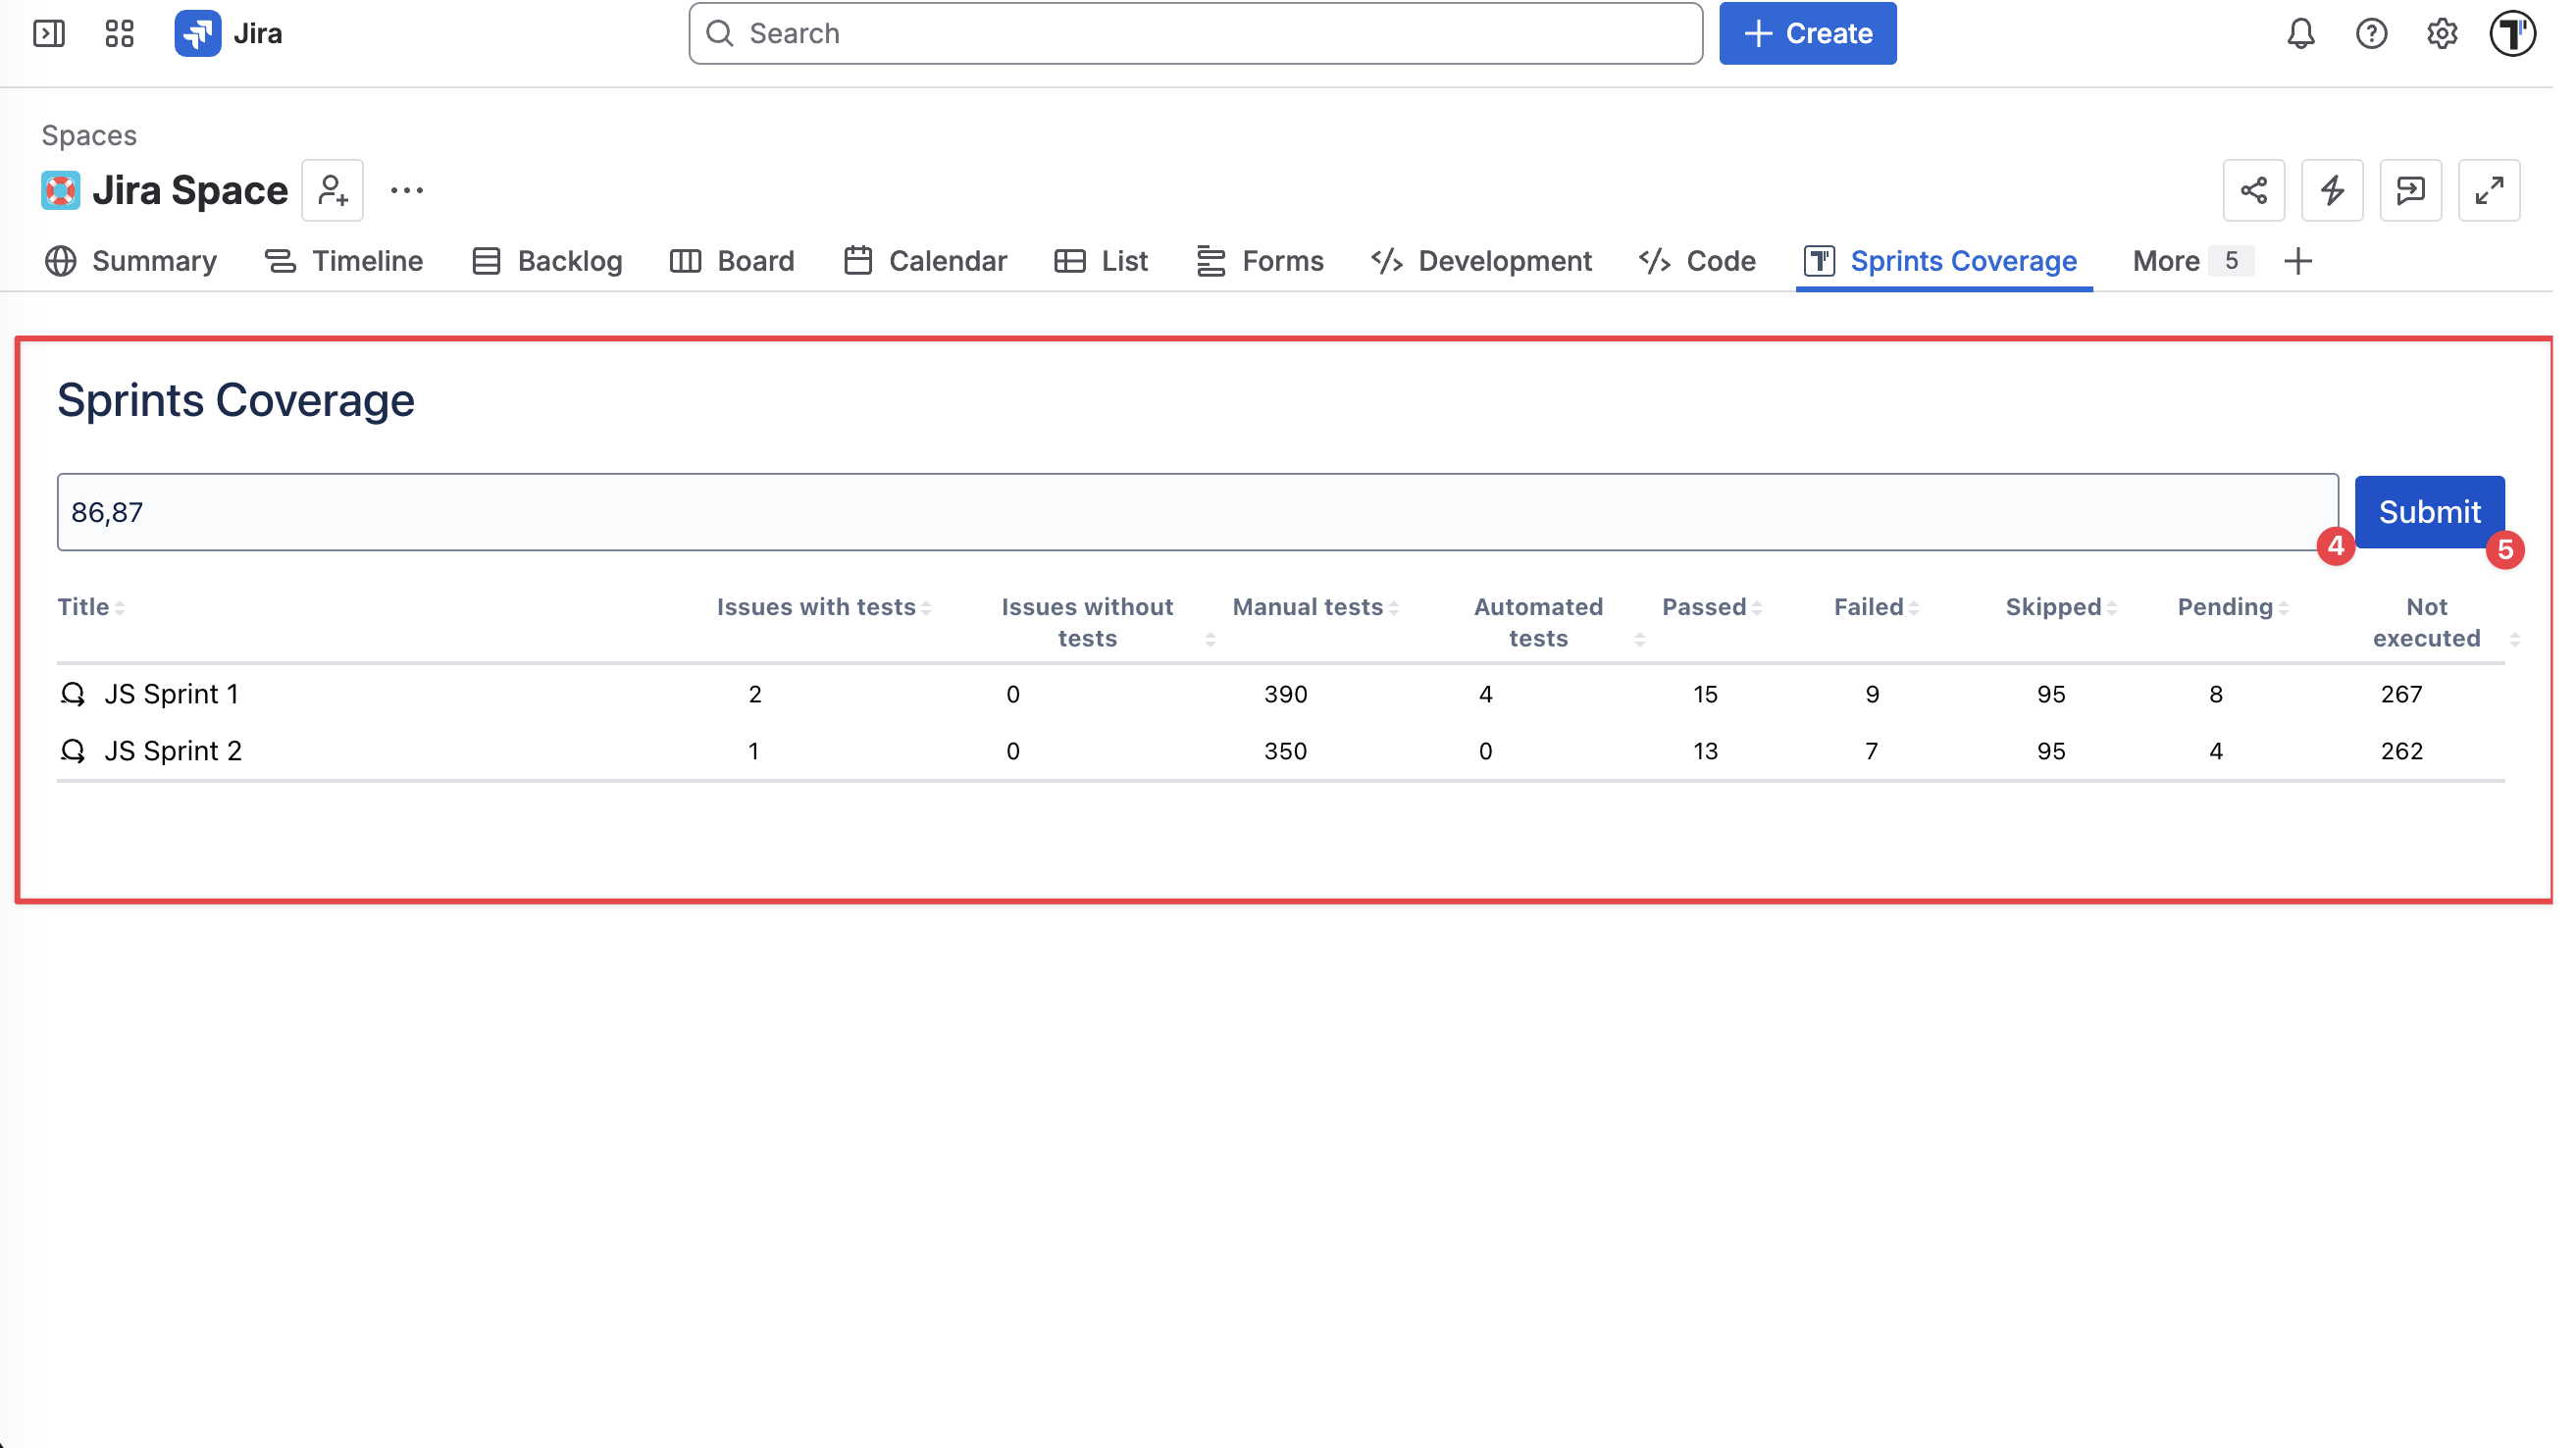
Section titled “Sprint Coverage”The Sprint Coverage tab gives a high-level summary of test execution health across a sprint. Use it to understand how well a sprint is covered with tests and how the execution is progressing — without leaving Jira.
For each sprint it shows:
- Issues with tests / Issues without tests — how many sprint issues have linked tests and how many are left uncovered
- Manual tests / Automated tests — breakdown of test types across the sprint
- Passed / Failed / Skipped / Pending / Not executed — full execution status breakdown
This makes it easy to spot coverage gaps, track automation progress, and assess sprint readiness at a glance.
To check test coverage for a sprint:
- Open the specific space
- Click the ‘More’ option
- Select the ‘Sprints Coverage’ tab
- Enter the sprint ID(s)
- Click the ‘Submit’ button
Data Sync in Jira
Section titled “Data Sync in Jira”Testomat.io and Jira are continuously synchronized to ensure test data stays up to date across both systems. This two-way sync keeps all team members — QA, development, management, and stakeholders — aligned.
Automatic Sync
All key updates are automatically synchronized:
- Linked test cases, test suites, and plans remain aligned in both systems
- Statuses of linked Jira issues are synchronized
- Executing a run in Testomat.io updates the corresponding Jira issue with the latest run status
- Launching or updating a run from Jira instantly reflects in Testomat.io
- Testomat.io settings — including environments, branches, users, run groups, and CI integrations — are synchronized and visible in Jira
This real-time, two-way sync ensures that everyone sees the same up-to-date information, eliminating confusion and reducing manual updates.
Manual Sync
If your Jira issue view or run list does not show the latest data, you can trigger synchronization manually. This ensures that all test results, linked issues, and run information are up-to-date in both Jira and Testomat.io.
To manually refresh data:
- Open the Tests tab in the Jira issue
- Click the ’⋯’ (extra menu) button
- Select Sync from the dropdown list
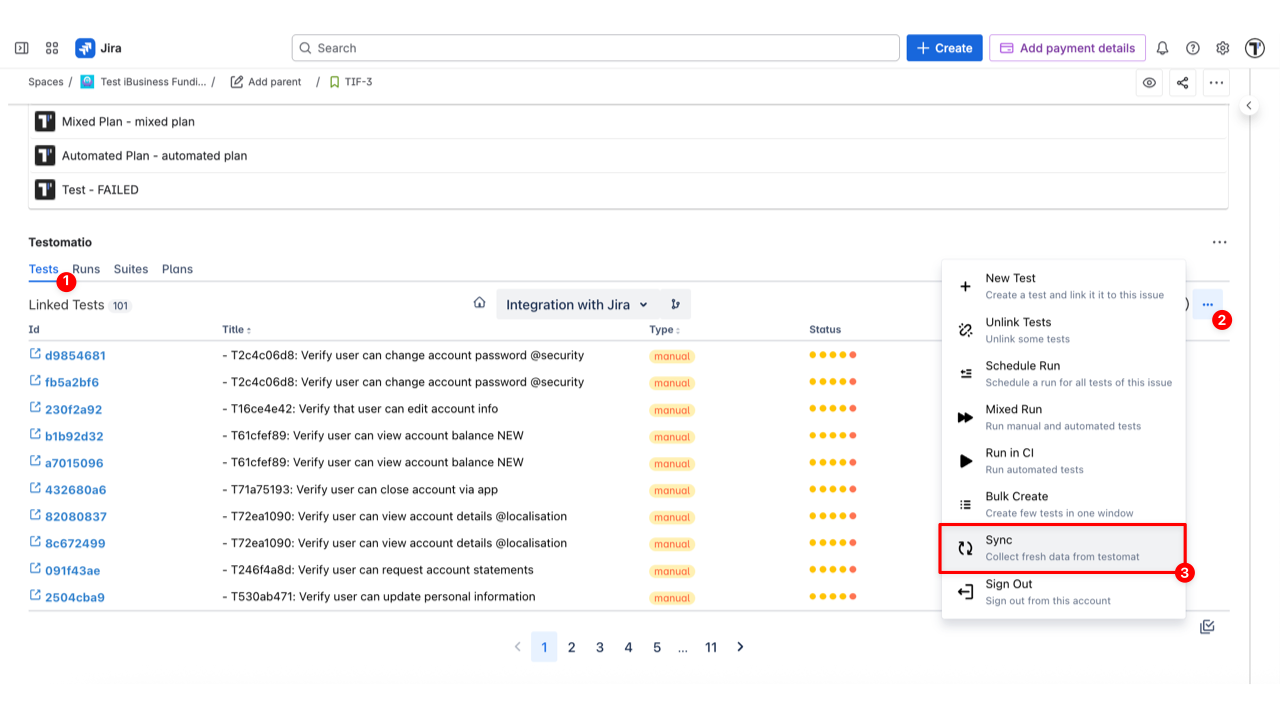
Testomat.io will re-fetch the latest information and update linked test results, statuses, and settings inside Jira. This keeps your Jira and Testomat.io data fully consistent — whether you rely on automatic background sync or perform a quick manual refresh when needed.